How To Integrate Facebook, Twitter And Google+ In WordPress

Email Newsletter
Weekly tips on front-end & UX.
Trusted by 182,000+ folks.
 Custom Web Forms for Angular, React, & Vue. Your backend.
 Celebrating 10 million developers


Integrating social media services in your website design is vital if you want to make it easy for readers to share your content. While some users are happy with the social media buttons that come built into their design template, the majority of WordPress users install a plugin to automatically embed sharing links on their pages. Many of you will find that a plugin does exactly what you need; others not so much. Some are poorly coded, and most include services that you just don’t need. And while some great social media plugins are out there, they don’t integrate with every WordPress design.
Further Reading on SmashingMag:
- 8 Useful Tips To Become Successful With Twitter
- Twitter Icons: Cute Tweeters & Birdies
- 15 Useful Twitter Hacks and Plug-Ins For WordPress
- Create A Responsive, Mobile-First WordPress Theme
If you aren’t comfortable editing your WordPress templates, a plugin is probably the best solution. If you are comfortable making a few edits to your theme, then consider manually integrating social media so that you have more control over what services appear on your website.
![]()
Today, we’ll show you how to manually integrate the three most popular social media services on your website: Twitter, Facebook and Google+. First, you’ll learn how to integrate Facebook comments on your WordPress website, to make it easier for readers to discuss your posts. Then, we’ll show you the most common ways to display your latest tweets in the sidebar, which should encourage more people to follow you on Twitter. Finally, we’ll show you how to add sharing buttons for all three social media services to your home page, posts and pages.
Please make sure to back up all of your template files before making any changes, so that you can revert back if something goes wrong. Testing your changes in a non-production area first would also be prudent.
Integrate Facebook Comments On Your Website
Because most people are signed into Facebook when they browse the Web, enabling Facebook comments on your website is a great way to encourage people to leave comments. It also curbs spam. While many solutions purport to reduce spam comments on WordPress, most are either ineffective or frustrate visitors by blocking legitimate comments.
Feature-rich commenting solutions such as IntenseDebate and Disqus have benefits, of course, because they allow users to comment using Facebook and a number of other services; but before visitors can comment, they have to grant access to the application, an additional step that discourages some from commenting. By comparison, integrating Facebook comments directly enables visitors to comment with no fuss. Also, this commenting system allows users to comment by signing into Facebook, Yahoo, AOL or Hotmail.
Before integrating Facebook on WordPress Mods at the end of September, I looked at a few solutions. I followed a great tutorial by Joseph Badow and tried a few plugins, such as Facebook Comments For WordPress. The reality, though, is that the official Facebook comment plugin is the quickest and easiest way to add Facebook comments to your website.
Simply follow the steps below to get up and running.
1. Create a Facebook Application
To use Facebook comments on your website, create a new comment application for your website on the Facebook Application page. This step is required, whether you add Facebook comments manually using a third-party plugin or with the official Facebook plugin.
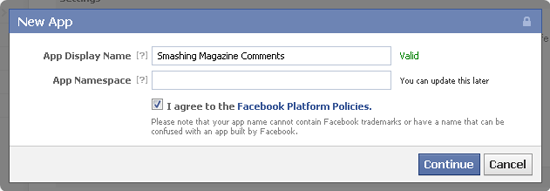
Simply click on the “+ Create New App” button on the Facebook Application page, and enter a unique name for your application in the “App Display Name” field. The “App Namespace” field doesn’t have to be filled in for Facebook comments (it’s used with the Facebook Open Graph Protocol).
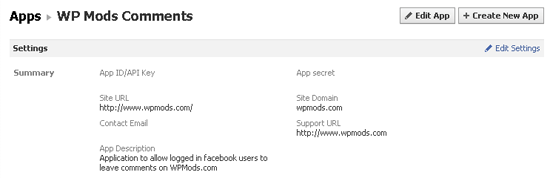
You will then be provided with an “App ID/API key” and an “App secret key.” You don’t need to remember these numbers because the official Facebook comments plugin automatically inserts them into the code that you need to add to your website.
2. Add the Code to Your Website
Next, go back to the Facebook Comments plugin page and get the code for your website. The box allows you to change the URL on which comments will be placed, the number of comments to be shown, the width of the box and the color scheme (light or dark).
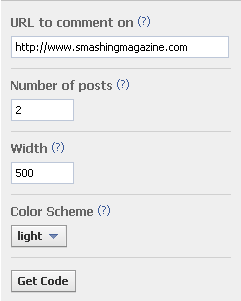
You don’t have to worry about what you enter in the box because all of the attributes can be modified manually. And it doesn’t matter what URL you enter because we will be replacing it later with the WordPress permalink:
hrefThe URL for this Comments plugin. News feed stories on Facebook will link to this URL.widthThe width of the plugin in pixels. The minimum recommended width is 400 pixels.colorschemeThe color scheme for the plugin (either light or dark).num_postsThe number of comments to show by default. The default is 10, and the minimum is 1.mobile(beta) Whether to show the mobile version. The default isfalse.
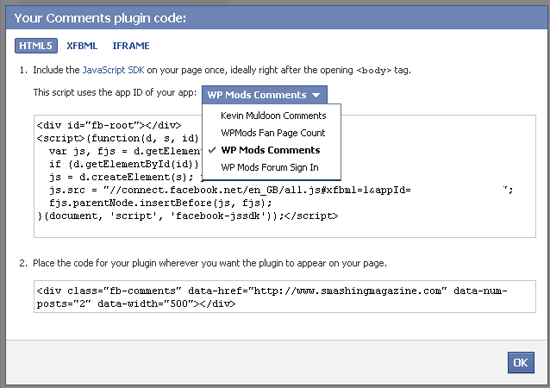
When you click on the “Get Code” button, a box will appear with your plugin code (choose the HTML5 option, because FBML is being deprecated). Make sure to select the application that you set up earlier for your comments so that the correct application ID is added to the code.
Insert the first piece of code directly after the <body> tag in your header.php template:
<div id="fb-root"></div>
<script>(function(d, s, id) {
var js, fjs = d.getElementsByTagName(s)[0];
if (d.getElementById(id)) return;
js = d.createElement(s); js.id = id;
js.src = "//connect.facebook.net/en_GB/all.js#xfbml=1&appId=YOURAPPLICATIONID";
fjs.parentNode.insertBefore(js, fjs);
}(document, 'script', 'facebook-jssdk'));</script>
Put the second line of code where you want to show the comments. Make sure the static URL is replaced with the WordPress permalink (<?php the_permalink(); ?>) so that comments show correctly on every page of your website.
<div class="fb-comments" data-href="<?php the_permalink(); ?>" data-num-posts="15" data-width="500"></div>To put Facebook comments above WordPress comments, add the above code just below the line that reads <!-- You can start editing here. --> in the comments.php template. To put Facebook comments below WordPress comments, add the above code below the </form> tag (again in the comments.php template).
If you plan to completely replace your WordPress comments with Facebook comments, simply replace the call to your comments.php template with the call to your Facebook comments. For example, to replace comments in posts, simply add the code to the single.php template. Similarly, edit the page.php template to show Facebook comments on pages.
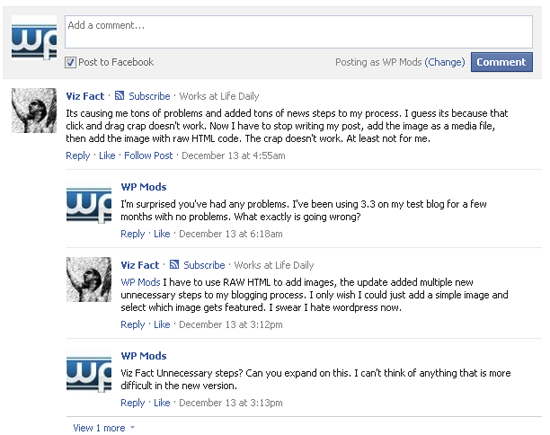
Your should now see the Facebook comments box displayed on your website. To get an update whenever someone leaves a comment using Facebook, add yourself as a moderator to your application on the Comment Moderation tool page.
Show Your Latest Tweets In The Sidebar
Displaying your latest tweets is a good way to encourage people to follow you on Twitter. The most common place to display tweets is in the sidebar, although you can add them to any area of the website.
Display Your Latest Tweets Manually
I have tried a few manual solutions for showing tweets on my websites, and my favorite comes from Chris Coyier of CSS-Tricks. His RSS fetching snippet is a quick and effective way to show the latest tweets from your account. The RSS address of your Twitter account is https://api.twitter.com/1/statuses/user_timeline.rss?screen_name=xxxxx (where xxxxx is your Twitter user name). For the tweets that you favorite, use https://twitter.com/favorites/xxxxx.rss. For example, the RSS for the latest tweets from Smashing Magazine is https://api.twitter.com/1/statuses/user_timeline.rss?screen_name=smashingmag; and to display only the favorites, https://twitter.com/favorites/smashingmag.rss. Once you’ve got your Twitter RSS address, simply add it to Chris’ PHP snippet.
<?php
include_once(ABSPATH . WPINC . '/feed.php');
$rss = fetch_feed('https://api.twitter.com/1/statuses/user_timeline.rss?screen_name=smashingmag');
$maxitems = $rss->get_item_quantity(3);
$rss_items = $rss->get_items(0, $maxitems);
?>

<ul>
<?php if ($maxitems == 0) echo '<li>No items.</li>';
else
// Loop through each feed item and display each item as a hyperlink.
foreach ( $rss_items as $item ) : ?>
<li>
<a href='<?php echo $item->get_permalink(); ?>'>
<?php echo $item->get_title(); ?>
</a>
</li>
<?php endforeach; ?>
</ul>
For a more stylish way to display tweets manually, check out Martin Angelov’s tutorial “Display Your Favorite Tweets Using PHP and jQuery,” or Sea of Cloud’s “Javascript Plugin Solution.”
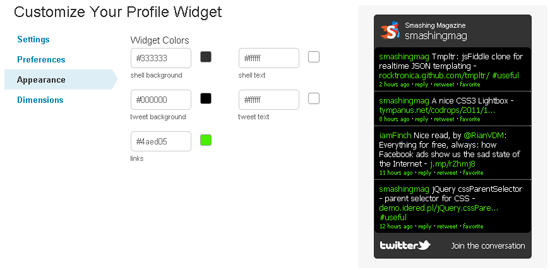
Display Your Latest Tweets Using the Official Twitter Widget
The official Twitter profile widget looks great and is easy to customize. You can define the number of tweets to display and whether the box should expand to show all tweets or provide a scroll bar.
The dimensions can be adjusted manually, or you can use an auto-width option. The color scheme can easily be changed in the settings area, too. Once the widget is the way you want it, simply grab the code and add it to the appropriate WordPress template.
Display Your Latest Tweets Using a WordPress Plugin
If you don’t want to code things manually or use the official Twitter profile widget, you could try one of the many plugins available:
- Cardoza Twitter Box
- Floating Tweets
- Latest Twitter Sidebar Widget
- My Twitter Ticker
- Tweet Blender
- Twitter Plugin for WordPress
- Twitter Widget Pro
Add Social-Media Sharing Buttons To Your WordPress Website
Adding social-media sharing and voting buttons is very straightforward and enables readers to share your content on the Web. Simply get the code directly from the following pages:
The buttons you get from the above links work well when added directly to posts (single.php) and pages (page.php). But they don’t work correctly on the home page (index.php) or the archive (archive.php) by default, because we want to show the number of likes, pluses and retweets for each individual article, rather than the page that lists the article. That is, if you simply add the default code to index.php, every button will show the number of shares for your home page, not for each article.
To resolve this, simply make sure that each button uses the article permalink, rather than the URL of the page it is on. To add sharing buttons only to posts, simply choose the button you want from the links above and copy the code to single.php; to add the buttons only to pages, just add the code to page.php.
To show the number of likes, pluses and retweets that an article has on the home page and in the archives, follow the steps noted below for Facebook, Google+ and Twitter below (the code for showing a sharing button on the index page will work for posts and pages, too). You can see an example of sharing buttons integrated in post excerpts on my own website WordPress Mods and on popular blogs such as Mashable.

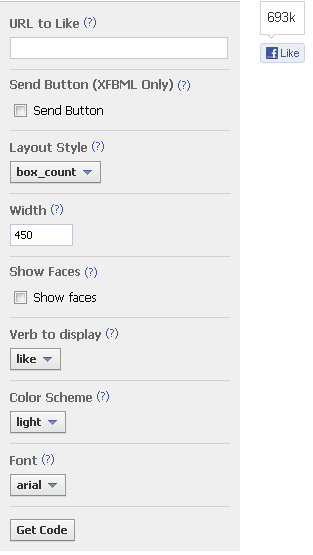
Facebook’s Like button comes with a lot of options. Choose from three layouts: standard, button count and box count. An email button (labelled “Send”) can be added, and you can set the width of the box, too. You can also show profile pictures below the button, choose between the labels “Like” and “Recommend,” choose between a light and dark color scheme, and set the font.
You need to add two pieces of code to your website. First, add the JavaScript SDK code directly after the <body> tag (in the header.php template). This code has to be added only once (i.e. if you’ve already added the code to show Facebook comments on your website, you don’t need to add it again).
Put the second piece of code where you want to show the Like button. To ensure that the correct page is referenced, add href="<?php echo get_permalink($post->ID); ?>" to the second piece of code. It should look something like this:
<div class="fb-like" data-href="https://www.facebook.com/smashmag" href="<?php echo get_permalink($post->ID); ?>" data-send="false" data-layout="box_count" data-width="450" data-show-faces="true" data-font="arial"></div>More information on how to customize the Like button can be found on the Facebook Like Button page.
Google+
Google+ offers four sizes of sharing buttons: small, medium, standard and tall. The number of votes that a page has received can be shown inline, shown in a bubble or removed altogether.
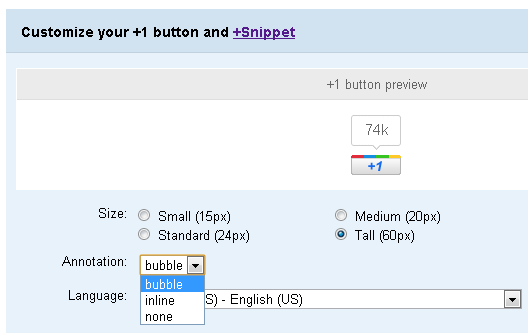
Linking to your article’s permalink is very easy. Just append href="<?php the_permalink(); ?>" to the g:plusone tag. For example, to show a tall inline Google+ button, you would use the following code:
<!-- Place this tag where you want the +1 button to render -->
<g:plusone size="tall" annotation="inline" href="<?php the_permalink(); ?>"></g:plusone>

<!-- Place this render call where appropriate -->
<script type="text/javascript">
(function() {
var po = document.createElement('script'); po.type = 'text/javascript'; po.async = true;
po.src = 'https://apis.google.com/js/plusone.js';
var s = document.getElementsByTagName('script')[0]; s.parentNode.insertBefore(po, s);
})();
</script>
For more tips on customizing the Google+ button, please view the official Google+ button documentation page.
Twitter offers four types of buttons: one for sharing links, one for inviting people to follow you, a hash tag button for tweeting stories, and another for mentions (used for contacting others via Twitter). The button you need to show the number of shares that an article has gotten is called “Share a link.”
On the button customization page, you can choose whether to show the number of retweets and can append “Via,” “Recommend” and “Hashtag” mentions to the shared link.
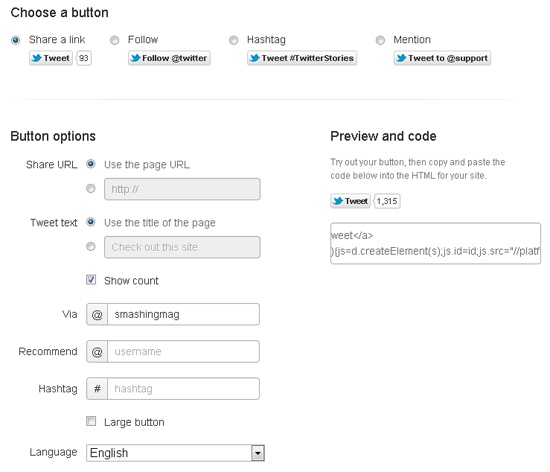
To make sure Twitter uses the title of your article and the correct URL, simply add data-text="<?php the_title(); ?>" and data-url="<?php the_permalink(); ?>" to your link. For example, if you were using the small button, you would use:
<a href="https://twitter.com/share" class="twitter-share-button" data-via="smashingmag" data-text="<?php the_title(); ?>" data-url="<?php the_permalink(); ?>">Tweet</a>
<script>!function(d,s,id){var js,fjs=d.getElementsByTagName(s)[0];
if(!d.getElementById(id)){js=d.createElement(s);js.id=id;js.src="//platform.twitter.com/widgets.js";
fjs.parentNode.insertBefore(js,fjs);}}(document,"script","twitter-wjs");</script>
To show the larger button instead, simply append data-size=“large” to the link. To show the popular vertical button (shown below) instead of the default horizontal button, append data-count=“vertical” to the link.

For more tips on customizing the Twitter button, please view the official Twitter button documentation page.
Summary
Many WordPress users continue to use plugins to integrate social-media sharing buttons and activity on their websites. As we’ve seen, though, integrating social-media services manually is straightforward and, for many users, a better solution than simply installing a plugin and making do with whatever features it offers.
Integrating Facebook comments on your website takes only a few minutes and is much less complicated than any of the available plugins. While good tutorials are available that show you how to manually add Twitter to your website, the official widget from Twitter is the best all-around solution for most websites.
Some fantastic plugins exist for WordPress to automatically insert social-media voting buttons in your design. Installing and setting them up takes only a few minutes, although manually adding the buttons enables you to give them maximum visibility.
Remember, play it safe and make any changes in a test area first before applying the changes to the live website. I also recommend backing up all of your template files before changing anything (and your database if required). A few minutes of preparation could save you hours of troubleshooting, so try not to skip this step.
Hopefully, you’ve found this useful. If you are unsure of any aspect of this tutorial, please let us know and we’ll do our best to clarify the step or help you with it. Also, subscribe to Smashing Magazine via RSS, Twitter, Facebook or Google+ to get the latest articles delivered directly to you.


