Handy Tweaks To Make GIMP Replace Photoshop

Email Newsletter
Weekly tips on front-end & UX.
Trusted by 182,000+ folks.

 Custom Web Forms for Angular, React, & Vue. Your backend.
 Celebrating 10 million developers


GIMP was never designed to replace Photoshop, yet with every release, it comes a little closer to being able to do so. It can be used to author graphics, create logos and edit photos, as well as make short animations (using GAP).
Despite these features, the open-source app is a foreign world for many users switching from Photoshop. Familiar tools are missing, menus are laid out differently and tasks must be accomplished in unknown ways.
In this article, we list eight tweaks to make GIMP a more serious Photoshop replacement option. Version 2.6 was used to test the following tweaks, but past versions of the app should work as well.
Installing Plug-Ins, Brushes and Filters
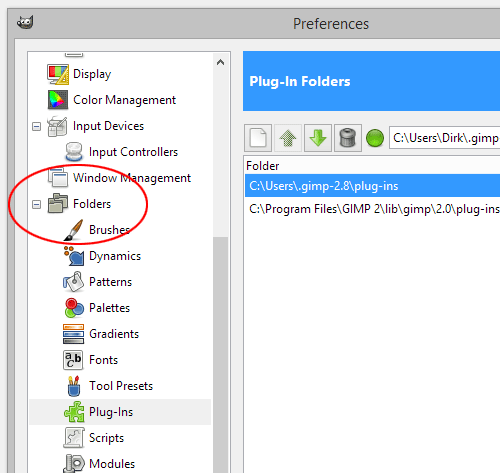
Before continuing, you need to know how to install add-ons. It’s very simple to do, and takes little time. You’ll find three different folders in the application’s program folder. The location of the application folder depends on the operating system you use. Go to Edit > Preferences > Folders to see all folders.
To install a brush or plug-in, copy and paste it into the appropriate folder and restart GIMP.
1. Add the PSPI Plug-In
The PSPI plug-in allows GIMP to use Photoshop plug-ins. This increases the number of filters available to GIMP and allows Photoshop users to not have to sacrifice their library. If an equivalent GIMP plug-in can’t be found, assembling a kit of Photoshop filters is a potential option.
To start, download the PSPI plug-in from Gimp.org
In the program folder, copy and paste the entire contents of the PSPI plug-in download into the Plug-ins folder. If you’re running Linux, make sure you copy both the PSPI plug-in and the PSPI.exe, or it will not work.
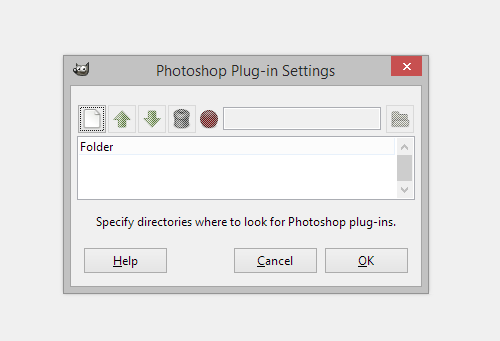
Restart GIMP and open the Filters menu. At the bottom, you will see a new entry: “Photoshop Filters Plug-In Settings.” Select that to open the Photoshop dialog box, and point it to the folder where your Photoshop plug-ins are located. Add all future Photoshop plug-ins to that folder.
2. Install Layer Styles
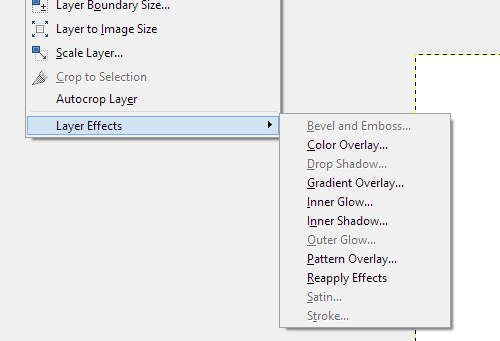
Layer Styles are a beloved feature of many Photoshop users, and living without them can be a difficult adjustment. Layer Styles are called Layer Effects in GIMP and include: Drop Shadow, Inner Glow, Outer Glow, Gradient Overlay, Stroke, Bevel and Emboss, etc. These can be used to quickly apply effects to your layer(s) without having to jump through hoops.
Download the Layer Effects GIMP plug-in from Gimp.org. There are two versions: Script-Fu and Python. The Python version allows for live previews of the effects; the Script-Fu version does not. No matter which version you choose, save the plug-in in GIMP’s Plug-in folder and restart the program.
If you download the Python version, Layer Effects will be added under Layer > Layer Effects. The Script-Fu version will be listed under Script-Fu > Layer Effects.
3. Add CMYK Color Separation
CMYK stands for cyan, magenta, yellow, key (black). In the context of photo editors and graphics programs, it is a subtractive color model that is different from the commonly used, additive RGB color model. In simplified terms, RGB colors work by becoming lighter with the addition of white, while CMYK colors subtract the white by overlaying colors, eventually resulting in black; that black isn’t as deep as it should be for printing, so black is added to the CMYK mix.
Many users complain about GIMP’s lack of CMYK support. For many designers and photographers, images have to be converted to CMYK colors for high-quality prints. If you require CMYK separation, download the plug-in Separate+ from Yellowmagic. Save the ZIP file, extract the plug-in to the GIMP plug-in folder, then restart the program.
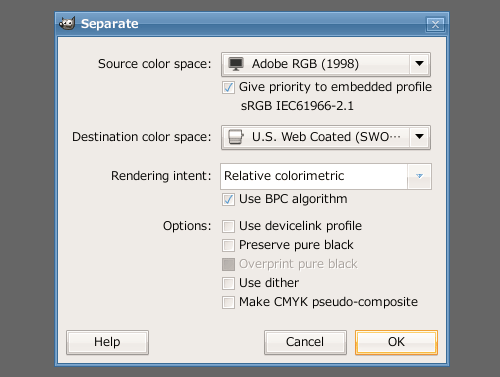
The new feature will be located in the Image menu.
4. Install Liquid Rescale
Liquid Rescale is a favorite of many users and created quite a buzz when first introduced into Photoshop. Liquid Rescale makes it possible to alter an image’s dimensions from, for example, 16:9 to 4:3 without distortion by eliminating unnecessary pixels in certain areas. This process, known most commonly as seam carving, allows you to resize a narrow photo to widescreen format without stretching the content into a morphed, twisted mess.
To add the Liquid Rescale feature to GIMP, download the plug-in from Wikidot and copy it into the GIMP Plug-In folder. Restart the program.
5. Add Essential Brushes
GIMP comes with far too few brushes; and the ones that are there are small, basic and not all useful. If you’re planning to author graphics, you’ll need a new library of brushes to accomplish anything. Installing brushes in GIMP is as simple as copying the brush file into the Brush folder and restarting GIMP.
Brushes can be downloaded from numerous locations, depending on what you’re looking for. That said, an excellent repository of free brushes of all types – including grunge, fire, splatter, stone and more – is at DeviantArt.
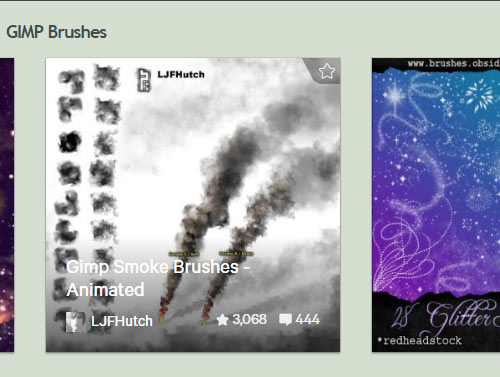
If you add the largest brushes available, you can scale the features in GIMP to reduce their size, allowing for high-resolution graphics.
6. Anchor Windows
If you were to ask Photoshop users their biggest dislike about GIMP, they would almost unanimously express a disdain for the loose docks and toolbars. The canvas, toolbar and layers, paths and brushes dock are all free-floating and scattered about the desktop. If you have a decent window manager, this is a benefit; for most users, it’s a hindrance.
If the loose docks in GIMP bother you, go to Windows > Single-Window Mode.
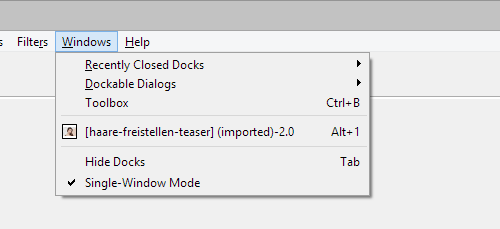
If you still aren’t satisfied with the window system, two different versions of GIMP are available that have interfaces similar to Photoshop’s: GIMPshop and GimPhoto. GimPhoto has a slightly more appealing interface, but GIMPshop is based on a newer version of GIMP.
7. Install Animation Package
The GIMP Animation Package, known as GAP, allows users to create animations. The most common use of GAP is for animated GIFs and avatars; but it is sophisticated enough to make full-episode animations, surrealistic landscapes and realistic water motion.
GAP is not automatically included in GIMP. It can be downloaded from an ever-changing number of locations. Mac users can find a download and instructions at GAP-Systems. Windows users have dozens of mirrors to choose from, and a fresh Internet search will yield the best results. Finally, Linux users can download GAP by running a gimp-gap install in the terminal or, if you’re on Ubuntu, searching gimp-gap in the Synaptic packages.
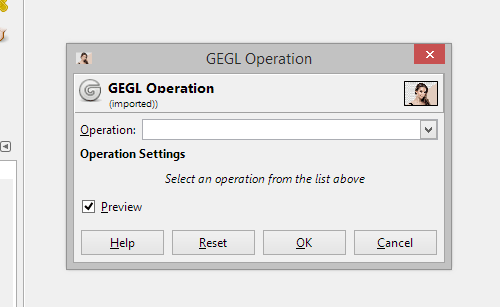
8. Enable GEGL
GEGL is a new feature found only in GIMP 2.6+. According to Gimp.org:
“Many highly requested features of the GIMP will be easier to do using GEGL. Layer effects, layer groups, and adjustment layers are quite easily represented (and efficiently calculated) using the DAG organization of GEGL. CMYK and high bit depth support will be easier because GEGL does not make the same assumptions about color spaces and data types that the GIMP does.”
You can use the presets available at Tools > GEGL Operations. Approximately a dozen different presets can be applied to layers and images.
Conclusion
These tweaks, plug-ins and add-ons push GIMP closer to its full potential. While it still wouldn’t replace Photoshop as the top graphics program, it will stand a step higher and provide features that would otherwise be missing.
In addition to the add-ons above, a great deal more can be added to customize GIMP to your own personal needs, including HDR plug-ins, photo cleaners, scrapbook borders and animation effects for GAP. New features are added to the GIMP registry everyday. In addition, if you can’t find a plug-in to meet your needs, you can write your own plug-in script.
For further resources, check out these links:
- GIMP Equivalent of PDSTuts
- Splatter and Watercolour Brushes For Photoshop & GIMP
- How To Develop Websites On Linux
- Useful Photoshop Tools and Techniques For Your Workflow


