5 Useful And Creative Ways To Use WordPress Widgets

Email Newsletter
Weekly tips on front-end & UX.
Trusted by 182,000+ folks.

 Custom Web Forms for Angular, React, & Vue. Your backend.

 Celebrating 10 million developers
If you’ve been reading some of the previous WordPress-related articles here on Smashing Magazine, you’ll know that WordPress is much more than a blogging platform. It can be used as a CMS, too. And WordPress widgets are a powerful tool in your WordPress development arsenal.
When you think of WordPress widgets, you may think they’re just a way to rearrange various items in your blog’s sidebar without touching any code. Sure, that’s nice and all, but that’s really just the tip of the iceberg of all the things WordPress widgets can do.
You may be interested in the following related posts:
- Power Tips For WordPress Template Developers
- 10 Useful WordPress Loop Hacks
- Custom Field Hacks For WordPress
- 15 Useful Twitter Hacks and Plugins For WordPress
- Mastering WordPress Shortcuts
- 100 Amazing Free WordPress Themes For 2009
1. Multiple Widget-Ready Areas
.jpg)
A widgetized theme has come to be expected by theme users and developers alike. Nowadays, however, just one widgetized area doesn’t cut it. The first step to using widgets on your WordPress website is to widgetize your theme, and that’s really not that hard if you have the right code in place.
Register the Widget Areas
To have multiple widget-ready areas, the first thing to do is register the widget areas in the functions.php file of your WordPress theme. Let’s say you have a three-column theme, and you want to have two different sidebars on the left and right side:
<?php
  register_sidebar( array(
    'name' => 'left-sidebar',
    'id' => 'left-sidebar',
    'before_widget' => '<div id="%1$s" class="%2$s widget">',
    'after_widget' => '</div>',
    'before_title' => '<h3 class="widget-title">',
    'after_title' => '</h3>'
  ) );
  register_sidebar( array(
    'name' => 'right-sidebar',
    'id' => 'right-sidebar',
    'before_widget' => '<div id="%1$s" class="%2$s widget">',
    'after_widget' => '</div>',
    'before_title' => '<h3 class="widget-title">',
    'after_title' => '</h3>'
  ) );
?>
Activate the Widget Areas
The next step is to put the dynamic sidebar code in the actual sidebar files. Depending on your theme, this could be located in a sidebar.php file, or elsewhere. Here’s the code to use:
<?php if (!dynamic_sidebar("left-sidebar") ) : ?>
Default left sidebar stuff here…
<?php endif; ?>
<?php if (!dynamic_sidebar("right-sidebar") ) : ?>
Default right sidebar stuff here…
<?php endif; ?>The code between the PHP tags will be displayed if no widgets are currently used in the relevant widget area. For example, if no widgets are used in the “left-sidebar” widget, then “Default left sidebar stuff here…” would be displayed instead.
Sources:
2. Widget Logic
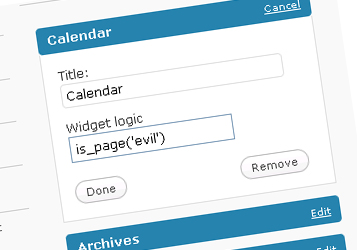
Sometimes you may not want the same widgets to appear the same way on every single page of your blog. This is where the Widget Logic plug-in comes in handy.
After the plug-in is installed, a new “Widget Logic” input box is displayed in the options box of every widget you use. In this box, you can type a series of WordPress conditional tags to control where exactly the widget is displayed.
In the screenshot above, the Calendar widget is set to display only on the page called “Evil.” You can use many more conditional tags as well.
Examples
- Display only on the home page:
is_home() - Display only on individual posts:
is_single() - Display only on pages:
is_page() - Display on archive pages (category, tag, etc.):
is_archive() - Display on search results pages:
is_search() - Display on all pages except the home page:
!is_home() - Display on “Advertise” or “Contact” page:
is_page('advertise') || is_page('contact')
Simply type something similar in your own Widget Logic boxes, depending on where you want the widgets to display.
Sources:
3. Query Posts
For those who don’t know, the query_posts template tag is a powerful WordPress function that you can use to control how different posts and pages show up in the loop.
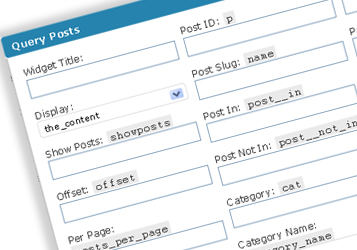
However, if you’d rather not mess around with more PHP code than is necessary but still want to take advantage of the query_posts tag, you can use the Query Posts widget to display WordPress content in almost any way you can think of.
After installing and activating the plug-in, you will have a new “Query Posts” widget available in the WordPress widgets menu.
What It Can Do
- Display posts by tag, category, author, time/date or custom field keys/values,
- Display however many number of posts you want,
- Order posts by date published, title or ID in either ascending or descending order,
- Display posts with full content, as excerpts or in a list,
- Show WordPress pages.
Source:
4. 404 Templates
.jpg)
A lot of WordPress themes out there, including the default WordPress theme, don’t offer anything useful in their 404 templates. For example, if you land on a 404 page of a WordPress website that uses the default theme, you’ll be greeted with a message that says “Error 404 - Not Found,” and that’s it.
There are plenty of WordPress widgets you can use to spice up your 404 page and make it more useful to visitors who are trying to find content. The widgets “Recent Posts,” “Categories” and “Archives” come to mind.
The Code
The first step is to register the widget area in WordPress. To do this, open up your theme’s functions.php file, and put the following code in it:
<?php
  register_sidebar( array(
    'name' => '404',
    'id' => '404',
    'before_widget' => '<div id="%1$s" class="%2$s widget">',
    'after_widget' => '</div>',
    'before_title' => '<h3 class="widget-title">',
    'after_title' => '</h3>'
  ) );
?>
Now that the widget is registered, you’ll have to edit your theme’s 404.php file and add the following code:
<?php dynamic_sidebar( '404' ); ?>That’s it. You can now place any widgets you’d like in your “404” widget, and they will be displayed every time a visitor lands on a 404 page. Load it up with things like a search box, recent posts, category listings or maybe a few Query Post lists.
Source:
5. Insert Ads Between Posts
.jpg)
You can code your theme to insert a widget in between a certain number of posts. Some people use this to insert advertising, but the sky is the limit when it comes to widgets.
The Code
As we did when widgetizing the 404 template, the first step to setting this up is to register the widget area for the index insert. Open up your functions.php file again and insert this similar code:
<?php
  register_sidebar( array(
    'name' => 'index-insert',
    'id' => 'index-insert',
    'before_widget' => '<div id="%1$s" class="%2$s widget">',
    'after_widget' => '</div>',
    'before_title' => '<h3 class="widget-title">',
    'after_title' => '</h3>'
  ) );
?>
To set it up on your main index page, you’ll need to open up the index.php file of your theme, locate the “endwhile” near the end and put the following code directly above it, so that it looks like this.
<?php if ($count==2) { ?>
<?php dynamic_sidebar('index-insert') ?>
<?php } ?>
<?php $count = $count + 1; ?>
<?php endwhile; ?>
The above code will insert the “index-insert” widget area right after the second post. You can change the $count==2 number to something else, according to the post you’d like the widget area to be displayed after.
If you want ads to show up in between your archive listings, such as on category or tag pages, you may have to insert the above code in other files, including archive.php, category.php and tag.php. You can even control which ads are displayed on which pages by using conditional tags, such as is_archive(), is_category() and is_tag(), in the Widget Logic plug-in.
Source:
More Widget Resources
- Add a Widgetized Footer to Your WordPress Theme A tutorial that teaches you how to code your own widgetized footer, including the HTML, CSS and WordPress code needed.
- List of WordPress Widgets A list of WordPress widgets from the Codex, as well as several other widget-related resources.
Related posts
You may be interested in the following related posts:
- Power Tips For WordPress Template Developers
- 10 Useful WordPress Loop Hacks
- Custom Field Hacks For WordPress
- 15 Useful Twitter Hacks and Plugins For WordPress
- Mastering WordPress Shortcuts
- 100 Amazing Free WordPress Themes For 2009


