10 Useful WordPress Hook Hacks

Email Newsletter
Weekly tips on front-end & UX.
Trusted by 182,000+ folks.

 Custom Web Forms for Angular, React, & Vue. Your backend.

 Celebrating 10 million developers
What Is A Hook?
To achieve a particular effect on a WordPress blog, you have to modify how WordPress works. Some of these modifications are made to what WordPress developers call “core files,” files required by WordPress to work properly.
But modifying core files is always a bad idea. It may create a security loophole. Also, you will have lost the modification when you upgrade your WordPress installation.
Still, developers need to overwrite some of WordPress’ functionality, which is why WordPress provides the Plugin API.
Hooks are one of the main building blocks of WordPress plug-ins. Almost every plug-in uses a hook to overwrite WordPress’ core functionality.
How to Use Hooks on Your WordPress Blog
Unless you’re writing a plug-in, you would write hooks in the functions.php file. This file is located in the wp-content/themes/yourtheme directory.
A hook, as you would expect, “hooks” one function to another. For example, you could write a custom function and attach it to one of WordPress’ core functions:
add_action ( 'publish_post', 'myCustomFunction' );In this example, we hook our own custom function to WordPress’ publish-post function, which means that every time WordPress executes the publish-post function, it will also execute this hooked function.
Of course, we can also remove hooks using the remove_action() function:
remove_action ( 'publish_post', 'myCustomFunction' );Hooks resources:
1. Disable WordPress’ Automatic Formatting
The problem. You have probably noticed that, by default, WordPress converts normal quotes to “curly” quotes, and makes other little formatting changes when a post is displayed.
This is very cool for people who publish normal content, but anyone who uses their blog to discuss code will be annoyed because, when pasted in a text editor, code with curly quotes returns syntax errors.
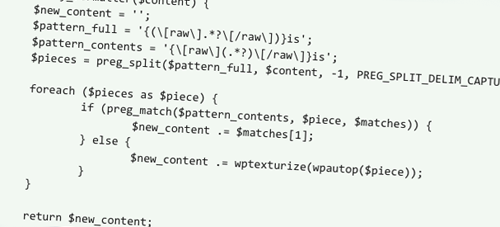
The solution. Simply paste the following code in your functions.php file:
function my_formatter($content) {
  $new_content = ’;
  $pattern_full = '{([raw].*?[/raw])}is';
  $pattern_contents = '{[raw](.*?)[/raw]}is';
  $pieces = preg_split($pattern_full, $content, -1, PREG_SPLIT_DELIM_CAPTURE);

  foreach ($pieces as $piece) {
    if (preg_match($pattern_contents, $piece, $matches)) {
      $new_content .= $matches[1];
    } else {
      $new_content .= wptexturize(wpautop($piece));
    }
  }

  return $new_content;
}

remove_filter('the_content', 'wpautop');
remove_filter('the_content', 'wptexturize');

add_filter('the_content', 'my_formatter', 99);
Once that’s done, you can use the [raw] shortcode in your posts:
[raw]This text will not be automatically formatted.[/raw]Code explanation.
Our first step here was to create a function that uses a regular expression to find the [raw] shortcode in your posts’ content.
Then we hook our my_formatter() function to WordPress’ the_content() function, which means that my_formatter() will now be automatically called every time the_content() is called.
To remove the automatic formatting, we use the remove_filter() function, which lets you delete a hook on a specific function.
Source:
2. Detect The Visitor’s Browser Using A Hook

The problem.
Cross-browser compatibility is probably the most common problem in Web development. You will save yourself a lot of headaches if you are able to detect the browsers that people use to visit your website and then create a custom class wrapped in the body tag. Few people are aware of it, but WordPress can already detect browsers, and a few global variables are available for us to use.
The solution. Nothing hard here: just paste the code below in your functions.php file, then save the file and you’re done!
<?php
add_filter('body_class','browser_body_class');
function browser_body_class($classes) {
  global $is_lynx, $is_gecko, $is_IE, $is_opera, $is_NS4, $is_safari, $is_chrome, $is_iphone;

  if($is_lynx) $classes[] = 'lynx';
  elseif($is_gecko) $classes[] = 'gecko';
  elseif($is_opera) $classes[] = 'opera';
  elseif($is_NS4) $classes[] = 'ns4';
  elseif($is_safari) $classes[] = 'safari';
  elseif($is_chrome) $classes[] = 'chrome';
  elseif($is_IE) $classes[] = 'ie';
  else $classes[] = 'unknown';

  if($is_iphone) $classes[] = 'iphone';
  return $classes;
}
?>
Once you have saved the file, the function will automatically add a CSS class to the body tag, as shown in the example below:
<body class="home blog logged-in safari">Code explanation.
WordPress has global variables that return true if a visitor is using a particular browser. If the visitor’s browser is Google Chrome, the $is_chrome variable will return true. This is why we create the browser_body_class() function, which returns the name of the visitor’s browser. Once that’s done, we just hook the function to WordPress’ body_class() function.
Sources:
3. Define Default Text In TinyMCE
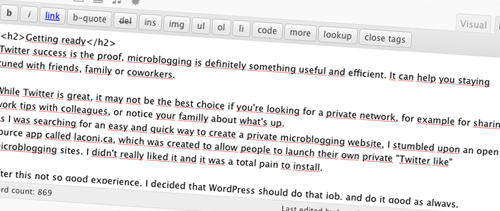
The problem. Many bloggers almost always use the same layout for their blog posts. Posts on my own blog WpRecipes.com are always displayed the same way: some text, some code and then some more text.
What about saving time by forcing tinyMCE (WordPress’ visual editor) to display default text?
The solution. Once again, hooks are the solution. Just open your functions.php file, paste the code and let the hooks work their magic!
<?php
add_filter('default_content', 'my_editor_content');

function my_editor_content( $content ) {
  $content = "If you enjoyed this post, make sure to subscribe to my rss feed.";
  return $content;
}
?>
Code explanation.
This code is powerful, and yet the method is so simple. Just create a function that returns the desired text (in this example, we have defined some simple text that asks readers to subscribe to the blog’s RSS feed), and hook the function to WordPress’ default_content() function. That’s it.
Sources:
- How to preset text in the WordPress post editor
- How to: Automatically insert text in WordPress editor
4. Insert Content Automatically After Each Post

The problem.
Most blogs use the single.php template to insert some text, images or ads just after a post. Sure, this can be done by opening single.php and pasting the desired text after the the_content() function. But the text won’t show up in your RSS feed? Hooks and the technique described below solve this problem.
The solution. One again, simply paste the code below in the functions.php file of your theme. That’s it.
function insertFootNote($content) {
        if(!is_feed() && !is_home()) {
                $content.= "<div class='subscribe'>";
                $content.= "<h4>Enjoyed this article?</h4>";
                $content.= "<p>Subscribe to our  <a href='https://feeds2.feedburner.com/WpRecipes'>RSS feed</a> and never miss a recipe!</p>";
                $content.= "</div>";
        }
        return $content;
}
add_filter ('the_content', 'insertFootNote');
Code explanation.
The purpose of the insertFootNote() function is pretty simple: it simply concatenates text of your choice to the $content variable, which contains your post’s content.
Then, our insertFootNote() function is hooked to the the_content() function, and it is automatically called every time the the_content is called. Using this function is basically the same as typing in the text at the end of each post.
Notice the (!is_feed) condition on line 2, which prevents the text from being inserted in the RSS feed. If you want the text to appear in your RSS feed, replace line 2 with the following:
if (!is_home()) {Sources:
5. Disable The “Please Update Now” Message On WordPress Dashboard

The problem. Your dashboard automatically lets you know when a new version of WordPress is released by inserting a message at the top of admin pages. This is definitely a good thing, because updating gives your blog the latest functions and security fixes. But if the blog is a client project, letting the client control updates may not be a good idea.
The solution. Just paste these four lines of code in your functions.php file:
if (!current_user_can('edit_users')) {
  add_action( 'init', create_function( '$a', "remove_action( 'init', 'wp_version_check' );" ), 2 );
  add_filter( 'pre_option_update_core', create_function( '$a', "return null;" ) );
}
Once you save functions.php, you won’t see the message on the dashboard.
Code explanation. The first thing we do here is make sure the current user has sufficient administrative rights to update WordPress. Once we do that, we just create two hooks to overwrite the automatic check for updates and message display.
Sources:
6. Disable WordPress From Auto-Saving Posts
Photo by thatcanadiangirl
The problem. As you type a post in the dashboard, WordPress periodically saves the content. This is a useful feature, but sometimes you may want to disable it.
The solution. To disable WordPress’ auto-saving functionality, simply open the functions.php file and paste the following function:
function disableAutoSave(){
    wp_deregister_script('autosave');
}
add_action( 'wp_print_scripts', 'disableAutoSave' );
Code explanation.
Again, nothing hard about this code. We simply create an action (on line 4) and hook the disableAutoSave() function that we created on line 1 to WordPress’ wp_print_scripts().
The result is that our disableAutoSave() function is called every time WordPress executes wp_print_scripts(). This way, we make sure the auto-save functionality is disabled.
Sources:
7. Prevent Duplicate Content On Comment Pages

The problem. Duplicate content is an SEO problem for many websites. It can also be a problem for your WordPress blog if you don’t apply a few tricks.
Introduced in version 2.7, paged comments is a great addition to WordPress because it lets bloggers split comments into multiple pages. The only problem, again, is the risk of duplicate content.
Let’s use the new rel=“canonical” attribute to prevent duplicate content in paged comments.
The solution. Simply paste the following code in your function.php file:
function canonical_for_comments() {
  global $cpage, $post;
  if ( $cpage > 1 ) :
    echo "n";
      echo "<link rel='canonical' href='";
      echo get_permalink( $post->ID );
      echo "' />n";
   endif;
}

add_action( 'wp_head', 'canonical_for_comments' );
Code explanation.
First, we create a function to add the rel=“canonical” attribute to comment pages, except page 1. Then we hook this function to WordPress’ wp_head() function. As simple as that!
Sources:
8. Get Entire Post Or Page In A PHP Variable

The problem.
Being able to get the entire current post or page as a PHP variable is definitely a good thing. You could, for example, replace parts of the content using the str_replace() PHP function, and much more.
The solution. Once again, nothing hard. Just paste the following in your function.php file.
function callback($buffer) {
  // modify buffer here, and then return the updated code return $buffer;
}

function buffer_start() {
  ob_start("callback");
}

function buffer_end() {
  ob_end_flush();
}

add_action('wp_head', 'buffer_start');
add_action('wp_footer', 'buffer_end');
Code explanation. To achieve this hack, we need three functions:
callback(): this function returns the whole page as a variable called$buffer. You can modify it before returning it by using regular expressions, for example.buffer_start(): this function simply starts the buffer. It is hooked to WordPress’wp_head()function.buffer_end(): this function clears the buffer. It is hooked to WordPress’wp_footer()function.
Once we have our function, we just hook it to existing WordPress functions.
Sources:
9. Use Hooks And Cron To Schedule Events

The problem.
You probably already know that WordPress can schedule events. For example, it can publish posts at preset dates and times. Using hooks and wp-cron, we can easily schedule our own events. In this example, we will get our WordPress blog to send us an email once hourly.
The solution. Paste the following code block in the functions.php file of your theme.
if (!wp_next_scheduled('my_task_hook')) {
  wp_schedule_event( time(), 'hourly', 'my_task_hook' );
}

add_action( 'my_task_hook', 'my_task_function' );

function my_task_function() {
  wp_mail('you@yoursite.com', 'Automatic email', 'Hello, this is an automatically scheduled email from WordPress.');
}
Code explanation.
The first thing we did, of course, was create a function that performs the desired action. In this example, the function is called my_task_function() and it just sends an email to the specified email address.
To schedule an event, we have to use the wp_schedule_event() function. The last argument has to be a hook, which is why we hook our my_task_function() function to my_task_hook.
Sources:
- Timing is everything: scheduling in WordPress
10. List All Hooked Functions
The problem. When things go wrong, listing all hooked functions can be very useful for debugging.
The solution. As with the others, this code has to be pasted in your functions.php file. When you have finished debugging, don’t forget to remove the code from functions.php, or else the debugging message will continue to appear.
function list_hooked_functions($tag=false){
global $wp_filter;
if ($tag) {
$hook[$tag]=$wp_filter[$tag];
if (!is_array($hook[$tag])) {
trigger_error("Nothing found for '$tag' hook", E_USER_WARNING);
return;
}
}
else {
$hook=$wp_filter;
ksort($hook);
}
echo '<pre>';
foreach($hook as $tag => $priority){
echo "<br />>>>>>t<strong>$tag</strong><br />";
ksort($priority);
foreach($priority as $priority => $function){
echo $priority;
foreach($function as $name => $properties) echo "t$name<br />";
}
}
echo '</pre>';
return;
}6. Disable WordPress From Auto-Saving Posts
Photo by thatcanadiangirl
The problem. As you type a post in the dashboard, WordPress periodically saves the content. This is a useful feature, but sometimes you may want to disable it.
The solution. To disable WordPress’ auto-saving functionality, simply open the functions.php file and paste the following function:
function disableAutoSave(){
    wp_deregister_script('autosave');
}
add_action( 'wp_print_scripts', 'disableAutoSave' );
Code explanation.
Again, nothing hard about this code. We simply create an action (on line 4) and hook the disableAutoSave() function that we created on line 1 to WordPress’ wp_print_scripts().
The result is that our disableAutoSave() function is called every time WordPress executes wp_print_scripts(). This way, we make sure the auto-save functionality is disabled.
Sources:
7. Prevent Duplicate Content On Comment Pages
The problem. Duplicate content is an SEO problem for many websites. It can also be a problem for your WordPress blog if you don’t apply a few tricks.
Introduced in version 2.7, paged comments is a great addition to WordPress because it lets bloggers split comments into multiple pages. The only problem, again, is the risk of duplicate content.
Let’s use the new rel=“canonical” attribute to prevent duplicate content in paged comments.
The solution. Simply paste the following code in your function.php file:
function canonical_for_comments() {
  global $cpage, $post;
  if ( $cpage > 1 ) :
    echo "n";
      echo "<link rel='canonical' href='";
      echo get_permalink( $post->ID );
      echo "' />n";
   endif;
}

add_action( 'wp_head', 'canonical_for_comments' );
Code explanation.
First, we create a function to add the rel=“canonical” attribute to comment pages, except page 1. Then we hook this function to WordPress’ wp_head() function. As simple as that!
Sources:
8. Get Entire Post Or Page In A PHP Variable
The problem.
Being able to get the entire current post or page as a PHP variable is definitely a good thing. You could, for example, replace parts of the content using the str_replace() PHP function, and much more.
The solution. Once again, nothing hard. Just paste the following in your function.php file.
function callback($buffer) {
  // modify buffer here, and then return the updated code return $buffer;
}

function buffer_start() {
  ob_start("callback");
}

function buffer_end() {
  ob_end_flush();
}

add_action('wp_head', 'buffer_start');
add_action('wp_footer', 'buffer_end');
Code explanation. To achieve this hack, we need three functions:
callback(): this function returns the whole page as a variable called$buffer. You can modify it before returning it by using regular expressions, for example.buffer_start(): this function simply starts the buffer. It is hooked to WordPress’wp_head()function.buffer_end(): this function clears the buffer. It is hooked to WordPress’wp_footer()function.
Once we have our function, we just hook it to existing WordPress functions.
Sources:
9. Use Hooks And Cron To Schedule Events
The problem.
You probably already know that WordPress can schedule events. For example, it can publish posts at preset dates and times. Using hooks and wp-cron, we can easily schedule our own events. In this example, we will get our WordPress blog to send us an email once hourly.
The solution. Paste the following code block in the functions.php file of your theme.
if (!wp_next_scheduled('my_task_hook')) {
  wp_schedule_event( time(), 'hourly', 'my_task_hook' );
}

add_action( 'my_task_hook', 'my_task_function' );

function my_task_function() {
  wp_mail('you@yoursite.com', 'Automatic email', 'Hello, this is an automatically scheduled email from WordPress.');
}
Code explanation.
The first thing we did, of course, was create a function that performs the desired action. In this example, the function is called my_task_function() and it just sends an email to the specified email address.
To schedule an event, we have to use the wp_schedule_event() function. The last argument has to be a hook, which is why we hook our my_task_function() function to my_task_hook.
Sources:
- Timing is everything: scheduling in WordPress
10. List All Hooked Functions
The problem. When things go wrong, listing all hooked functions can be very useful for debugging.
The solution. As with the others, this code has to be pasted in your functions.php file. When you have finished debugging, don’t forget to remove the code from functions.php, or else the debugging message will continue to appear.
function list_hooked_functions($tag=false){
global $wp_filter;
if ($tag) {
$hook[$tag]=$wp_filter[$tag];
if (!is_array($hook[$tag])) {
trigger_error("Nothing found for '$tag' hook", E_USER_WARNING);
return;
}
}
else {
$hook=$wp_filter;
ksort($hook);
}
echo '<pre>';
foreach($hook as $tag => $priority){
echo "<br />>>>>>t<strong>$tag</strong><br />";
ksort($priority);
foreach($priority as $priority => $function){
echo $priority;
foreach($function as $name => $properties) echo "t$name<br />";
}
}
echo '</pre>';
return;
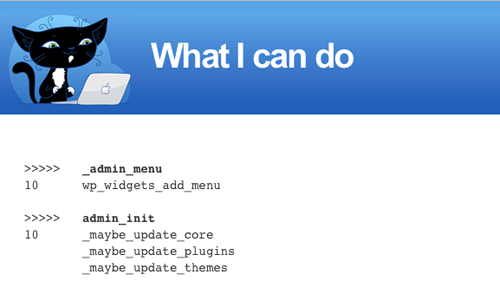
}Once that’s done, simply call the list_hooked_functions() function, as shown below, to print all hooked WordPress functions on your screen.
list_hooked_functions();Code explanation.
If no hook name is provided to the function as an argument, then hooks are printed to the screen using the global variable $wp_filter. Alternatively, you can list one particular hook by passing its name as an attribute:
list_hooked_functions('wp_head');Related posts
You may be interested in the following related posts:
- 10 Handy WordPress Comments Hacks
- Power Tips For WordPress Template Developers
- 10 Useful WordPress Loop Hacks
- Custom Field Hacks For WordPress
- 15 Useful Twitter Hacks and Plugins For WordPress
- Mastering WordPress Shortcuts


