Mastering Photoshop With Paths

Email Newsletter
Weekly tips on front-end & UX.
Trusted by 182,000+ folks.

 Custom Web Forms for Angular, React, & Vue. Your backend.
 Celebrating 10 million developers

Creation
Pen Tool
The Pen tool (P) – simple to use but difficult to master. It provides a precise method for creating paths, but requires an experienced hand to plot naturally flown curves. The power unlocked by mastering this tool is well worth the time needed to do so. While no amount of instruction can make you a Bezier master, below are some tips to keep in mind as you practice.
- Always use as few points as possible.
- Place an anchor at every acute or abrupt angle.
- Mid-curve anchors should be placed to comfortably accommodate curve transitions.
- To help set anchor points, you can turn on the ‘Rubber Band’ option – located in the drop-down next to the Custom Shape Tool button in the Pen’s property bar. This setting will allow you to see the curve connecting the last anchor point with the mouse’s current position.
Pen Tool with the Rubber Band setting
Shape Tool
The Shape Tool (U) gives you access to standard geometric shapes as well as more complex presets with the Custom Shape setting. To define your own custom shape, select the shape using the Path Selection Tool (A), right-click inside the canvas, select ‘Define Custom Shape…’, name it and click OK. When using the Shape tool, more advanced settings – involving size, proportion, origin and pixel-snapping – lie hidden inside the drop-down next to the custom shape button in the tool’s property bar.
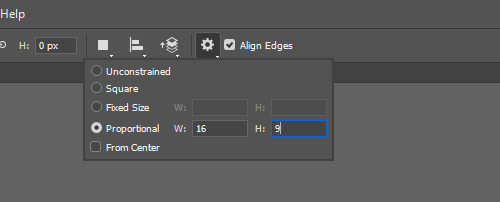
Advanced Shape Tool settings
From Type
Converting type to a shape layer allows you to work directly with the anchors and curves of each letter and might even help improve your typesetting. This technique is most useful when you know the text won’t change as you’ll have to sacrifice the ability to edit it. With the type layer selected, right-click the layer in the Layers palette and choose ‘Convert Type to Shape’. You now have access to the actual paths used to create the type. Thinking of type in this manner – as shapes instead of letters – can dramatically change the way you work. Kerning is now more intuitive; select a letter and move it – no pesky integers to set!
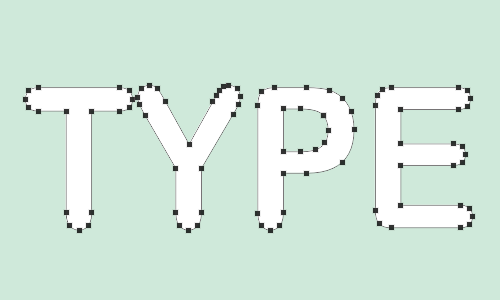
Type to Path conversion
From Selections
The editing of paths is far superior to raster data, especially when it comes to matters of upscaling. If working with a simple enough raster shape, why not convert it to a path? Select your shape. From the flyout menu in the Paths palette, select ‘Make Work Path…’ or Option-click the ‘Make work path from selection’ button at the bottom of the palette. Set the tolerance based on the complexity of your shape – the simpler the shape, the higher the tolerance. Click OK. You’ll notice that pixel to path conversion is not an exact science, but with some manual clean-up you can effectively recreate the original shape.
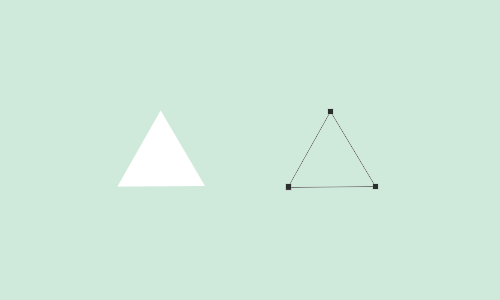
Selection to Path conversion
Implementation
Modes
When creating paths via the Pen or Shape tool, three settings – found in the tool’s property bar – are available to define how the path should be used: Shape Layer, Paths and Fill Pixels. The Shape Layer setting will automatically create a new fill layer using the color and layer style set to the right. Paths will create a temporary Work Path accessible in the Paths palette, which makes it available for many different implementations (see below). Fill Pixels will paint raster data on the current layer, leaving no paths behind.
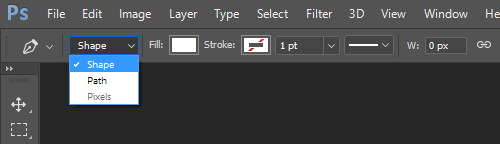
Pen tool set to create a Shape Layer
Shape Layer
The easiest way to create a Shape Layer is to use a path drawing tool set to Shape Layer. However, using the tool set to Paths, allows you to specify the type of fill used. First, draw your path. Then, click the ‘Create new fill or adjustment layer’ in the Layer’s palette and choose from Solid…, Gradient…, or Pattern…. Note that you can also create an adjustment layer with a Vector Mask in the same manner.
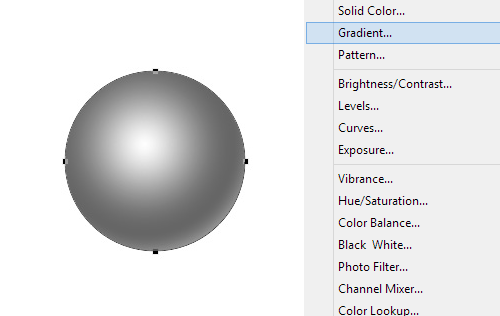
Creating a Gradient Shape Layer
Vector Mask
Vector Masks are often more preferable than a Raster Mask as they can be easily tweaked or scaled and still produce a crisp edge. With CS4’s introduction of the Masks palette, Vector Masks are more powerful than ever. Now, you can also feather the edges and adjust the density of a Vector Mask. The quickest way to create a Vector Mask is to select the layer you wish to mask. Then, select the path using the Path Selection Tool (A) and Command-click the ‘Add Layer Mask’ button at the bottom of the Layer’s palette.
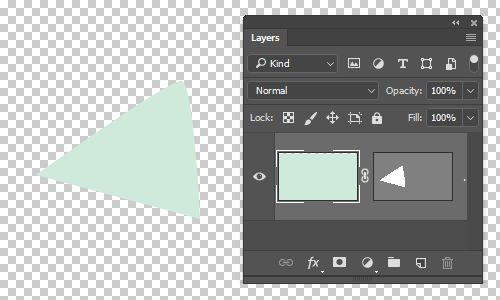
Command-clicking to quickly create a Vector Mask
Type Paths: In and On
There are two ways paths can be used with the type tool: by defining the baseline and by creating a custom text box shape. Select the Work Path you’d like to use and with the Type tool (T) mouse-over the path. The dotted square on the cursor will change from a square to a curved line. Click on the path and you’ll see that the type flows right along the path. After committing the type (Command + Enter), you can use the Path Selection Tool (A) to move the beginning and end points – indicated with an ‘x’ and a black circle respectively – or to flip the type from the top of the line to the bottom. If using a closed path, you can click inside of it to create a custom-shaped text box.
Type on a path
Type in a path
Fill and Stroke
The Paths palette provides an interesting array of options to fill and stroke a Work Path. These options are available only when the current layer is a raster layer; you can quickly create a new raster layer using Command + Option + Shift + N. Then, by Option + clicking on either the ‘Fill path with foreground color’ or ‘Stroke path with brush’ button, you can open the Fill or Stroke dialog boxes. From here you can set the fill type, blending modes, transparency, feathering or stroke tool, which will adopt that tool’s current settings.
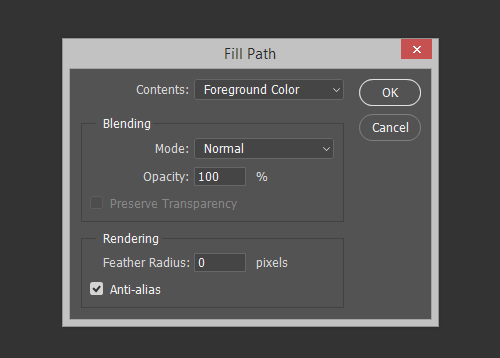
Fill Path dialog box
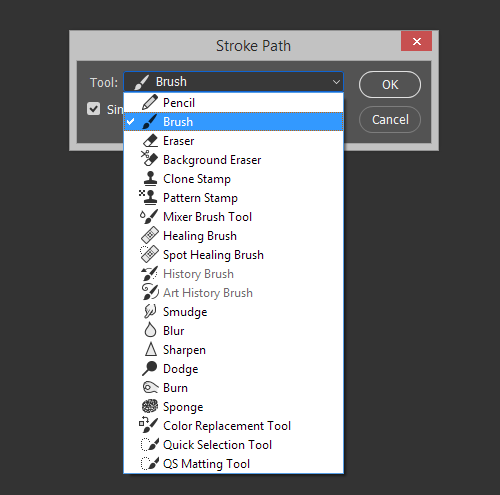
Stroke tools
Boolean Operators
Use
To allow for more complex shapes, multiple paths can be grouped together into a compound path, on which Boolean operations can be set. These are accessible in the properties bar of the Path Selection Tool (A) and include: Add (+), Subtract (-), Intersect and Exclude. Add specifies a fill area and Subtract defines an area that is not filled; if only one path exists, the entire canvas is considered the fill area from which the shape is subtracted. Intersect sets the fill to areas included in all paths, while Exclude fills all path areas except those that overlap; these modes work only in compound paths.
Boolean Modes
Stacking Order
When creating compound paths, it’s important to take note of the paths’ positions in the stacking order. A compound shape with an Add path on the bottom and a Subtract on top will be completely different with swapped depths. A path’s Boolean operator takes effect on all of the paths below it. Unfortunately, there are no commands or palettes to simply swap depths in Photoshop; you’ll need to use a series of Cut (Command + X) and Paste (Command + V) to rearrange them.
Path Stacking Order
Combining
Combining paths can help reduce complexity by creating a single path from the perimeter of a compound path’s fill area. To do so, select the paths to combine using the Path Selection Tool(A) and click the Combine button in the Tool Properties bar.
Reducing complexity by combining Paths
Importing/Exporting
Importing
Though Photoshop provides vector tools sufficient for many basic tasks, it in no way compares to the ease and power of Illustrator. Fortunately, Adobe products work in unison. You can create your paths in Illustrator and easily import them by Copying (Command + C) and Pasting (Command + V) in Photoshop. In the Paste dialog box, select either ‘Path’ to import a Work Path or ‘Shape Layer’ to create a fill layer with the foreground color.
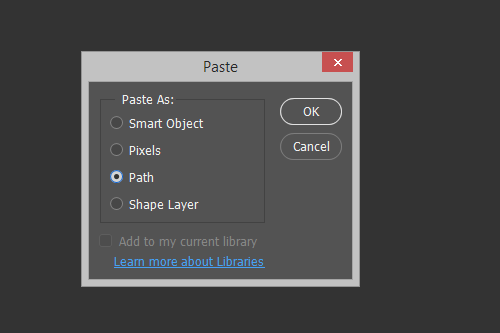
Path Paste dialog box
Exporting
In the occasion that you might need to translate your paths in the opposite direction, copy and paste will work in the same fashion as above or you can use Export → ‘Paths to Illustrator…’ to create a new Illustrator document with the same dimensions and positions as the current Photoshop document.
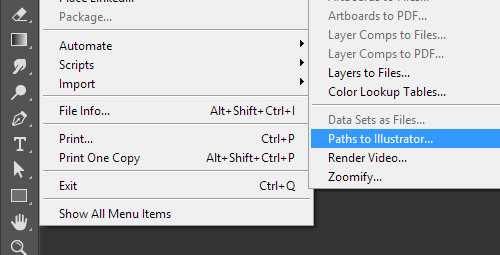
Paths to Illustrator…
Pixel Precision
The positions of anchor points and the lines connecting them do not correspond to the pixel grid of the image. This can lead to undesirable anti-aliasing, most noticeable along horizontal and vertical edges. To avoid these unclean edges, you can zoom in (Command + ‘+’) and use the Direct Selection Tool (A) to select and move the anchor points so that they lie on exact pixel coordinates; Pixel Grid (Show → Pixel Grid) can be very handy when doing this.
![]()
On- and Off-Pixel edge comparison
Keyboard Shortcuts
Pen Tool (P)
- Shift + P – toggle between Pen Tool and Freeform Pen Tool
- Shift – constrains to 45° angles
- Option – change to Convert to Point Tool, used to set directional handles
- Command – change to Direct Selection Tool, used to move anchor points or stretch line segments
- Command + Shift – select multiple anchor points and segments
- Command + Option – change to Group Selection Tool, used to select entire paths
- Command + Option + Shift – select multiple paths
- + – set Boolean mode to Add
- - – set Boolean mode to Subtract
Shape Tool (U)
- Shift + U – rotate through Shape tools
- Shift – constrain proportions
- Option (while dragging) – draw from center of shape
- Option (before clicking, if set to create Shape Layers) – temporarily switch to Eyedropper tool
- Option (before and while dragging, if set to create Paths) – set Boolean mode to Subtract
- Option + Shift (before and while dragging, if set to create Paths) – set Boolean mode to Intersect
- Command – change to Path Selection Tool, used to select and move paths
- Command + Shift – select multiple paths
- + – set Boolean mode to Add
- - – set Boolean mode to Subtract
- Spacebar (while dragging) – move the shape’s origin
Path Selection Tool (A)
- Shift + A or Command-click inside document window – toggle between Path Selection Tool and Direct Selection Tool
- Shift + Click – select multiple
- Shift + Drag – move and snap to 45° angles
- Command + Option – Convert to Shape Tool
- Command + Option + Shift – Convert to Shape Tool (constrained to 45° angles)
- Option – change to Group Selection Tool
- Option-Click-Drag – Duplicate selected path
- Arrow key – Nudge selected path or anchor point 1px
- Shift + Arrow key – Nudge selected path or anchor point 10px
- Option + Arrow key – Duplicate selected path or anchor point and move copy 1px
- Option + Shift + Arrow key – Duplicate selected path or anchor point and move copy 10px
Target Path
- Enter – Dismiss Target Path
- Command + Enter – Selection from target path
- Command + Option + Enter – subtract path area from current selection
- Command + Option + Shift + Enter – intersect path area from current selection
- Command + T – Free Transform Path
- Command + Shift + T – Free Transform Path Again
- Command + C – Copy path or anchor point with neighboring points
- Command + X – Cut path or anchor point with


