Brushing Up On The Photoshop Brush Tool

Email Newsletter
Weekly tips on front-end & UX.
Trusted by 182,000+ folks.


 Custom Web Forms for Angular, React, & Vue. Your backend.
 Celebrating 10 million developers
Mastering the digital brush is by no means easy. It carries the same difficulties as the sable brush hidden at the bottom of your art bin. In fact, the difficulty is multiplied by the disconnect between the hand and monitor. Developing Photoshop brush skills takes time, but it is well worth the effort. This article outlines the plethora of options that Photoshop affords, so that you can efficiently create and use brushes like the Old Masters.

Basic Settings
Along the brush’s options bar are some simple yet powerful settings that determine the strength and shape of your brush. These settings have a large impact on the how the brush applies paint, so they’re definitely important to understand.
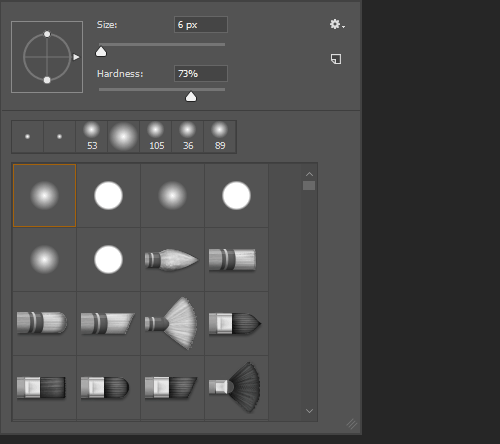
![]()
The brush’s most essential settings are found in the options bar.
Brush
The brush menu, which is accessible by clicking the drop-down menu next to the brush preview or by right-clicking within the canvas, presents three options to control the shape of your brush: “Master Diameter,” “Hardness” and “Brush Shape.”
Further Reading on SmashingMag:
- Free Photoshop Brushes: Watercolor, Space, Canvas
- Splatter and Watercolour Brushes For Photoshop
- 30 Free Photoshop Swirl Brushes
- Health And Beauty Photoshop Brushes Set
The Master Diameter setting sets the overall width and height of your brush in pixels. It’s hard to notice on a standard round brush, but making a brush larger than its original size can cause it to become blurry. So, if you want to maintain clean edges, keep an eye on the brush’s original diameter. This setting is easily controlled using a couple of shortcuts. You can use [ and ] to modify the diameter in increments of 10 pixels, or you can use the on-canvas drag method: with your mouse cursor inside the canvas, hold down Option + Control + Shift and drag the mouse left or right. The brush will change in size as you scrub back and forth. This is great for when you need a precise size on the fly.
The brush menu is easily accessible by right-clicking on the canvas.
The hardness setting is available only for Photoshop’s round brushes. Setting the hardness as a percentage from 0 to 100 will feather the edges of the brush; 100% is a crisp edge, and 0% is a completely feathered edge from the center of the brush to the circumference. For broad alterations to this setting, use the keyboard shortcuts Shift + ] and Shift + [ to change the values in 25% increments, or you can hold Command + Option + Control and drag inside the canvas to change the values and see them take effect as you do it.
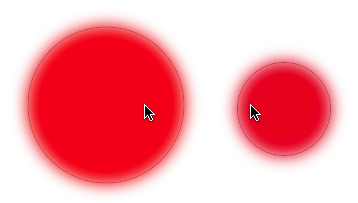
The on-canvas drag shortcuts make diameter and hardness adjustments simple and intuitive.
At the bottom of the panel is an assortment of brush presets, which gives you quick access to the brushes you use most. Some of the defaults are just simple shapes and textures, but others have been customized with advanced settings in the Brushes palette (F5). Photoshop has a number of brush libraries that can be added to the list using the panel’s fly-out menu, but you can also load and create custom brushes (see “Managing Presets” below).
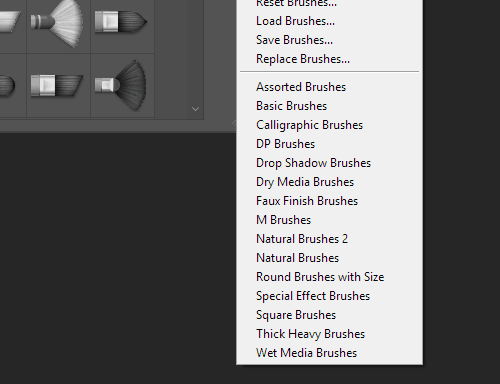
Photoshop provides a dozen additional brush libraries, which can be found in the brush menu’s fly-out.
Mode
The brush’s mode sets how painted pixels affect those already on the current layer. These modes work in the same way that Blend Modes work on the layer’s palette, except that they’re converted to absolute values when the stroke is finished. This is an important distinction to make: once you’ve painted using a blending mode, that mode cannot be altered after the fact as you would using blending modes on the layer’s palette.
Setting the mode (e.g. Normal to Multiply) changes how the paint affects the layer’s current pixels.
The brush tool also introduces two blending modes not found in the layer’s palette: “Behind” and “Clear.” The Behind setting allows you to paint only in the areas of the layer that are transparent; this can be helpful if you need to paint behind a subject and leave filled pixels intact. The Clear setting essentially turns the brush into an eraser; instead of adding paint to the layer, it removes it.
The Behind mode allows you to paint strictly in transparent areas. Clear mode essentially turns your brush into an eraser.
Opacity, Flow and Airbrush
These three settings work in unison to determine the amount of paint laid on the canvas. The opacity setting is the master control; it sets the maximum amount that can be painted with each stroke, mouse down to mouse up, regardless of any other setting.
Flow, on the other hand, sets the amount of paint applied to an area every time the brush moves. So, if your Flow setting is set to 20%, and you click one area of the layer, only 20% will be painted. However, if you move the mouse back and forth over an area with the same setting, the paint will build up incrementally by 20%.
Finally, the Airbrush setting allows you to build up paint based on time instead of movement; by simply holding the mouse down in one area, you can multiply the brush’s effect. You can quickly set the Opacity of a brush using the number keys (5 is 50%, 65 is 65%). By holding Shift while inputing the numbers, you can control the brush’s Fill setting. Note: if the Airbrush setting is on, these two shortcuts are reversed.

Opacity and Flow both control the brush’s transparency but are very different.
Advanced Settings
Within the Brushes palette (F5) are dozens of settings that control the way the brush paints, from shape and size to flow and scatter. Understanding how to use these options is the key to creating wonderful brushes.
Brush Presets
The Brush Presets menu lists all of the currently available brushes. While some of the presets simply change the shape of the brush, others have advanced settings.
The brushes in the Brush Presets list are not just brush shapes; some also have advanced settings.
Photoshop contains a number of brush libraries in addition to the defaults, which can be easily appended to the current list of presets. These presets are accessible in the fly-out menus located in the Brushes Palette and in the Brush drop-down menu in the toolbar. Photoshop provides a dozen or so libraries, including Calligraphic, Dry Media, Wet Media and Natural, but you can also load a custom library by choosing “Load Brushes…”
If you’ve created a brush that you would like to save as your own custom preset, you can do so by clicking the Create New Brush button at the bottom of the palette. This will add the brush to your preset menu; however, if the menu is reset, the brush will be lost. Luckily, Photoshop allows you to export a custom library so that you never lose your favorite brushes. Simply choose, “Save Brushes…” from the fly-out menu and you can export an .ABR file containing all of the brushes currently in the Brush Presets menu.
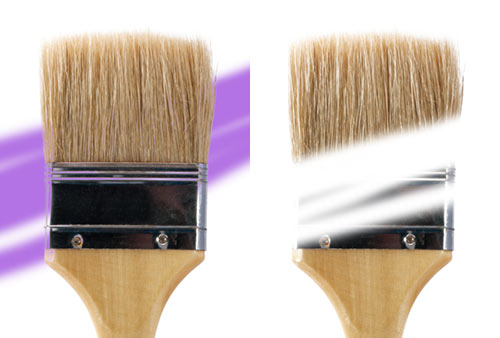
You can customize even further by creating your own custom brush shape. To do so, start by creating a selection of the area you’d like to create the brush sample from (or select the layer you’d like to use). Then, select Edit → Create Brush Preset… Name it and click “Okay.” A new brush preset will be added to the menu.
Creating a custom brush shape is the first step in creating a completely unique brush.
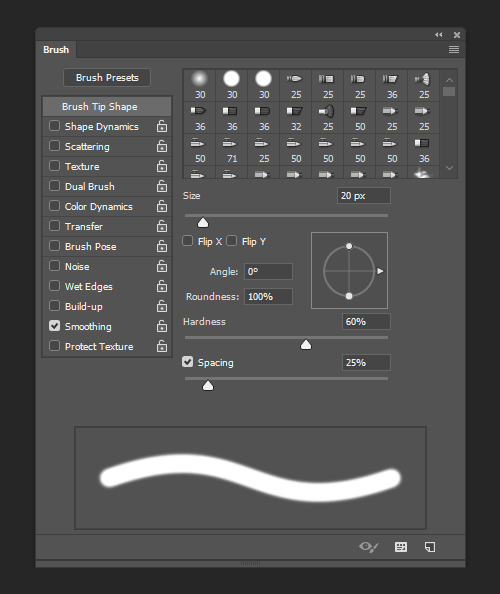
Brush Tip Shape
This group allows you to control the primary shape of the brush. Many of these settings, which are outlined above, are also found in the Brushes toolbar, but here we also have options for flipping, rotation, roundness and spacing. “Rotation,” “Flip X” and “Flip Y” modify how the brush is oriented. Setting Roundness to lower than 100% will squish the brush along its original x-axis; this can be used to easily create a calligraphic brush. Adobe realized that Roundness and Rotation may be hard to visualize and so has added a more intuitive way to work with these settings: simply drag the arrow and control points on the image to the right, and the values will be updated.
The Brush Tip Shape menu provides control of the primary shape of the brush.
Photoshop scales brushes by interpolating them up or down; no vector brushes are available. Therefore, some brushes may become gritty or pixelated if scaled too much. To quickly return a brush to its original size, click the Use Sample Size button.
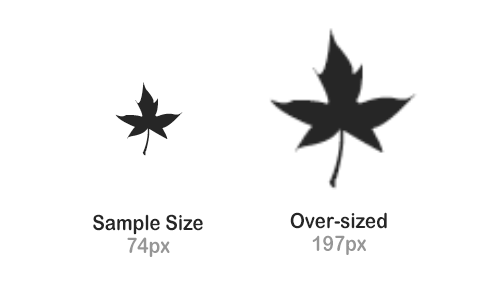
Over-sizing a brush can cause unwanted pixellation. This can be remedied with the Use Sample Size button.
The final setting in this group is Spacing, which determines how often the brush is sampled onto the layer. Lower values place the samples close together, and higher values space them out. Spacing not only changes the stroke’s appearance but can drastically affect Photoshop’s performance. Setting it to 1% can produce smoother edges, but a large or complex brush can seriously bog Photoshop down. If performance is an issue, keep this setting as high as you possibly can. Spacing can also be turned off using the checkbox next to its name. This causes the brush to sample with inconsistent spacing, based on the speed of your movements.
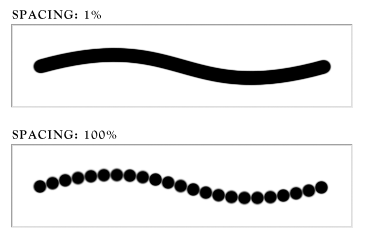
Spacing has a large effect on the smoothness of your brush but can also impact rendering speed.
Brush Control Methods
A number of the settings in the Brushes palette allow you to set a method for controlling values. They include “Off,” “Fade,” “Pen Pressure,” “Pen Tilt,” “Stylus Wheel,” “Rotation,” “Initial Direction” and “Direction.” Some of these settings require a tablet, such as a Wacom. If you don’t have a tablet or if the method is not available with your particular stylus, Photoshop will display an error icon to notify you.
Off
Control is completely negated with the Off setting, which means that values will remain consistent throughout the stroke of the brush.
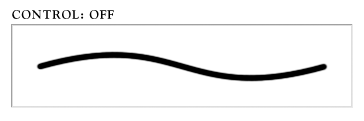
Without a control set, each sample of the brush remains consistent.
Fade
Using the Fade control allows you to specify the number of steps over which the setting will incrementally decrease until it reaches its minimum. So, by default, setting the Size control to Fade with 10 steps will cause the brush to decrease its size by 10% each step until the brush reaches 0. This can be used with the Size setting to effectively create individual strands of hair. While many of the settings allow you to specify the fade’s minimum percentage, others use a preset amount. For example, setting steps for the Angle Fade specifies how many steps will be used to rotate the brush 360°.
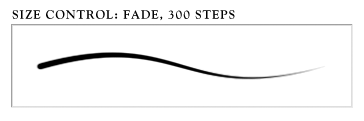
The Fade Control incrementally decreases values until the minimum is reached.
Pen Pressure
Pen Pressure is an extremely useful setting but requires a pressure-sensitive tablet device. It determines values based on how hard you press the pen to the pad. This makes for very intuitive painting especially when used on size and opacity settings.
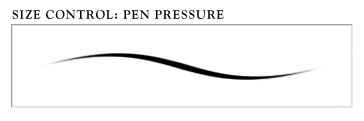
Pen Pressure requires a tablet device and determines values based on how hard the stylus is pressed to the pad.
Pen Tilt
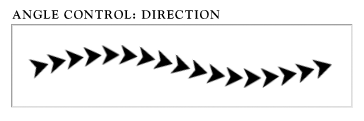
The Pen Tilt setting changes values based on the angle of the pen to the tablet. When the pen is perfectly perpendicular to the tablet, the variance is set to 0%. As you tilt the pen, the values increase. This setting is especially helpful for controlling the angle of the brush, because it also takes into consideration the direction in which the pen is pointing on the tablet. So, holding the pen at an angle and pointing it to the left side of the tablet will point the brush to the left.
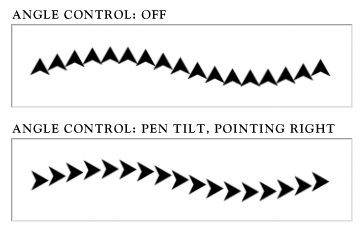
By setting the Angle Control to Pen Tilt, you can match the brush tip’s rotation to your hand’s rotation.
Stylus Wheel
If your stylus comes equipped with a Stylus Wheel, you can use it to control variance on the fly by rotating it. This may be helpful for quickly changing settings between strokes, but using to change values during a stroke is difficult.
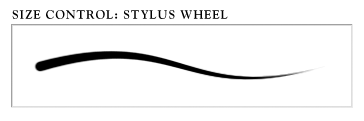
If your pen has a stylus wheel, you can use it to control values.
Rotation
This is another setting that requires a special type of stylus. If your stylus supports Rotation, you can simply rotate the stylus to control values. This is probably best used with the angle setting.
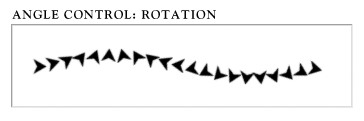
If your pen has a stylus wheel, you can use it to control values.
Initial Direction
When using the Initial Direction setting, the brush will not immediately start applying paint. Photoshop waits to see in which direction you move the brush and then rotates the brush based on the angle.
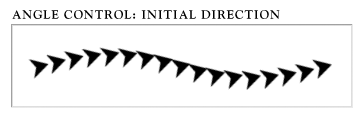
The first movement you make using the brush determines the angle when using the Initial Direction control.
Direction
The Direction setting can be particularly useful for painting something like grass along a contour, because it will rotate based on the direction that your brush has traveled since the last step.
The Direction control rotates your brush so that it naturally follows the curve of the stroke.
Shape Dynamics
Now that you have a basic shape and size set, you can add some variance using Shape Dynamics. Here you’ll see three different types of jitters, which control the amount of variation allowed for size, angle and roundness. Setting any of these options to above 0% will cause the brush to sample at random values within the range set by the percentage (e.g. setting the Angle Jitter to 50% will limit the brush’s rotation to 180°).
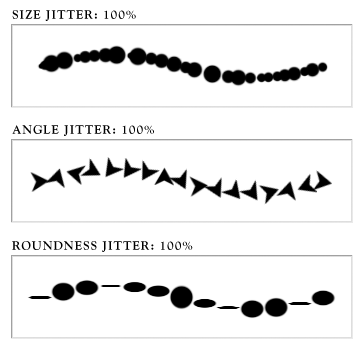
The Shape Dynamics’ jitter controls can be used to add some variation to the brush shape.
Scattering
The Scattering menu allows you to vary where each sample of the brush is placed and how many samples are placed per step. Three sliders are here for you to control: “Scatter,” “Count” and “Count Jitter.” The Scatter setting sets a percentage for how far off the origin the sample is allowed to travel. By default, this will control the variance only along the y-axis, but by clicking the “Both Axes” checkbox, you can set the same value for the x-axis.
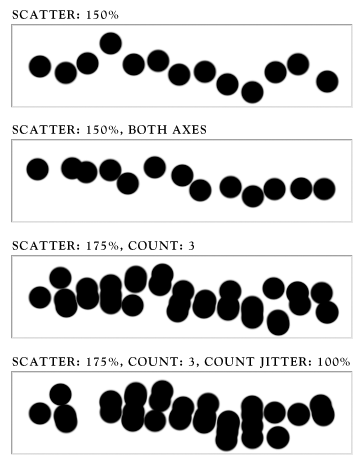
Scattering can add a lively randomness to a stroke.
Count and Count Jitter work together to determine how many samples are generated in every step. Count dictates the maximum number of samples allowed, while Count Jitter randomly chooses a number within that range to sample. If the Scatter setting is not set to above 0%, then the Count setting will place the brush on top of itself, which can create a “heavy” brush with jagged edges.
Texture
Adding a texture to your brush can give a wonderful sense of depth. Photoshop allows you to apply any of your Texture presets to your brush. You can then modify the Scale or Invert it. The Mode drop-down menu provides a list of blending modes that determine how the texture mixes with the current values of the brush. Although most of these blending modes look familiar, they function a little differently here. For example, you would think that setting the Mode to Multiply on a brush that is completely black wouldn’t have any effect. However, Photoshop compensates by reducing the original values of the brush so that the texture is visible.
At first, the Depth setting seems to work by setting the opacity of the texture. However, what it really does is ramp the values of the texture from their original grayscale values (at 100%) to completely white (0%). This allows for more dramatic results than simply reducing the texture’s opacity.
This menu also has a feature, called “Texture Each Tip,” that allows you to control the texture of every brush sample. Checking this option turns a couple of other sliders on, which set the Minimum Depth and Depth Jitter. Altering these values will cause each sample to have a random depth within the set range.
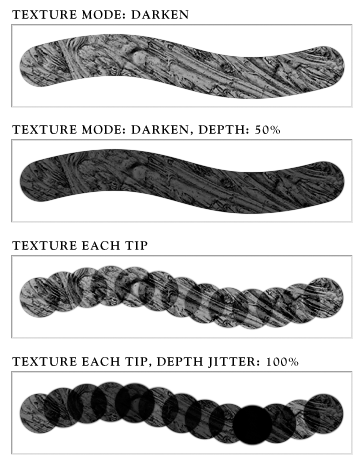
Using a texture adds tactility and depth to each stroke.
Dual Brush
Combining two brushes using the Dual Brush option opens the door to some fantastic effects that you could never have created using a single brush. As the name implies, this setting uses two different brush shapes to create the final sample. The primary brush is basically used as the mask that the dual brush is contained within. The Dual Brush menu has a few settings for the second brush, which work in the same manner as they do for the primary brush. The differences you set in Shape, Spacing, Scattering, Count and Mode make for a more dynamic and naturally random brush stroke.
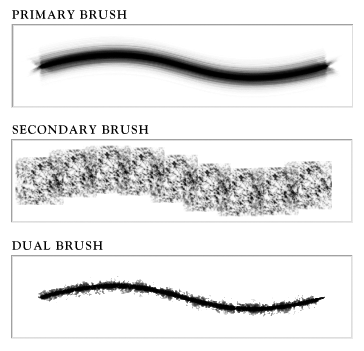
Combining brush shapes creates a unique effect that you couldn’t have achieved otherwise.
Color Dynamics
The Color Dynamics menu helps you interject some color variation into your brush strokes. You can control the colors by using the Foreground/Background Jitter, or you can allow Photoshop to randomly select values using the Hue, Saturation and Brightness Jitters.
The Foreground/Background Jitter controls how much of the background color is allowed to be sampled into the brush. Note that the background color is added to, not substituted for, the foreground color. This means that if your foreground color is red and your background color is blue, the intermediary samples will be a purple hue.
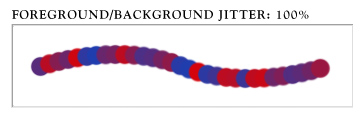
The Foreground/Background Jitter randomly blends two colors together.
The Hue, Saturation and Brightness Jitters determine the maximum amount of variance allowed based on the foreground color’s values for each. So, if your foreground color has a saturation or brightness value of 0, then your brush strokes will be completely grayscale. At the other extreme, setting a foreground color with 100% brightness and saturation will make every possible color available to use.
Hue, Saturation and Brightness Jitters can be used to add variation to the foreground color’s properties.
In addition to the Jitter settings is a Purity slider. This sets how pure the saturation is for each sample. If set to 0%, it does nothing; if moved to 100%, it limits the Saturation value for each sample to 100%. However, this should not be mistaken as an overriding setting for saturation; it sets only thresholds for it. So, setting it to -50% would ensure that saturation values never go above 50%, and a setting of -100% would completely remove all saturation.
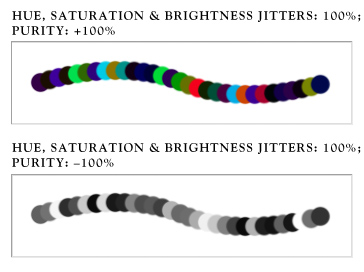
The Purity slider sets a threshold for each brush sample’s saturation level.
Other Dynamics
With the Other Dynamics menu, you can jitter and set controls for varying the brush’s opacity and flow. Both of these jitters depend on the brush’s current settings in the properties bar. They don’t allow the brush to gain opacity; they only determine how much lower it can go. The pen pressure control is an intuitive match for either of these settings.
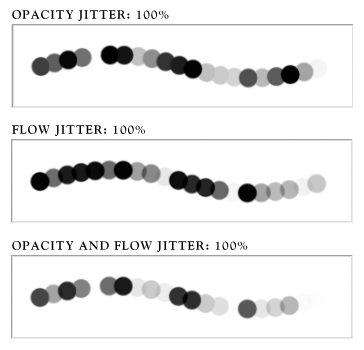
Opacity and Flow Jitters both change the transparency of each brush tip shape, but the Flow Jitter allows the samples to compound.
Other Settings
Noise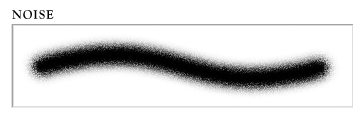 Generates random noise within the gray values of your brush shape.
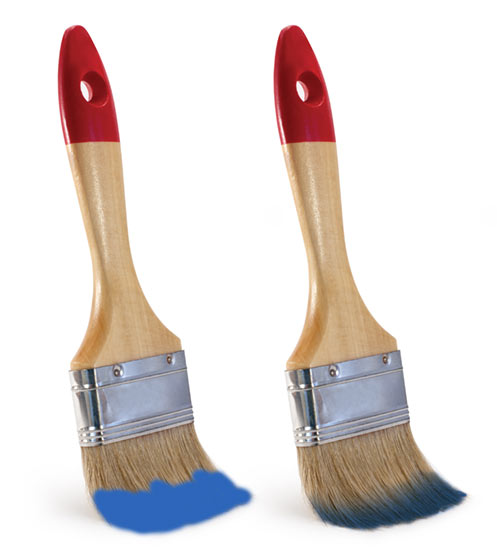
Wet Edges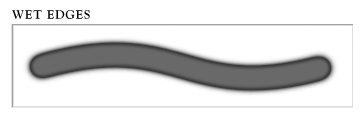 Decreases the interior values of your brush, while leaving the edges at full opacity. Doing so, the brush creates an effect similar to watercolor with its “wet edges.”
Airbrush Allows paint to build up incrementally based on the Flow setting and limited by the Opacity setting (see Opacity, Flow and Airbrush above).
Smoothing Smoothes the curves of the stroke to prevent polygonal curvatures. Turning this off may help if your brush is rendering slowly.
Protect Texture Ensures that the same texture is used for every brush with a texture.
Other Palette Options
Lock Setting Next to each menu name in the Brushes Palette is a padlock icon. These allow you to lock a setting so that when you switch to a different brush preset, the settings from that menu carry over to the new preset. This can be very helpful when you need a similar effect but don’t want to have to rebuild it with a new brush shape.
Resetting The Brushes Palette has two different ways to reset controls in its fly-out menu: “Clear Brush Controls” and “Reset All Locked Settings.” Clear Brush Controls will turn off all controls except for Smoothing but keeps the locked settings locked. Reset All Locked Settings also turns off all controls but will also unlock everything.
Painting Quick Tips
Learning the technical aspects of the digital brush is only the first step in becoming a master brush artist. It also requires a bit of talent mixed in with never-ending practice. Here are some quick tips to help you along the way.
Changing the Cursor
If you find that the normal cursor doesn’t suit your liking, you may want to change it. In Photoshop’s Preferences menu (Command + K) is a section called Cursors (Command + 5). Here you have the option to change the “Painting Cursor” from Normal Brush Tip to Standard, Precise or Full-Size Brush Tip. You can also create a hybrid cursor by using the Normal or Full-Size Brush Tip in conjunction with the “Show Crosshair in Brush Tip” option. Below the Paint Cursors section is an option for the Brush Preview color. This is the color that is displayed when modifying the brush shape with the on-canvas drag shortcuts: Control + Option + Drag to change the diameter, and Control + Option + Command + Drag to change the hardness.

Changing the cursor may help you gain better control of the brush.
Painting Straight Lines
Painting a freehand straight line is nearly impossible. Luckily, Photoshop has some features to help with this. By holding the Shift key while painting, your stroke will be constrained to 45° angles. Painting straight lines that aren’t locked to 45° angles is just as easy. Start by clicking once on the beginning point of the line. Move the cursor to the end point, hold Shift and then click. A perfectly straight line will have been drawn between the two points.
Clicking to start a line and then holding Shift and clicking at the end of a line will paint a perfectly straight line between the two points.
Painting Perfect Curves
Photoshop’s Paths palette allows you to stroke a path using the current brush’s settings. This can be extremely helpful if you have a tricky curve or complex shape to paint. First, set up your brush. Then, select the path you wish to stroke; and in the Paths palette, Option + Click the Stroke path with the brush button. This will present you with a dialog box that allows you to set the tool you want to stroke with. You can even use the Simulate Pressure button to activate any control methods you have set on your brush.
Stroking a path with your brush gives you perfect control over the stroke’s curvatures.
Other “Painting” Tools
Remember that the Brush Tool is not the only tool that uses brush settings. By customizing these other tools, you can create some very impressive effects. The other “Painting” tools include: Pencil, Eraser, Background Eraser, Clone Stamp, Pattern Stamp, Healing Brush, History Brush, Art History Brush, Smudge, Blur, Sharpen, Dodge, Burn, Sponge, Color Replacement and Quick Selection.
Keyboard Shortcuts Of The Photoshop Brush Tool
Tool Selection
- B: Brush tool
- Shift + B: Rotate through Brush tools (i.e. Brush, Pencil and Color Replacement tools)
- F5: Show or hide Brushes palette
Brush Settings
- [: Decrease brush diameter
- ]: Increase brush diameter
- Shift + [: Decrease brush hardness by 25%
- Shift + ]: Increase brush hardness by 25%
- Digit Combination (with airbrush off): Set the brush’s opacity
- Shift + Digit Combination (with airbrush off): Set the brush’s fill
- Digit Combination (with airbrush on): Set the brush’s fill
- Shift + Digit Combination (with airbrush on): Set the brush’s opacity
- Option + Shift + ‘+’: Next blending mode
- Option + Shift + ‘-’: Previous blending mode
- ,: Previous brush
- .: Next brush
- Shift + ,: First brush
- Shift + .: Last brush
- Caps Lock: Toggles between Precise and Normal cursors
- Control + Click (inside canvas): Bring up the quick brush menu
- Control + Shift + Click (inside canvas): Brush blending mode menu
- **Control + Option + Drag (inside canvas): Change the brush’s diameter**
- Control + Option + Command + Drag (inside canvas): Change the brush’s hardness
Painting
- Shift + Drag: Constrain the brush to 45°
- Click, move cursor, then Shift + Click: Draw a straight line from the first click to the second click
Helper Tools
- Option (hold): Temporarily switch to Eyedropper tool
- Shift + Option (hold): Temporarily switch to Color Sampler tool
- Command (hold): Temporarily switch to Move tool
- Command + Option (hold): Duplicate and Drag layer
- Space (hold): Temporarily switch to Hand tool


