Photoshop Secrets: Unknown Tricks and Time-Savers

Email Newsletter
Weekly tips on front-end & UX.
Trusted by 182,000+ folks.


 Custom Web Forms for Angular, React, & Vue. Your backend.

 Celebrating 10 million developers
We all have shortcuts that are essential to our daily workflow. A majority of them are staples such as Copy (Command + C) and Paste (Command + V), but occasionally we stumble upon a shortcut we wish we’d learned years ago.
Suddenly, this simple shortcut has streamlined our process and shaved quite a bit of time off our day.
Collected here are some lesser known but extremely useful shortcuts. Many of these are not documented in the “Keyboard Shortcuts” menu, and some of them don’t even have equivalent menu options.
Please note that all of the shortcuts listed below assume that you are using Photoshop CS4 on OS X. They will work on the Windows platform by converting as follows: Command → Control and Option → Alt.
Layers
Selection
Sifting through nests of layer sets to find the layer you need quickly becomes tiresome. Luckily, there are a number of ways to select layers more intuitively. Using the Move tool (V), you can Command + click on the canvas to select the uppermost layer with pixel data located directly below the mouse. If your layers are grouped within layer sets, this action may have selected the entire folder. You can change this behavior to select the actual layer by using the Auto-select drop-down in the Move tool’s property bar.

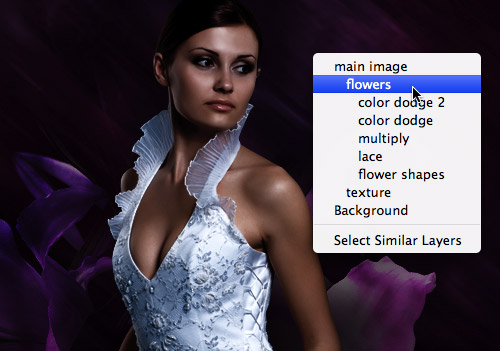
There will be times when you want to select a layer that is located below a number of other layers. By right-clicking with the Move tool, you’ll bring up a contextual menu containing a list of all layers located below the cursor. If your layers are properly named, you should be able to quickly select the layer you need. By holding Shift while using either of the selection methods above, you can select multiple layers. After selecting multiple layers, you can link the layers together by right-clicking and selecting Link Layers.
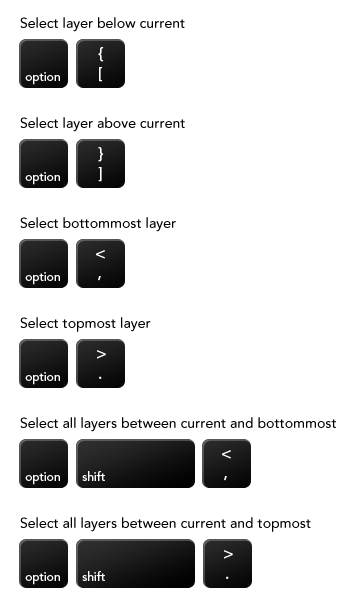
The keyboard can also be used to select layers. Pressing Option + [ or Option + ] selects the layer below or above the current layer, respectively. Pressing Option + < selects the bottommost layer, and Option + > selects the uppermost. Option + Shift + < selects all layers between the current layer and the bottommost layer, and Option + Shift + > selects all layers between the current and uppermost.
Sorting
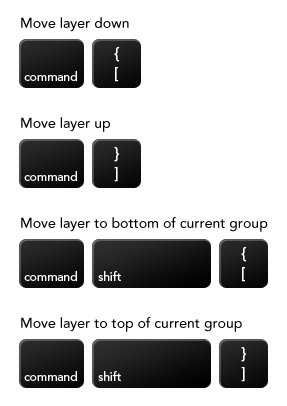
Sorting layers with the mouse can be clumsy and slow. A few shortcuts speeds up the organizing. Command + [ and Command + ] moves the selected layer up or down one position in the stack. If multiple layers are selected, they’ll move relative to the uppermost or bottommost layer. Pressing Command + Shift + [ or Command + Shift + ] brings the selected layer to the top or bottom of its current layer group. If the layer is already at the top or bottom of the layer group, it jumps to the top or bottom of the parent layer group.
Viewing
Option + clicking the eye icon of a layer is a commonly known way to hide or show all other layers. There is also a way to expand and collapse layer groups: by Command + clicking the arrow next to the layer group, you can close or expand all other layer groups; this does not work on nested layer groups. Alternatively, right-clicking the arrow gives you a menu to perform the same actions; but this will work on nested layer groups.
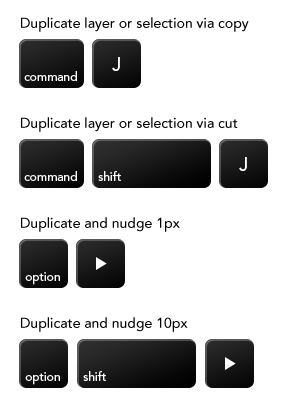
Duplicating
There are a number of ways to duplicate data from one layer to another. Duplicating an entire layer is as simple as pressing Command + J. If a selection is active, you can use the same shortcut (Command + J) to create a new layer based on the selected area of the original layer. Pressing <Command + Shift + J with a selection creates a new layer while cutting the data from the original layer. Holding Option while pressing one of the arrow keys allows you to duplicate the current layer and nudge it by 1 pixel. Holding Shift and Option nudges the new layer by 10 pixels.
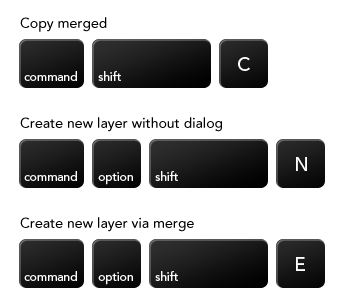
Duplicating data from multiple layers can also be done more quickly using some keyboard commands. Using Command + Shift + C with an active selection copies the data contained within it to the clipboard. You can then paste it to a new layer (Command + Option + Shift + N, Command + V). If you’d like to create a flattened copy of the entire document, use the shortcut Command + Option + Shift + E: a composite of all visible layers will be added as a new layer to the top of your layer stack.
Brushes
Shape and Size
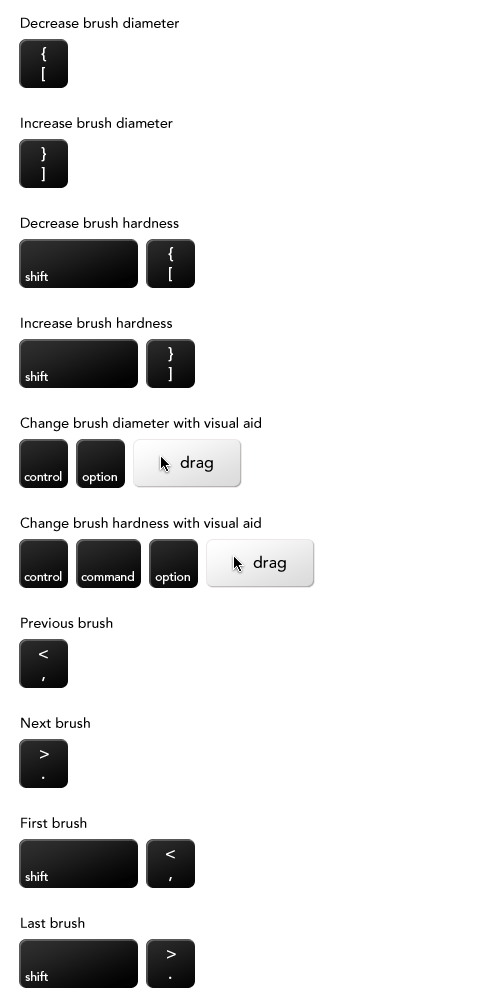
Being able to quickly adjust the brush tool is crucial to getting a swift workflow. Many know about using [ and ] to decrease and increase the brush’s diameter, as well as Shift + [ and Shift + ] to decrease and increase the brush’s hardness. However, CS4 introduced an even more intuitive way to do this. By holding Control + Option and dragging on the canvas, you can change the brush’s diameter with a visual aid. Control + Command + Option and dragging gives you control of the brush’s hardness.
If you would like to completely change the brush shape to a different preset, press < or > to cycle through them and Shift + < or Shift + > to select the first or last brush. Right-clicking inside the canvas also displays a condensed menu of brushes.
Opacity, Flow and Mode
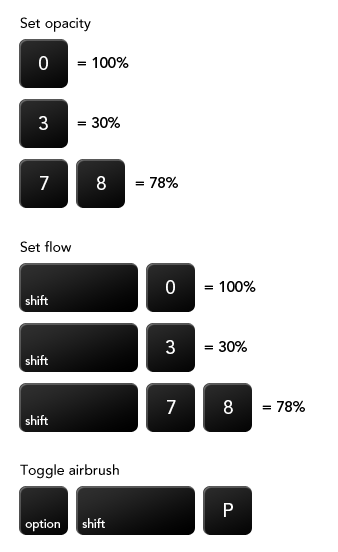
The opacity of the brush tool can be quickly tweaked using the number keys: 3 = 30%; 3 + 5 = 35%; 0 + 3 = 3%; 0 = 100%. Holding Shift when inputting the numbers sets the flow of the tool. Note that if Airbrush mode is on, these two shortcuts swap (i.e. holding Shift controls opacity instead of flow). You can toggle Airbrush mode on and off using Option + Shift + P. The same numeric input method can be used to determine the opacity of a layer when the Move tool (V) is active; pressing Shift allows you to alter the Fill of the layer.
Quick Fill
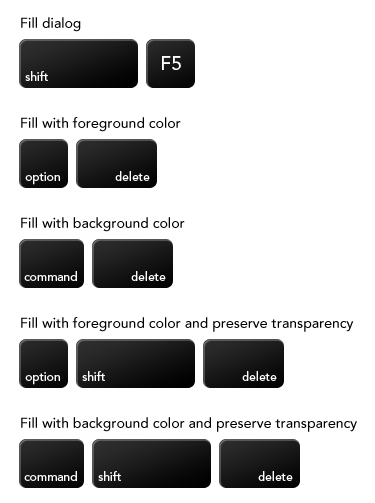
Instead of selecting the Fill tool (G), you can quickly bring up the Fill menu using Shift + F5. Even better, bypass the menu entirely using Option + Backspace to fill with the foreground color or Command + Backspace to fill with the background color. These keyboard commands can also be used to quickly set the color of a type or shape layer. To preserve transparency when filling, you could first lock the transparency of the layer by pressing / and then fill, but there’s an easier way. Pressing Option + Shift + Backspace or Command + Shift + Backspace fills with the foreground or background color while preserving transparency.

Blending Modes
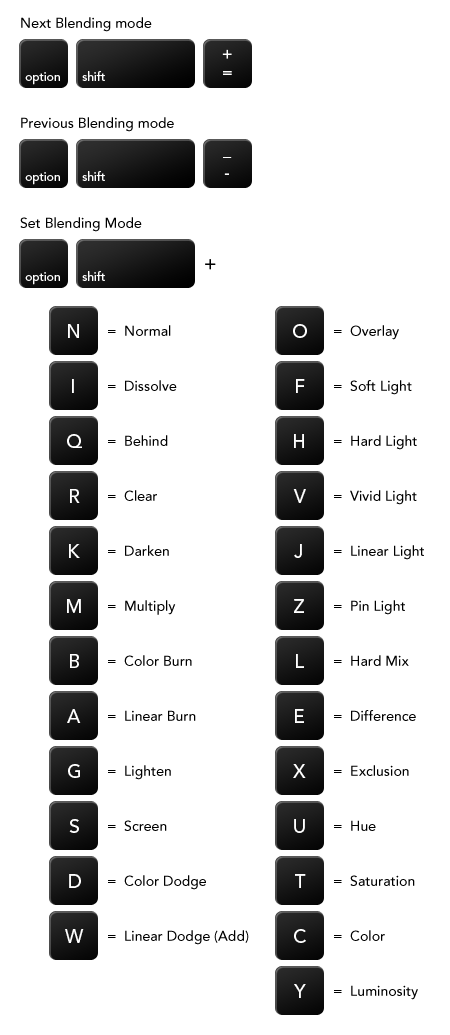
You can cycle through blending modes or jump to a specific one by using just the keyboard. By pressing Option + Shift + + or Option + Shift + -, you can cycle forward or backward through available modes. Alternatively, you can set a specific mode using the shortcuts below.
Variants
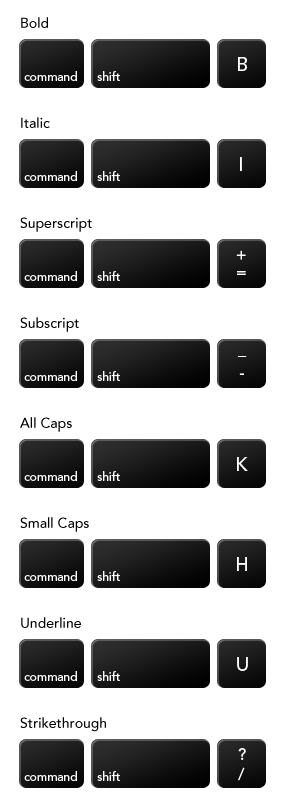
There are six shortcuts for changing the font variant, but they should be used with caution. If the appropriate variant or character does not exist within the currently selected font family, Photoshop creates a faux variant. These fake variants are frowned upon within the typosphere and are extremely easy to spot. So, if you use these shortcuts, make sure that Photoshop has selected an actual variant and not faked it. Now, onto the shortcuts:
Justification
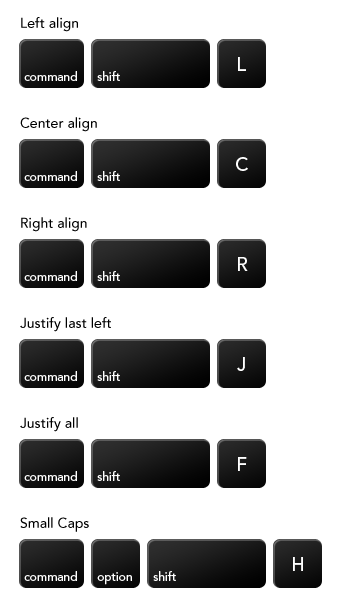
To set the justification, use one of the commands below. Note that a selection must be made within the target paragraph for these to work.
Spacing and Sizing
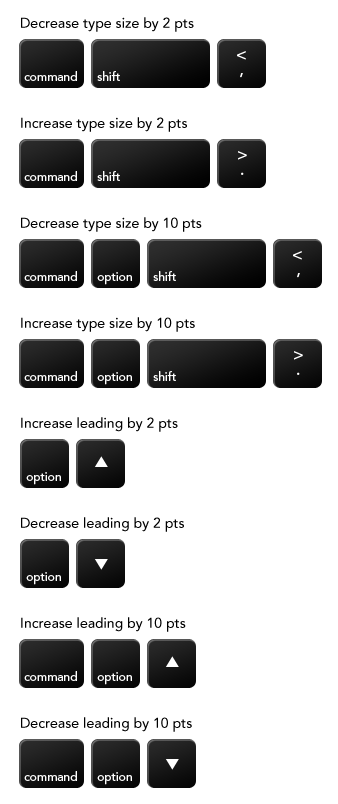
Properly sizing and spacing type is a tedious task, but Photoshop does provide some handy—albeit broad—shortcuts. Unfortunately, there is no way to fine-tune the increments by which they adjust. Note that these shortcuts will work only if a text selection is made; selecting a type layer is not enough. To change the type size by increments of 2, press either Command + Shift + < or >. To bump the increment up to 10 points, use Command + Option + Shift + < or >. Leading can also be modified by 2 or 10 point increments using Option + Up or Down arrow or by Command + Option + Up or Down arrow.
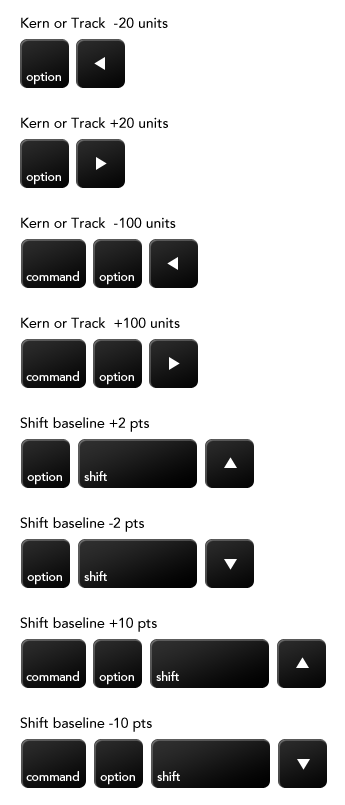
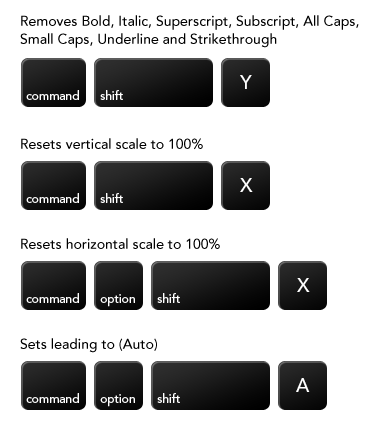
The arrow keys can also be used to adjust kerning and tracking. Pressing Option + Left or Right either kerns or tracks 20 units depending on whether or not a type selection is active (i.e. if the cursor is between two characters, kerning is applied; if multiple characters are selected, then tracking is adjusted). The increment can also be changed to 100 units using Command + Option + Left or Right arrow. Finally, the baseline can be shifted by 2 or 10 points using Option + Shift + Up or Down arrow or Command + Option + Shift + Up or Down arrow, respectively.
Resets
Sometimes, we have to return to the defaults. Below are some shortcuts to get you back on track.
Menus
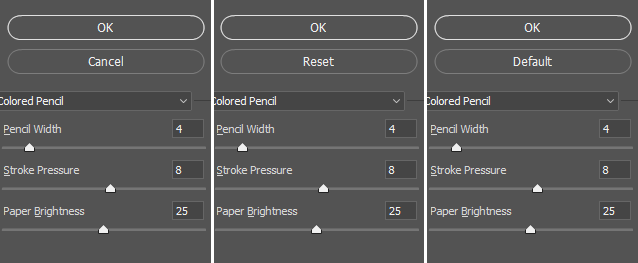
Hidden within many of Photoshop’s menus are a number of shortcuts that make adjustments faster and easier. Just about every menu—whether for Adjustment, Filter or anything else—allows you to revert to the original settings; by simply holding Option, the Cancel button will turn into a Reset button. Depending on the menu, holding Option might even change some of the other buttons (e.g. the Done button in the “Save for Web and Devices” menu will change to Remember). Certain menus, such as the Filter Gallery, also allow you to hold Command to turn the Cancel button into a Default button.
Spring-loaded Commands
By default, most menus transform the cursor into the Hand tool or Move tool. These tools can be used on the canvas while the menu is open to pan the document or to adjust settings, such as the Angle and Distance settings for a Drop Shadow. More tools, however, are available via spring-loaded shortcuts. The zoom tools can be accessed using either Command (to zoom in) and Option (to zoom out) or Command + Space (to zoom in) and Command + Option + Space (to zoom out). The hand tool can also be accessed by holding the space bar.
Adjustment Menus and Layers
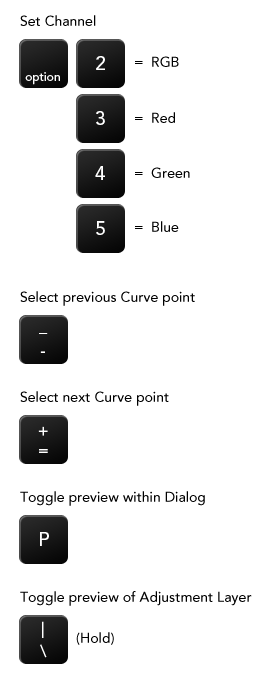
The Curves adjustment, like most other adjustments, contains some handy shortcuts. Similar to how you can cycle through the Channels in a document, you can cycle through the adjustment’s channels using Option + 2, 3, 4, 5, etc. You can also cycle through the points on the actual curves using - and =. With a point selected, you can nudge the points in increments of 2 in any direction using the arrow keys. Holding Shift in conjunction with the arrow keys moves the point by 16 units. When working with an adjustment menu, you can toggle the Preview option on and off by pressing P. Adjustment layers don’t have a Preview option, but you can temporarily disable it by pressing and holding .
Photoshop Secrets Summary
Hopefully, reading this has taught you a few new tricks and uncovered for you some of the more obscure options within Photoshop. While memorizing shortcuts can be a chore, integrating them into your daily workflow saves you an incredible amount of time. Do you have other obscure time-savers? Share your favorites in the comments!
Related Articles
- A Better Way To Design For Retina In Photoshop
- Introduction To Photoshop Scripting
- A-Z of Free Photoshop Plugins and Filters
- Photoshop Actions – The Ultimate Collection


