Design A Print-Ready Promotional Ad Using Photoshop and Illustrator

Email Newsletter
Weekly tips on front-end & UX.
Trusted by 182,000+ folks.


 Celebrating 10 million developers
 Custom Web Forms for Angular, React, & Vue. Your backend.
Today, we’ll look at what it’s like to develop print material in cooperation with a major marketing company for top-name brands and retailers using Adobe Photoshop and Illustrator. For anyone in the print industry, we’ll share methods and resources that you’ll hopefully find helpful. For others, this article will shed light on what it’s like to work for a design firm. You’ll gain in-depth insight not only into the methods of professional print designers but also into the marketing implications of their work.
You might be interested in the following related posts:
- Beautiful Photoshop Illustrations By Artists Around The World
- Photoshop Techniques And Professional Tutorials
- Urban Art Tutorial in Photoshop and Illustrator
The World Of Print Promotional Advertising
Though many newcomers to the design industry lean towards Web design, professional print design is still very much a viable alternative. Despite declining print sales of magazines and newspapers, print-based marketing (such as for in-store signage, direct-mail campaigns and free-standing inserts) doesn’t seem to be going anywhere soon. If anything, the industry is eager to hire talent from the next generation to bring much-needed fresh ideas and innovation to the table.
Shopper Marketing 101
The particular area of print design that we’ll be delving into today goes by several names: “shopper marketing,” “co-marketing,” etc. Whichever buzz term you prefer, what is basically meant is a kind of partnership between brands and retailers to better target customers across all fronts, both in-store and outside.
What this generally looks like is this: a given retailer, such as Wal-Mart, will partner with a given brand, such as Coke, to announce a sale, distribute a coupon, reveal a new product launch, etc. The practical and unfortunate implication of this partnership for you as a designer is that you now have two masters to please.
Every major brand name has a personality to go with it. A brand is typically made up of very specific messaging targeted to a specific audience, as well as a locked-in visual theme containing certain fonts, pre-built art, photography and packaged shots. Returning to the example above, Coke has one of the biggest brands on the planet and is very picky about how that brand is represented. Likewise, Wal-Mart is one of the biggest retailers on the planet, and no matter what the brand managers at Coke say, the Wal-Mart brand must also be presented in a very particular way.
As you can see, conflicts between the two are bound to arise in every area of the design. The job of a shopper marketing designer is to balance these often contradictory sets of rules and create something that pleases both parties.
The Job
Imagine you are sitting at your desk in the trendy office space of a marketing company in LA. A typical request will specify, among other things, the product to be featured, the retailer, the terms of the sale or offer and the print vendor. Today, you are given the following information:
- Product: OangeSoda brand 12 oz bottles, original flavor
- Retailer: BuyLots
- Offer: Save $1 on purchase of three (with coupon)
- Specs: Valassis full-page free-standing insert (FSI)
From this list, we can already glean several steps to get on our way. Let’s look at a few of these.
1. Obtain Resources
We will have to gather several resources before designing. In an ideal world, everything you need would be either located on a company server, to which you would be granted access, or already stored on your hard drive from recent jobs. However, this is not an ideal world, and you will rarely get everything so easily. Fortunately, there are a few places to go for help.
Product Shots
The Web’s best one-stop shop for free, high-resolution, manufacturer-approved product shots is Kwikee (from MultiAd). The website is the holy grail for print designers who work with notable brands, because it eliminates a ton of red tape in finding the right contact at an organization to obtain package shots.
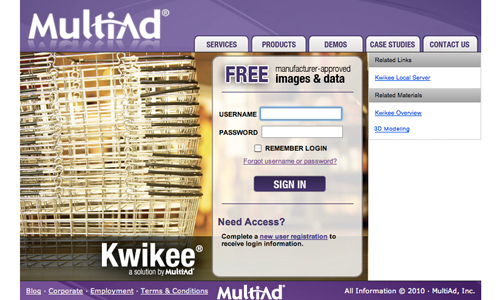
Kwikee, free product images.
The sign-up process is simple and free, so if you ever work with consumer brands, be sure to check it out. Finding the right product is as easy as using a search engine and selecting a file format to download (usually EPS or JPG). One of the best things about Kwikee is that its files not only are high resolution but contain clipping paths as well, saving you plenty of tedious Pen Tool time when you’re up against a deadline.
Logos
The story with logos is the same as that of product shots. Sometimes you’ll already have them; much of the time you won’t. While Kwikee has many logos to accompany its stockpile of product shots, the first place I turn to for logos is Brands of the World.
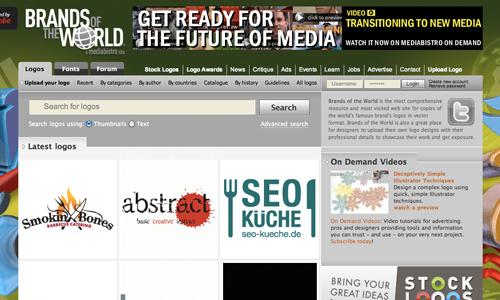
Brands of the World: free vector logos.
Just like Kwikee, Brands of the World is a simple search engine. All downloads are free and nearly always in vector EPS or AI format (although you have to jump through some annoying hoops to find the download links). The quality varies greatly because many of the logos are provided by users and therefore are not official artwork. For the most part, the artwork is useable, with little to no clean up needed; occasionally you’ll come across an item that needs so much repair that you’d be better off starting from scratch.
Ad Specs
The requirements above call for a Valassis full-page FSI. (Valassis is a popular distributor of these types of marketing material.) To obtain the specs for this ad, just stop by its website and locate the production templates.
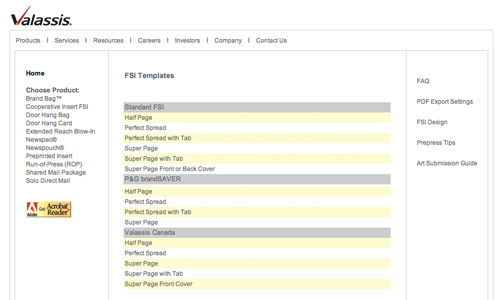
Page specs for Valassis, a popular advertising vendor.
In this case, we’re looking for the “Super Page” template. Clicking on this gives us the specs for the ad. We see from the resulting PDF that the trim size is 7” x 10.25”. The live area is 6.75” x 10”.
If you’re confused, the trim area is basically the ad size (i.e. what the paper will be trimmed to), and the live area is an invisible box inside which all of your art and text should stay to prevent them from getting too close to the edge. At this point, we could simply download and use the template, but we’ll build one from scratch instead.
Miscellaneous Brand Resources
Now that you’ve collected most of the things you need to get started, the only thing left to do is familiarize yourself with the brand you’ll be working on and obtain any necessary resources (spot colors, art, etc).
Many major brands have built a “brand bible” to aid designers through this process. This is usually a PDF or PowerPoint presentation that walks through the do’s and don’ts of working with the brand. If you don’t have this document, check out the brand’s website and/or get ahold of some recent ads to get a feel for how it markets itself.
For this project, the requirements for the “OangeSoda” brand are that the product shot must be the “hero” of the ad and placed on a black background. The messaging must be related to beverage’s ingredients and written in the approved OangeSoda font (which is ChunkFive). Similarly, the retailer’s requirements are that a store logo must be shown and that Helvetica must be used for all messaging and appear in the official BuyLots red (24, 100, 92, 20).
As you can see, we’re already looking at a potential conflict because both parties require their own font (the colors could also present complications). We’ll have to consider this as we design the ad and figure out a way to please both parties.
2. Lay Out The Ad
When you’re working with very specific rules, creating an ad is almost never as simple as opening Photoshop and getting started. The red tape and resource collection is a necessary part of the job and often overlooked. Now that we’ve completed these steps, we’re ready to start the ad-building process.
Customized Workflow
The workflow below has been heavily customized. While many advertising designers use InDesign for page layout, today we’ll use Illustrator. InDesign and Illustrator each has its pros and cons, and it comes down to preference and the specifics of the job.
InDesign would be a wise choice if you are designing something that has 10 or more pages. Working with multiple art boards and files in Illustrator can be more trouble than doing it in a simple multi-page InDesign document. Fortunately today, we’re building only a single-page ad, so Illustrator will be perfect.
Design professionals also tend to keep all of their resources as separate files, which they then place into the page layout document. For instance, they’ll have bottle.psd for the product, logo.eps for the retailer logo, background.psd for the background layer, etc. While this simplifies the layout process because all of the elements can be shuffled in a single application, it usually results in an Illustrator (or InDesign) file that is cluttered with externally linked files. When they send the job to a printer, someone has to manually locate and relink all of the separate files to ensure that everything is present.
Although this is the industry-standard way of doing things, it’s a bit sloppy. Today, we’ll take the high road and build one single Photoshop document, which we’ll place as a linked file in one Illustrator document. This will no doubt feel strange to designers who are used to the traditional way, but it keeps things far tidier and makes print vendors incredibly happy.
Build the Template in Illustrator
The ad requirements specify a trim size of 7” x 10.25” and a live area of 6.75” x 10”. Go into Illustrator and create a document with these specs.
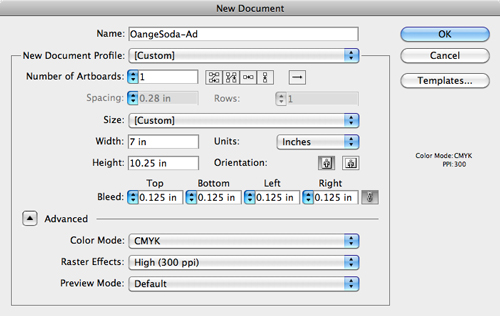
Create a 7” x 10.25” Illustrator document.
Notice that I’ve thrown in a 1/8th-inch bleed as well. Most of the time when building an FSI, a bleed is not necessary, but we’ll include one just to be thorough.
Now, go into the Layers palette and set up three layers: Text&Art, Guides and PSD. If you’re used to working with Photoshop, you might think that everything should be on its own layer. But that’s simply not a good way to work with vectors or page layout elements. Grouping everything onto only a few different layers makes organization easier to follow.
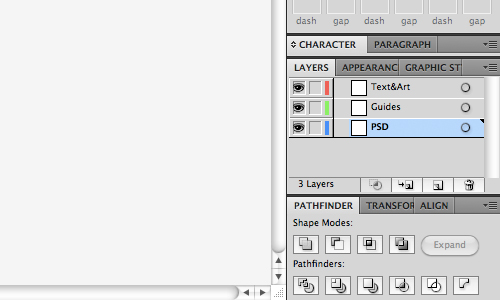
Create three layers.
With the Guides layer selected, grab the Rectangle Tool (M) and click once on the art board. Use the resulting dialog to create a box the size of our live area.
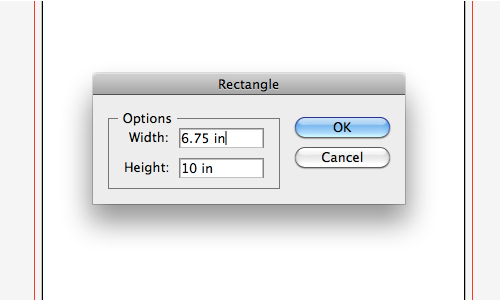
Make a rectangle for the live area.
Center this box on the page and convert it to a guide using ⌘ + 5 (Control + 5 on a PC).

Center the rectangle on the art board.
The final step in setting up the template is to create a little informational tag to serve as a reference for anyone who opens the file. Place this just outside the art board and bleed area.

Write a quick reference line with document specs.
Almost everything in here is self-explanatory. Include some basic information on the file, the trim size, the specs and the current date. The “4⁄0 CMYK” part tells the print vendor that the ad will be printed in CMYK and is single-sided (i.e. four colors on one side, zero on the other). Now save this file and open up Photoshop.
Create the Photoshop Template
Go into Photoshop and create a document that is big enough to accommodate the bleed. In this case, we’ll need a 7.25” x 10.5” canvas. Make sure you’re building at 300 DPI and in CMYK; both are standard in print (unless you’re printing in large format, in which case the DPI tends to be closer to 150).
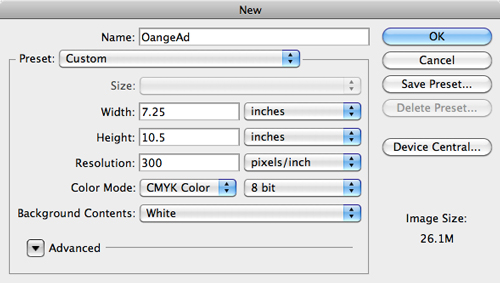
Create the PSD.
Set up some guides in Photoshop for the trim and live area to help you stay within the required space of your design. After you put the guides in place, fill the background with a rich black (e.g. 75, 68, 67, 90), and save the file.
Place the PSD in Illustrator
Now go back to Illustrator, select the PSD layer, and go to File → Place. Navigate to the folder where you put the PSD, and center it in the Illustrator art board. Make sure to add the file as a “link” so that it updates in Illustrator as we edit in Photoshop.
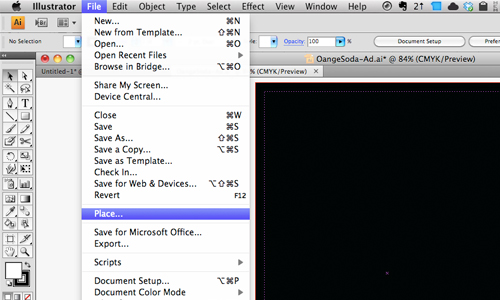
Place the PSD in the Illustrator file.
Illustrator vs. Photoshop
As you know, Photoshop is for raster artwork, while Illustrator is for vector. This will determine what we build in each program. We’ll use Illustrator for text and custom vectors, while keeping product shots in Photoshop.
Still, these clear lines will need to be crossed in a few places, particularly when our Photoshop art has to go over our vector art. In such cases, we’ll build the element in Illustrator and then import it into Photoshop as a Smart Object. This will make more sense later as we get into the design.
Create the Coupon Area
Next, in Illustrator, create a white rectangle that’s a little narrower than the live area and about 2.45” tall. Then add a dashed black stroke to the rectangle.
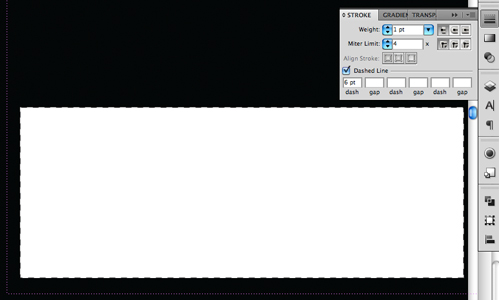
Create a dashed rectangle for the coupon.
A few elements are found in just about every manufacturer’s coupon. These include a bar code, legal copy and an expiration date. These are all very situation-specific and would be provided with the job information. For our purposes, we’ll throw in some placeholder elements there. Keep in mind that these elements have strict size restrictions. While they vary by company and brand, barcodes are usually not scaled down (bar code software creates them at the correct size), and legal copy is often set at 6 points or larger.
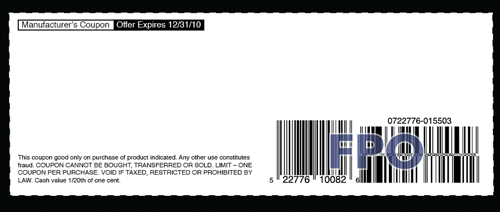
Arrange the standard coupon elements.
Next, we’ll go through the seemingly strange step of cutting and pasting that coupon box (just the box, not the other elements) into Photoshop. Try to position it in roughly the same spot so that your coupon elements align right. We’re doing this so that placing images on top later will be easier.
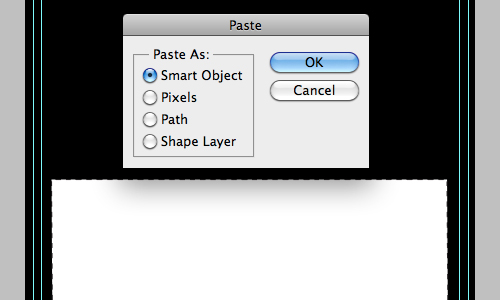
Paste the coupon box into Photoshop as a vector Smart Object.
Now, save the Photoshop job and jump back to Illustrator to make sure everything is aligned correctly. Again, this workflow might seem a little wonky at first, but in the end it’s quite orderly and makes good sense.
Add the Product Shot
Next on the to-do list is throwing your Kwikee product shot over the coupon. Remember that the ad specs require the product to be the hero, so it has to be as large as possible. Below, I’ve doctored a fake OangeSoda bottle from a Flickr image that I found.
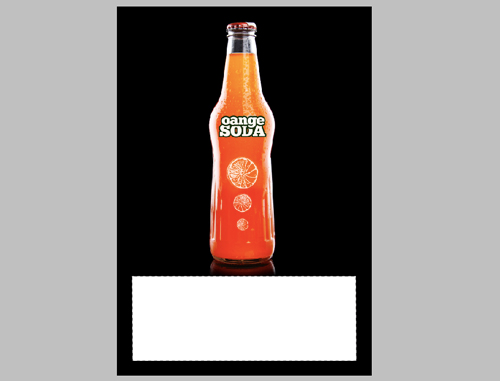
Notice that I’ve made the product quite large within the available space, while still giving it ample breathing room on all sides.
Add Some Flair
To visually emphasize the focus on natural ingredients, we’ll add some organic-looking graphics. To accomplish this, go into Illustrator and draw a small circle. Then grab the right-most point of the circle and drag it right a bit. Finally, convert it from a curve to a point, using the button in the menu shown below.
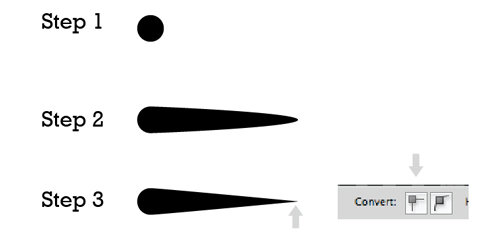
Create the shape above and drag it to the brushes palette.
Now, drag this little graphic to your brushes palette and then apply the settings below.
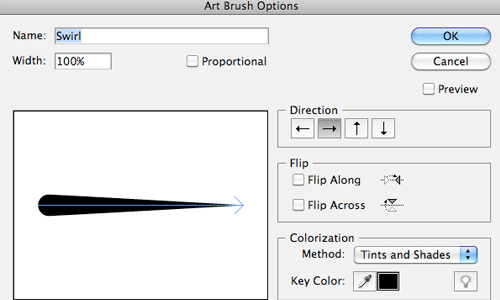
Create the shape above and drag it to the brushes palette.
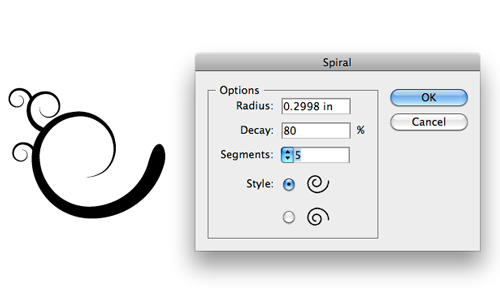
Finally, use the spiral tool in conjunction with the brush that you just made to make some curly vine shapes. Make a few of different sizes, expand the strokes, and connect them using the pathfinder (make a couple of variations). Granted, oranges grow on trees, not vines, but the point is to emphasize the beverage’s naturalness, so anything that could be branches or leaves will work.
Use these options for the brush.
Now go into Photoshop and place your swirly branches behind the bottle as smart objects. This retains the editable vector aspect while giving you the ability to layer it with Photoshop art. Use color overlays and inner shadows to give it the dark sinister look below.
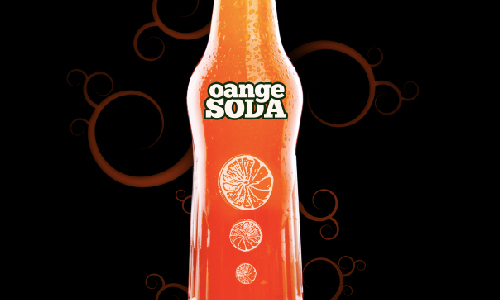
Place the branches behind the bottle and add layer effects.
3. Add Text
Almost there! Next, let’s go into Illustrator and add some text to our Text&Art layer. First, go to FontSquirrel and download ChunkFive, the font specified in the instructions.
To make both parties (the retailer and the OangeSoda brand) happy, we’ll apply each set of directions to the most appropriate part of the ad. For the coupon, we’ll use the BuyLots font, color and logo because this is where the retail aspect of the ad has the most focus. For the branding portion that we worked on above, we’ll stick to the OangeSoda font and colors.
Using the ChunkFive font, type some copy in the top-right and bottom-left of the bottle. Use size and color to differentiate keywords.
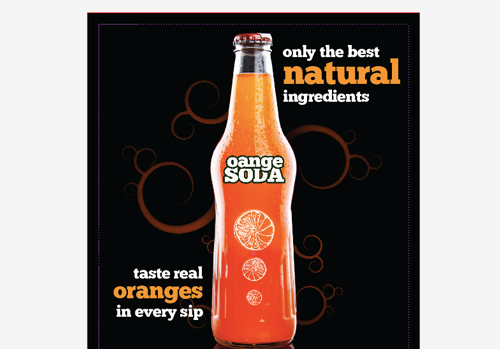
Place text at the top and bottom of the bottle.
Finally, add the terms of the offer and the retailer logo to the coupon (remember to use Helvetica and the BuyLots red).
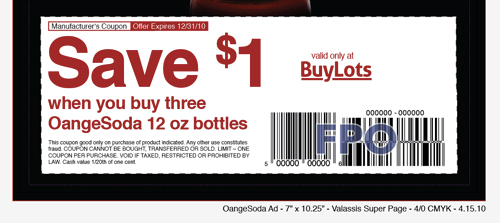
Add the terms of the offer and the retailer logo to the coupon.
Coupon Product Shots
To finish the coupon, go into Photoshop and duplicate the bottle image. Make the new bottle layer small and place it on the right side of the coupon, above the barcode area. Duplicate this layer twice. Because the offer is good only when you buy three bottles, showing three bottles will make for a quicker visual read of the coupon.
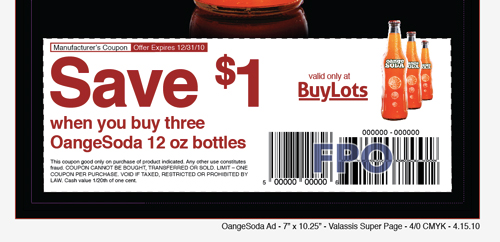
Finish the coupon with some product shots.
Save the Photoshop file and look at Illustrator for the final effect. Notice that I’ve intentionally intruded on the coupon space a bit. This is one of those circumstances where breaking a rule is okay if it is intentional and purposeful. Popping the bottles out of the coupon makes for a bit of a visual distraction that brings the eye down to the coupon.
Final Image
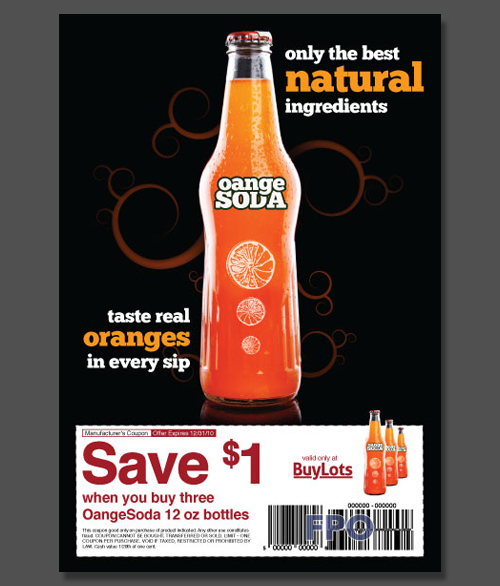
The final product.
With that, our design is finished! Below is a quick visual guide to what we did in Illustrator and what we did in Photoshop, and how we brought them together to create the result.
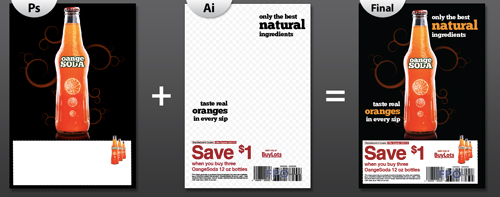
Illustrator vs. Photoshop elements.
The trick here is turning very specific and even conflicting instructions into something attractive and creative, and using only two files (plus fonts), which will be collected to be sent out.
4. Prepare For Launch
After the initial design, the artwork will be sent off as a JPG or PDF to various parties to be inspected for approval. After a few rounds of changes, the files will be ready to send to the printer. Printers commonly request files in one of two ways: as fully layered files or as a print-ready PDF. Let’s look at the easiest one first.
Print-Ready PDF
Many print vendors choose to forgo the complications of folders full of files and simply print from a high-resolution PDF. This is a wonderfully simple method that works just fine.
To make a print-ready PDF in Illustrator, go to the “Save As” dialog and choose PDF as the file type. Then hit “Save.” The next window that pops up will display various settings related to the quality of the PDF. Fortunately, Illustrator is built with a perfect print-ready PDF preset. Just select “Press Quality” from the drop-down menu at the top and save the file. This single PDF can now be sent to the printer all by itself, with no fonts, links or other external files.
Layered Files
As proof that Adobe doesn’t really believe that many designers use Illustrator for page layout, it has neglected to include a “Collect for Output” feature as you would find in InDesign. You could manually prepare all the files in a few minutes, but if you want a better solution and use a Mac, check out Art Files from Code-Line. This amazingly simple application allows you to just drag an AI file to the open window, and it automatically collects any related fonts and placed images.
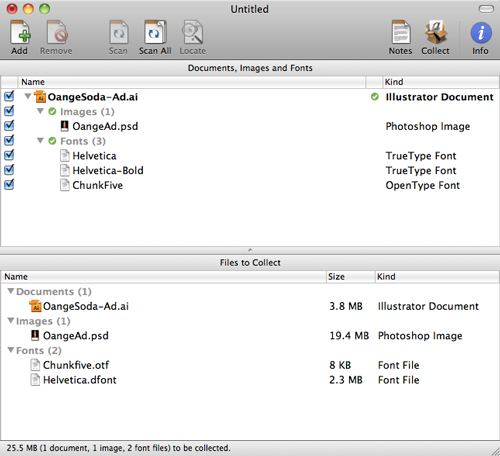
Art Files, the missing Illustrator “Collect for Output.”
Notice that the resulting collection is very basic. When the printer or another designer opens the ZIP file, they’ll see one Illustrator file, one Photoshop file and some font files. No clutter to speak of.
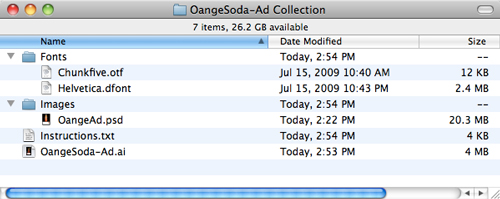
A simple, easy-to-grasp file hierarchy.
This is the same principle followed by website coders when they advocate for clean, organized code that is easily sortable by future maintainers. Print designers should apply this principle to their layering methods in both Photoshop and Illustrator (i.e. in naming and organizing all of the layers), as well as to the resulting file hierarchy. The simpler the system, the less time you’ll waste answering questions and trouble-shooting for anyone who wants to work on your files.
Conclusion
We’ve looked briefly at the world of print-based retail marketing. We saw that promotional print designers must deal with several complications beyond design, including resource gathering and working with multiple partners. Finally, we examined common print practices regarding ad layout, and we presented a unique method of integrating and organizing files using Photoshop and Illustrator synergistically. Hopefully now, you feel more confident creating your own print-ready promotional ad.
Finish the coupon with some product shots.
Save the Photoshop file and look at Illustrator for the final effect. Notice that I’ve intentionally intruded on the coupon space a bit. This is one of those circumstances where breaking a rule is okay if it is intentional and purposeful. Popping the bottles out of the coupon makes for a bit of a visual distraction that brings the eye down to the coupon.
Final Image
The final product.
With that, our design is finished! Below is a quick visual guide to what we did in Illustrator and what we did in Photoshop, and how we brought them together to create the result.
Illustrator vs. Photoshop elements.
The trick here is turning very specific and even conflicting instructions into something attractive and creative, and using only two files (plus fonts), which will be collected to be sent out.
4. Prepare For Launch
After the initial design, the artwork will be sent off as a JPG or PDF to various parties to be inspected for approval. After a few rounds of changes, the files will be ready to send to the printer. Printers commonly request files in one of two ways: as fully layered files or as a print-ready PDF. Let’s look at the easiest one first.
Print-Ready PDF
Many print vendors choose to forgo the complications of folders full of files and simply print from a high-resolution PDF. This is a wonderfully simple method that works just fine.
To make a print-ready PDF in Illustrator, go to the “Save As” dialog and choose PDF as the file type. Then hit “Save.” The next window that pops up will display various settings related to the quality of the PDF. Fortunately, Illustrator is built with a perfect print-ready PDF preset. Just select “Press Quality” from the drop-down menu at the top and save the file. This single PDF can now be sent to the printer all by itself, with no fonts, links or other external files.
Layered Files
As proof that Adobe doesn’t really believe that many designers use Illustrator for page layout, it has neglected to include a “Collect for Output” feature as you would find in InDesign. You could manually prepare all the files in a few minutes, but if you want a better solution and use a Mac, check out Art Files from Code-Line. This amazingly simple application allows you to just drag an AI file to the open window, and it automatically collects any related fonts and placed images.
Art Files, the missing Illustrator “Collect for Output.”
Notice that the resulting collection is very basic. When the printer or another designer opens the ZIP file, they’ll see one Illustrator file, one Photoshop file and some font files. No clutter to speak of.
A simple, easy-to-grasp file hierarchy.
This is the same principle followed by website coders when they advocate for clean, organized code that is easily sortable by future maintainers. Print designers should apply this principle to their layering methods in both Photoshop and Illustrator (i.e. in naming and organizing all of the layers), as well as to the resulting file hierarchy. The simpler the system, the less time you’ll waste answering questions and trouble-shooting for anyone who wants to work on your files.
Conclusion
We’ve looked briefly at the world of print-based retail marketing. We saw that promotional print designers must deal with several complications beyond design, including resource gathering and working with multiple partners. Finally, we examined common print practices regarding ad layout, and we presented a unique method of integrating and organizing files using Photoshop and Illustrator synergistically. Hopefully now, you feel more confident creating your own print-ready promotional ad.
Helpful Resources
- MultiAd Kwikee
- Brands of the World
- FontSquirrel
- Art Files (Mac-only)


