Illustrator’s Live Trace: Sketch To Vector

Email Newsletter
Weekly tips on front-end & UX.
Trusted by 182,000+ folks.


 Celebrating 10 million developers
 Custom Web Forms for Angular, React, & Vue. Your backend.
Live Trace was introduced in Adobe Illustrator CS2 but is still a powerful tool available in Illustrator CS5. This process really gives an artist the freedom to digitally experiment with drawings of any kind. The vector art it produces can be used in numerous ways and is easily customized.
Further Reading on SmashingMag:
- Pen Tool Vs. Live Trace: The Big Comparison
- Things You Didn’t Know Your Doodles Could Accomplish
- I Draw Pictures All Day
- 40 Excellent Adobe Illustrator Tutorials
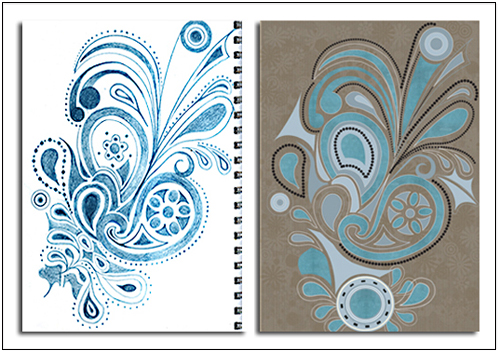
My motivation for trying this was originally to make a “growing vine”-type animation in Adobe After Effects. I will show a link to the resulting animation at the end of this tutorial, but for now, let’s get started.
Scan And Clean Up
Scan your sketch and bring the image into Adobe Photoshop. Make sure that the image is Grayscale (Image → Mode → Grayscale). Begin by adjusting the image using Image → Adjust → Brightness/Contrast → Levels (Cmd/Ctrl + L) and/or Curves (Cmd/Ctrl + M) to improve upon the sharpness and contrast if needed. Clean the image using the Eraser Tool (E), trying to get the white areas as clean as possible. Paint the black areas, and alter or redesign any shapes so you are happy with the overall design.
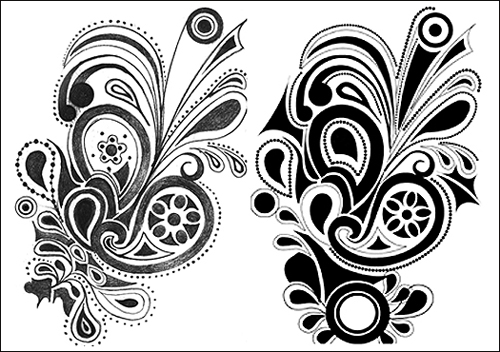
Cleaning up the image is important for getting a good trace in Illustrator. There are a number of techniques that help get rid of unwanted specks and imperfections, here’s the method I used:
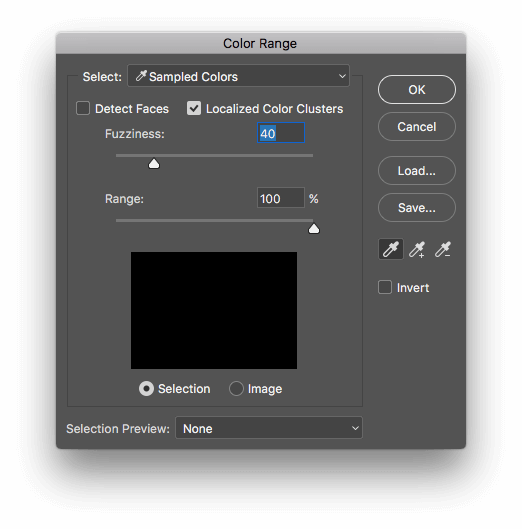
Go to Select → Color Range:
- Sample Colors: Select from drop-down.
- Localized Color Clusters: Leave this deselected in the beginning.
- Fuzziness: Play with this setting to get the edges less, or more, sharp.
- Selection Preview: Select None.
- Invert: Choose this if you would rather preview selected pixels as black instead of white.
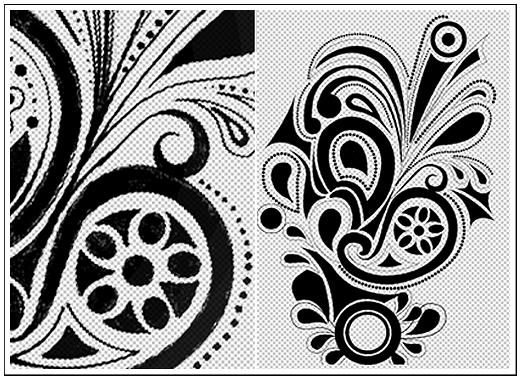
Use the Eyedropper Tool to click on your image and to sample the colors you want included. Because we chose the Selection preview (and Invert is not selected), you will see the selected pixels as white, so white = selected. Using the Eyedropper Tool, zoom into your main drawing (Cmd/Ctrl + Scroll) so you can see the pixels you are selecting. View the results on the Color Range preview.
- Add to Sample and Subtract from Sample: Use these Eyedropper Tools (to the right of the main Eyedropper Tool) to select or take away from the preview image.
If you have trouble areas, you can select the Localized Color Clusters box and this will help add or take away from localized areas (not the whole image). When you are happy with the selection, click OK; you should now see dancing ants. Make a new layer and click on that empty layer. Go to Edit → Fill (Shift + F5) and fill with black.
Turn off your previous layer. The result should be a much cleaner version of your image. It may take a few experimental tries, since every drawing is different. When you are done, save the image as a .PSD file (this is important for editing it later in Illustrator).
Lastly, take the Eraser Tool (E) and separate parts of the image that run together, isolating each component image or shape that you want separated. An alternative is to select small shapes with the Magic Wand Tool (W) and add a 2-4 pixel white stroke (Edit > Stroke) to slightly separate shapes. This is to avoid having large groups of your drawing connected with anchor points when it is converted to vectors. There are methods to cut and separate these areas later (which will be explained), but it’s a good idea to try to achieve this early-on.
Tracing In Illustrator
Open a document in Illustrator and place your clean PSD image. Click on the image to select. Click the small box to the right of the Live Trace button called Tracing Presets and Options and scroll down to Tracing Options.
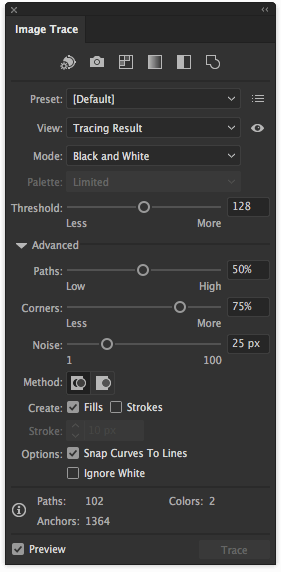
The Tracing Options dialogue box will open. There are many preset selections to choose from but we’re going to use our own settings to get the best possible trace:
- Check Preview: Now you can see the effects live as you change the settings.
- Check Ignore White: Now the white background is not present.
- Set the Mode: Select Black and White. Leave Raster set to No Image and Vector set to Tracing Results, and check Fills.
Since you can see the results live, it helps to play with the settings a bit to get used to what effect they have. The way to think of the settings is that the left side (Adjustments) resembles Photoshop, and is conditioning the raster image before it is traced; the right side (Trace Settings) resembles Illustrator, and is taking the conditioned rasterized image and converting it to paths. Let’s look at what the most relevant settings do.
- Threshold: This value determines which pixels are white and which are black. Any pixels lighter than the Threshold value are turned white and all pixels darker will become black. For instance, making the threshold higher means that more of the darker pixels will be included in the vector shape.
- Blur: This blurs the original image before its traced, which helps smooth out jagged edges.
- Resample: This may come as a surprise to some, but with Live Trace, a higher resolution doesn’t necessarily translate to a better traced result. In many cases, a high-resolution file can add unwanted complexity to a traced file. So play with this feature to see if your image might do better using a lower resolution.
- Path Fitting: The lower the number/setting, the tighter the image will be traced. If it’s too low you could get a jaggy effect. The higher the number/setting, the smoother the effect, but you lose detail.
- Minimum Area: Defines the minimum area that will be traced, which helps get rid of the imperfections or “dirty” areas you don’t want to capture. This setting determines the pixel minimum area, so anything smaller won’t be traced.
- Corner Angle: Sets the sharpness of the corner angles. The lower the number/setting, the sharper the corners.
When you are happy with the settings, be sure to first Save Preset. This is on the right of the Tracing Options dialogue box and will come in very handy if you need to make some other changes before tracing again. Once you’ve saved, hit Trace. You will then need to hit the Expand button or Object → Live Trace → Expand to see the actual results.
Edit And Tweak The Results
Separate Grouped Vector Objects
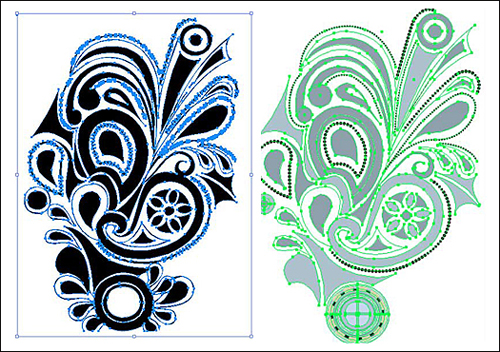
Be sure to Ungroup (Shift + Cmd/Ctrl + G) (Object > Ungroup) as many times as necessary to make sure everything is ungrouped.
In the above images you can see that I did some editing to my original trace. Some shapes were unwittingly grouped together, despite my efforts in Photoshop to keep them separate. Luckily, should this happen, there are a few easy solutions.
Revise the Original Image:
It is easy to go back and quickly edit your image in Photoshop with a click of a button. The Undo (Cmd/Ctrl + Z) command will need to be applied until you return to the raster image (hence saving the preset, so we can use it again here):
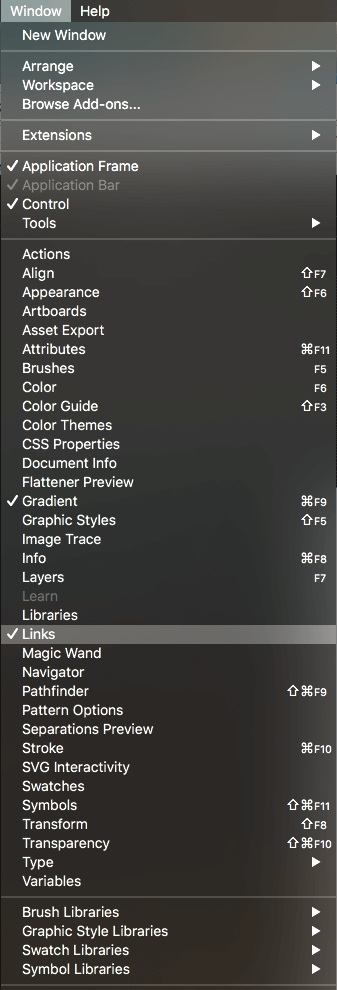
Go to the Links panel (Window > Links) and click on the little pencil icon in the lower right corner. It can now be instantly edited in Photoshop. When the editing is done, close the window and when prompted, choose to update/save the changes in Illustrator. You can now use your preset to re-apply the trace in Illustrator.
Use the Knife Tool:
Another solution is to simply use the Knife Tool (pictured above, it is part of the Eraser group on the tool bar) to cut grouped anchor points apart. It helps to View Outlines (Cmd/Ctrl+Y). You can also hold down Alt to have the knife tool cut a straight line. Zoom in by scrolling while holding Cmd/Ctrl. The Delete Anchor Point Tool (Pen Tool + minus sign) is another tool for deleting anchor points and separating grouped objects.

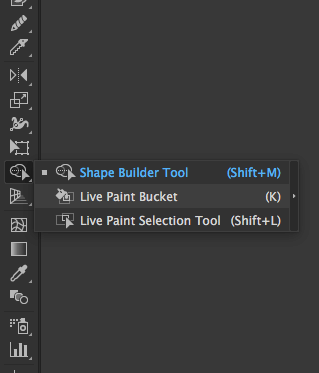
Live Paint (see “Inspirational Suggestions” section below):
This feature doesn’t actually alter any of the vector groupings; instead it allows the coloring and texturing of any lines or shapes, regardless of how they are grouped.
Reduce the Number of Anchor Points
Live Trace tends to produce an extraneous amount of anchor points in some places. To get rid of some of these we can use the Smooth Tool (pictured in the above image). Click and drag to simplify and reduce the anchor points and to smooth curves.
Touch-Ups
If some shapes did not trace properly (as with the circles in the example below), they can quickly be redrawn. It’s helpful to lock down the original raster art on the background at around 20% opacity.

Animated Illustration
Design Techniques
At this point you can alter, delete or add to your vector design as you creatively see fit. I experimented with patterns, textures and backgrounds. The main thing is that you now have your art in vector form and can easily alter it in many creative ways. Here are a few brief suggestions for techniques that are useful:
Adobe Kuler
An extension handy for anyone using Illustrator, Adobe Kuler puts a pallet of suggested and popular color combinations that can be added to the swatches panel. This tutorial shows a way to create and load your own Kuler swatches from the Kuler website to your Illustrator library. Another great informational video tutorial: Learn CS4 Design Premium: Using Kuler Color Themes.
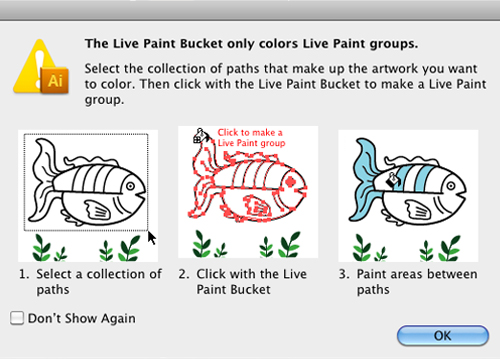
Live Paint
Live Paint deserves a tutorial of its own, as there are many features; a quick mention is worth it here, because Live Paint can easily fill in shapes without having to alter the vector groupings:
Select your artwork and go to the Object menu. Select Live Paint > Make. Select the Live Paint Bucket (K) and fill the cells with the desired colors.
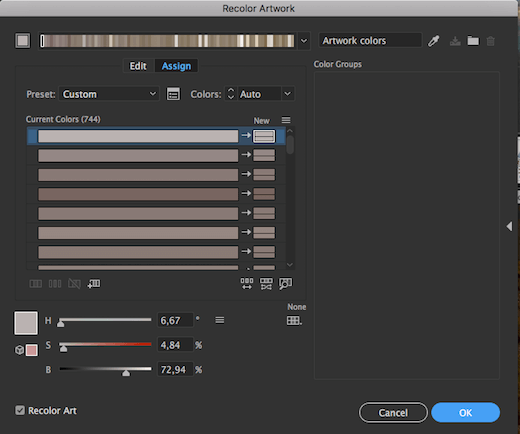
Recolor Artwork
Great for playing with color combinations. This feature takes the existing colors and provides complimentary color options which can be viewed instantly. To open the palette, select your artwork and click the little colorful circular button on the top menu, or choose Edit > Edit Colors > Recolor Artwork. This is pretty intuitive to use, but here is a great tutorial from Mordy Golding if you’re interested in an in-depth look.
Credits, Links And Resources
- Fridays with Mordy I’ve seen Mordy Golding pop up, over and over again, in video tutorials about Illustrator. He has a great deal of valuable information. This link takes you directly to his “Fridays with Mordy: Live Trace in Illustrator” podcast.
- Lynda.com This website has many useful video tutorials, including ones on the Live Trace feature. Access them by subscription, or by signing up for their 7-day free trial.
- Tweak to Get the Perfect Trace From the Adobe website, this gives an in-depth explanation of all the options in the Trace Settings feature.
- Live Trace Tricks in Adobe Illustrator This video tutorial from Layers Magazine is more about using Live Trace for color photographs, but I thought I’d include it since it’s a nice variation and describes the Live Paint Bucket feature very well.
This is a nice, simple tutorial for adding textures.


