Pixel Perfection When Rotating, Pasting And Nudging In Photoshop

Email Newsletter
Weekly tips on front-end & UX.
Trusted by 200,000+ folks.


When creating Web and app interfaces, most designers slave over every single pixel, making sure it’s got exactly the right color, texture and position. If you’re not careful, though, some common functions like moving, rotating and pasting can undo your hard work, resulting in a blurry mess. But with some small changes to your workflow, you should be able to maintain the highest-quality artwork from the start to the end of the project.
Pixel-Perfect Rotation
If you’re not careful, rotating layers in Photoshop can damage them in a very noticeable, pixel-mashing way.
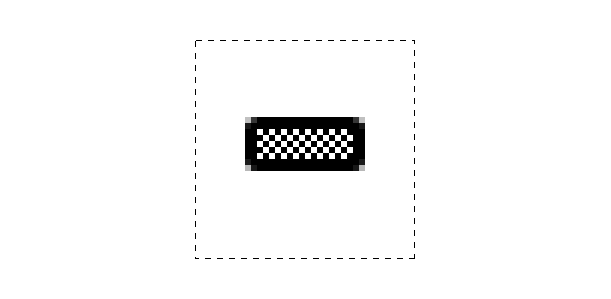
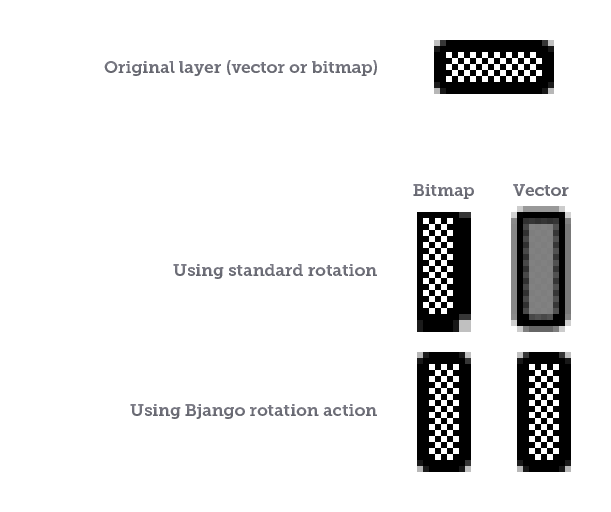
When rotating layers with Free Transform (and some other tools) to exactly 90 or 270°, the quality of the outcome is determined by the layer’s size. If the layer is of an even width and even height, then you’ll be fine. If it’s of an odd width and odd height, you’ll also be okay. But if they’re of an odd width by even height or even width by odd height, then you’ll see something like the result below:
In this case, the artwork is 20 × 9 pixels: even-by-odd dimensions. The results for bitmap layers and vector layers are different, but they both produce unusable results because the origin of rotation doesn’t fall on an exact pixel boundary.
A Fix
Because even-by-odd or odd-by-even dimensions are the problem, we need a way to ensure that the contents of the layer are odd-by-odd or even-by-even. Probably any method you can think of will solve this problem, be it adding a square bitmap mask to a layer or adding more content to the layer that you’re rotating. You could also draw a square on another layer and rotate both at once.
As long as the dimensions for the layer or layers are even-by-even or odd-by-odd, it’ll be fine.
An Easier Fix
Changing the origin of rotation to the top left (or any other corner) will ensure it is on a pixel boundary, guaranteeing perfect results every time. To do this, click on a corner origin after selecting the Free Transform tool, but before rotating. This works brilliantly and is the simplest solution yet.
Bitmap and vector masks are affected by this issue as well, so please take care. But the issue affects only rotated layers, either via “Free Transform” or “Transform” under the Edit menu. Rotating the entire canvas via Image → Image Rotation has no problem.
To make things even easier, I’ve created some Photoshop Actions and Workflows that take care of everything for you.
Pixel-Perfect Vector Pasting
If you’ve drawn pixel-snapped artwork in Illustrator and pasted it into Photoshop as a shape layer, you may have noticed that the result is not quite what you expect (i.e. a perfectly sharp image), but rather a blurry mess. Here’s how to fix that.
Below is some artwork as it appears in Illustrator: perfectly formed, snapped to the pixel grid, and at the size we intend to use it in Photoshop.
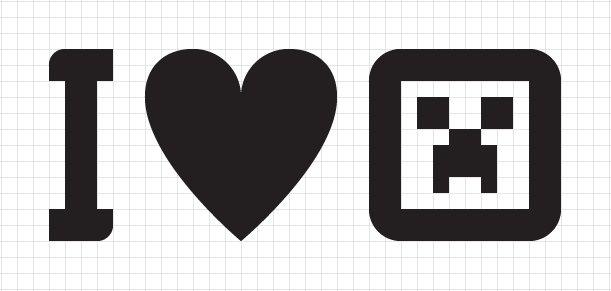
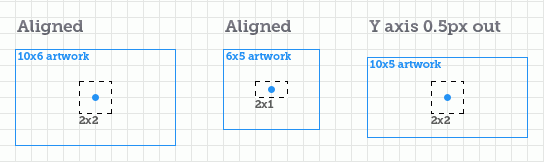
Below are the same paths pasted into Photoshop a few times. Notice how only the top-left version is sharp, while the others are half a pixel out on the x axis, y axis or both.
What Went Wrong?
Photoshop’s pasting behavior works in one of two ways. If you’ve made a selection, then the clipboard’s contents are pasted so that the center of the clipboard is aligned with the center of the selection. If a selection hasn’t been made, then the contents are pasted so that the center of the clipboard aligns with the center of your current view. The level you’re zoomed into and the portion of the document you’re viewing determines the result.
A Fix
Our test artwork is 32 pixels wide by 12 pixels high. Drawing a 32 × 12 marquee selection in Photoshop forces the artwork to land exactly where we want it and to be pixel-aligned. This works every single time.
An Easier Fix
The marquee doesn’t have to be the exact size of your artwork, though. In our case, a 2 × 2-pixel selection would work just as well, because the center of an even-width-and-height marquee selection and the center of even-width-and-height clipboard contents would fall exactly on a pixel boundary, which is what we want. If the artwork was an odd width and height, then a 1 × 1 selection would have been required.
If you couldn’t be bothered noting your artwork’s dimensions, then by drawing an appropriately sized marquee, you can draw a 2 × 2-pixel selection and paste. If the image is blurry on the x axis only, make the selection 1 × 2 and paste again. If the image is blurry on the y axis only, make the selection 2 × 1 and paste again. If the image is blurry on both axes, make the selection 1 × 1 and paste again.
It may sound complex, but in practice it’s very quick; you’ll only ever have to paste twice to get sharp vector paths from Illustrator.
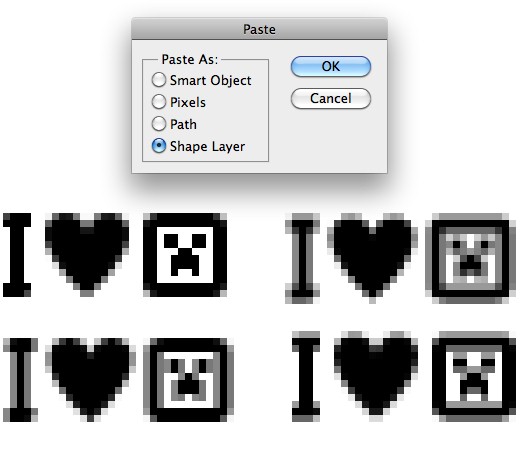
Smart Objects
Pasting elements as smart objects doesn’t come with the same issue (at least not in Photoshop CS5 anyway). I like to use Shape layers, though: they allow more control and editability and have better anti-aliasing.
Pixel-Perfect Vector Nudging
When nudging vector points, Photoshop exhibits some strange behavior, related to how far you’re zoomed in. At 100%, nudging with the arrow keys will move your vector point exactly 1 pixel. At 200%, nudging moves the point by half a pixel. At 300%, it moves by a third of a pixel.
The behavior seems intentional, but it’s not usually what I’m after. Most of the time, I want to nudge in whole pixel increments. Here’s how you can do that, without zooming out to 100%.
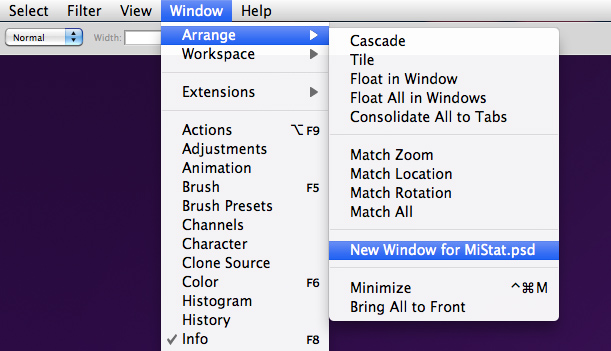
Open your document, and then create a second window by going to Window → Arrange → New Window. You can then resize the new window and place it out of the way.
Edit in the other window as normal, zooming in as far as you’d like. You’ll now be able to press Cmd + ` to switch back to the window that’s zoomed to 100%, nudge using the arrow keys, and then press Cmd + ` to switch back again. Because the other window is zoomed to 100%, nudging will move the selected vector points exactly 1 pixel.
Please note that holding Shift while using the arrow keys to nudge always moves by 10 pixels, no matter how far in you’re zoomed. Also, dragging points with the mouse will snap to pixels in most situations — most, but not all.
While not perfect, this technique does remove some of the frustration with editing detailed vector paths in Photoshop. Or maybe it’s just another reason why complex shapes should be drawn in Illustrator first, and then pasted as shape layers?
Take Charge Of Your Pixels
Using the correct techniques, it should be easy to place pixels exactly where you want. Remember, you’re the one in charge. Demand that they fall in line. Accept nothing less than pixel perfection.
Would you like to know more about a particular technique or Photoshop feature? Please let us know in the comments.
Further Reading
- Mastering Photoshop: Unknown Tricks and Time-Savers
- The Ultimate Guide To Cloning In Photoshop
- Noise, Textures, Gradients and Rounded Rectangles
- Useful Photoshop Tools and Techniques For Your Workflow


