A Comprehensive WordPress Checklist To Creating The Perfect Website

Email Newsletter
Weekly tips on front-end & UX.
Trusted by 182,000+ folks.

 Custom Web Forms for Angular, React, & Vue. Your backend.

 Celebrating 10 million developers
There is no doubt that WordPress is the best content management system (CMS) for your website. Sure, countless CMS’ are available, ranging from open-source to paid, and you’ll hear evangelists on all sides swearing that their choice is the best. But Drupal, Joomla or any other CMS doesn’t hold a candle to WordPress for its ease of use, security and reliability.

It’s no wonder that Web developers have built over 50 million websites on its sturdy back, or that so many designers would never dream of using anything else. For the sake of this article, let’s agree that WordPress is the way to go, no looking back. With that established, let’s lay out a 15-step checklist to help you create the perfect WordPress website.
Choose A Domain
Without a domain, users wouldn’t be able to find or share your website. In case you’re unsure, facebook.com is a domain, as is https://www.google.com. The https:// and www. are optional. Websites will work whether or not you type in the prefix. We’re referring to the rest when discussing domain selection.
There are four key elements to a domain: top-level domain, root domain, subdomain and subfolder:
Top-Level Domain
The top-level domain, or TLD, is the end of the domain. The most ubiquitous TLD and the one you will be most familiar with is .com. Because .com is the first TLD that comes to mind, it is sought after the most by far, which is why most great .com domains are already owned.
There are many different TLDs, some created exclusively for organizations (.gov, .edu), some specific to countries (.co.uk, .us, .es) and some used most often as an alternative to .com (.net, .org .info).
Root Domain
Unlike the TLD, you have full control over your root domain; example.com is a root domain. We have tremendous freedom in choosing root domains. The only two restrictions when registering a domain are that it be unique (i.e. it isn’t currently registered) and that it consist only of letters, numbers and hyphens.
Purchasing domains that have already been registered is also possible, but they usually command much higher prices. A good domain should be concise, memorable, unique, easy to spell and easy to pronounce.
Subdomains
A subdomain is the domain that appears before the root domain; sub.example.com, for example. Once you own a root domain, you can create subdomains at no additional cost.
Subfolders
Subfolders are listed after the TLD; for example, domain.com/subfolder. SEOmoz has an in-depth article on the intricacies of domains relative to search engine optimization.
Articles on choosing a domain:
Where to buy a domain:
Choose A Hosting Package
Choosing the right host and package is extremely important. Get it wrong and your website will suffer. A host should empower you, never limit you. For example, some hosting packages allow only a single domain, so if you plan on having multiple websites (which many people do), these wouldn’t work.
When choosing a host, look for three key elements:
Limitations:
- Does the host support WordPress?
- How many domains can you host?
- How much bandwidth and storage are you allocated?
- What up-time percentage are you guaranteed?
Company:
- How long has the company been in business?
- Does it have positive reviews by users?
- What kind of support does it offer?
Pricing:
- How much is the package you need?
- Are upgrades available if required?
- Are there any additional costs (IP addresses, software, etc.)?
- Is there a trial period?
The best hosting recommendations will come from friends and colleagues, because they will have first-hand experience to share. Here are some reputable hosting providers, in case you don’t know anyone with experience:
- Media Temple,
- FireHost,
- VPS.net.
There are also high-quality WordPress-specific hosting companies that can take care of everything for you. Rather than simply host your website, they install and configure WordPress and support you every step of the way.
WordPress-specific hosting providers:
Articles on hosting providers
Configure The Nameservers
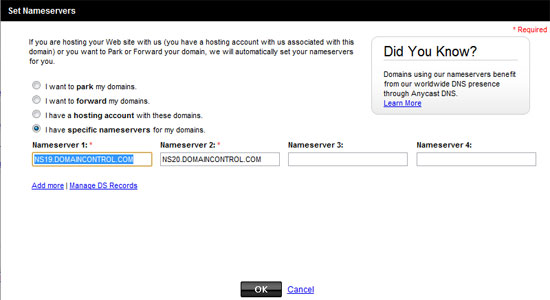
(If your domain came with your hosting package, this step is not required.)
Once you have both a domain and hosting account, you will need to point the domain to your host’s nameservers, to connect the domain name to the server. When you signed up, your hosting provider should have sent you the names of the nameservers. They look something like ns1.nameserver.com and ns2.nameserver.com.
Navigate to your domain’s control panel, and search for something along the lines of “change nameservers.” This is where you will enter the nameservers. Once this step is completed, you will have to wait up to 24 hours for the change to propagate. You will know that it’s working if your domain shows your host’s landing page when you enter the URL in a browser.
If you can’t locate where to change the nameservers, do not hesitate to contact your domain registrar. It would be happy to point you in the right direction.
Upload WordPress
Download and unzip the latest version of WordPress, and then upload it to your hosting account using FTP. FTP stands for “file transfer protocol”; it is a method of transferring files between a computer and hosting server.
To upload files using FTP, you must first download and install an FTP client program, such as FileZilla (the one I use). FileZilla will ask for your FTP credentials (host name, user name and password). Your host will already have given you these; if not, request them.
Once you have connected to your server via FTP, you will be presented with a list of folders. Search for one named public_html or the name of your domain. This is where you will upload WordPress.
If you want your website to be on the root domain, upload it directly. If you want to install WordPress in a subfolder, you must first create the folder and then upload the files there. Many people install WordPress in a subfolder (such as example.com/blog), but this is not required.
Articles on uploading WordPress:
Create A Database
A database is where all your WordPress data is stored, including your content (i.e. posts, pages and comments), configurations and user data. Each time a page loads, WordPress queries the database for all of the required information, such as title, content, categories, tags and published date.
Using your host’s control panel, create a database and a database user name and password for WordPress to connect with. If you are unsure how to complete this step, your host will be able to assist you.
Articles on creating a database:
Modify wp-config-sample.php
Once you have set up the database and its user name and password, it’s time to use the FTP client to edit the wp-config-sample.php file.
First, rename the file to wp-config.php (i.e. remove sample). Then, using a text editor, open the file.
/** The name of the database for WordPress */

define('DB_NAME', 'database_name_here');

/** MySQL database username */

define('DB_USER', 'username_here');

/** MySQL database password */

define('DB_PASSWORD', 'password_here');
Find these lines, and replace the placeholders with your credentials. Then save your edited file to the server.
Install WordPress
Head to your domain. WordPress will request some basic information to complete the installation and create your account. The process is short and self-explanatory.
Security tip: Do not use the user name admin because it is too easily guessed by hackers.
Once you have submitted this information, you will be able to log into the admin panel at yourdomain.com/wp-admin. You will also receive a confirmation email.
Choose A Theme
Your WordPress theme is the design foundation for your website. Literally thousands of free and premium themes are available, or you could have one custom designed, although this option is substantially more expensive.
Whether your website is about design, food, real estate or pretty much anything else, you’ll find themes tailored to your needs. But finding the perfect one can feel like a never-ending quest.
Here are the absolute minimum requirements for the perfect theme:
- Great design,
- Valid HTML and CSS,
- Rock-solid code,
- Strong readability,
- Compatibility with the latest version of WordPress,
- Compatibility with the most popular plugins,
- Extensive support and documentation.
With the space being so competitive, all reputable theme providers will offer these features as standard.
With your foundation in place, ask yourself a few questions to ensure the theme is ideal:
- Does this theme meet all of my requirements?
- Can it be customized?
- How quickly will I outgrow this theme?
- Do any of its color schemes match my brand?
A website should focus more on what your customers like and what they will respond to than on your personal preference. People get lost in their own personal style all too often. If your blog is personal, that’s fine. But if it’s for business, then you must put customers first.
Places to buy WordPress themes:
Articles about WordPress themes
Configure The Basics
Once you have installed WordPress and picked out a few potential themes, you should make a few basic configurations that will dramatically improve the website.
- Activate Akismet. Akismet is the number one tool for detecting spam comments. Fortunately, it comes built into WordPress. You will need to activate it and generate an API key. If you don’t plan to allow comments on your articles, this step isn’t required.
- Disable comments. If you don’t want to allow comments, navigate to Settings → Discussion, and uncheck “Allow people to post comments on new articles.” This setting can be overridden in each post.
- Configure permalinks. By default, WordPress URLs look like
example.com?p=232. By enabling the custom permalink structure (Settings → Permalinks) and pasting in%postname%, your URLs will be much friendlier to search engines and RSS readers. For example, for a page titled “WordPress checklist,” the URL would beexample.com/wordpress-checklist. You can customize the URL of each post even after having customized the permalink structure. - Add Gravatar. A Gravatar is an image associated with and linked to your email address. Comments are a perfect example of Gravatars in use. Some themes also have author boxes that feature Gravatars. The great thing about a Gravatar is that you need to set it up only once, and then your image will load wherever your email address appears in a Gravatar-enabled location.
Articles about WordPress basics:
- “WordPress: The Complete Post-Install Checklist” [Offline]
Secure WordPress
WordPress is relatively secure out of the box, and its few weaknesses can be ironed out with little effort. Note, however, that no website is 100% secure. Your aim is simply to make it as hard as possible for someone to exploit the website.
No matter how much you invest in security, as long as your website is live, there is a chance it will be exploited, which is just one reason why backing up is so important. Also, the points we’ll cover here relate only to WordPress security, whereas hackers can attack from all angles; there have been cases of hosting providers being exploited, leaving their customers vulnerable.
- Keep WordPress up to date. Many WordPress updates contain functional upgrades as well as security fixes. Do not leave yourself exposed to old exploits.
- Do not use
wp_as the database table’s prefix. Many WordPress users leave the database table’s prefix as the default,wp_, allowing malicious hackers to search for that specifically in their exploits. By changing the prefix to something unique, you make the database less vulnerable. - Remove the WordPress version from the website’s header. By telling malicious users which version of WordPress you are running, you might be inadvertently telling them how to exploit your website, especially if the version is outdated.
- Remove admin user name. Malicious users know that a large percentage of users will have the user name
admin. This means that they need to discover only a single piece of data: your password. By using a unique user name, they would have to guess twice as much data.
The above tweaks need not be done manually. The WP Security Scan plugin does some of these things automatically and can assist you with completing the others.
One final recommendation is to make your file permissions as strict as possible without preventing you from performing essential tasks such as uploading media from within the admin area. In my experience, setting all directories as 755 and all files as 644 is best, although you might need to set wp-content/uploads to 777 in order to allow uploads from within the admin area.
Articles about securing WordPress:
Create Essential Pages
When someone stumbles on your blog, you want them to be able to find everything they need as quickly as possible. You want to make it easy. That means having a few basic pages that will help you help them quickly.
- Home page. The is the landing page for your website. It can be either a static page that explains a little about you or your business, or a dynamic page that updates with each new blog post. By default, WordPress displays a list of your latest blog posts. If you would like a static page to be shown instead, first create that page, and then navigate to Settings → Reading and enable the static page.
- About page. If you’re not using the home page as a static landing page, then the “About” page is an ideal place to discuss you and your company. Present yourself in the best possible light by saying who are you, where you come from and why that should matter to visitors. Make the copy on this page informative and, if possible, a bit intriguing.
- Contact page. Visitors to your website might want to reach you and would expect to be able to do so with the ease of a click, which is the exact purpose of the contact page. Whether you use a form plugin or simply display an email address, the contact page makes it dead simple for people to connect with you.
- Products, services or “hire me” page You probably aren’t building the website for fun. Whether you’re selling a service or have a full-blown e-commerce website with merchandise ready to ship, the product page is essential to your revenue. Make it easy to see your offerings and as simple and quick as possible for users to find exactly what they’re looking for.
Optimize For Search Engines
Search engine optimization (SEO) is essential to ensuring that your copy draws as much targeted traffic as possible. Some themes come with built-in SEO features, and while this is great, I prefer to use a plugin so that my settings are uniform across all of my websites, regardless of the theme. The best SEO plugin available at the moment is WordPress SEO by Yoast.
Here are its most important features:
- Generation of XML site map. A site map is a search engine-friendly map of all of your pages. No theme has this functionality built in, and most SEO plugins don’t include it either.
- Site-wide and post-level control of meta data. Being able to control the title and meta description of each page is essential to optimizing for search engines, because they are shown in the results when someone performs a search on Google.
- Control of
noindexandnofollowBeing able to control which pages search engines index helps to avoid problems with duplicate content, and it also keeps the wrong pages from showing up in results.
Articles about WordPress SEO:
- “WordPress SEO: The Definitive Guide to Higher Rankings for Your Blog”
- “WordPress SEO: The Only Guide You Need”
Set Up Analytics
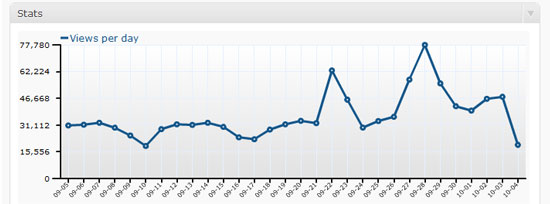
Analytics enables you to track visitors, with a ton of useful data on their browsing, such as:
- How they landed on your website,
- How long they stayed,
- How many pages they viewed,
- Which pages they viewed.
The most popular analytics software is Google Analytics, because it has pretty much everything you’ll need and is entirely free to use, no matter how big or small the website. Installing it is also extremely simple. All you have to do is create a Google Analytics account, and then place the JavaScript code you are given just before the </body> tag in your theme’s footer file (usually footer.php).
Articles about analytics:
Back Up
Backing up is undoubtedly the most important item on this list. If something goes wrong and you haven’t set up a back-up system, you could lose all of your online assets. Fortunately, there are multiple fantastic solutions. The most vital thing is to back up both the database and your files, not just one or the other.
- VaultPress Owned by Automattic (the creator of WordPress), VaultPress is certainly the most reputable back-up solution. Plans start at $15 per month.
- BackupBuddy This back-up solution has been around longer than VaultPress and allows you to back up content to your server, Amazon S3 or an email address. It also has a one-time cost, starting at $75 for two websites.
- WP-DB-Backup This plugin backs up only your database and then emails it to you. The problem with backing up only the database is that while your content will be saved, you will lose your themes, plugins and modifications. WP-DB-Backup is free.
Articles about backing up:
- “5 Great Backup Plugins For WordPress”
Set Up Caching
Every time a page is loaded by a user, WordPress processes that page on your server. This involves retrieving the title and content from the database and executing other processes. But if multiple people are viewing the exact same page, why not display a static version rather than process the page for every instance?
That is exactly what the W3 Total Cache plugin does.
The plugin also offers features such as minification, which strips all white space from your HTML, CSS and JavaScript files. Minification also combines CSS and JavaScript files; so, instead of making many calls, the browser makes just one for CSS and another for JavaScript. In short, minification makes your files smaller and, therefore, faster to load.
Simply by activating W3 Total Cache and leaving the default configuration, you could double or triple your blog’s speed while reducing server load.
Articles about caching:
Summary
In helping you choose a domain and hosting provider, install WordPress, select a theme, optimize the website for search engines, and install analytics to monitor traffic, this 15-point checklist is your bulletproof guide to building a quality website without wasting time.
It gives you everything you need to get a high-quality WordPress website up and running in very little time. Of course, if you want someone else to take care of everything for you, there are companies that offer high-quality and affordable solutions.
Don’t forget to bookmark this page in case you need it later. And best of luck with your new WordPress website!
(al) (il) (vf)


