How To Use Custom Post Types To Organize Online Marketing Campaigns

Email Newsletter
Weekly tips on front-end & UX.
Trusted by 182,000+ folks.
 Register for Free
 Celebrating 10 million developers


 Custom Web Forms for Angular, React, & Vue. Your backend.
As an Internet marketer and analyst, I need to be able to organize online marketing campaigns in a way that is trackable in Google Analytics. This is the perfect task for WordPress custom post types.
In this article, we’ll explain how to create a WordPress plugin that enables you to organize Internet marketing campaigns using trackable URLs, shortened versions of those URLs, and trackable QR codes that you can also use for offline marketing activities.
Further Reading on SmashingMag:
- Extending WordPress With Custom Content Types
- A Detailed Guide To WordPress Custom Page Templates
- Customizing WordPress Archives For Categories, Tags
- Building A Custom Archive Page For WordPress
We’ll show you how to create this plugin in a way that maximizes ease of use and functionality. If you have other methods that you have found useful, please share them in the comments. Also, let’s remember that we are standing on the shoulders of WordPress developers who have laid the foundation for easier coding.
Here are the criteria for our custom post type plugin:
- It must provide a form in which users can specify a landing page to be tracked, the anchor text or content, the term (if this link is a PPC ad), and any additional information about this link.
- It must provide three custom taxonomy types, so that users can select the URL variables for source, medium and campaign name. This is a taxonomy type because they will be reusable across campaigns and posts.
- It must be organizable in the admin area and be displayed in the user interface.
- The output must include a Google Analytics campaign-trackable URL, the information about the URL in human-readable format, a shortened version of the URL using a URL shortener, and a QR code of the shortened URL.
The File Structure
This plugin will use three files. To set up the structure, create a plugin folder named campaign-tracker. Inside the campaign-tracker folder, create the following three PHP files:
campaign-tracker.phpga-functions.phpcampaign-template.php
After you have created the files, we are ready to start adding the code.
The Plugin File
The main plugin file will be campaign-tracker.php. The content of this file will begin the standard way, by providing WordPress with the information that it needs to recognize it is as plugin. We then dive into setting up the CampaignTracker10 class and functions. We will set up our campaign custom post type and register the taxonomies that we will need. We will also initiate our admin interface.
<?php
   /*
   Plugin Name: Campaign Tracking 1.0
   Plugin URI: https://www.convergeconsulting.org
   description: >-
   Google Analytics Campaign Tracking system for WordPress 3.0 and above.
   Author: Joshua Dodson
   Version: 1.0
   Author URI: https://www.convergeconsulting.org
   */

   // Include the ga-functions.php helper functions
   include_once('ga-functions.php');

   if(!class_exists('CampaignTracker10'))
   {

      class CampaignTracker10 {

         var $meta_fields = array("gaca10-gaurl","gaca10-gaterm","gaca10-gacontent","gaca10-gadescription");

         // This function will create the custom post type. Thanks to Konstantin Kovshenin's example for additional examples of how to construct custom post types (https://kovshenin.com/2010/03/custom-post-types-in-wordpress-3-0-2089/), which inspired much of this.
         function __construct(){
            // Register custom post types
            register_post_type('campaign', array(
            'label' => _x('Campaigns','campaigns label'), // We're labeling the custom posts as Campaigns and also accounting for gettext appropriately
            'singular_label' => _x('Campaign','campaign singular label'), // Each post will be called a Campaign
            'public' => true, // These will be public
            'show_ui' => true, // Show the UI in admin panel
            '_builtin' => false, // This is a custom post type, not a built in post type
            '_edit_link' => 'post.php?post=%d',
            'capability_type' => 'post',
            'hierarchical' => false,
            'rewrite' => array("slug" => "campaign"), // This is for the permalinks
            'query_var' => "campaign", // This goes to the WP_Query schema
            'supports' => array('title'/* We only need the default title field, but we could use others such as 'author', 'excerpt', 'editor' ,'custom-fields'*/)
            ));

            add_filter("manage_edit-campaign_columns", array(&$this, "edit_columns"));
            add_action("manage_posts_custom_column", array(&$this, "custom_columns"));

            // Register custom taxonomies gasource (for the Campaign Source), gamedium (for the Campaign Medium), and ganame (for Campaign Name)
            // Campaign Source
            register_taxonomy("gasource", array("campaign"), array("hierarchical" => true, "label" => _x( 'Campaign Sources', 'campaign sources taxonomy label' ), "singular_label" => "Campaign Source", "rewrite" => true));
            // Campaign Medium
            register_taxonomy("gamedium", array("campaign"), array("hierarchical" => true, "label" => _x( 'Campaign Mediums', 'campaign mediums taxonomy label' ), "singular_label" => "Campaign Medium", "rewrite" => true));
            // Campaign Name
            register_taxonomy("ganame", array("campaign"), array("hierarchical" => true, "label" => _x( 'Campaign Names', 'campaign names taxonomy label' ), "singular_label" => "Campaign Name", "rewrite" => true));

            add_action("admin_init", array(&$this, "admin_init"));
            add_action("template_redirect", array(&$this, 'template_redirect'));

            add_action("wp_insert_post", array(&$this, "wp_insert_post"), 10, 2);

         }
Let’s give the columns on the admin screen some headings:
function edit_columns($columns)
{
$columns = array(
'cb' => '<input type="checkbox" />',
'title' => _x('Campaign Title','campaign title label for edit columns'),
'gaca10_ganame' => _x('Campaign Name','campaign name label for edit columns'),
'gaca10_gasources' => _x('Campaign Source','campaign source label for edit columns'),
'gaca10_gasmedium' => _x('Campaign Medium','campaign medium label for edit columns'),
);
return $columns;
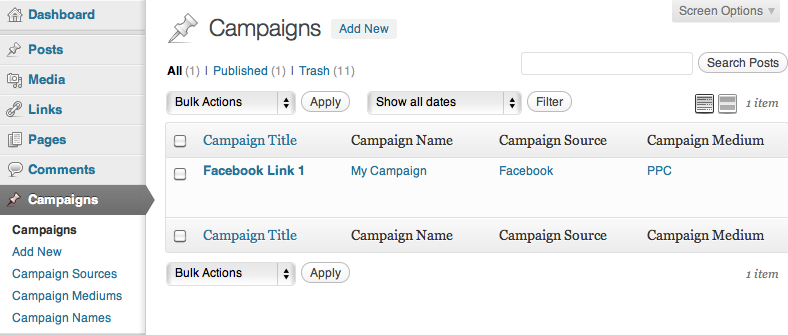
}Let’s specify which columns we would like to show up on the admin screen for this custom post type. We’ll have columns for campaign source, medium and name, in addition to the post’s title.
function custom_columns($column)
   {
      global $post;
      switch ($column)
      {
         // The campaign source
         case "gaca10_gasources":
         $gasources = get_the_terms(0, "gasource");
         if ( $gasources && ! is_wp_error( $gasources ) ) :
         $gasources_html = array();
         foreach ($gasources as $gasource)
         array_push($gasources_html, '<a href="' . get_term_link($gasource->slug, "gasource") . '">' . $gasource->name . '</a>');

         echo implode($gasources_html, ", ");
         endif;
         break;

         // The campaign medium
         case "gaca10_gasmedium":
         $gamediums = get_the_terms(0, "gamedium");
         if ( $gamediums && ! is_wp_error( $gamediums ) ) :
         $gamediums_html = array();
         foreach ($gamediums as $gamedium)
         array_push($gamediums_html, '<a href="' . get_term_link($gamedium->slug, "gamedium") . '">' . $gamedium->name . '</a>');

         echo implode($gamediums_html, ", ");
         endif;
         break;

         // The campaign name
         case "gaca10_ganame":
         $ganames = get_the_terms(0, "ganame");
         if ( $ganames && ! is_wp_error( $ganames ) ) :
         $ganames_html = array();
         foreach ($ganames as $ganame)
         array_push($ganames_html, '<a href="' . get_term_link($ganame->slug, "ganame") . '">' . $ganame->name . '</a>');

         echo implode($ganames_html, ", ");
         endif;
         break;
      }
   }
Once our columns are set up appropriately, we should see the following columns (note that this example is with one campaign already added):
The next section enables us to specify which template we would like to use to display this custom post type. We will be using the campaign-template.php template:
function template_redirect()
   {
      global $wp;

      // If the post type is set and is campaign…
      if (isset($wp->query_vars["post_type"])) {
         if ($wp->query_vars["post_type"] == "campaign")
         {
            // Then use the campaign-template.php file from this plugin directory
            include WP_PLUGIN_DIR.'/campaign-tracker/campaign-template.php';
            die();
         }
      }
   }
If a post is inserted or updated, then loop through the array and update or add the post’s meta data.
function wp_insert_post($post_id, $post = null)
   {
      if ($post->post_type == "campaign")
      {
         foreach ($this->meta_fields as $key)
         {
            $value = $_POST[$key];
            if (empty($value))
            {
               delete_post_meta($post_id, $key);
               continue;
            }

            if (!is_array($value))
            {
               if (!update_post_meta($post_id, $key, $value))
               {
                  add_post_meta($post_id, $key, $value);
               }
            }
            else
            {
               delete_post_meta($post_id, $key);

               foreach ($value as $entry){
                  add_post_meta($post_id, $key, $entry);
               }
            }
         }
      }
   }
With the following function, we can add custom meta boxes for the admin screen where we edit the campaign:
function admin_init()
{
// Add custom meta boxes for the edit campaign screen
add_meta_box("gaca10-meta", "Campaign Information", array(&$this, "meta_options"), "campaign", "normal", "core");
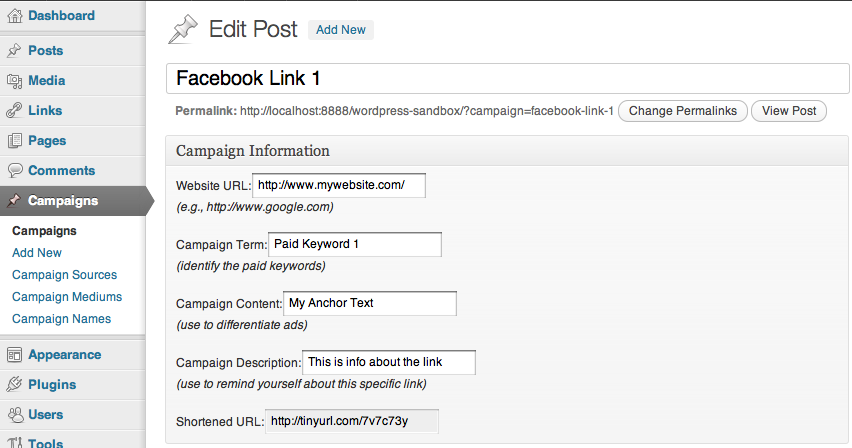
}The following function is for the admin post meta contents. This lets us create the form in which we specify some of the variables for our trackable URL (except for the taxonomies). It also provides a read-only field that shows the shortened URL after the URL variables have been saved.
function meta_options()
   {
      global $post;
      $custom = get_post_custom($post->ID);
      if($custom["gaca10-gaurl"][0]){
         $gaurl = $custom["gaca10-gaurl"][0];
      }
      else{ $gaurl = ’; }
      if($custom["gaca10-gaterm"][0]) {
         $gaterm = $custom["gaca10-gaterm"][0];
      }
      else { $gaterm = ’; }
      if ($custom["gaca10-gacontent"][0]) {
         $gacontent = $custom["gaca10-gacontent"][0];
      }
      else { $gacontent = ’; }
      if ($custom["gaca10-gadescription"][0]) {
         $gadescription = $custom["gaca10-gadescription"][0];
      }
      else { $gadescription = ’; }

      $url = trackable_url();
      if ($custom["campaign_tinyurl"][0]) {
         if($gaurl == ’) { $shortenedurl = ’; }
         else{ $shortenedurl = create_tiny_url($url); }
      }

      ?>
      <label><?php _ex('Website URL:','website url label'); ?></label><input name="gaca10-gaurl" value="<?php echo $gaurl; ?>" /><br />
      <em><?php _ex('(e.g., https://www.google.com)','website url example'); ?></em><br /><br />

      <label><?php _ex('Campaign Term:','campaign term label'); ?></label><input name="gaca10-gaterm" value="<?php echo $gaterm; ?>" /><br />
      <em><?php _ex('(identify the paid keywords)','campaign term information'); ?></em><br /><br />
      <label><?php _ex('Campaign Content:','campaign content label'); ?></label><input name="gaca10-gacontent" value="<?php echo $gacontent; ?>" /><br />
      <em><?php _ex('(use to differentiate ads)','campaign content information'); ?></em><br /><br />

      <label><?php _ex('Campaign Description:','campaign description label'); ?></label><input name="gaca10-gadescription" value="<?php echo $gadescription; ?>" /><br />
      <em><?php _ex('(use to remind yourself about this specific link)','campaign description information'); ?></em><br /><br />

      <label><?php _ex('Shortened URL:','shortened URL label'); ?></label><input name="gaca10-gashortened-url" value="<?php echo $shortenedurl; ?>" readonly="readonly" /><br />

      <?php
   }
}

}
Here is how the “Add/Edit Campaign” screen will appear:
If CampaignTracker10 exists, then we initiate the plugin:
if(class_exists('CampaignTracker10')){

      // Initiate the plugin
      add_action("init", "CampaignTracker10Init");

      function CampaignTracker10Init() {
         global $gaca10;
         $gaca10 = new CampaignTracker10();

      }
   }
Combine these functions into the campaign-tracker.php file.
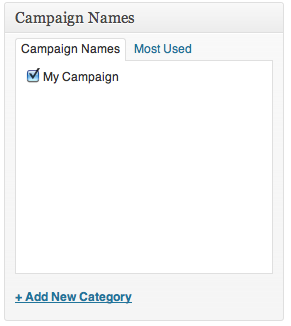
The following taxonomy examples should also be on the “Add/Edit Campaign” screen after everything has been added. Here is the “Campaign Names” taxonomy:
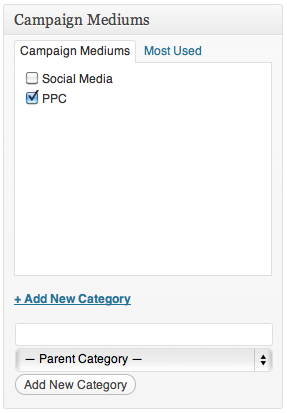
Here is the “Campaign Mediums” taxonomy:
Here is the “Campaign Sources” taxonomy:
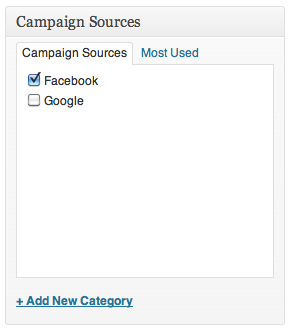
Similar to how traditional post categories are set up, you can create new categories or select previous categories.
A note on usage: When you begin to use the system, try to select only one category each from name, source and medium. One category per taxonomy type will prove to be most useful in your actual analysis in Google Analytics. So, as a general rule: one name, one source and one medium per URL.
The Helpful Display Functions
Each of the functions in this section is part of the ga-functions.php file. The functions have been separated from the other functions in order to keep the display functions together.
Our file will begin with the formatted_utm_taxonomy_terms function, which will display a URL-friendly version of the taxonomy terms:
<?php
   /* Some Helpful Display Functions */

   function formatted_utm_taxonomy_terms($the_term) {
      global $post;
      $post_terms = get_the_terms( $post->ID, $the_term );
      if ( $post_terms && ! is_wp_error( $post_terms ) ) :
      $encoded_terms = array();
      foreach ($post_terms as $term ) {
         if(!$encoded_terms[] = $term->slug){
            $encoded_terms[] = urlencode($term->name);
         }
      }
      $return_terms = implode('+',$encoded_terms);
      return $return_terms;
      endif;
   }
The trackable_url function generates the trackable URL from the fields on the admin screen as well as the taxonomies. This appends the appropriate tracking criteria to the URL so that Google Analytics can use the variables and provide information based on these specific variables. To do this, we will use the add_query_arg WordPress function.
function trackable_url() {
      global $post;
      $custom = get_post_custom($post->ID);

      // the url
      if ($custom["gaca10-gaurl"][0]) {
         $gaurl = $custom["gaca10-gaurl"][0];
      }
      else { $gaurl = ’; }

      // the term(s)
      if ($gaterm = $custom["gaca10-gaterm"][0]) {
         $gaterm = $custom["gaca10-gaterm"][0];
         $gaterm = urlencode($gaterm);
      }
      else { $gaterm = ’; }

      // the content(s)
      if ($custom["gaca10-gacontent"][0]) {
         $gacontent = $custom["gaca10-gacontent"][0];
         $gacontent = urlencode($gacontent);
      }
      else { $gacontent = ’; }
      $arr_params = array ( 'utm_campaign' => formatted_utm_taxonomy_terms('ganame'), 'utm_source' => formatted_utm_taxonomy_terms('gasource'), 'utm_medium' => formatted_utm_taxonomy_terms('gamedium'), 'utm_term' => $gaterm, 'utm_content' => $gacontent);
      return add_query_arg( $arr_params, $gaurl );

   }
The following functions take the campaign-trackable URL and shortens it with TinyURL. This method uses wp_remote_get to generate the shortened URL. It then saves the shortened URL to the post’s meta data when a post is saved. The trackable_url_tiny function enables us to retrieve the shortened URL in the template.
// Save the shortened trackable URL to the post meta
   function save_shortened_meta($post_ID) {
      $url = trackable_url();
      $shortened_url = create_tiny_url($url);
      update_post_meta($post_ID, "campaign_tinyurl", $shortened_url);
      return $post_ID;
   }

   // Add an action to save it when the post is saved.
   add_action('save_post', 'save_shortened_meta');

   // Retrieve the shortened URL from post meta
   function trackable_url_tiny($url = null, $post_ID) {
      global $post;
      $custom_fields = get_post_custom($post->ID);
      $campaign_tinyurl = $custom_fields['campaign_tinyurl'][0];
      return $campaign_tinyurl;

      return $post_ID;
   }

   // Create shortened trackable URL through the wp_remote_get function
   function create_tiny_url($strURL) {
      $tinyurl = wp_remote_get( 'https://tinyurl.com/api-create.php?url='.$strURL );
      if( is_wp_error( $response ) ) {
         return 'Something went wrong!';
      } else {
         return $tinyurl['body'];

      }
   }
The trackable_url_report function is what provides the human-readable version of the variables. These are broken out by each section. The landing page, campaign name, source, medium, terms and content are all separated and displayed individually if they exist.
function trackable_url_report() {
      global $post;
      $custom = get_post_custom($post->ID);

      // get the url
      if ($custom["gaca10-gaurl"][0]) {
         $gaurl = $custom["gaca10-gaurl"][0];
      }
      else { $gaurl = ’; }
      // get the term(s)
      if ($gaterm = $custom["gaca10-gaterm"][0]) {
         $gaterm = $custom["gaca10-gaterm"][0];
      }
      else { $gaterm = ’; }

      // get the content(s)
      if ($custom["gaca10-gacontent"][0]) {
         $gacontent = $custom["gaca10-gacontent"][0];
      }
      else { $gacontent = ’; }

      // The Landing page
      $url_info =’;
      $url_info.= "<strong>". _x( 'Landing Page:','landing page label') . "</strong> ";
      $url_info.= $gaurl;
      $url_info.= "<br />";

      // The campaign name
      $url_info.= "<strong>". _x( 'Campaign:','campaign label') . "</strong> ";
      $url_info.= formatted_utm_taxonomy_terms('ganame');
      $url_info.= "<br />";

      // The Source
      $url_info.= "<strong>". _x( 'Source:','source label') . "</strong> ";
      $url_info.= formatted_utm_taxonomy_terms('gasource');
      $url_info.= "<br />";

      // The medium
      $url_info.= "<strong>". _x( 'Medium:','medium label') . "</strong> ";
      $url_info.= formatted_utm_taxonomy_terms('gamedium');
      $url_info.= "<br />";

      // The term
      $url_info.= "<strong>". _x( 'Term:','term label') . "</strong> ";
      $url_info.= $gaterm;
      $url_info.= "<br />";

      // The content
      $url_info.= "<strong>". _x( 'Content:','content label') . "</strong> ";
      $url_info.= $gacontent;
      $url_info.= "<br />";

      return $url_info;
   }
The display_description function displays the description of the URL. We’ve broken this part out here in order to keep all of the pieces that are specific to the URL together. This is also the last function in the ga-functions.php file.
  <label><?php _ex('Campaign Description:','campaign description label'); ?></label><input name="gaca10-gadescription" value="<?php echo $gadescription; ?>" /><br />
  <em><?php _ex('(use to remind yourself about this specific link)','campaign description information'); ?></em><br /><br />

  <label><?php _ex('Shortened URL:','shortened URL label'); ?></label><input name="gaca10-gashortened-url" value="<?php echo $shortenedurl; ?>" readonly="readonly" /><br />

  <?php
} }
}
Here is how the “Add/Edit Campaign” screen will appear:
If CampaignTracker10 exists, then we initiate the plugin:
if(class_exists('CampaignTracker10')){

      // Initiate the plugin
      add_action("init", "CampaignTracker10Init");

      function CampaignTracker10Init() {
         global $gaca10;
         $gaca10 = new CampaignTracker10();

      }
   }
Combine these functions into the campaign-tracker.php file.
The following taxonomy examples should also be on the “Add/Edit Campaign” screen after everything has been added. Here is the “Campaign Names” taxonomy:
Here is the “Campaign Mediums” taxonomy:
Here is the “Campaign Sources” taxonomy:
Similar to how traditional post categories are set up, you can create new categories or select previous categories.
A note on usage: When you begin to use the system, try to select only one category each from name, source and medium. One category per taxonomy type will prove to be most useful in your actual analysis in Google Analytics. So, as a general rule: one name, one source and one medium per URL.
The Helpful Display Functions
Each of the functions in this section is part of the ga-functions.php file. The functions have been separated from the other functions in order to keep the display functions together.
Our file will begin with the formatted_utm_taxonomy_terms function, which will display a URL-friendly version of the taxonomy terms:
<?php
   /* Some Helpful Display Functions */

   function formatted_utm_taxonomy_terms($the_term) {
      global $post;
      $post_terms = get_the_terms( $post->ID, $the_term );
      if ( $post_terms && ! is_wp_error( $post_terms ) ) :
      $encoded_terms = array();
      foreach ($post_terms as $term ) {
         if(!$encoded_terms[] = $term->slug){
            $encoded_terms[] = urlencode($term->name);
         }
      }
      $return_terms = implode('+',$encoded_terms);
      return $return_terms;
      endif;
   }
The trackable_url function generates the trackable URL from the fields on the admin screen as well as the taxonomies. This appends the appropriate tracking criteria to the URL so that Google Analytics can use the variables and provide information based on these specific variables. To do this, we will use the add_query_arg WordPress function.
function trackable_url() {
      global $post;
      $custom = get_post_custom($post->ID);

      // the url
      if ($custom["gaca10-gaurl"][0]) {
         $gaurl = $custom["gaca10-gaurl"][0];
      }
      else { $gaurl = ’; }

      // the term(s)
      if ($gaterm = $custom["gaca10-gaterm"][0]) {
         $gaterm = $custom["gaca10-gaterm"][0];
         $gaterm = urlencode($gaterm);
      }
      else { $gaterm = ’; }

      // the content(s)
      if ($custom["gaca10-gacontent"][0]) {
         $gacontent = $custom["gaca10-gacontent"][0];
         $gacontent = urlencode($gacontent);
      }
      else { $gacontent = ’; }
      $arr_params = array ( 'utm_campaign' => formatted_utm_taxonomy_terms('ganame'), 'utm_source' => formatted_utm_taxonomy_terms('gasource'), 'utm_medium' => formatted_utm_taxonomy_terms('gamedium'), 'utm_term' => $gaterm, 'utm_content' => $gacontent);
      return add_query_arg( $arr_params, $gaurl );

   }
The following functions take the campaign-trackable URL and shortens it with TinyURL. This method uses wp_remote_get to generate the shortened URL. It then saves the shortened URL to the post’s meta data when a post is saved. The trackable_url_tiny function enables us to retrieve the shortened URL in the template.
// Save the shortened trackable URL to the post meta
   function save_shortened_meta($post_ID) {
      $url = trackable_url();
      $shortened_url = create_tiny_url($url);
      update_post_meta($post_ID, "campaign_tinyurl", $shortened_url);
      return $post_ID;
   }

   // Add an action to save it when the post is saved.
   add_action('save_post', 'save_shortened_meta');

   // Retrieve the shortened URL from post meta
   function trackable_url_tiny($url = null, $post_ID) {
      global $post;
      $custom_fields = get_post_custom($post->ID);
      $campaign_tinyurl = $custom_fields['campaign_tinyurl'][0];
      return $campaign_tinyurl;

      return $post_ID;
   }

   // Create shortened trackable URL through the wp_remote_get function
   function create_tiny_url($strURL) {
      $tinyurl = wp_remote_get( 'https://tinyurl.com/api-create.php?url='.$strURL );
      if( is_wp_error( $response ) ) {
         return 'Something went wrong!';
      } else {
         return $tinyurl['body'];

      }
   }
The trackable_url_report function is what provides the human-readable version of the variables. These are broken out by each section. The landing page, campaign name, source, medium, terms and content are all separated and displayed individually if they exist.
function trackable_url_report() {
      global $post;
      $custom = get_post_custom($post->ID);

      // get the url
      if ($custom["gaca10-gaurl"][0]) {
         $gaurl = $custom["gaca10-gaurl"][0];
      }
      else { $gaurl = ’; }
      // get the term(s)
      if ($gaterm = $custom["gaca10-gaterm"][0]) {
         $gaterm = $custom["gaca10-gaterm"][0];
      }
      else { $gaterm = ’; }

      // get the content(s)
      if ($custom["gaca10-gacontent"][0]) {
         $gacontent = $custom["gaca10-gacontent"][0];
      }
      else { $gacontent = ’; }

      // The Landing page
      $url_info =’;
      $url_info.= "<strong>". _x( 'Landing Page:','landing page label') . "</strong> ";
      $url_info.= $gaurl;
      $url_info.= "<br />";

      // The campaign name
      $url_info.= "<strong>". _x( 'Campaign:','campaign label') . "</strong> ";
      $url_info.= formatted_utm_taxonomy_terms('ganame');
      $url_info.= "<br />";

      // The Source
      $url_info.= "<strong>". _x( 'Source:','source label') . "</strong> ";
      $url_info.= formatted_utm_taxonomy_terms('gasource');
      $url_info.= "<br />";

      // The medium
      $url_info.= "<strong>". _x( 'Medium:','medium label') . "</strong> ";
      $url_info.= formatted_utm_taxonomy_terms('gamedium');
      $url_info.= "<br />";

      // The term
      $url_info.= "<strong>". _x( 'Term:','term label') . "</strong> ";
      $url_info.= $gaterm;
      $url_info.= "<br />";

      // The content
      $url_info.= "<strong>". _x( 'Content:','content label') . "</strong> ";
      $url_info.= $gacontent;
      $url_info.= "<br />";

      return $url_info;
   }
The display_description function displays the description of the URL. We’ve broken this part out here in order to keep all of the pieces that are specific to the URL together. This is also the last function in the ga-functions.php file.
function display_description(){
      global $post;
      $custom = get_post_custom($post->ID);
      $description = $custom["gaca10-gadescription"][0];
      return $description;
   }

   ?>
Combine these functions into the ga-functions.php file, and then we can move onto creating the template file.
The Template File
The final file that we will use to generate the view of the trackable URL is campaign-template.php. You will remember from the campaign-tracker.php file that we have a call in the template_redirect() function to redirect users to this template when viewing the custom post type of campaigns.
For display purposes, we will use the single.php file from the current default WordPress theme, TwentyEleven. You can, of course, use another theme and different styles.
First, we include the ga-functions.php file so that we can use some of our display functions. The campaign template also uses the Google Charts API to generate the QR code.
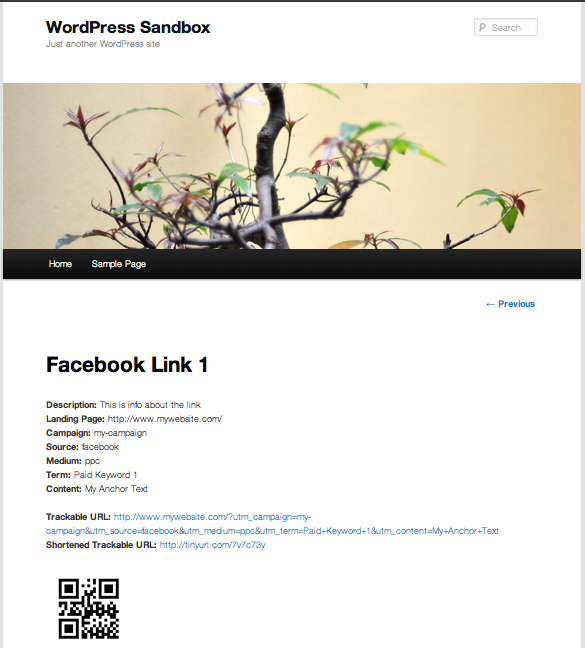
The following code will do all of the heavy lifting to display our campaign-trackable URL, the information about the URL, the shortened URL and the QR code. It will also allow us to edit the post if we need to change a variable. Simply drop this code into the loop.
<h1 class="entry-title"><?php the_title() ?></h1><br />
<?php
echo "<strong>". _x( 'Description:','description label') . "</strong> ";
echo display_description();
echo "<br />";
echo trackable_url_report();
echo "<br />";
echo "<strong>". _x('Trackable URL:','trackable URL label') . "</strong> ";
echo "<a href=".trackable_url()." target='_blank'>".trackable_url()."</a><br />";
echo "<strong>" . _x('Shortened Trackable URL:','shortened trackable URL label') . "</strong> ";
echo "<a href=".trackable_url_tiny()." target='_blank'>".trackable_url_tiny()."</a><br />";
?>
<br />
<img src="https://chart.googleapis.com/chart?chs=150x150&cht=qr&chl=<?php trackable_url_tiny(); ?>" /><br />
<?php edit_post_link( __( 'Edit', 'twentyeleven' ), '<span class="edit-link">', '</span>' ); ?>When we combine the code, the campaign template will be as follows:
<?php
/**
* The Template for displaying all single posts.
*
* @package WordPress
* @subpackage Twenty_Eleven
* @since Twenty Eleven 1.0
*/
// Include the ga-functions.php file so that we can easily display the results
include_once('ga-functions.php');
get_header(); ?>
<div id="primary">
<div id="content" role="main">
<?php while ( have_posts() ) : the_post(); ?>
<nav id="nav-single">
<h3 class="assistive-text"><?php _e( 'Post navigation', 'twentyeleven' ); ?></h3>
<span class="nav-previous"><?php previous_post_link( '%link', __( '<span class="meta-nav">←</span> Previous', 'twentyeleven' ) ); ?></span>
<span class="nav-next"><?php next_post_link( '%link', __( 'Next <span class="meta-nav">→</span>', 'twentyeleven' ) ); ?></span>
</nav><!-- #nav-single -->
<h1 class="entry-title"><?php the_title() ?></h1><br />
<?php
echo "<strong>". _x( 'Description:','description label') . "</strong> ";
echo display_description();
echo "<br />";
echo trackable_url_report();
echo "<br />";
echo "<strong>". _x('Trackable URL:','trackable URL label') . "</strong> ";
echo "<a href=".trackable_url()." target='_blank'>".trackable_url()."</a><br />";
echo "<strong>" . _x('Shortened Trackable URL:','shortened trackable URL label') . "</strong> ";
echo "<a href=".trackable_url_tiny()." target='_blank'>".trackable_url_tiny()."</a><br />";
?>
<br />
<img src="https://chart.googleapis.com/chart?chs=150x150&cht=qr&chl=<?php trackable_url_tiny(); ?>" /><br />
<?php edit_post_link( __( 'Edit', 'twentyeleven' ), '<span class="edit-link">', '</span>' ); ?>
<?php comments_template( ’, true ); ?>
<?php endwhile; // end of the loop. ?>
</div><!-- #content -->
</div><!-- #primary -->
<?php get_footer(); ?>When the template is set up and a campaign has been added, then it should display the following page:
In Conclusion
By using WordPress custom post types in the method described, it is possible to organize marketing campaigns with the relevant Google Analytics campaign-tracking URL, shortened URL and QR code. This makes organizing marketing campaigns much simpler and more effective.
Custom post types make it very easy to set up a system by which to organize content. And we can get creative in how we use custom post types. They can be very useful when organizing content outside of the normal structure of WordPress and other content management systems (i.e. posts, pages, etc.).
Other possible uses of custom post types include the following:
- Manage client contacts,
- Create an employee directory,
- Keep an inventory of items,
- Organize other data.
Resources
You may be interested in the following resources and articles:
- “Custom Post Types in WordPress 3.0,” Konstantin Kovshenin
- “Custom Post Types in WordPress,” Justin Tadlock
- “Creating a TinyURL With TinyURL’s API,” Richard Castera
- “Getting Started With Infographics” (QR Codes with the Google Charts API), Google Code
- “Post Types,” WordPress Codex
- URL Builder tool Google Analytics
- “IQ Lessons,” Google Analytics


