iOS Prototyping With TAP And Adobe Fireworks (Part 2)

Email Newsletter
Weekly tips on front-end & UX.
Trusted by 182,000+ folks.

 Custom Web Forms for Angular, React, & Vue. Your backend.
 Celebrating 10 million developers

After following the steps in Part 1, we now have everything to start building the prototype. But first, allow me try to sum it up quickly: to create a “live” iOS prototype, you only need to perform the following six steps:
- Design each page in Fireworks (each page representing one step of a walkthrough of the user’s actions).
- Add hotspots over the page to create buttons.
- Customize each hotspot:
- Which page will the hotspot link to?
- Which gesture will initiate the hotspot link?
- Which transition will animate once the correct gesture is used?
- Export your design as a prototype, and upload it to your server.
- Download Touch Application Prototypes (TAP), a free Fireworks extension for prototyping on the iPhone and iPad.
- Convert (with the help of TAP) the exported prototype to an animated, gesture-based prototype that you can use on an iOS device.
We’ll cover steps one to three in this tutorial. Steps four through six (exporting the prototype from Fireworks and converting to an iOS prototype with TAP) will be covered in part 3 of this series.
So, where do we begin? We have already covered pages, shared layers, symbols and styles — a few of the major building blocks of our design in Fireworks. But now we need interactivity!
The Basics Of Interactive Prototyping In Fireworks
We’ll assume you know the basics of designing pages, adding hotspots and linking pages, so we won’t cover them here in detail. The rest of the article focuses on how to use TAP together with Fireworks to take your wireframes to the next level.
If you need basic information about Fireworks before moving on to the rest of this article, please check out the following resources:
- “Understanding Fireworks,” Jim Babbage, Adobe TV This video tutorial has general information about Adobe Fireworks.
- “Fireworks for Beginners,” MediaLoot This tutorial provides a quick overview of the unique and useful features in Fireworks.
- “How to Create and Link Image Maps in Fireworks,” For Dummies This quick tutorial shows how to create hotspots in image maps.
Also, these two detailed articles, published recently on Smashing Magazine, will help you get started with interactive prototyping in Fireworks:
- “Create Interactive Prototypes With Adobe Fireworks,” André Reinegger
- “Interactive Prototypes and Time-Savers With Adobe Fireworks,” Trevor Kay
TAP: Customizing Hotspots And Using Gestures, Transitions And Timers
TAP allows you to specify whether the interactions in a prototype will be taps or gestures. The following gestures are supported:
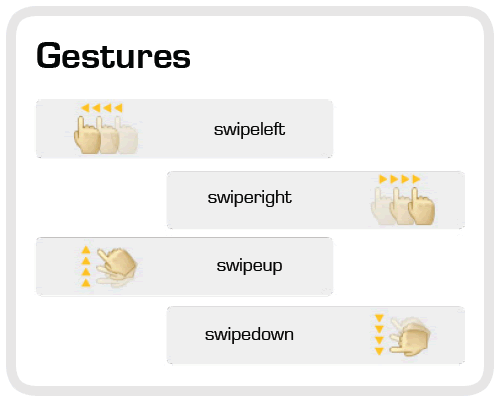
List of gestures supported by TAP (PDF)
Once the user has interacted with a prototype by tapping or gesturing, you can specify which transition will be used to change the interface. The following transitions are supported:
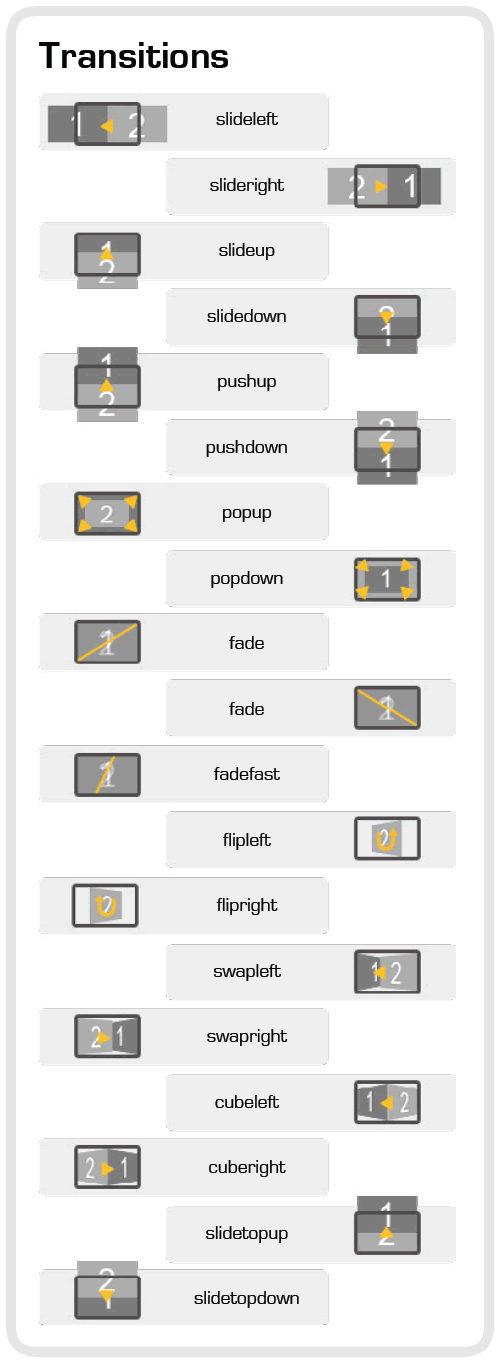
List of transitions supported by TAP (PDF)
Although TAP supports transitions for both taps and gestures, we will use slightly different methods to define the interactions for each. We will place hotspots over the design and then assign interactions in the Properties panel.
Because a tap is the simplest interaction, a hotspot for a tap may have only one transition and one destination. However, a hotspot for a gesture may respond to multiple gestures and have multiple transitions and destinations.
Customizing Hotspots For Taps

When setting up your Fireworks PNG file for use with TAP, keep in mind that you will be using the “Link,” “Alt” and “Target” fields differently than when you are using Fireworks on its own. Be sure to fill in the correct fields with the syntax required by the TAP extension. Also, the way you enter the properties into the “Link,” “Alt” and “Target” fields will vary depending on whether you are using a gesture or a tap (we’ll explain this in detail further below).
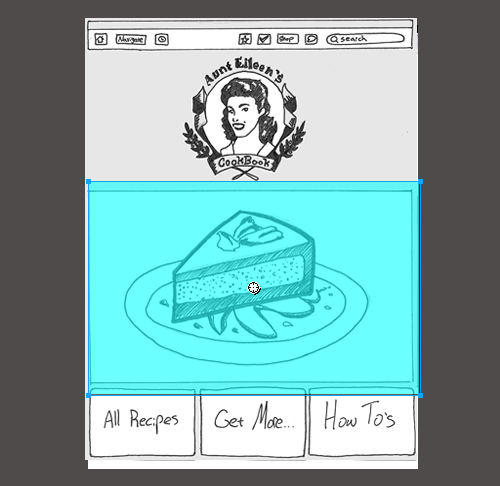
Hotspots are represented on the canvas as a translucent blue shape with crosshairs in the center. Hotspots exist on their own special Web layer, separate from the rest of the elements on the canvas.
Each hotspot has three fields that can be customized in the Properties panel: “Link,” “Alt” and “Target.” Each property is used by TAP in the following ways when a tap (rather then a gesture) is made:
- Link
Link to another page (remember that links are case-sensitive!). - Alt
The transition will animate in between pages. - Target
This is a timeout, used to transition to another page after a set amount of time has passed. (This is a great feature for loading screens or step-by-step animations.)
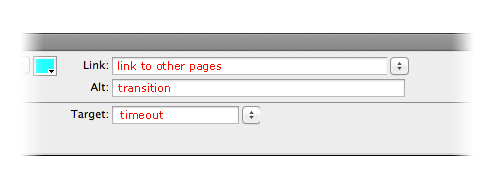
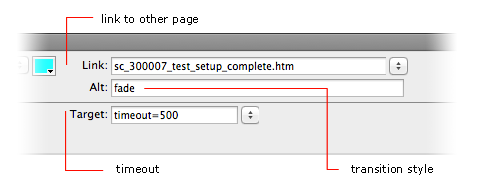
Notice how the Properties panel changes when a hotspot is selected. The “Link,” “Alt” and “Target” fields are used by TAP as “Link,” “Transition” and “Timeout” fields.
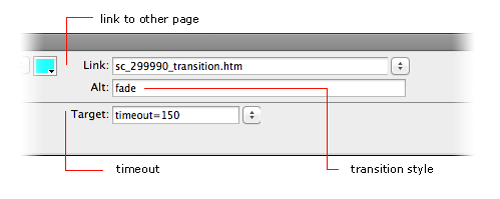
Here is the Properties panel again when a hotspot is selected, now with an example filled out; in this case, a tap that initiates a fade to another page.
Customizing Hotspots For Gestures
Four gestures are supported by TAP:
- Swipe left,
- Swipe right,
- Swipe up,
- Swipe down.
Note: Tapping (which is technically a fifth gesture) is also supported, and it is the default if no gesture is explicitly declared.
Gestures work only when there are hotspots, so the first step is to create a hotspot. If you swipe outside of a hotspot area, nothing will happen. However, if you create a hotspot that takes up the entire page, then the swipe will work everywhere on the page.
Each property is used by TAP in the following ways when a gesture (rather then a tap) is made:
- Link.
The link field must contain a hash sign (#). - Alt.
When gestures are used, this field will be blank. - Target.
The gesture, the page linked to and the transition are all defined here when a gesture is used.
For hotspots that use a gesture, you do not specify which page the hotspot will link to in the “Link” field (the page linked to is defined in the “Target” field, as described below); rather, you would add a # (hash sign). The hash sign allows for a JavaScript call, which makes the gesture recognition work properly. Decide which gesture you will use, and then enter the programming code needed into the “Target” field. The amount of coding you need to know is minimal, and even with no experience, memorizing and mastering all of the options takes minutes.
You can also use a TAP cheat sheet (PDF), which applies to TAP version 0.46 and later.
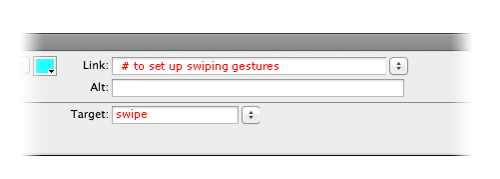
The way the Properties panel is used is different when gestures are used than when only a tap is used. The “Link” and “Target” fields take on different functionality.
The format for writing the statement is a combination of three phrases, separated by commas:
- Type of gesture,
- Page to link to,
- Transition type.
For example, the statement swipeleft, page2, slideleft actually says the following: “If you swipe this area with your finger from right to left, then page 2 will appear with a slide-left transition.”
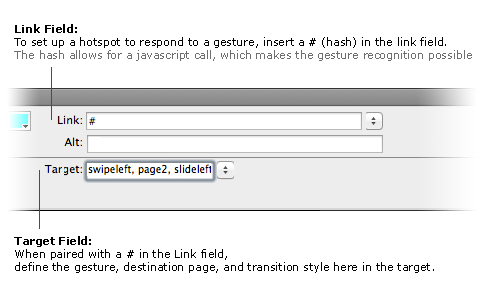
The Properties panel (with a hotspot selected); a filled-out TAP example.
To also enable swiping in another direction, simply continue adding the three parameters to the “Target” field. (Remember that, according to TAP’s syntax, a “statement” is made up of a three-phrase group.)
The following code has three statements (each composed of three phrases, for a total of nine phrases in this declaration): swipeleft,page2,slideleft, swiperight,page0,slideright, swipeup,page3,pushup. With these commands, the user can swipe left, swipe right and swipe up, finding page 2, page 0 and page 3, respectively.
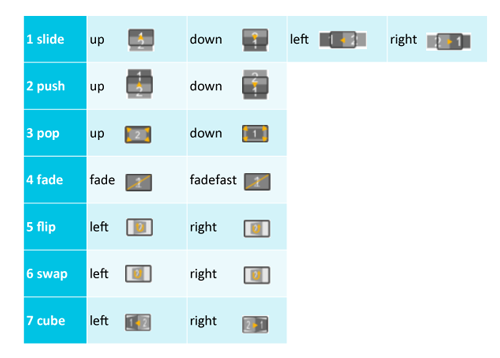
Transitions
Sixteen transitions are supported by TAP, falling into the following categories: slide, push, pop, fade, flip, swap and cube.
All animations are CSS3 transitions supported natively by WebKit. (The Safari and Chrome browsers are both based on the WebKit engine.)
To add a transition, select the hotspot you want to add a transition to. In the Property Inspector (PI) panel, enter the transition type in the “Alt” field. The proper syntax can be found in the official TAP documentation. If you have a bit of CSS3 knowledge, you can easily add your own transitions.
Timers

Sometimes you want to load a new page without the user having to interact at all. For example, you might want to show a loading screen that automatically goes to the start page of the application after a set amount of time.
To create a timed transition, draw a hotspot on the page that will be displayed for a limited amount of time. It is not really important where you place this hotspot, because it will be triggered automatically when the specified amount of time has passed.
In the “Target” field of your hotspot (where gestures are also handled), enter timeout=. The time of the delay before switching to another page is entered to the right of the = sign. Time is measured in milliseconds, so timeout=500 is equal to half a second. Experiment with the number to get the result you are looking for. If desired, add a transition to the “Alt” field.
Note: If you don’t put a transition in the field, the default of “fast fade” will be used by TAP.
The Properties panel with a hotspot selected and an example filled out: a 500-millisecond delay that initiates a fade to another page.
Change In Orientation
You can display a different page when the device detects a change in orientation, from landscape to portrait or vice versa. Providing a layout for each orientation will make your prototype feel more like a real app and will allow for more versatile usage.
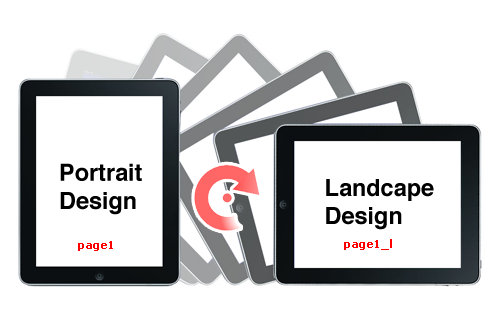
TAP supports both landscape and portrait orientations through two versions with similar names. The landscape version is followed by an underscore and lowercase “L” (_l).
For TAP to be able to identify which screen design to use when the orientation changes, you must have two screens with similar names. You can name the portrait design anything you want (although it is recommended that you follow HTML naming conventions — that is, no spaces — so that your pages render properly when exported), and the corresponding landscape page must have the same name followed by an _l. So, you would create a portrait page in Fireworks and name it, for example, Page1. Then, you would create another page, this one in landscape. Make sure the canvas is landscape-sized (you don’t need to design everything rotated by 90°), and name this page Page1_l. The _l extension is enough to trigger the prototype to switch between the portrait and landscape versions.
Building An iOS Prototype With Adobe Fireworks And TAP
Now it’s time to put all of that theory into practice by creating an interactive iOS prototype.
Tutorial Exercise Files
To help you with this tutorial, I have prepared three exercise files:
Note: A common convention among designers is to add an .fw before the .png file extension, in order to easily differentiate between Fireworks editable PNG files and flattened (exported) PNG files. For some reason, Smashing Magazine’s uploader adds an underscore to the file extension, so the files linked to above were originally named CookbookBlank.fw.png and CookbookFinished.fw.png.
- You’ll use
CookbookBlank.fw.pngto follow along with this tutorial. CookbookFinished.fw.pngis the completed version of the file that you would get by following this tutorial closely. Use this file if you get stuck, to check your progress, or if you want to jump ahead and see how everything works together in Fireworks.- The
CookbookPackage.zipis a ZIP archive containing the exported designs and the TAP framework. You can quickly upload the folder (after unzipping it, of course) and see the working prototype on any server.
Getting Acquainted With The Fireworks PNG File
Open the file CookbookBlank.fw.png. Note that six pages and one master page are in it (you can see them in the Pages panel in Fireworks). All page names are HTML-compliant (no special characters, no spaces), and the first page is named index, just like on a normal website.
Creating And Customizing Hotspots
Master Page
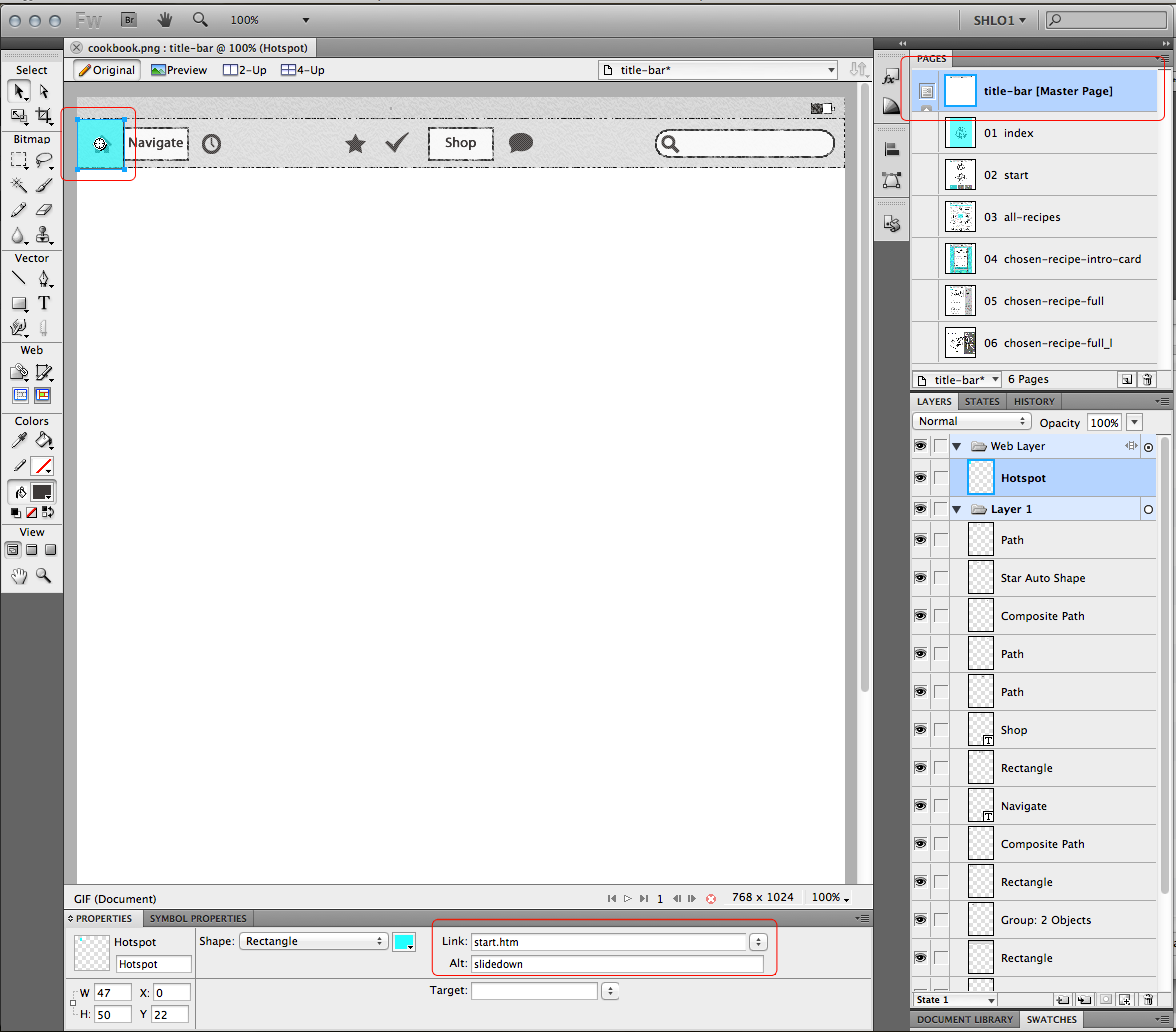
The master page in our exercise file is named title-bar, and it appears above all other pages in the Pages panel. Any objects on this page will appear on all the other pages. We want to create a universal link to the start page on the master page so that it can be produced only once and appear in the rest of the design automatically. When the user taps on the “Home” button, whatever is being displayed on the screen will slide down to reveal the start page.
- Create a hotspot covering the “Home” button:
- Select the Rectangle Hotspot tool (found in the Tools panel, or press
J).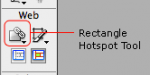 ”)
”) - Click in the upper-left corner of the “Home” button and drag to the lower-right corner. A hotspot will be created.
- Select the Rectangle Hotspot tool (found in the Tools panel, or press
- Customize the “Home” hotspot in the Properties panel:
- Select the hotspot you have just created, and in the Properties panel select
start.htmlin the “Link” drop-down menu. - In the “Alt” field, type
slidedown.
- Select the hotspot you have just created, and in the Properties panel select

The preceding steps should result in a hotspot and the hotspot properties seen in this screenshot. (Larger version)
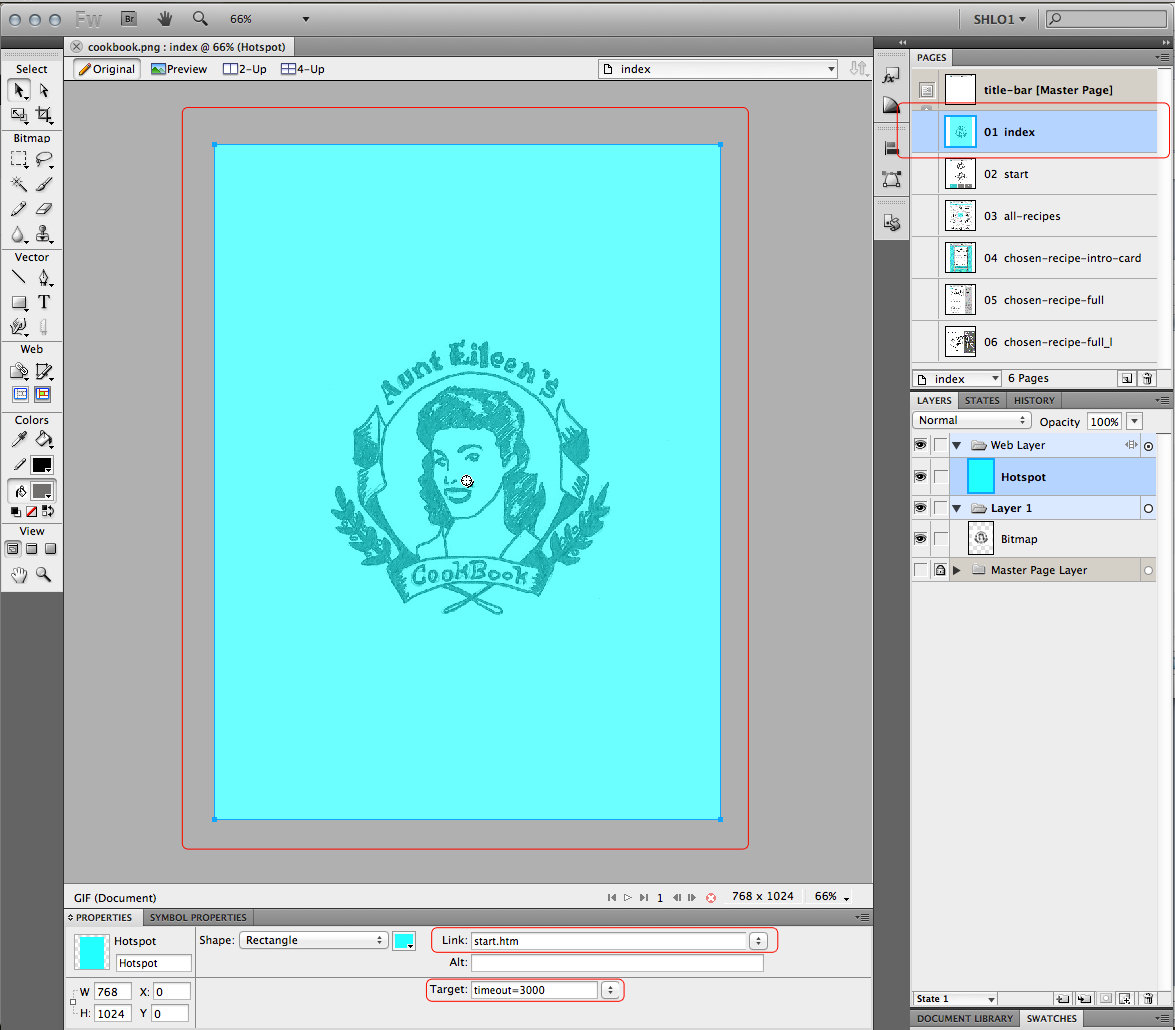
Page 1: The Loading Screen
The first page of our iOS prototype represents the loading screen.
Typically, a loading screen appears upon the launch of an app and stays for a couple seconds until the app loads. We’ll duplicate this functionality by creating a hotspot with a timeout (or timer) function.
- Select the first page (named
index) in the Pages panel. - Create a hotspot that covers the whole screen.
- Customize the hotspot in the Properties panel so that it automatically goes to the next page after a three-second delay:
- Choose which page the hotspot will link to: in the “Link” drop-down menu, select
start.htm. - Set up the timer: in the “Target” field, enter
timeout=3000(which is in milliseconds and equal to 3 seconds).
- Choose which page the hotspot will link to: in the “Link” drop-down menu, select
The preceding steps should result in a hotspot and hotspot properties as shown in this screenshot. (Larger version).
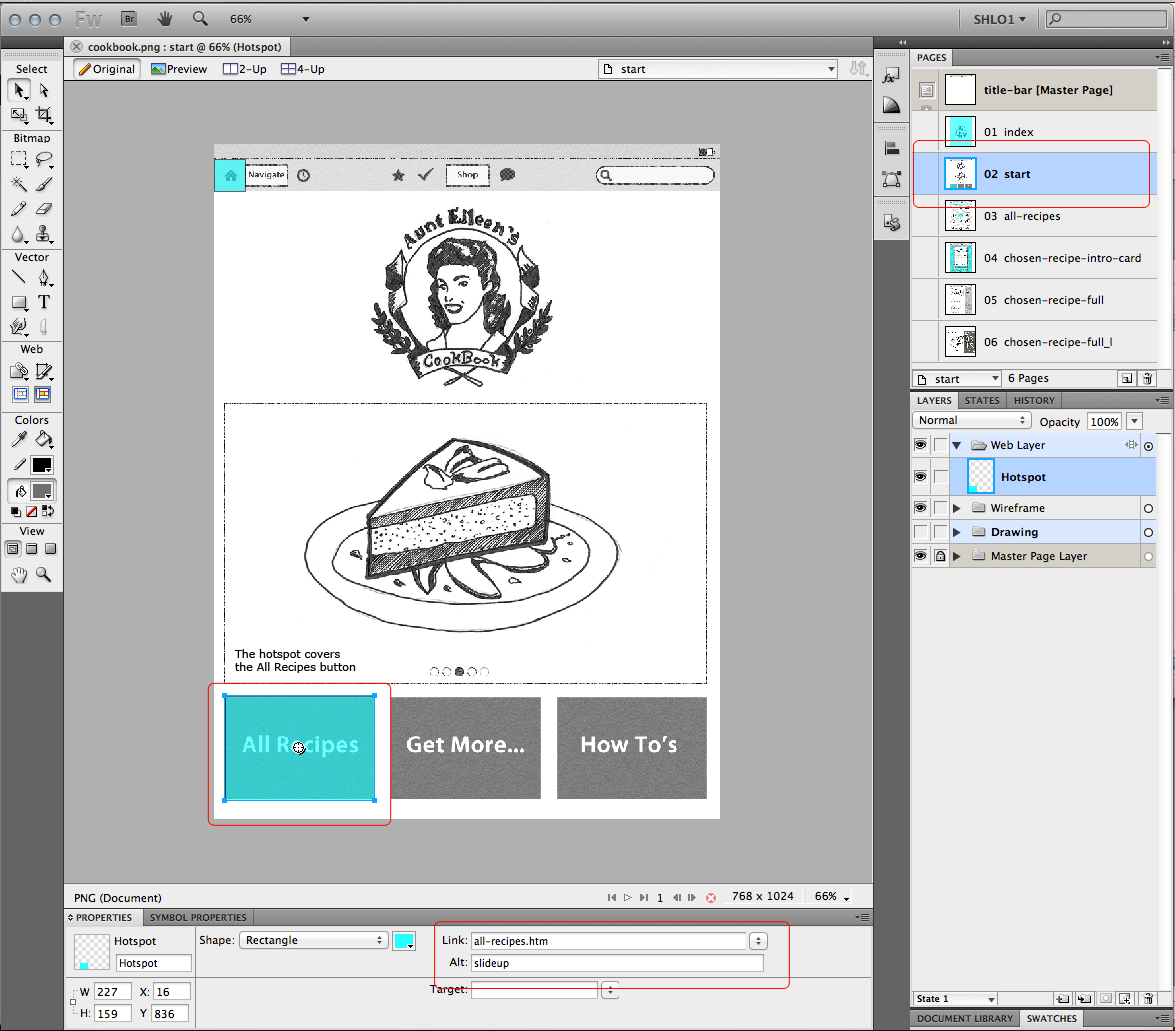
Page 2: The Start Screen
The start screen has a carousel in the middle of the page and three buttons at the bottom. To simplify some of the steps in this tutorial, we will make only the “All recipes” button functional:
- Select the second page (named
start) in the Pages panel. - Create a hotspot over the “All Recipes” button:
- Choose which page the hotspot will link to in the Properties panel: in the “Link” drop-down menu, select
all-recipes.htm.
- Choose which page the hotspot will link to in the Properties panel: in the “Link” drop-down menu, select
- Set up the transition to the next page: in the “Alt” field, type
slideup.
The preceding steps should result in a hotspot and hotspot properties as shown in this screenshot. (Larger version).
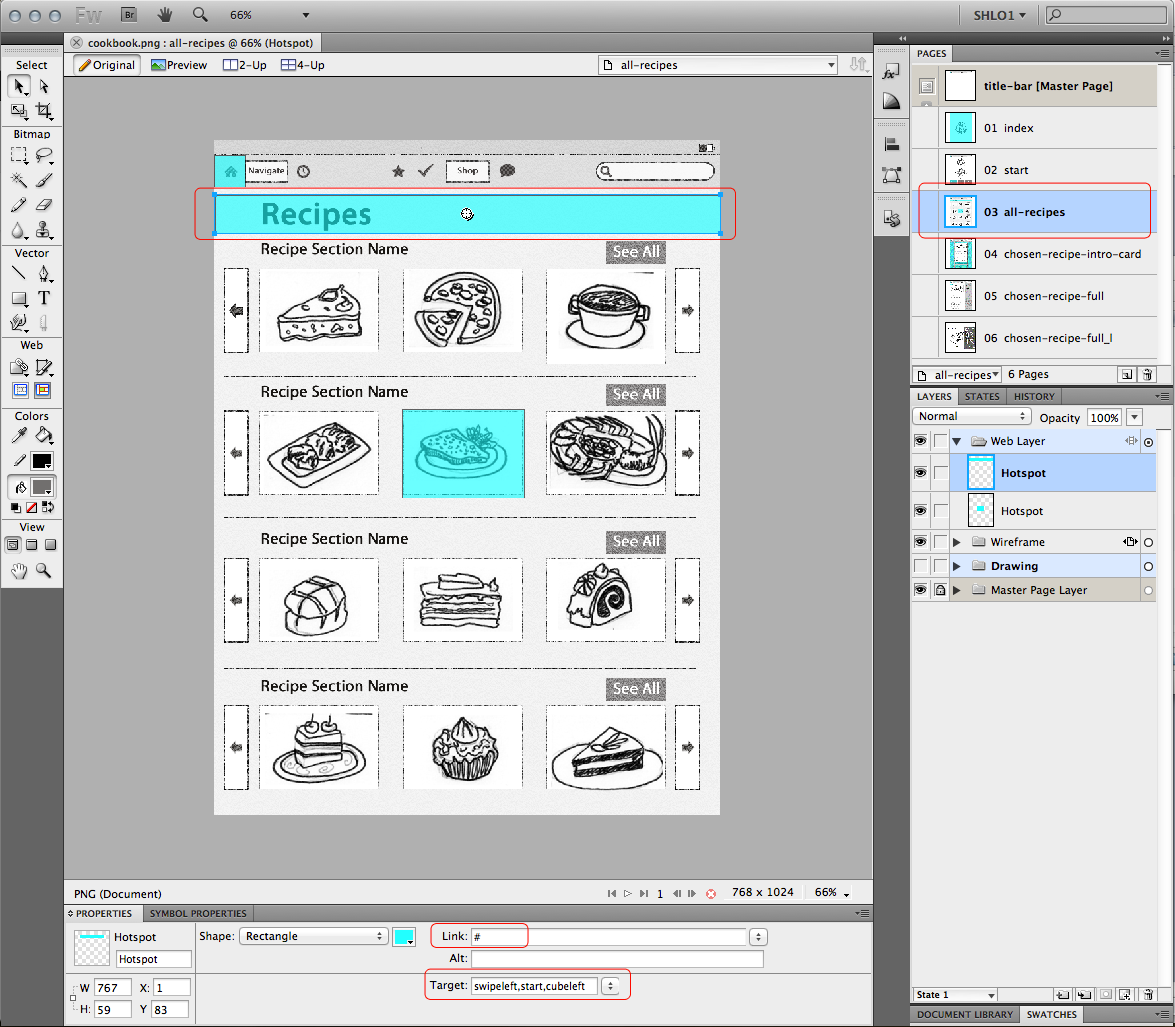
Page 3: Recipe Selection Screen
We will now create a swipeable region at the top of the screen that (in addition to the “Home” button we’ve already created) allows the user to go back to the start page. While this functionality is not necessary, it gives the user another way to navigate the app, and it will teach you how to create a swipe in your prototype:
- In the Pages panel, select the third page,
all-recipes. - Create a hotspot that covers the entire width of the screen and the horizontal band across the title “Recipes” (see the illustration below).
- Customize the hotspot in the Properties panel:
- Initiate the swipe function: in the “Link” field, type
#(a hash sign).
- Initiate the swipe function: in the “Link” field, type
When a swipe is set, the transition, swipe and link are defined in the “Target” field:
- In the “Target” field, type
swipeleft,start,cubeleft(i.e. when you swipe left, go to the start page, using the cubeleft transition).
The preceding steps should result in a hotspot and hotspot properties as shown in this screenshot. (Larger version)
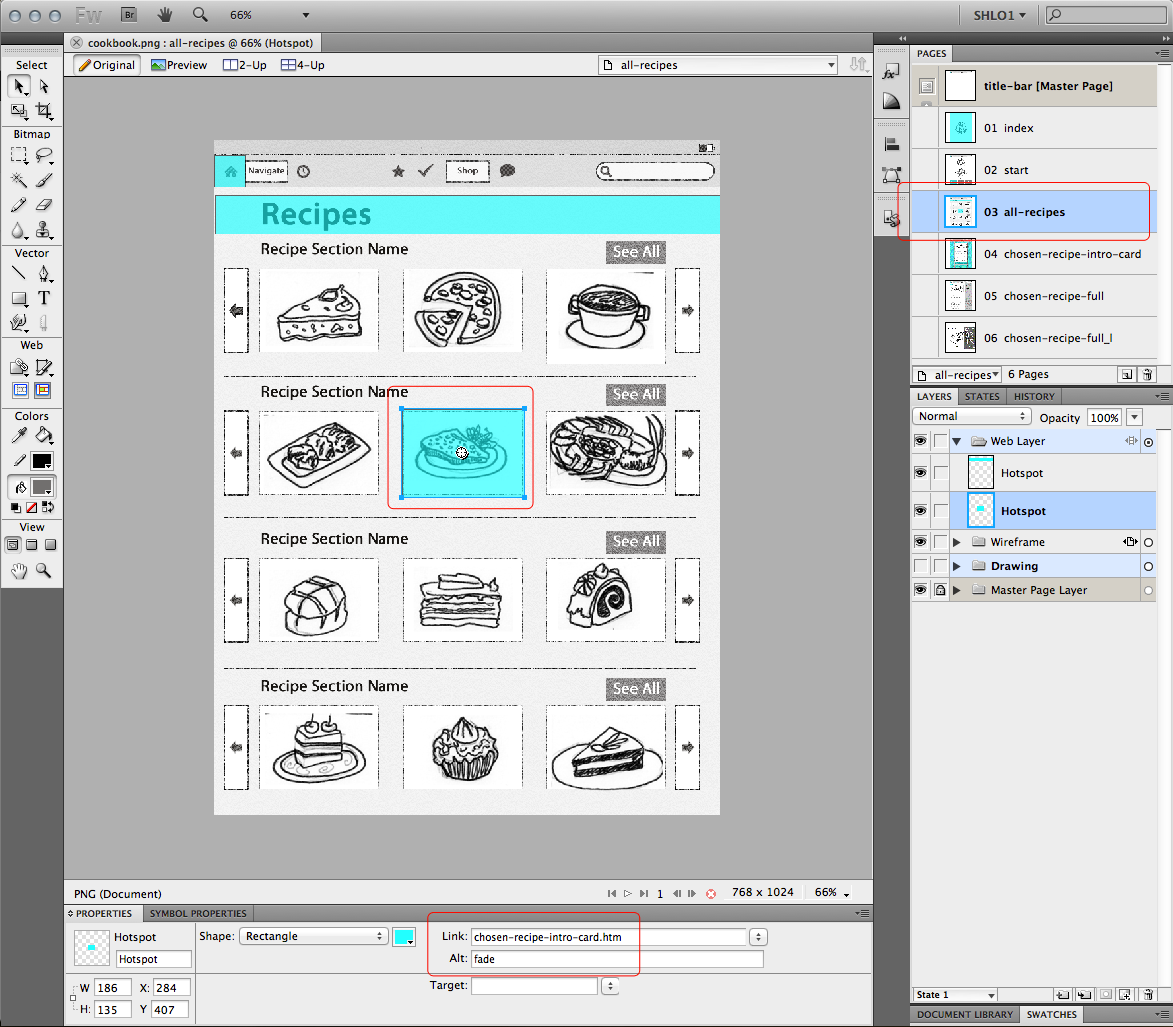
Next, let’s enable the user to choose a particular recipe:
- Over the Salisbury steak (located in the middle of the second row from the top), draw a hotspot.
- Customize the hotspot in the Properties panel:
- Choose which page the hotspot will link to: in the “Link” field, select
chosen-recipe-intro-card.htm. - Choose the transition: type
fade.
- Choose which page the hotspot will link to: in the “Link” field, select
The preceding steps should result in a hotspot and hotspot properties as shown in this screenshot. (Larger version)
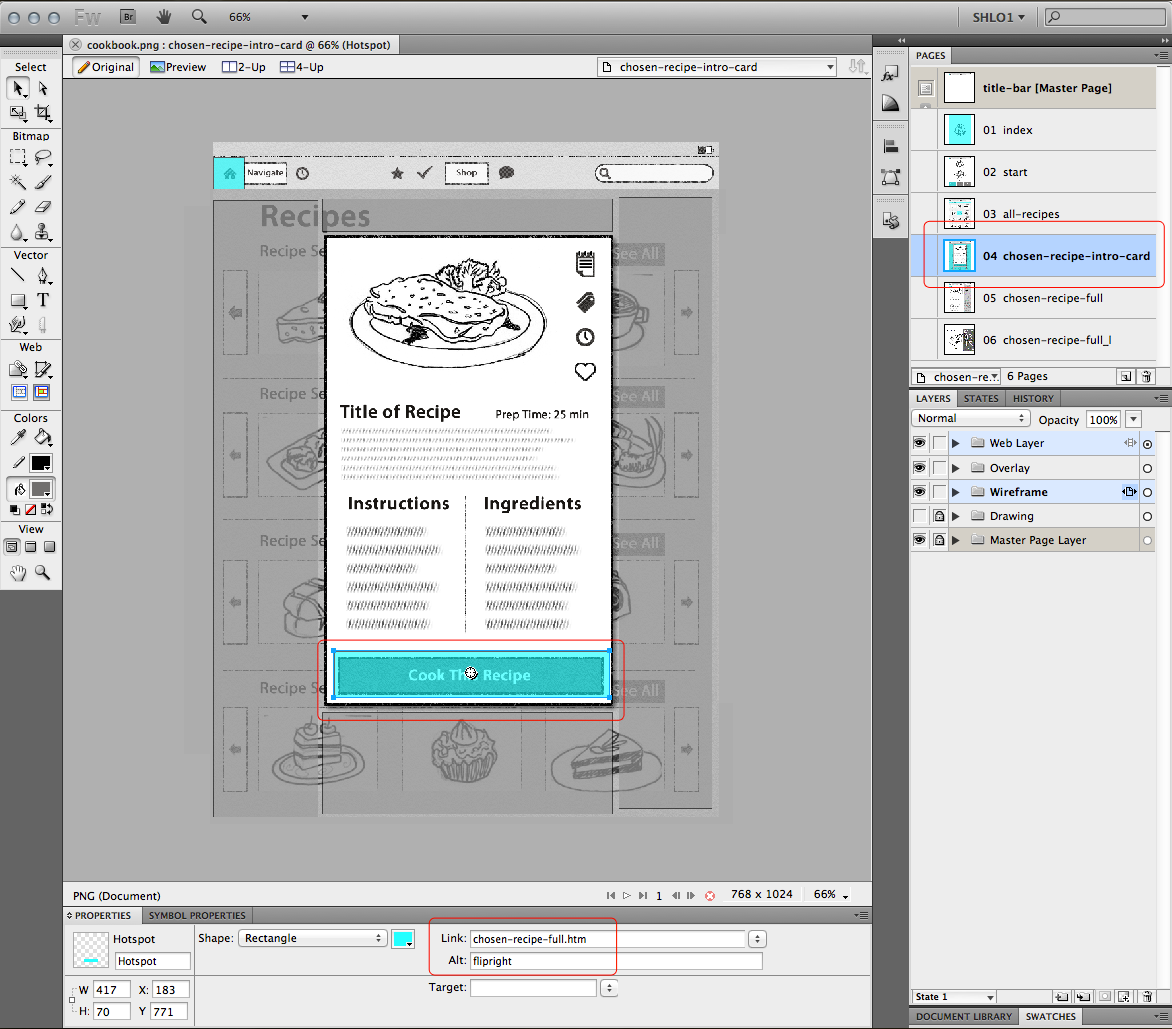
Page 4: Recipe Info Card
In the Pages panel, select the page chosen-recipe-intro-card.
Note: The design of page four is similar to the design of page three, in that page four is simply a lightbox laid over page three. This was achieved by sharing the wireframe layer of page three to page four. Sharing layers in Fireworks is an efficient way to maintain consistency in a project. The benefit of sharing layers between pages is that, if the design of page three is changed, those changes will be automatically reflected on page four.
- Create a hotspot over the “Cook This Recipe” button.
- Customize the hotspot in the Properties panel:
- Choose which page the hotspot links to: in the “Link” drop-down menu, select
chosen-recipe-full.htm. - Choose the transition: in the “Alt” field, type
flipright.The preceding steps should result in a hotspot and hotspot properties as shown in this screenshot. (Larger version)
- Choose which page the hotspot links to: in the “Link” drop-down menu, select
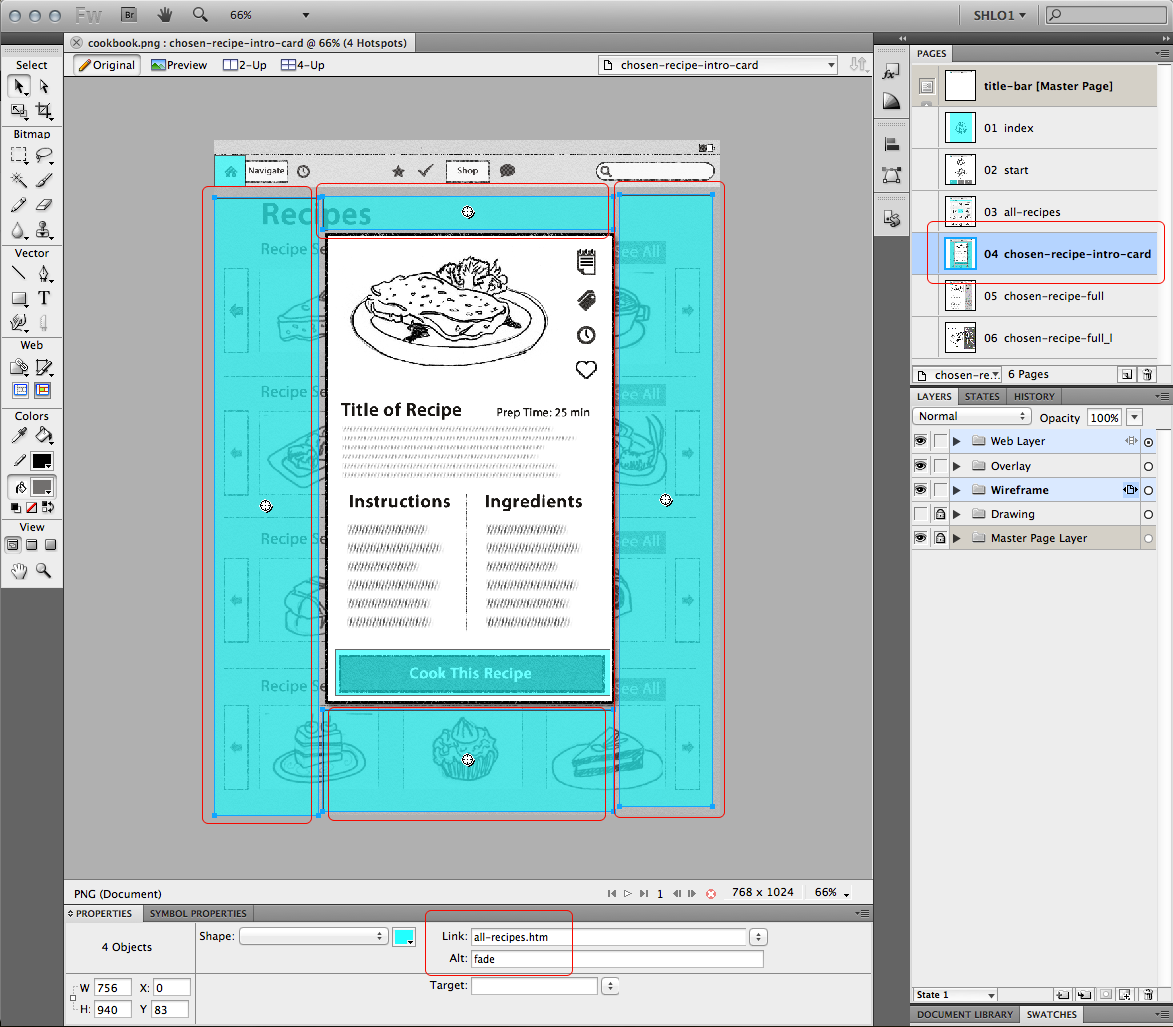
- Allow the user to close the lightbox:
- Create four hotspots that completely surround the lightbox (one above, one below, one to the right and one to the left), and with the same attributes (i.e. the “Link” is
all-recipes.htm, and “Alt” isfade).
- Create four hotspots that completely surround the lightbox (one above, one below, one to the right and one to the left), and with the same attributes (i.e. the “Link” is
The preceding steps should result in a hotspot and hotspot properties as shown in this screenshot. (Larger version)
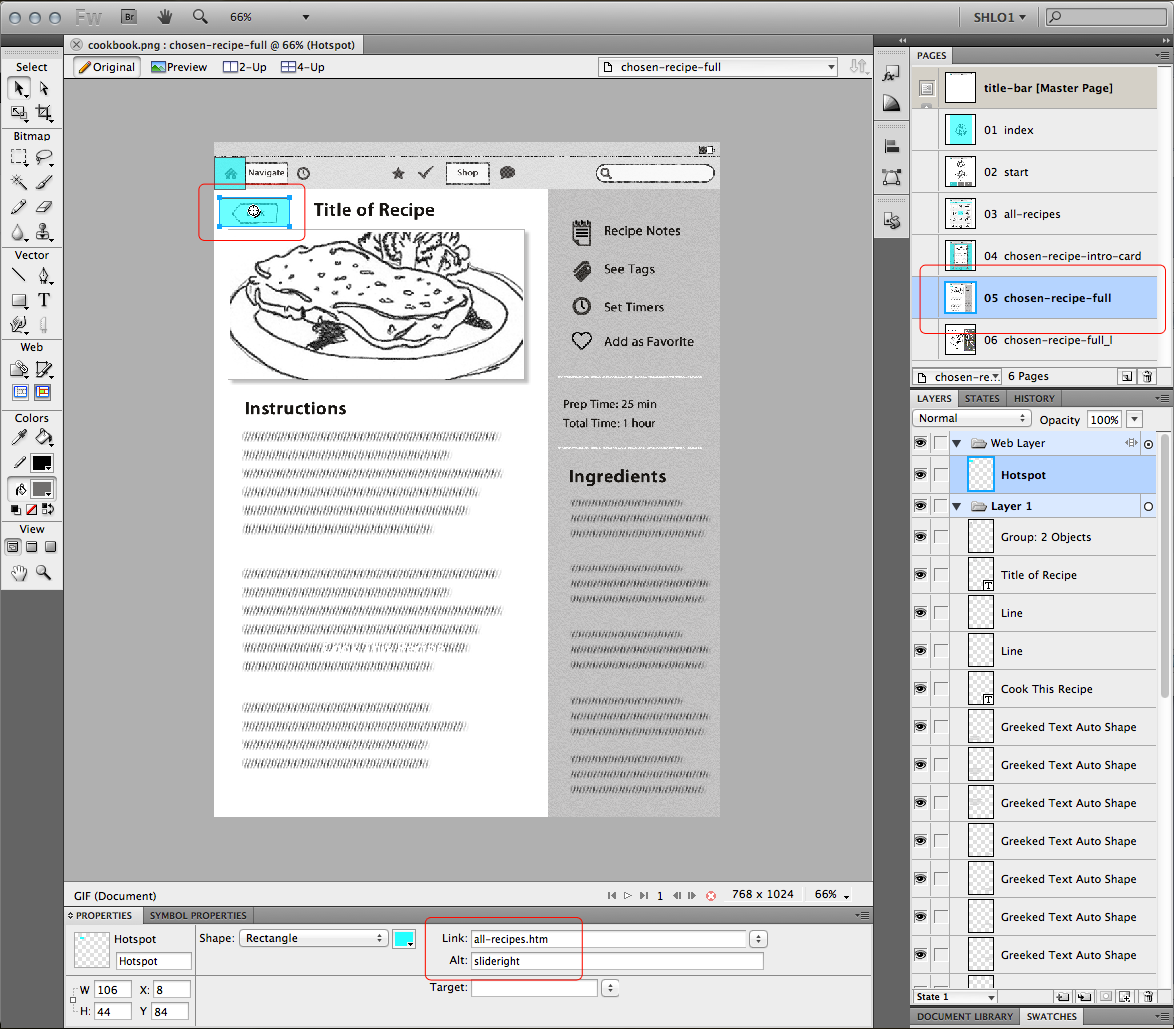
Page 5: Recipe Detail Page
We will now create a “Back” button from the recipe detail page:
- Select
chosen-recipe-fullin the Pages panel. - Create a hotspot over the “Back” button in the upper-left part of the screen.
- Customize the hotspot in the Properties panel:
- Choose which page the hotspot links to: in the “Link” drop-down menu, select
all-recipes.htm. - Choose the transition: in the “Alt” field, type
slideright.
- Choose which page the hotspot links to: in the “Link” drop-down menu, select
The preceding steps should result in a hotspot and hotspot properties as shown in this screenshot. (Larger version)
Page 6: Landscape Of The Recipe Detail Page
Note: Page five and six have a special relationship: they have the same name, except for the latter’s suffix of _l. Thus, when page five is being viewed and the iOS device is rotated to landscape mode, the view will switch to page six!
Unlike the first five pages, page six has a landscape orientation. This was achieved by creating a page, adding _l to the page’s name, and modifying the size of the canvas (Modify → Canvas → Canvas Size):
- Set the width to 1024 pixels and the height to 768 pixels;
- Enable the “Current page only” option.
Changing the size of the landscape canvas
To design the landscape page, either draw the landscape version from scratch, or rearrange and resize the graphics and symbols from the portrait version to fit the wider format.
Conclusion
Now that all of the pages are linked together with hotspots, and the TAP properties (transitions, gestures and timers) are correctly set, the prototype should be ready for exporting.
We’ll do this in the next and final part of this tutorial!
Further Reading
- Introducing New iOS6 Features In Mobile Safari
- Developing A Design Workflow In Adobe Fireworks
- Transform A Tablet Into An Affordable Kiosk For Your Clients
- Developing A Design Workflow In Adobe Fireworks
- Switching From Adobe Fireworks To Sketch: Ten Tips And Tricks
- The Present And Future Of Adobe Fireworks
- The Power of Adobe Fireworks: What Can You Achieve With It?


