Building An App In 45 Minutes With Meteor

Email Newsletter
Weekly tips on front-end & UX.
Trusted by 182,000+ folks.
 Celebrating 10 million developers


 Custom Web Forms for Angular, React, & Vue. Your backend.
The other day, I finally accomplished one of my long-standing goals: to go from one of those “Wouldn’t it be cool…” ideas to a working, live app in less than 1 hour. 45 minutes, actually.
It all started with a design meet-up in San Francisco. I can honestly say this was the best meet-up I’ve ever been to: Even though it was announced only two days in advance, more than 200 people RSVPed, and a good number of them showed up. It was a great chance to put faces to familiar names, as well as to make new friends.
But I got to talking with so many people that I didn’t have a chance to get contact info for everybody. So, the next day, I asked the organizers about it and they suggested that everyone who attended leave a link to their Twitter account in a shared Google Doc.
That would work, but I was afraid it would prove to be too much effort. If I’ve learned one thing in my years as a designer, it’s that people are lazy. Instead, what if I built an app that lets the user add their Twitter account to a list in a single click?
The app would work something like this:
- The user signs into Twitter,
- A link to their Twitter profile appears on the page,
- That’s pretty much it!
With my list of requirements complete, I set to work to see how fast I could build this, and I thought it’d be interesting to walk you through the process.
At first, take a peek at how the final app looked like:
Our final bare-bones (but working!) app.
You can also see a demo of the finished product, and find the code on GitHub. (Note: Give it some time to load. Apps hosted on Meteor’s free hosting service often slow down under a lot of traffic.)
A word of warning: This won’t be a traditional tutorial. Instead, it will be a play-by-play walkthrough of how I coded the app in one hour, including the usual dumb mistakes and wrong turns.
Introducing Meteor
I decided to build the app with Meteor. Meteor is a fairly young JavaScript framework that works on top of Node and has a few interesting characteristics.
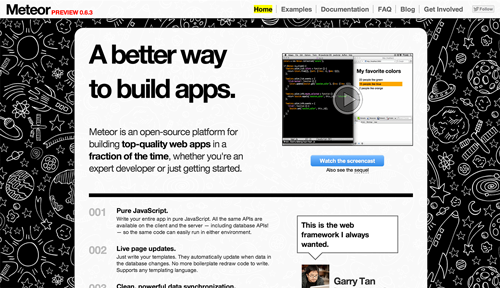
Meteor’s home page
First, it’s all JavaScript, so you don’t need to deal with one language in the browser and another on the server. That’s right: the same language you use to set up jQuery slider plugins can also be used to query your app’s database! The added benefit of this is that your app now has only a single code base — meaning you can make the same code accessible from both the client and server if you need to.
Meteor is also reactive, meaning that any change to your data is automatically reflected everywhere throughout the app (including the user interface) without the need for callbacks. This is a powerful feature. Imagine adding a task to a to-do list. With reactivity, you don’t need a callback to insert the new HTML element into the list. As soon as Meteor receives the new item, it automatically propagates the change to the user interface, without any intervention on your part!
What’s more, Meteor is real time, so both your changes and the changes made by other users are instantly reflected in the UI.
Like many other modern frameworks, Meteor also speeds up your Web app by transforming it into a single-page Web app. This means that instead of refreshing the whole browser window every time the user changes the page or performs an action, Meteor modifies only the part of the app that actually changes without reloading the rest, and then it uses the HTML5 pushState API to change the URL appropriately and make the back button work.
Not having to update the whole page enables another very powerful feature. Instead of sending HTML code over the network, Meteor sends the raw data and lets the client decide how to render it.
Finally, one of my favorite features of Meteor is simply that it automates a lot of boring tasks, such as linking up and minifying style sheets and JavaScript code. It also takes care of routine stuff for you on the back end, letting you add user accounts to the app with a single line of code.
I’ve been experimenting with Meteor for the past six months, using it first to build Telescope (an open-source social news app), and then in turn using Telescope as a base to create Sidebar (a design links website), and I’ve just released a book about it. I believe that, more than any other framework, Meteor helps you get from idea to app in the shortest possible amount of time. So, if all of this has made you curious, I recommend you give it a try and follow along this short walkthrough.
Step 0: Install Meteor (5 Minutes)
First, let’s install Meteor. If you’re on Mac or Linux, simply open a Terminal window and type:
curl https://install.meteor.com | /bin/sh
Installing Meteor on Windows is a little trickier; you can refer to this handy guide to get started.
Step 1: Create The App (1 Minute)
Creating a Meteor app is pretty easy. Once you’ve installed Meteor, all you need to do is go back to the Terminal and type this:
meteor create myApp
You’ll then be able to run your brand new app locally with this:
cd myApp
meteor myApp
In my case, I decided to call my app twitterList, but you can call yours whatever you want!
Once you run the app, it will be accessible at https://localhost:3000/ in your browser.
Step 2: Add Packages (1 Minute)
Because I want users to be able to log in with Twitter, the first step is to set up user accounts. Thankfully, Meteor makes this trivially easy as well. First, add the required Meteor packages, accounts-ui and (since we want users to log in with Twitter) accounts-twitter.
Open up a new Terminal window (since your app is already running in the first one) and enter:
meteor add accounts-ui
meteor add accounts-twitter
You’ll now be able to display a log-in button just by inserting {{loginButtons}} anywhere in your Handlebars code.
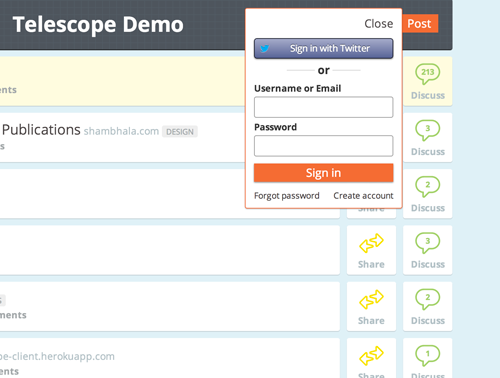 A more complex version of the
 accounts-ui widget, as seen in Telescope.
I didn’t want to have to bother with styling, so I decided to also include Twitter Bootstrap with my app.
I went to the Twitter Bootstrap website, downloaded the framework, extracted the ZIP file, copied it to my app’s Meteor directory, and then hooked up the required CSS files in the head of my app’s main file.
Ha ha, not really. What is this, 2012? That’s not how it works with Meteor. Instead, we just go back to the Terminal and type:
meteor add bootstrap
Client Vs. Server
I guess at this point I should briefly tell you more about how Meteor apps work. First, we’ve already established that a Meteor app’s code is all JavaScript. This JavaScript can be executed in the browser like regular JavaScript code (think a jQuery plugin or an alert() message), but can additionally be executed on the server (like PHP or Ruby code). What’s more, the same code can even be executed in both environments!
So, how do you keep track of all this? It turns out Meteor has two mechanisms to keep client and server code separate: the Meteor.isClient and Meteor.isServer booleans, and the /client and /server directories.
I like to keep things clean; so, unlike the default Meteor app that gets generated with meteor create (which uses the booleans), I’d rather use separate directories.
Also, note that anything that isn’t in the /client or /server directories will be executed in both environments by default.
Since our app is pretty simple, we won’t actually have any custom server-side code (meaning that Meteor will take care of that part for us). So you can go ahead and create a new /client directory, and move twitterList.html and twitterList.js (or however your files are called) to it now.
Step 3: Create The Markup (10 Minutes)
I like to start from a static template and then fill in the holes with dynamic data, so that’s what I did. Just write your template as if it were static HTML, except replace every “moving part” with Handlebars tags. So, something like this…
<a href="https://twitter.com/SachaGreif">Sacha Greif</a></p>
… becomes this:
<a href="https://twitter.com/{{userName}}">{{fullName}}</a>
Of course, those tags won’t do anything yet and will appear blank. But we’ll match them up with real data pretty soon. Next, I deleted the contents of twitterlist.html and got to work on my HTML. This is the code I had after this step:
<head>
<title>Who Was There?</title>
</head>
<body>
<div class="container">
<div class="row">
<div class="span6">
<div class="well">
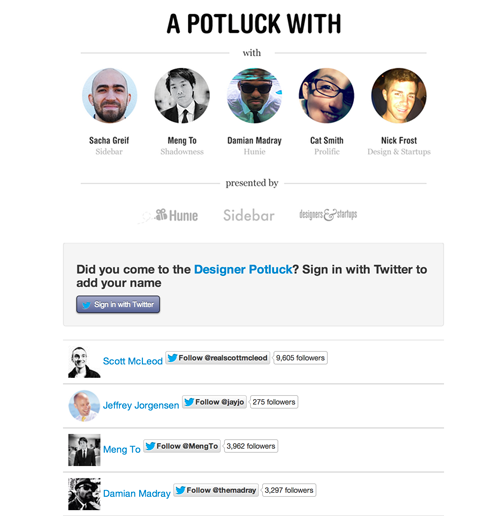
<h4>Did you go to the <a href="https://www.meetup.com/Meteor-SFBay/events/115875132/">Designer Potluck</a>? Sign in with Twitter to add your name.</h4>
{{loginButtons}}
</div>
<table class="table">
<tr>
<td>
<a target="_blank" href="https://twitter.com/{{userName}}"><img src="{{image}}"/> {{fullName}}</a>
</td>
</tr>
</table>
</div>
</div>
</div>
</body>
Step 4: Configure Twitter Sign-In (3 Minutes)
You’ll have noticed the {{loginButtons}} Handlebars tag, which inserts a log-in button on your page. If you try to click it right now, it won’t work, and Meteor will ask you for additional information.
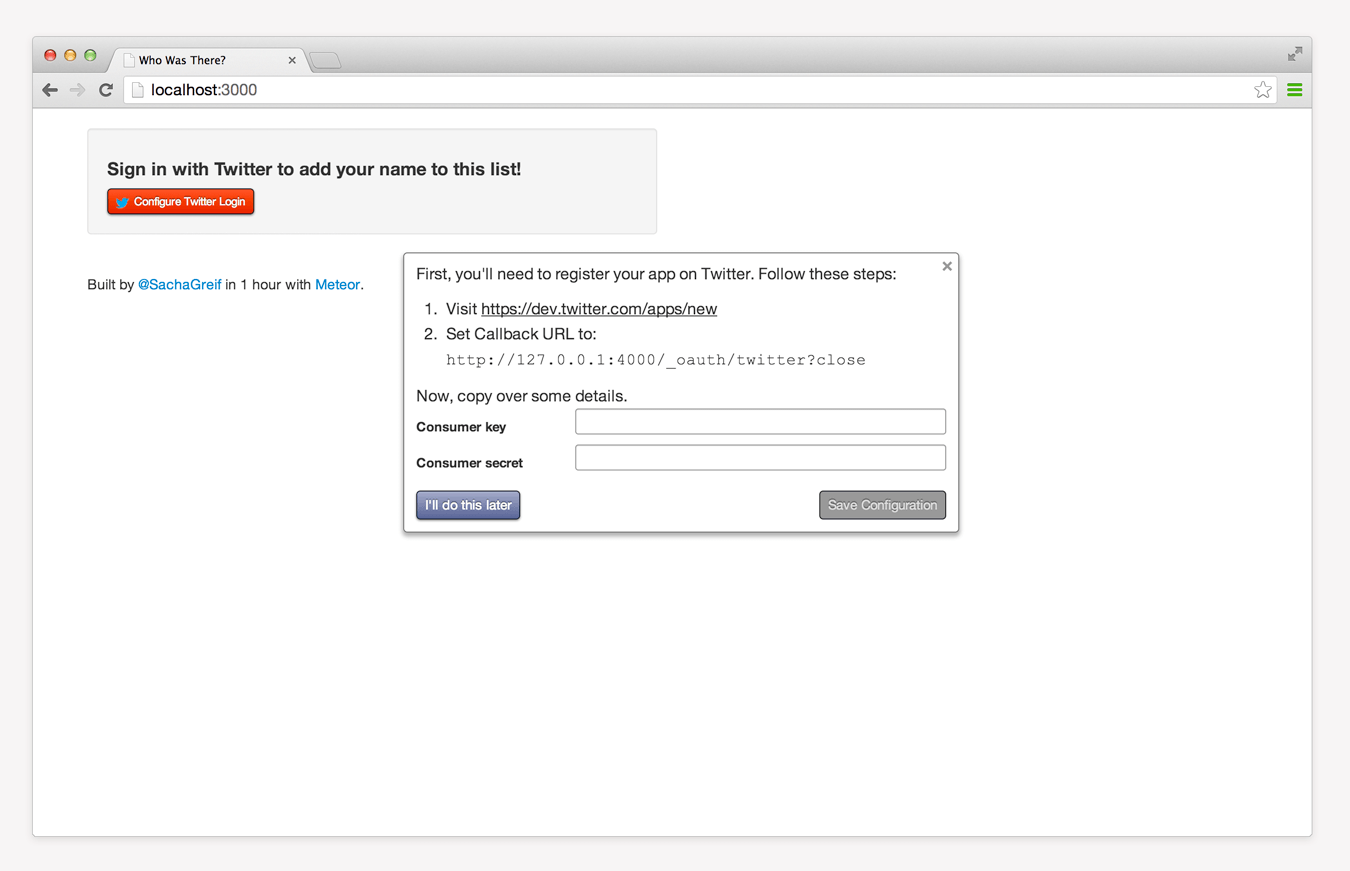
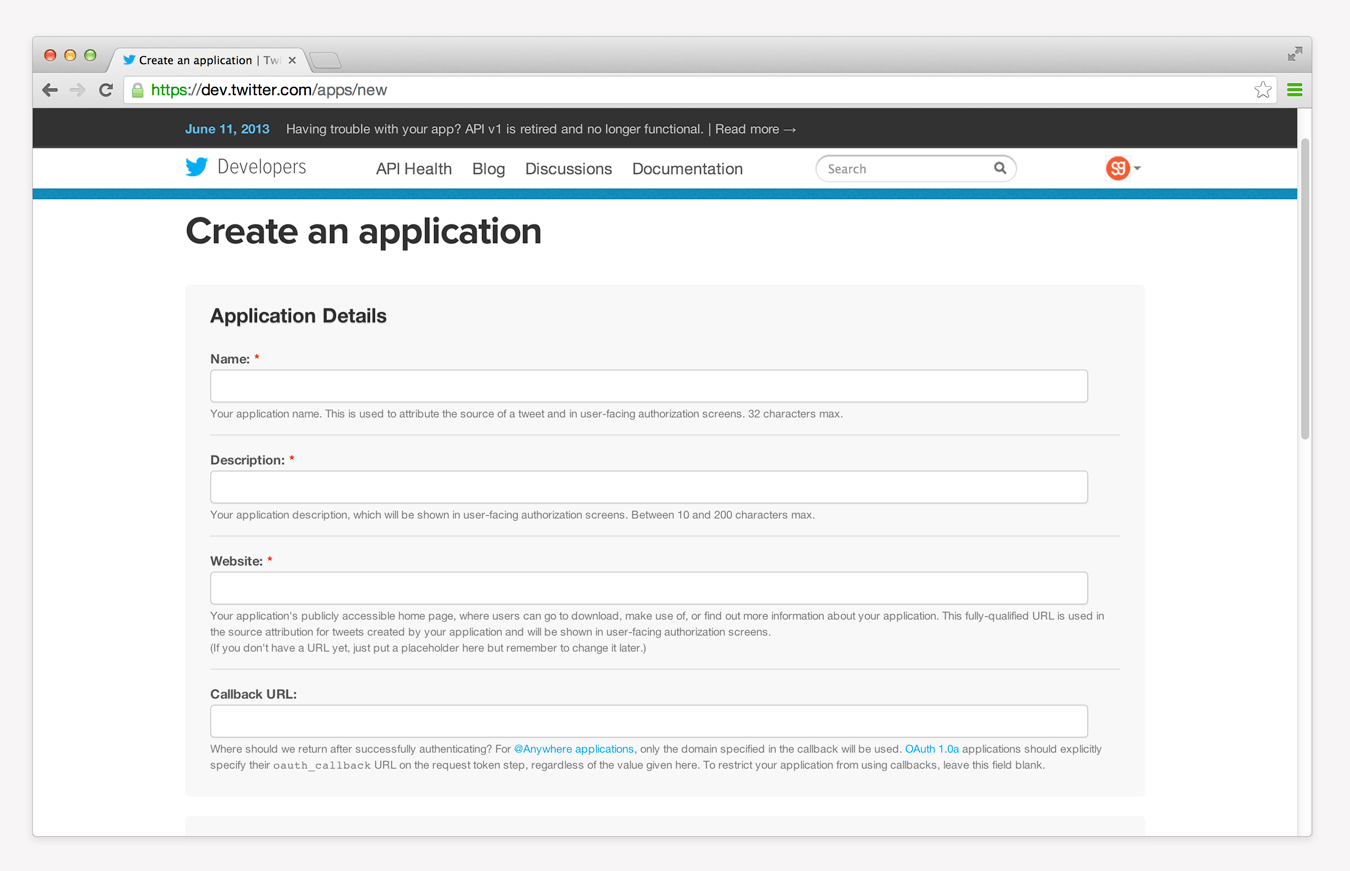
You’ll need to fill in your app’s Twitter credentials. Larger view.
To get this information, we first need to tell Twitter about our app. Follow the steps on the screen and create a new Twitter app; once you’re done, try logging in. If everything has worked right, you should now have a user account in the app!
Creating a new Twitter app. Larger view.
To test this out, open your browser’s console (in the WebKit inspector or in Firebug) and type this:
Meteor.user()
This will retrieve the currently logged-in user, and, if everything has gone right, it will give you your own user object in return (something like Object {_id: “8ijhgK5icGrLjYTS7”, profile: Object, services: Object}).
Step 5: Split It Into Templates (5 Minutes)
You’ll have noticed that our HTML has room to display only a single user. We’ll need some kind of loop to iterate over the whole list. Thankfully, Handlebars provides us with the {{#each xyz}} … {{/each}} helper (where xyz are the objects you want to iterate on, usually an array), which does just that.
We’ll also split the code into a few templates to keep things organized. The result is something like this:
<head>
  <title>Who Was There?</title>
</head>

<body>
  <div class="container">
    {{> content}}
  </div>
</div>
</body>

<template name="content">
  <div class="row">
    <div class="span6">
      <div class="well">
        {{loginButtons}}
      </div>
      <table class="table">
      {{#each users}}
        {{> user}}
      {{/each}}
      </table>
    </div>
</template>

<template name="user">
 <tr>
<td>
  <a target="_blank" href="https://twitter.com/{{userName}}"><img src="{{image}}"/> {{fullName}}</a>
</td>
</tr>
</template>
Step 6: Hook Up Our Template (5 Minutes)
Our template is all set up, but it’s iterating over empty air. We need to tell it what exactly this users variable in the {{#each users}} block is. This block is contained in the content template, so we’ll give that template a template helper.
Delete the contents of twitterlist.js, and write this instead:
Template.content.users = function () {
  return Meteor.users.find();
};
What we’re doing here is defining Template.content.users as a function that returns Meteor.users.find().
Meteor.users is a special collection created for us by Meteor. Collections are Meteor’s equivalent of MySQL tables. In other words, they’re a list of items of the same type (such as users, blog posts or invoices). And find() simply returns all documents in the collection.
We’ve now told Meteor where to find that list of users, but nothing’s happening yet. What’s going on?
Step 7: Fix Our Tags (5 Minutes)
Remember when we typed this?
<a target="_blank" href="https://twitter.com/{{userName}}"><img src="{{image}}"/> {{fullName}}</a>
The {{userName}}, {{image}} and {{fullName}} are just random placeholders that I picked for the sake of convenience. We’d be pretty lucky if they corresponded to actual properties of our user object! (Hint: they don’t.)
Let’s find out the “real” properties with the help of our friend, the browser console. Open it up, and once more type this:
Meteor.user()
The object returned has all of the fields we need. By exploring it, we can quickly find out that the real properties are actually these:
{{services.twitter.screenName}}{{services.twitter.profile_image_url}}{{profile.name}}
Let’s make the substitutions in our template and see what happens.
It works! Our first and only user (you!) should now appear in the list. We’re still missing some fields, though, and only the user’s full name appears. We need to dig deeper into Meteor to understand why.
A Database On The Client
We haven’t really touched on what Meteor does behind the scenes yet. Unlike, say, PHP and MySQL, with which your data lives only on the server (and stays there unless you extract it from the database), Meteor replicates your server-side data in the client and automatically syncs both copies.
This accomplishes two things. First, reading data becomes very fast because you’re reading from the browser’s own memory, and not from a database somewhere in a data center.
Secondly, modifying data is extremely fast as well, because you can just modify the local copy of the data, and Meteor will replicate the changes for you server-side in the background. But this new paradigm comes with a caveat: We have to be more careful with data security.
Step 8: Make The App Secure (1 Minute)
We’ll address data security in terms of both writing and reading. First, let’s prevent people from writing whatever they want to our database. This is simple enough because all we need to do is remove Meteor’s insecure package:
meteor remove insecure
This package comes bundled with every new Meteor app to speed up development (letting you insert data client-side without having to set up all of the necessary checks and balances first), but it is obviously not meant for production. And because our app won’t need to write to the database at all (except for creating new users — but that’s a special case that Meteor already takes care of), we’re pretty much done!
More On Security
While we’re on the topic of security, Meteor apps also come with a second default package, autopublish, which takes care of sending all of the data contained in your server-side collections to the client.
Of course, for a larger app, you probably won’t want to do that. After all, some of the information in your database is supposed to remain private, and even if all your data is public, sending all of it to the client might not be good for performance.
In our case, this doesn’t really matter because we do want to “publish” (i.e. send from the server to the client) all of our users. Don’t worry, though — Meteor is still smart enough not to publish sensitive information, such as passwords and authentication tokens, even with autopublish on.
Step 9: Add Follow Buttons (8 Minutes)
While visitors can now click on a name to go to their Twitter profile, simply displaying follow buttons for each user would be much better. This step took a little tinkering to get right. It turns out that Twitter’s default follow button code doesn’t play nice with Meteor.
After 15 minutes of unsuccessful attempts, I turned to the Google and quickly found that for single-page apps, Twitter suggests using an iframe instead.
This worked great:
<iframe style="width: 300px; height: 20px;" src="//platform.twitter.com/widgets/follow_button.html?screen_name={{services.twitter.screenName}}" height="240" width="320" frameborder="0" scrolling="no"></iframe>Step 10: Deploy (1 Minute)
The last step is to deploy our app and test it in production. Once again, Meteor makes this easy. No need to find a hosting service, register, launch an instance, and do a Git push. All you need to do is go back to the Terminal and type this:
meteor deploy myApp
Here, myApp is a unique subdomain that you pick (it doesn’t have to be the same as the app’s name). Once you’ve deployed, your app will live at . Go ahead and ask a few people to register: You’ll see their Twitter profiles added to the list in real time!
Going Further
Of course, I had to gloss over a lot of key Meteor concepts to keep this tutorial light. I barely mentioned collections and publications, and I didn’t even really talk about Meteor’s most important concept, reactivity. To learn more about Meteor, here are a few good resources:
- Documentation, Meteor This is a required reference for any Meteor developer. And it’s cached, meaning you can even access it offline.
- EventedMind Chris Mather puts out two Meteor screencasts every Friday. They’re a great help when you want to tackle Meteor’s more advanced features.
- Discover Meteor I’m obviously biased, but I think our book is one of the best resources to get started with Meteor. It takes you through building a real-time social news app (think Reddit or Hacker News) step by step.
- Blog, Discover Meteor We also make a lot of information available for free on our blog. We suggest looking at “Getting Started With Meteor” and “Useful Meteor Resources.”
- “Prototyping With Meteor” A tutorial we wrote for NetTuts that takes you through building a simple chat app.
I truly believe Meteor is one of the best frameworks out there for quickly building apps, and it’s only going to get better. Personally, I’m really excited to see how the framework evolves in the next couple of months. I hope this short tutorial has given you a taste of what Meteor’s all about and has made you curious to learn more!
Further Reading
- Build Your Own Product Hunt With Telescope And Meteor
- Building A First-Class App That Leverages Your Website
- Four Ways To Build A Mobile Application, Part 1: Native iOS
- Facing The Challenge: Building A Responsive Web Application


