WordPress Functions To Make Blogging Easier

Email Newsletter
Weekly tips on front-end & UX.
Trusted by 182,000+ folks.
 Register for Free


 Custom Web Forms for Angular, React, & Vue. Your backend.
 Celebrating 10 million developers
functions.php theme file provides an efficient way of modifying WordPress on a theme by theme basis. This file contains mostly theme related functions but it can also be used to enhance or modify default WordPress behavior. This file is saved inside the themes’ folder and a limitless amount of modifications can be added.In this article, we’ll share a few helpful functions that use WordPress default code to modify or enhance a blog’s behavior. By relying on default code, we can program changes that will work in all versions of WordPress and in all themes. Any modifications added to the functions.php file will activate only in the current theme, giving us control over changes theme by theme. Unlike creating a plugin, using this file for customizations enables us to control which themes benefit from any changes.
We’ll show you how to save time by using the permalink to your blog’s index within posts, how to disable the auto-formatting behavior, how to prevent WordPress from making your symbols fancy, and how to disable, customize or even create your own admin bar. Each function uses only native WordPress code, which means that our changes should work in any theme!
WordPress Shortcodes
In version 2.5, WordPress introduced shortcodes. Shortcodes are referenced functions that we use in posts and pages to run the functions inside posts. For example, we could add the function to the functions.php file and give it a name. We would then use that function’s name in WordPress’ default add_shortcode code and then call this shortcode in a post using the assigned name inside square brackets.
// Creates our function

function ExampleShortcode(){
    Code we want to process here…
}

// Registers our function with the shortcode. First parameter is the shortcode name, the second is our function name.

add_shortcode('example','ExampleShortcode');
We then process this function in a post or page using [example]. We can also add parameters to the shortcode to gain even more control over how its content is parsed. Several of the functions in this article use shortcodes, so you might wish to read Konstantinos Kouratoras’ article “WordPress Shortcodes: A Complete Guide.” You might also wish to consult the entry on the “Shortcodes API” in the WordPress Codex.
1. Navigational Links In Posts
When writing posts or pages, bloggers often need to link to other entries in their blog. When linking, they’d simply link to the address of the article, like https://www.myblog.com/a/page/. If they post regularly to their blog, they might start adding dozens of links throughout their articles.
Imagine what a pain it would be if your address or directory structure changed and you had to manually go through every post or page and change these links. We can make all links in our posts or pages dynamically point to the correct blog addresses by using WordPress’ simple get_bloginfo(‘wpurl’) function.
To do this, we create a shortcode in the functions.php file that displays our blog’s address as defined in the settings.
function BlogAddress(){
    return get_bloginfo('wpurl');
}
add_shortcode('url','BlogAddress');
We then use the [url] shortcode in posts and pages to display the address of the blog in place of the absolute address. For example, <a href="[url]/a/page/"> would link to the same page as https://www.myblog.com/a/page/; but if the blog’s address were ever to change, only the first link would point to the correct address.
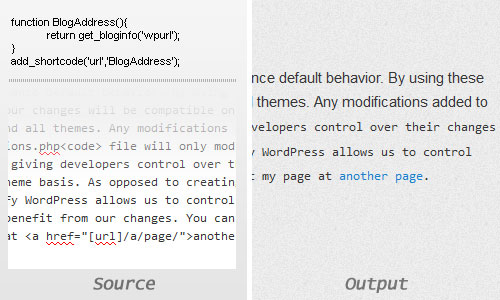
There’s no significant difference between this link and an ordinary link, but this link’s address will always be correct.
If we need to change the blog’s address or directory structure, then every link using the [url] shortcode would change when the settings are modified. This saves us from having to manually change potentially hundreds of links across hundreds of posts. The permalinks to these pages (in this case, /a/page/) would always remain the same, but the domain of our website would stay correct if we needed to change it at any point. We can also use this shortcode any time we need to print our blog’s address in a post or page.
2. Disable Source Modification
When we’re writing posts, WordPress likes to assist us by modifying and “tidying” up our source, even in HTML mode. While this is welcome most of the time, it can be troublesome occasionally.

This story extract was cut and pasted from Microsoft Word. Notice how WordPress adds dozens of <br/> tags of its own accord.
If you’re cutting and pasting something from a word processor, the default behavior of WordPress is to replace all line breaks in the pasted data with <br />, regardless of whether they’re the ends of paragraphs. This can lead to strange formatting on pages, with random line breaks all over the place.
WordPress also likes to ensure that any dropped lines in your source become <br />. If you’re dropping down one line to keep things tidy, such as when adding two images in a row, then the public page will display a full line break between the images. But this is not what you were after, and if it was, you’d have added you own <br /> tag.
Several plugins will alter this behavior, but you can add the following line to your functions.php file to disable it completely:
remove_filter ('the_content', 'wpautop');The filter we are disabling is wpautop, which adds both <p> and <br /> tags to your source in place of line breaks. The formatting is performed when the page is displayed to the end user, so posts and pages residing in your database shouldn’t need any modification to fix any previous problems with this filter.
The same line-break formatting is applied to post excerpts. You can disable it by replacing the_content with the_excerpt.
remove_filter ('the_excerpt', 'wpautop');Now, all pages displayed by this theme will strictly follow the line-break rules that you’ve put in their source. Usually, this filter won’t need disabling, and for authors who aren’t familiar with HTML, it might cause issues. Will they remember to add line breaks themselves and to add paragraph tags when necessary? This is worth considering before disabling this filter.
But if you’re the only one publishing on your blog, then you’ll likely be adding the <br/> and <p> out of habit. Disabling this filter ensures that you have total control over line breaks, and it prevents code previews and cut-and-pasted text from being butchered when the page is displayed.
But what about auto-quotes and the replacement of standard quotes with “fancy quotes,” as WordPress calls them? This leads us to the next tip!
3. Disable Fancy Characters
WordPress likes to make quotes, dashes, ellipses and symbols pretty and fancy because it adds a little color to otherwise bland elements on the page. The problem is that this change is not optional, and it can be a nuisance when you don’t want fancy quotes, dashes and so on. If you want to add a block of HTML code to your page, the wptexturize function will replace every standard quote or double quote with the fancy entity versions. This will totally ruin your block of code! It will also be a nightmare for people who cut and paste this code for their own use because they will be copying the fancy quotes, and fancy quotes are not parsed as valid HTML code.
Fancy quotes are a nightmare when you’re sharing code samples in WordPress posts.
Replacing symbols with their HTML entity counterparts is useful, but the decision of when to do this should be left to the author. Because this is done by default, the control is out of your hands. This can be a pain, though less so than fancy quotes.
Disabling this behavior is easy and can be done in the functions.php file. To do this, we’ll look for the WordPress filter that is causing all of this behavior and remove it from the fields where we want it to stop. The wptexturize filter is the culprit. As with the line-break issue in the second tip, this formatting is applied once the page is displayed, so you shouldn’t have to edit previous posts if you had used standard quotes.
remove_filter ('the_title', 'wptexturize');This function above will remove the fancy character formatting from the title of the post. You can remove it from any other parts of your posts by assigning the filter to the relevant tag. For example, to remove fancy characters from the content of posts, you would use remove_filter (‘the_content’, ‘wptexturize’);.
To remove fancy characters from your posts completely, add all of the following filters to your functions.php file.
remove_filter ('single_post_title', 'wptexturize');
remove_filter ('bloginfo', 'wptexturize');
remove_filter ('wp_title', 'wptexturize');
remove_filter ('category_description', 'wptexturize');
remove_filter ('list_cats', 'wptexturize');
remove_filter ('comment_author', 'wptexturize');
remove_filter ('comment_text', 'wptexturize');
remove_filter ('the_title', 'wptexturize');
remove_filter ('the_content', 'wptexturize');
remove_filter ('the_excerpt', 'wptexturize');
Consider when would be the right time and place to remove this filter. If you’re not going to be sharing HTML code with your visitors, then there would be no reason to disable it for the content field. Also note that these fields will stop converting symbols to their HTML entity counterparts; so, symbols like © will not be converted to ©. Converting these symbols in your posts’ source code is a good habit anyway, so this shouldn’t be much of an issue.
“But I Want To Be Able To Choose When This Works.”
Perhaps you don’t want auto-formatting or auto-quoting to be disabled in every post. As with all customizations, there are times when it would not be welcome. A plugin in the WordPress directory named WP Unformatted lets you disable all auto-formatting and auto-texturizing post by post. When installed, this plugin would activate for every theme, but it’s still worth a mention. Please note, the plugin might be listed as outdated, but it still functions fine.
4. Remove Or Modify The Admin Bar
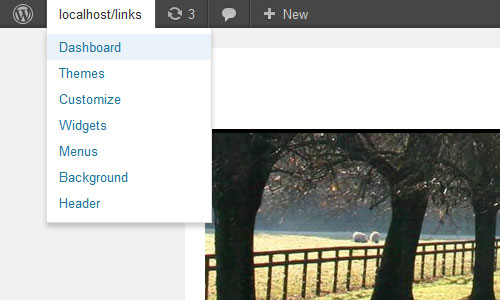
WordPress’ admin bar, as seen in the Twenty Ten theme.
WordPress’ admin bar is a helpful tool that provides quick access to several administrative sections of a website. It’s the gray bar that appears at the top of every page when you’re logged in. The admin bar will appear for all logged-in users if enabled, although users without administrative privileges will see only a couple of links. Another issue with the admin bar is that it adds padding to the top of every page, which can distort some layout elements that have absolute or fixed positioning.
Remove The Admin Bar
We can disable the admin bar completely by adding the following code to our functions.php file.
add_filter('show_admin_bar','__return_false');This not only will hide the admin bar, but will stop the whole process from being executed. It will also remove the padding at the top of the page.
Show The Admin Bar For Administrators
The problem with this code is that it also hides the admin bar for administrators. If the administrator or anyone who has privileges would like to see the admin bar, you can add a condition to the function above that will check the user’s privileges and hide the bar if they’re not sufficient.
if (!current_user_can( 'manage_options' )) {
        add_filter('show_admin_bar', '__return_false');
}
The line if (!current_user_can( ‘manage_options’ )) checks the permissions of the currently logged-in user. Only users at the administrator level will be able to change blog options, which means that anyone who’s not an administrator will fail this check and not see the admin bar on their screen.
Make Your Own Admin Bar
The admin bar isn’t of much use to registered users who don’t have permission to play with your blog’s settings. The only links they’ll see are to manage their accounts. To make registration and account settings a focal point of your blog, you’d have to add a lot more options to the bar. You might even have to rewrite it completely.
The first place you’d look to set up your own admin bar is in WordPress’ plugin directory, but creating your own admin bar in the functions.php file and then using it with your theme is also possible.
The first step in creating a custom admin bar is to disable the default one with the function shown above: add_filter(‘show_admin_bar’,’__return_false’);. Hide the default bar completely, or else administrators will see two bars.
Next, we create a function that contains our custom admin bar and all of the functionality and HTML that we want it to contain, and we add it to the functions.php file. No special function or filter is needed for this; simply give your bar a logical name, and put the desired code in it. In order for the bar to interact with the user’s settings and profile data, we’ll need to call on a few global variables.
<?php
function MyFirstAdminBar(){

    //global variables
    global $user_ID,$current_user,$user_identity;

    //the following obtains all of the user's profile data
    get_currentuserinfo();

    //the following will execute if the user is logged in
    if(is_user_logged_in()){

?>

        place your logged-in code here

<?php

    } else {

?>

        place your logged-out code here

<?

    }

} // end of function
?>
There is no end to the creative ways in which you can style the admin bar and the information displayed to users. The Codex entry for get_currentuserinfo lists the variables that can be used to display user-specific data. These variables can be used to show the user’s avatar, links to their profile, etc. At the end of this article, we’ll share a few useful links to help you customize the admin bar and decide what data to include.
To display the custom admin bar, you have to call on the function in your header file. All of the necessary checks for whether the user is logged in and what permissions they have are performed by this function, and then the relevant HTML gets displayed.
Custom Bars Take Time
Consider whether you need your own admin bar at all. Creating one from scratch can be time-demanding, whereas a plugin, although it would apply to every theme, might customize the bar to the extent you’re looking for. A few plugins in WordPress’ plugin directory will help you customize the existing admin bar, such as WP Custom Admin Bar, which allows you to style, add and hide links from the bar.
If you do want to make your own bar, now you know how! Be sure to follow the links at the end of this article for a few helpful articles on customizing the admin bar.
5. Theme Formatting
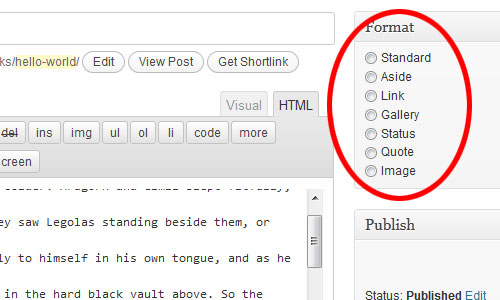
Once the feature is activated, authors can choose the relevant format from the post’s menu.
Introduced in version 3.1, post formats provide theme developers with a standardized list of formats with which to style their themes. A format is then picked post by post by the post’s author. The formats available are built into the core of WordPress, which means they will be the same on every WordPress blog.
This feature of WordPress is relatively new and has been somewhat overlooked. I often browse through WordPress’ themes directory for inspiration and ideas, and I find that not many use post formats. Activating and using them is easy; simply add this function to the functions.php file:
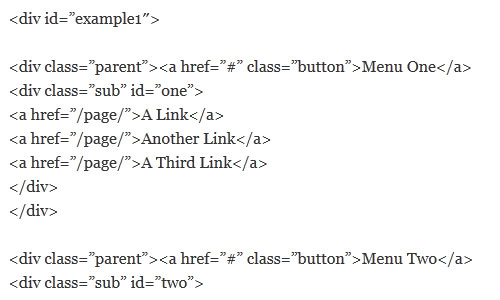
add_theme_support( 'post-formats', array( 'aside' ) );This will activate post formatting for the current theme and give authors a choice between a standard or aside format. A long list of formats may be used for a variety of purposes. The full list of standardized formats is in the Codex entry for “Post Formats.”
Now that the aside format is activated, an author can choose it in the options for their post, and the post will then by styled as an aside. But how does the theme’s author format an aside post? This is done in the single.php theme file. We use a conditional statement to check whether the post has an aside format and, if it does, we output our custom HTML. Checking whether post formats have been enabled will help to prevent errors in case they haven’t been.
// check if post formats have been enabled in functions.php
if(function_exists( 'has_post_format' )){

    // check if the post has an aside format and use different IDs accordingly
    if(has_post_format( 'aside' )){

        echo '<div id="asidecontent">';

    } else {

        echo '<div id="content">';

    }
}
You can use this conditional check to see whether any post format has been enabled by replacing aside with the relevant name. To check for more than one, simply use an else if conditional check one after the other with each name.
This simple function can add a lot of originality to a blog design. Rather than using the same format over and over, a designer can add different layouts for different purposes. You can also place these conditional checks anywhere inside the WordPress loop to customize different parts of the post, not just the wrapper element.
In his article “Advanced Layout Templates in Wordpress’ Content Editor,” David Hansen explains in detail how to use post formats to provide a variety of different templates for a single theme.
Conclusion
The code snippets in this article are just a few ways to modify WordPress with functions.php. We’ve tried to demonstrate the powerful capabilities of this file. Despite being a theme file, functions.php can be used to modify a plethora of default behavior, with the advantage of being theme-specific (whereas making these changes with a plugin would modify the behavior of every theme).
Hopefully, the functions included here have given you an idea of the kind of functionality that a modified functions.php file can bring and has given you ideas to experiment for yourself to maximize the functionality of your theme.
Additional Reading
- “WordPress Tips and Tricks: functions.php,” Ben Gillbanks
- “WordPress Text Formatting Problem: Solved,” Clay Lua
- “WordPress Post Formats Made Easy,” Ryan Taylor
Customizing The Admin Bar
- “Admin Bar Tricks,” Jeff Starr
- “Customizing the Wordpress Admin Bar,” Johan Brook
- “Manually Customizing the WordPress Admin Bar,” Mika Epstein
Further Reading
- How To Host A WordPress Site On Amazon Lightsail
- Advanced Form Control Styling With Selectmenu And Anchoring API
- Inserting Widgets With Shortcodes
- Limiting The Visibility Of Posts In WordPress Via Usernames


