How To Sketch For Better Mobile Experiences

Email Newsletter
Weekly tips on front-end & UX.
Trusted by 200,000+ folks.

 Flexible CMS. Headless & API 1st


 Register!
Mobile user experience design is maturing. One way to gauge this is to look at the tools at our disposal. Prototyping tools such as Balsamiq, Axure and Fireworks enable us to build wireframes and click-dummies, helping us to explain the targeted user experience. Cross-browser frameworks such as PhoneGap, Zurb Foundation and jQuery Mobile help us to create prototypes using the native languages of the Web: HTML, CSS and JavaScript.
Why? The Case For Sketching
We seem to be in a better position than ever to design great experiences in virtually no time. However, these tools come with a hidden cost: they tempt us to skip the key step necessary to creating a well-designed product — which is to take the time to understand the problem we are given.
That’s why I suggest to start using sketches to understand the problem and to come up with a concept before firing up your favorite tool.
Right now, you are probably thinking one of the following:
"We have a tight deadline and there is no time for doodling. We need to get started." "Designing in [insert your favorite tool] is faster by far. I need to get results quickly." "We need to present results to our [client or project partner or peers]. We cannot show them hand-drawn stuff." "Sorry, but I really can’t draw."
Not only have I heard these objections a couple of times before, I’ve also said all of them myself.
Defining The Problem And The Solution
Sketching enables us to explore the problem space and define the solution space at the same time. It frames our current understanding of the problem, while also helping us to figure out possible solutions.
While we sketch out our thoughts, new ideas will emerge. The ambiguity and lack of detail in sketches foster new ideas. Here, ambiguity is a good thing, because we will automatically try to fill in the blanks in our heads. That’s what makes sketching “generative”: it captures the ideas we already have and sparks new ideas. As Bill Buxton says in Sketching User Experiences:
"Learning from sketches is based largely on the ambiguous nature of their representation. That is, they do not specify everything and lend themselves to, and encourage, various interpretations that were not consciously integrated into them by their creator."
By sketching different solutions to a problem, we can explore them without immediately committing to one of them. This gives us new insight and raises new questions. Sketching is essentially a brainstorming exercise.
The “Cost” Of Sketching
The fastest way to get something out of our heads is to grab a pen and a sheet of paper and quickly sketch it out. Trying to do the same in our favorite prototyping tool takes more time: We have to create a new project, decide on the right library to use, place our little rectangles on the canvas, draw little arrows connecting our little rectangles, rearrange everything a bit to make it look nice — and suddenly 30 minutes or more are gone.
If we don’t like what we see on a sheet of paper, we can just toss it in the bin and start over. Using our prototyping tool, however, makes throwing stuff away harder because of the time and effort we’ve spent creating it — even if the idea wasn’t a great one. Starting over is harder. Paper sketches, on the other hand, are cheap and fast.

The fastest way to capture and evaluate a concept is to sketch it out.
Sketching As A Communication Tool
However worn out the saying is, a picture does say a thousand words. Sketching enables us to walk our peers and stakeholders through our current understanding of a project. We can use various visual representations to explain different aspects of the project (we’ll cover the most common ones in the next chapter). In The Back of the Napkin, Dan Roam says:
"Pictures can represent complex concepts and summarize vast sets of information in ways that are easy for us to see and understand, they are useful for clarifying and resolving problems of all sorts."
Our peers will be able to point out gaps in our thought process and discuss possible solutions and alternatives with us. They will most likely understand our shorthand and be able to give us feedback on the details of our concept. Presenting our idea to others also allows us reflect on our concept; we see mistakes and can find better alternatives just by walking through it.
Sketching As A Collaboration Tool
Sketching is a powerful tool for involving stakeholders early on in the design process. The following chicken-egg problem is typical when defining the process: Stakeholders are not able to formulate a complete set of requirements before they have seen some visual representation of the solution, but we designers are reluctant to start working on a solution before we are sure that the requirements we have been given are stable — we want to avoid unnecessary revision, which would result in extra work.
A way out of this dilemma is to start sketching possible solutions in a collaborative workshop, such as a design studio session (see Will Evans’ article “Introduction to Design Studio Methodology”). We can walk stakeholders through our concept (and alternatives) step by step and explain to them the impact of their requirements on the design.
Sketching also has a low barrier to entry, allowing non-designers to participate. (Whether you hand out pens to stakeholders is a matter of personal taste and of much debate. You’ll have to make up your own mind.)
Because sketches are rough and unfinished, giving feedback is also easier. Some people hold back upon seeing a pretty finished-looking version of a page because they think of all the work that must have surely gone into it. High-fidelity visuals also tend to distract people — instead of focusing on the concept, they are tempted to comment on the visual design or on minor details. Sketches keep them focused on the core concept.
The only thing you’ll need to overcome is your reluctance to show your unpolished work to others.
Sketching Is Not Drawing
A common misunderstanding is that your sketches have to be pretty. But interaction design is not art class. Your sketches don’t need to look good; they only have to convey your idea. They are supposed to spark discussion and generate ideas; they are unlikely to be framed on a wall. As long as you are able to draw boxes, arrows, circles and stick figures, you are good to go. As Joshua Brewer notes in “Sketch, Sketch, Sketch”:
"The sketch is not the end goal. The end goal of the drawing process is what you learn while sketching. So don’t worry if you can’t sketch."
Learning how to sketch is beyond the scope of this article, but look at the following presentations, article and book to get the basics:
- “The ‘Art’ of Sketching Interfaces” (slides), Jason Mesut and Sam Smith
- “Sketching 101” (slides), Jackson Fox
- “The Messy Art of UX Sketching,” Peiter Buick
- Sketching User Experiences: The Workbook, Saul Greenberg, Sheelagh Carpendale, Nicolai Marquardt, Bill Buxton (Morgan Kaufman: 2011)
How To Sketch
Now that I have (hopefully) convinced you that sketching should be a part of your workflow, let’s talk about what to sketch in a mobile project.
Divergent Sketching
In the beginning, you will want to capture different ideas for your mobile app or website. Start sketching different versions of a single key screen or parts of it. Your goal is twofold: to generate a lot of different ideas, and to explore and evaluate them — at the same time. The more ideas you come up with, the more options you will have to choose from later on. This process is often called “divergent sketching.”
A useful tool for this type of sketching is a multi-page template. It offers enough space to sketch six different versions on a single page, and it provides some guidance on the available screen space. By showing different ideas side by side, it makes comparing and discussing them later on easier.
A lot of templates are available online (I use Erik Loehfelm’s most often). Pick the one you like.
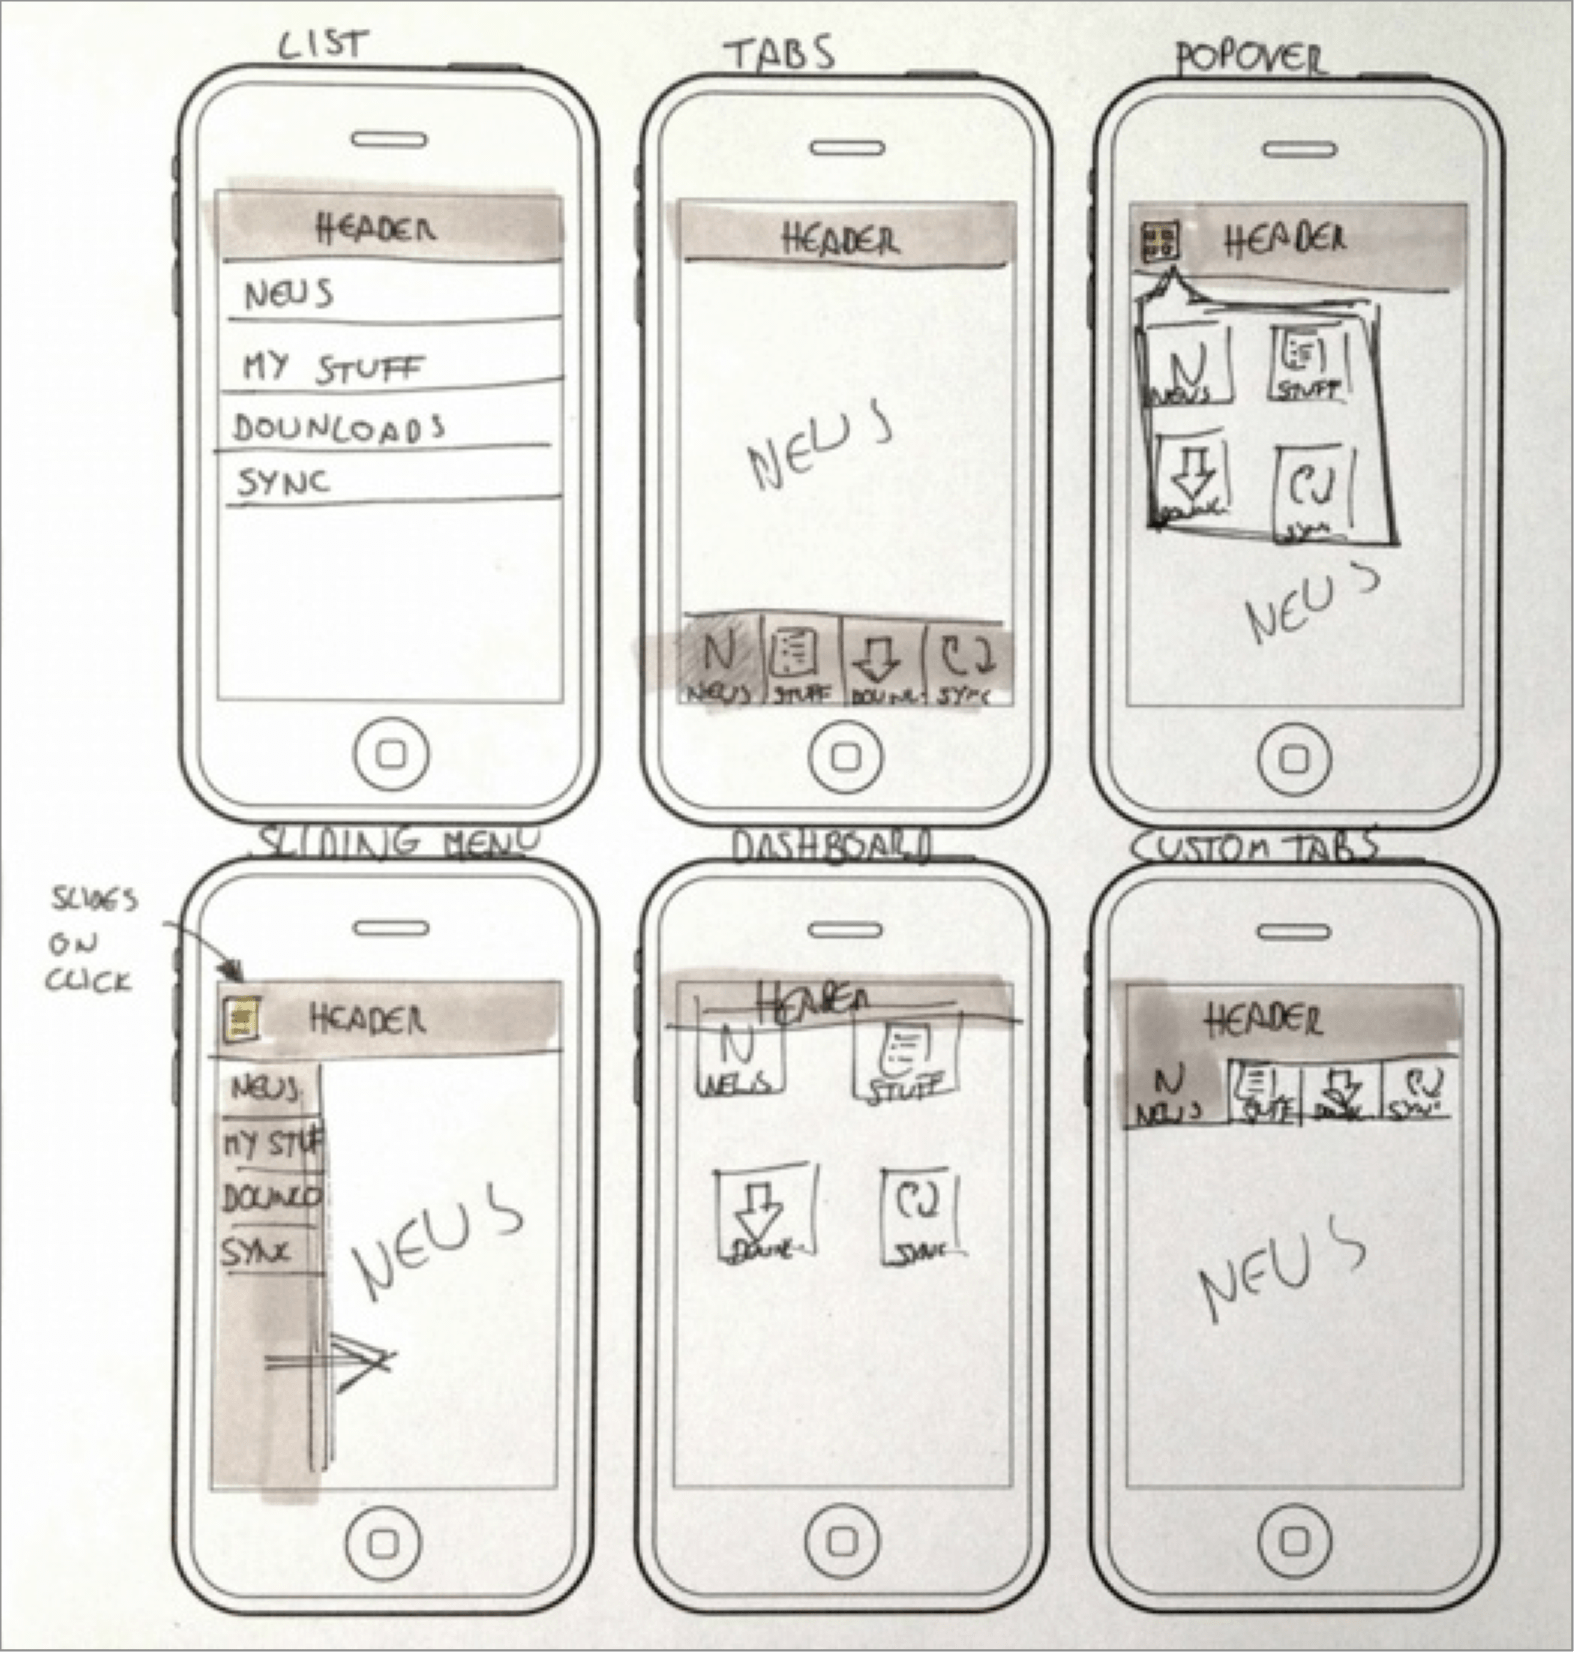
Wireframe variants for global navigation. (Large version)
The screenshot above shows six different ideas for an app’s main menu (plus vivid proof that my sketches are not pretty). I don’t often come up with six versions (I like to tell myself that I am a structure-first person), but I do try to create at least three variants of a single key screen. Because this is brainstorming and you will want a lot of options to discuss later, quantity is your friend here.
If you happen to be short of ideas, browse some mobile UI galleries for inspiration (such as Inspired UI, Pttrns, Lovely UI and UI Parade). They showcase solutions grouped by topic and feature (for example, main menus, chat windows). Include the things you like in your sketches, and mix them with your own ideas.
Make a habit of titling each sketch. This will make it easier to differentiate between them and refer to them later on. I add notes and annotations to explain the sketches and the thought processes behind them (such as strengths, weaknesses, trade-offs compared to other concepts, questions, new features, etc.). Labelling and dating the sheets are also a good practice.
Convergent Sketching
Once you have sketched multiple versions of a screen, pick the one that best solves the problem. Unfortunately, a single sketch will rarely check all of the boxes. In most cases, you will have to combine ideas or parts of ideas into a single winning concept. To do this, you will need to explore in more depth by making a more detailed sketch on a single page. Use the white space to annotate. Jot down all questions, new ideas, important or unclear areas, and things to discuss. This will help others to understand your thought process. This activity is often called “convergent sketching.”
For more information on divergent and convergent sketching, see Leah Buley’s presentation from FailCon 2010, “Good Design Faster,” and Brandon Shauer’s article “Sketchboards: Discover Better + Faster UX Solutions.”
Creating UI Flows
After boiling your ideas down to a set of key screens, the next step is to explore how they work together. For this, create a few UI flows (i.e. a series of key screens) that showcase how a user would use your solution to accomplish a task. UI flows highlight which interface elements are used (for example, which button is clicked or which gesture is used) and how the system responds (for example, with an animation, transition, pop-up dialog or new screen). They also show key screens in different states (for example, initially empty and then later filled with content).
You can visualize different outcomes within a UI flow (such as a list of search results versus an empty list). Your flow would then no longer be linear; different branches would show different outcomes. But try to limit the number of branches in a single UI flow. Each branch increases the complexity, making your flow harder to understand. It also makes them harder to explain.
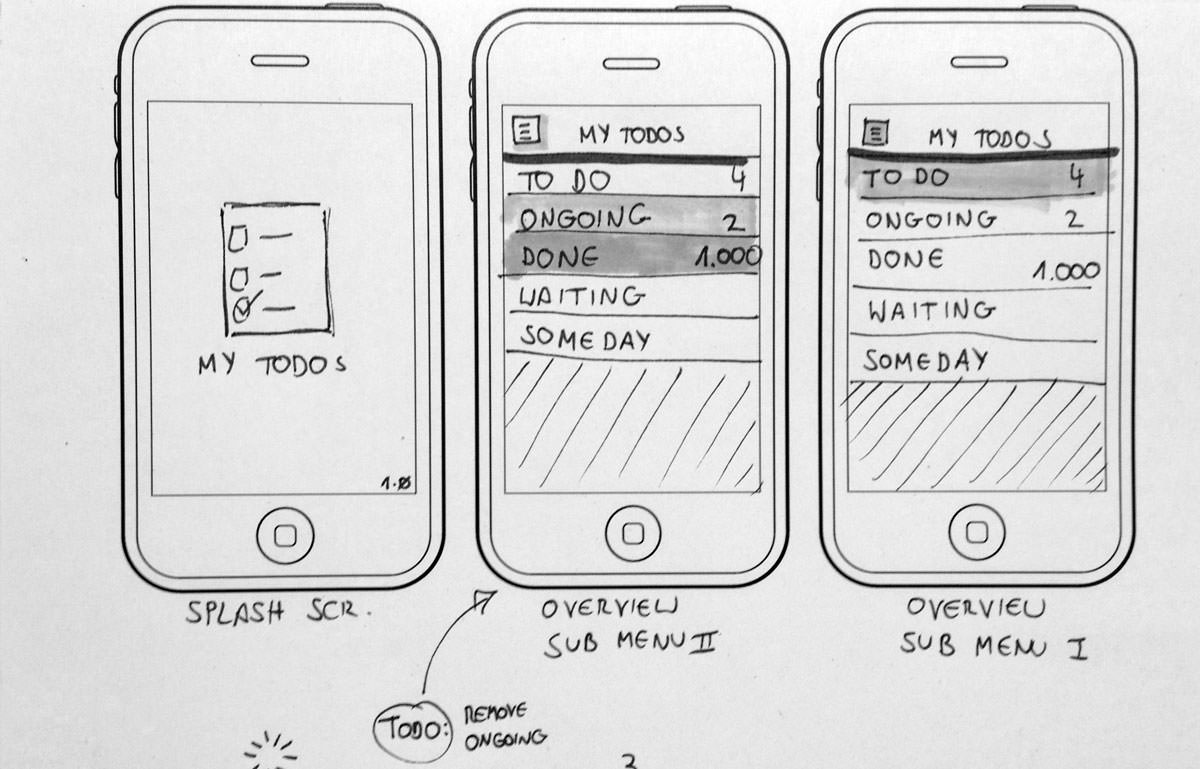
UI flows visualize how a user gets from A to B. (Large version)
You don’t need to sketch all use cases; pick the ones that are important and will be used most. The Pareto principle offers a good rule of thumb: prototype the 20% of functionality that will be used 80% of the time.
I usually start sketching one of the key use cases to try to come up with a way to solve it. I will highlight the interactions on the screens and (usually) connect the screens with arrows. I’ll explain each step and label the key screens. As always, I annotate wildly.
For inspiration on how to sketch mobile screens and UI flows, look at Gisele Muller’s article “Inspiring UI Wireframe Sketches”; MOObileFrames, a blog that showcases mobile wireframe sketches; and Wireframes, a website by Jakub Linowski. You can also use Jakub’s “Interactive Sketching Notation” (PDF) in your UI flows.
Steps To Take
To give you some more context and to show you how the three activities above relate to each other, here are the steps of a typical sketching session:
- List the information you have and what you want to capture.
- Make a first set of sketches (such as variations of a key screen or an initial UI flow).
- Review the sketches yourself.
- What are the strength and weaknesses of each variant?
- Are the UI elements and data consistent (i.e. the same elements are used for the same task)?
- Do you show data the same way?
- Are the interaction options clear?
- Get some feedback from others. Start with peers and continue with potential users if possible.
- What are their first impressions?
- What do they like best? Why?
- What do they dislike? Why?
- What is not clear in your sketch?
- What improvements have they suggested? Why did they suggest them?
- Iterate on the concepts.
- Can you combine different strengths of separate concepts into a new concept?
- Can the sketches be clarified?
- Can steps be reduced or simplified?
- Review the results in light of the initial feedback.
- Have new questions come up?
- What insights have you gained?
As you can see, a lot of these are “Why?” questions. This is because sketching is about trying to understand the problem while simultaneously working towards a solution. Write down all of the questions that come up during sketching next to the sketches themselves. This will guide you towards the right concept.
Beyond Sketching
After you’ve created sketches of the key screens and the main uses cases, you will want to try out your concept live on a real phone. Apps such as Pop and Protosketch enable you to import pictures of sketches and turn them into a prototype. This very fast and low-fi method will give you a feel for the concept’s interaction. Both apps allow you to define clickable hotspots and page transitions, which make a prototype’s interaction more realistic.
Alternatively, import your screens into a more advanced tool such as Axure and build a prototype in there.
Whatever method you choose, your goal is to test the concepts quickly and with little effort on a real phone.
Take-Aways
Sketching helps you better understand the problem you are trying to solve and lets you visualize possible solutions. It is a fast and inexpensive way to brainstorm and to test out a lot of UI ideas before committing to one. Sketching speeds us the concept creation and iteration phase and makes it possible to get feedback early on, when changes are easy to make.
For your next sketching session, keep the following principles in mind. They will help to keep you on track:
- Be lazy. Don’t try to reinvent the wheel. Use a template to guide your sketching.
- Get inspired. Browse design pattern libraries and mobile UI galleries, and look at wireframe showcases. Take what you like, mix it with your own ideas, and come up with something new.
- Stop at good enough. You sketches need to get your ideas across. Don’t get lost in (unimportant) details.
- What would Pareto do? A small set of your solution’s features will be used the most. Focus on them. Which 20% of the solution will be used 80% of the time?
- Be consistent. Use an existing sketching notation and/or develop your own. This will make your sketches reliable. Peers will understand your style and will need less time to look through the sketches to give feedback.
- Annotate everything. During sketching, new questions, ideas and problems will pop up. Write them down; otherwise, they will get lost.
- Be open. Make your sketches visible. Pin them on a wall, and always show them to others to get feedback.
- When in doubt, sketch some more. If you are unsure about a solution, start sketching variations. List their pros and cons and get feedback to see what works best.
Happy sketching!
Further Reading
- The Messy Art Of UX Sketching
- UX Sketching & Wireframing Templates For Mobile Projects
- Design Better And Faster With Rapid Prototyping
- Free Printable Sketching and Note-Taking PDF Templates


