Building An Online Magazine App For Windows 8, Part 2: The Web Back End

Email Newsletter
Weekly tips on front-end & UX.
Trusted by 200,000+ folks.
 Flexible CMS. Headless & API 1st
 Register!


We will look at how our magazine app obtains the articles to be shown, examine the transport protocol and set up a live content host.
When done, you will have a cloud-based content management system running on a free hosting plan from where you can manage and publish articles. With this, our HTML5-based magazine app will essentially be ready to submit to the Windows Store.
Setting Up The Content Host Via A Web Browser
We will be using freely available tools and an open-source content management system (CMS) for the back end, and we will host the content on a free Azure website account; so, getting everything up and running will be free. The goal here is to set up all of the components you’ll need with a minimum of effort, leaving you with a working end-to-end understanding of Microsoft-based Web development in 2013 that you can expand upon.
You can complete the entire process from your favorite browser.
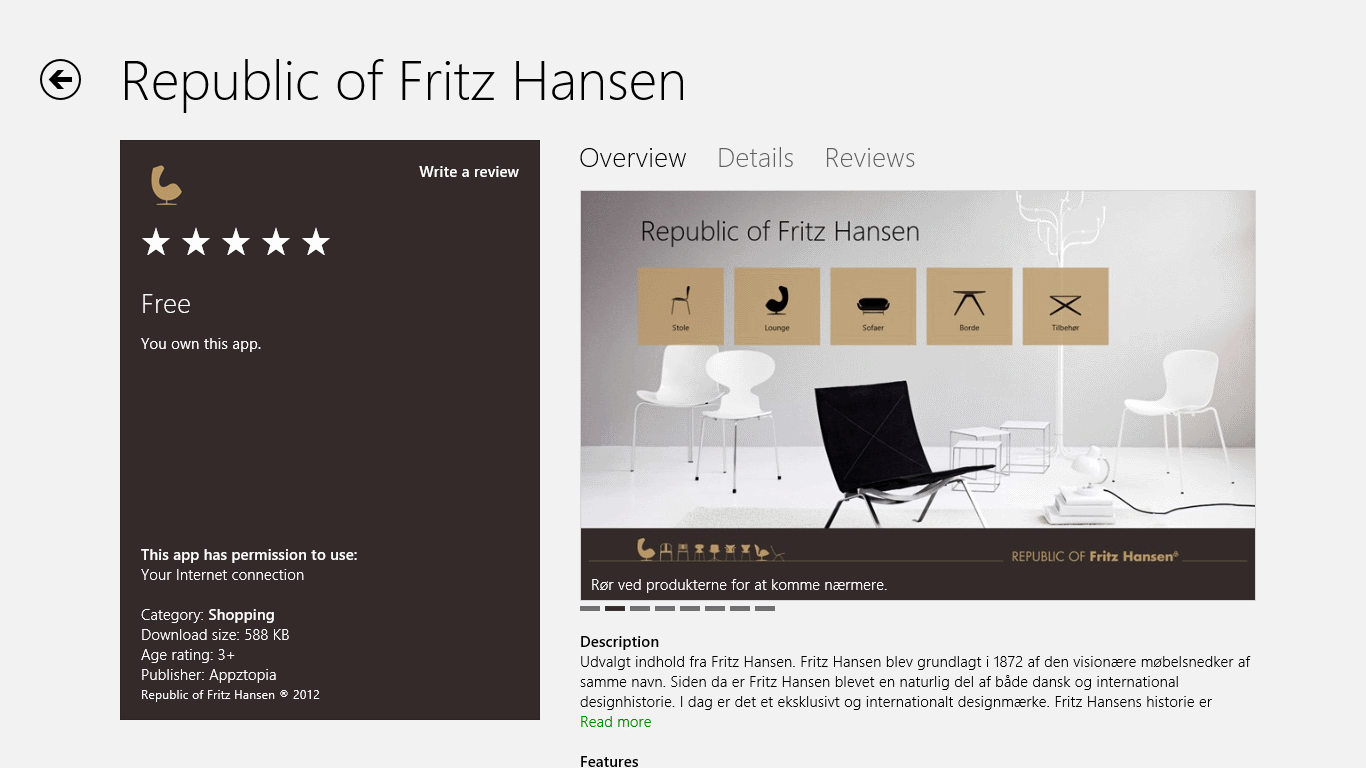
Here is how apps are presented in the Windows Store. A magazine app is used as a catalog by the Danish furniture designer Republic of Fritz Hansen, showing product data loaded from its website.
Recommended reading: Creating Universal Windows Apps With React Native
Articles Are Transported As JSON
In the Windows Store app file /js/data.js, the groups and articles to be displayed in the app are fetched from the content server using JSON:
var jsonGroup = {
    Key: "Group Key",               // key
    Title: "Group title",           // title
    SubTitle: "Group sub title",    // subtitle
    GroupViewImage: "URL",          // image - used in tile views
    Image: "URL",                   // image - big group view image
    Description: "HTML"             // html - a group description
};

var jsonArticle = {
    GroupKey: "Group Key",          // key of group article belongs to
    Title: "Article title",         // title
    SubTitle: "Article sub title",  // subtitle
    GroupViewImage: "URL",          // image - used in tile views
    Image: "URL",                   // image - big article lead image
    Description: "HTML",            // html - the actual article
    Url: "URL"                      // url - for share charm
}
The method used by the app to fetch data is rather crude. On launch, all articles are downloaded by the app and then cached on the local file system. The app auto-refreshes articles upon every launch or uses cached content if the content server is inaccessible.
To create your own content host, you would need to expose the structures covered below. For the purpose of this article, we will be using online services and pre-built bits to quickly raise up a content host with full content-management capabilities and the required JSON endpoints.
Azure Website Running Composite C1 CMS
Windows Azure is Microsoft’s cloud platform, which offers hosting and tools for building large-scale Web applications at one end and for providing easy access to Web applications at the other end. Here, we will be using the easy bits — i.e. Azure websites.
Azure allow you to host up to 10 websites for free. Setting up a content host on this platform is pretty easy. Here, we will set up Composite C1, an open-source CMS running on the .NET Web stack.
Full disclosure: I’m a member of the Composite C1 core team, so my choice of CMS is anything but impartial. Knowing the CMS very well has enabled me to create the tools for this article that should make this a fairly smooth ride, so please bear with me.
If you don’t want to take the cloud route here, you can download Composite C1 or the source code from CodePlex.
Windows Azure: Signing Up For The First Time
If you haven’t used an Azure website before, you’ll need to jump through the fiery hoops of registration, which will take about five minutes. You will be offered a 90-day free trial, but the Azure website you create here will keep on being free, even after the 90 days.
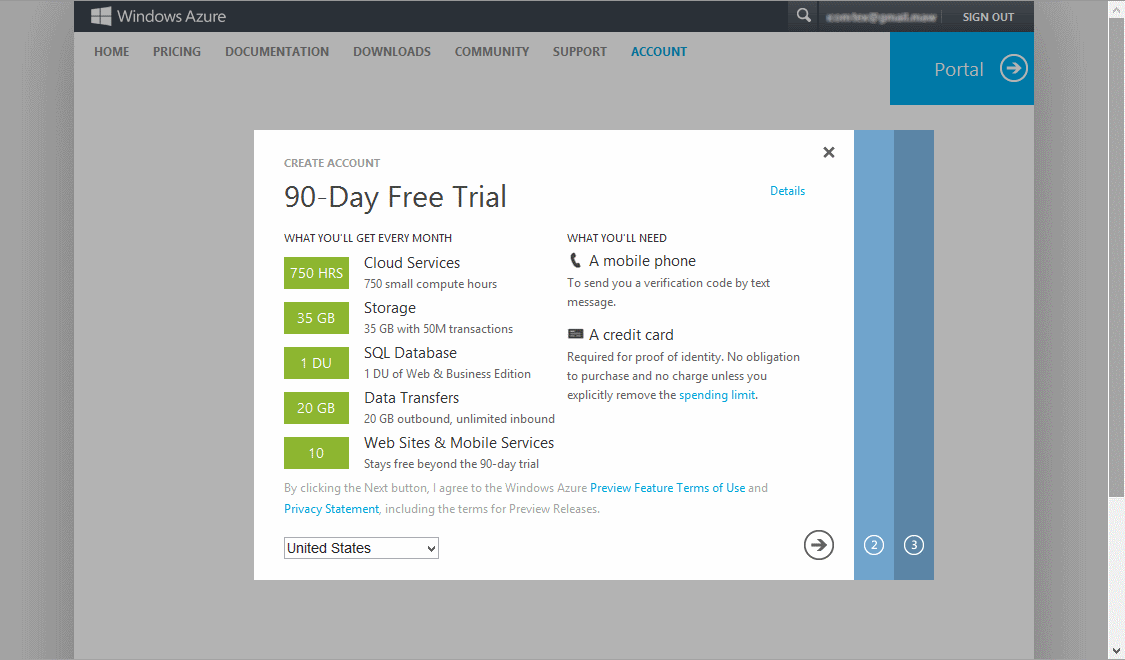
Sign up for a Windows Azure account.
To complete the registration, you’ll need to provide a mobile phone number and credit-card number. Don’t panic: As long as you don’t upgrade your Azure website plan or actively use other paid Windows Azure services, you will never be charged.
Note that the free option has limitations on traffic and CPU usage, and you can’t customize the website’s domain name unless you pay up; however, for the purpose of feeding data to an app, a host name like my-content-host.azurewebsites.net is just fine.
Here is how to sign up:
- Go to the Windows Azure page for a free trial.
- Click “Try it now.”
- Log in using a Microsoft account.
- In the registration wizard, specify your country, and click “Next.”
- On the second page, specify your mobile phone number, and click “Send text message.”
- Enter the six-digit code that you receive as a text message on your phone, and click “Verify code,” then “Next.”
- Fill in your credit-card details and address, and click “Next.”
Creating An Azure Website
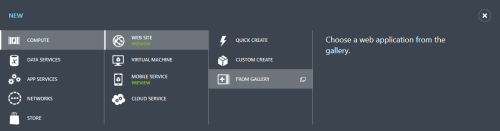
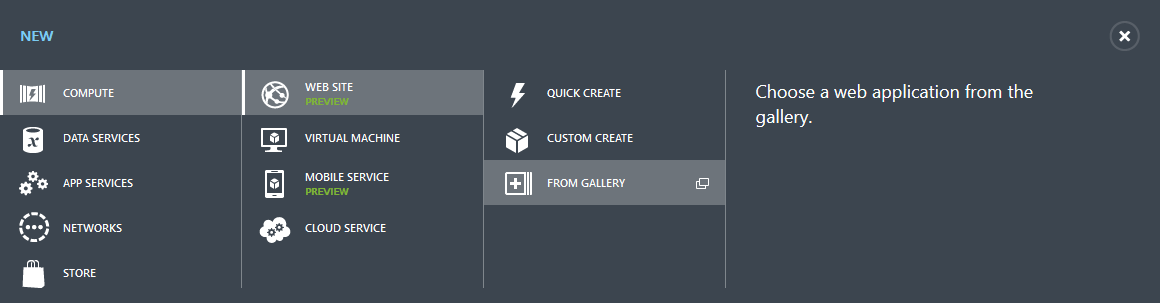
Once you have access to the Windows Azure management portal, here is how to create an Azure Website instance:
- Launch the management portal.
- Click the “New” button in the lower toolbar.
- Select “Compute,” then “Web Site,” then “From Gallery.”
- Select “.NET CMS Composite C1” and continue.
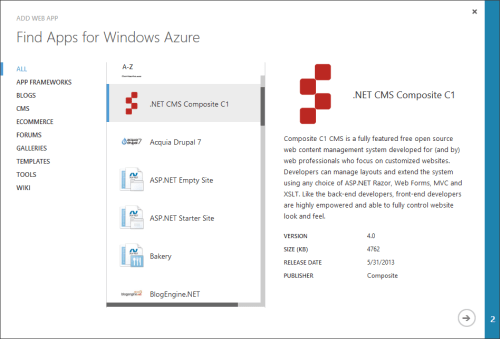
- Specify a name and a location for your website, and finish the wizard.
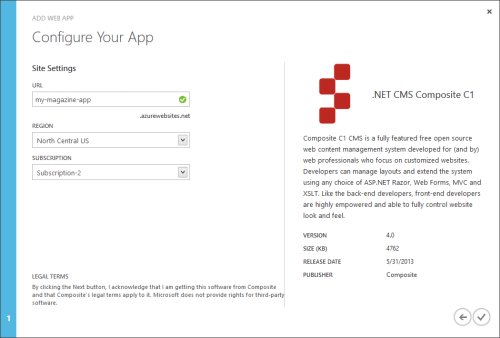


This will create your website. In the websites view, you will see yours running in “Free” mode, and you will see the URL.
It could take half a minute for your website to be reported as ready. When it’s ready, you can launch it by clicking the URL.
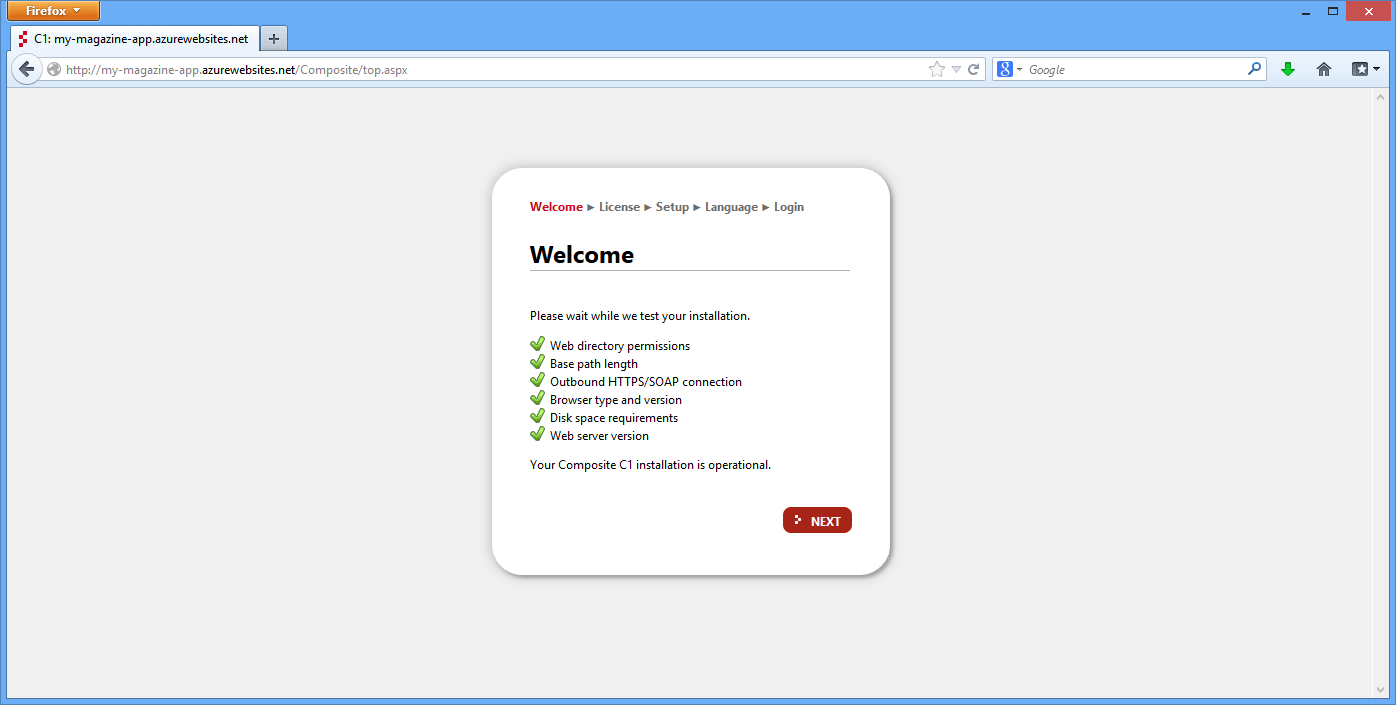
Once you launch the website, the CMS set-up wizard kicks in.
The CMS Set-Up Wizard
“Next” your way through the CMS set-up wizard; the only major options will be the default language for content and the starter website. Select the “Open Cph — Razor” website if you fancy Twitter Bootstrap and want to look at ASP.NET Razor.
Once you have completed the wizard, you’ll see the CMS admin window (the C1 console) and the welcome screen:
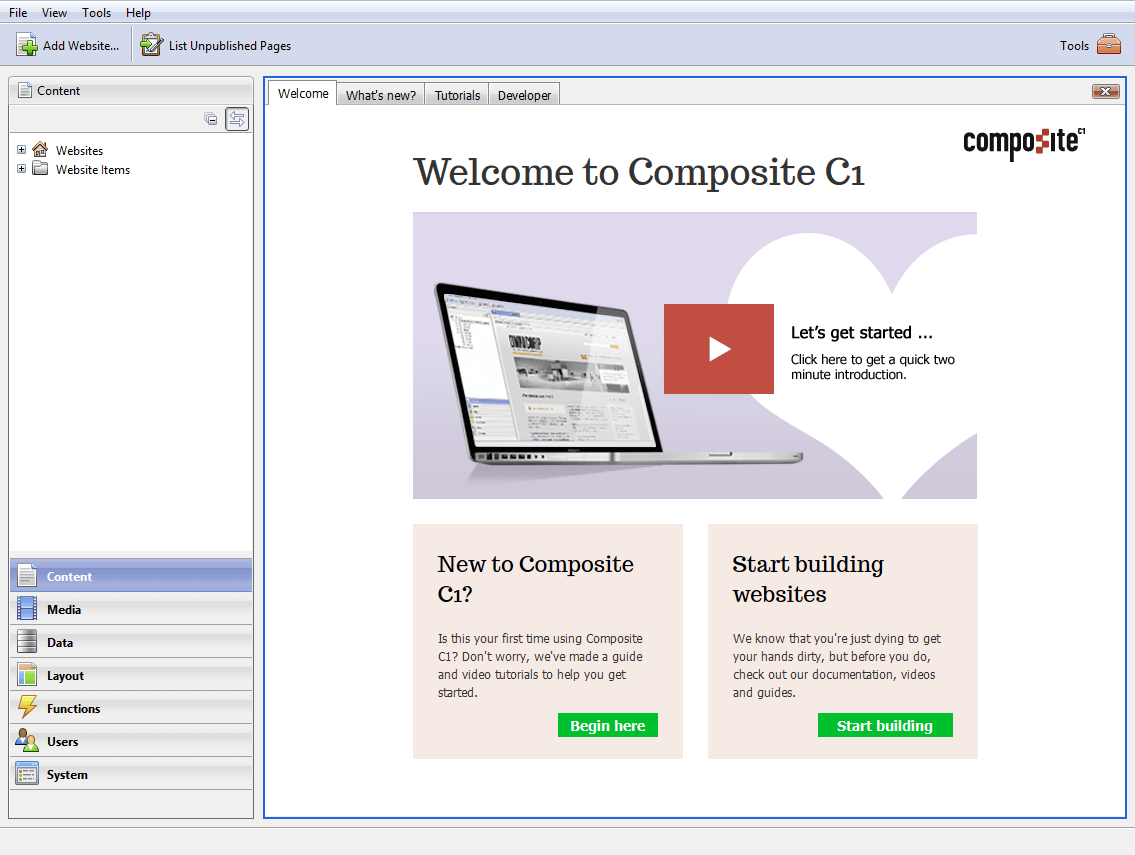
Welcome to the C1 console. This is where you can manage content, customize the website, install extension packages and other things.
Installing The App Feed Extensions
Using the C1 console, you can install two extension packages — made specifically for our magazine app — which will set up the bits needed to manage articles and feed it to the Windows 8 app. Some sample articles are also included, so that you have something to play around with.
To install the two packages, do the following in the C1 console:
- Go to the “System” view.
- Select “Packages,” then “Available Packages,” then “Composite.Tools,” and then select the
Composite.AppFeed.Serverpackage. - Execute “Package Info” on it.
- In the document view, click “Install” and finish the installation wizard.
- Also, install the package named “Composite.AppFeed.Provider.Magazine.”

The package manager lets you add features to the website.
Recommended reading: Beyond The Browser: From Web Apps To Desktop Apps
Under The Hood
The two package installations will add the following:
- data types for articles and groups,
- a user interface to manage these data types.
- the basic plumbing needed to communicate with the Windows 8 app using JSON,
- A configuration file in which you can set new providers for article content (i.e. to integrate with additional content sources).
To examine how these elements have come about or to extend something, get the source code for the Composite.AppFeed.Server and Composite.AppFeed.Provider.Magazine packages. We won’t get into the implementation details here; just note that things can be extended should you need it.
Managing Articles For The Magazine App
Once the packages have been installed, you will have the following new elements in the C1 console:
- In the “Content” view, you will have a new folder named “Windows 8 App Magazine Content.” Here, you can create and edit articles and article groups.
- In the “Media” view, you will have a new folder at
/Media Archive/App Feed images/Generic backgrounds. Articles with no accompanying image will receive a random image from this folder to brighten up the Windows 8 tile-oriented interface.

The editing UI in Composite C1 is called the C1 console.
When you edit articles, you will do so visually or via the source view. You can do basic formatting, work with images, link to media and websites, embed HTML5 video, and call the C1 function to add dynamic content. This is the content that will show up in the Windows 8 app once we hook things up.
You Cannot Serve JavaScript In An Article’s HTML
In case you are wondering, if you add JavaScript-driven features to an article’s HTML, you will not see them run in the Windows 8 app. Security prohibits a Windows 8 HTML5 app from executing externally loaded JavaScript, which kind of makes sense because of the app’s privileged access to native APIs.
Should you need to include custom JavaScript, you can add your script files to the Windows 8 app project. On that side of the fence, anything goes.
Connect Your App To Your Azure Website
Once your website is running on a public URL, you can hook it up to your app like this:
- Open up the Windows 8 app project that we created in the first article in this series.
- Edit the
/js/settings.jsfile. - Change the value of
dataHostUrlto reflect the URL of your local website, likehttps://my-magazine-app.azurewebsites.net/. - Launch the app (hit F5).
When the app has launched, you will see the same content items as you saw in the CMS. If you go back to the CMS and change some content, you will see those changes in the app once you relaunch it.

The sample content from the CMS is shown here in the Windows 8 app.
Publishing Your App To The Windows Store
The template that you initially downloaded and adapted should have all of the trimmings required for your app to pass the submission process. Still, make sure the following are in place:
- Check that the information in
/package.appxmanifestis relevant and up to date. - In
/js/settings.js, the value ofprivacyUrlshould point to a public Web page containing your privacy policy; the CMS is a convenient place to put such a page. - If your content has images featuring nudity or the like, set the correct age restrictions when submitting the app. Unlike Apple, Microsoft won’t censor your content, provided that you’ve set the appropriate age rating.
You can run the app through a set of local tests to catch issues that could complicate the approval process. Assuming you have created a developer account for the Windows Store, you can use Visual Studio to do the packaging, testing and uploading; go to Project → Store → Create App Packages.
The actual publication process is mostly Web-based and entails naming your app and adding descriptions and screenshots. For a detailed guide on this process, see “Submitting Your App.”
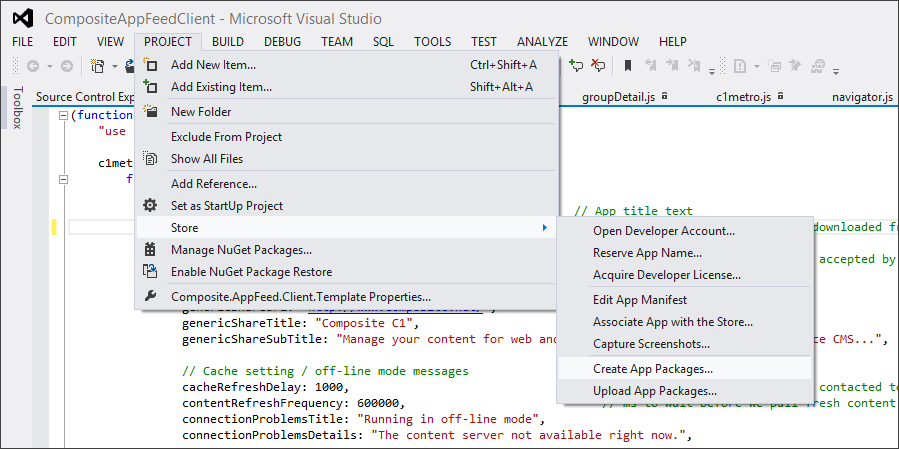
You can package, test and upload your app from within Visual Studio.
I have seen a number of apps based on this template go through the approval process. Absent not having a working privacy policy or not specifying the correct age rating, the approval process has been a smooth ride.
Once you have submitted the app, expect it to be online within a day or two. And congratulations on publishing your first Windows 8 app!
Recommended reading: Why You Should Consider React Native For Your Mobile App
Wrapping Up
With support for developing native Windows 8 apps using HTML5, JavaScript and CSS, Web developers can pretty easily step onto this scene.
The app we’ve created is generic and basic but open to customization. All of the elements used are open source and built for change, so you can modify the behavior and look of the app and customize the data model and CMS experience to meet your requirements.
Connecting your app to the content you manage in a CMS will come very naturally because you are using Web technology at both ends of the wire. The articles need not be the centerpiece of the app; obviously, you can take this in any direction. By having access to the OS-integrated JavaScript API available to Windows Store apps and by taking advantage of all of the HTML5 features of Internet Explorer 10, you will enjoy both a simpler and a richer development experience, all the while in a familiar setting.
If you have any questions, you can use the Composite C1 developer forum. Happy coding!
Further Reading
- The State Of Mobile And Why Mobile Web Testing Matters
- Optimizing The Image Element LCP
- Using AI To Detect Sentiment In Audio Files
- Principles Of HTML5 Game Design


