So We Wanted To Build A File Uploader… A Case Study

Email Newsletter
Weekly tips on front-end & UX.
Trusted by 182,000+ folks.

 Custom Web Forms for Angular, React, & Vue. Your backend.
 Celebrating 10 million developers
One day I discovered that I needed to design an API that would upload files from a client to a server. I work on the Russian Web mail provider at Mail.Ru and deal with JavaScript in all its aspects. A basic feature of any Web mail service is of course attaching a file to an email.
")
Mail.ru is no exception: We used to have a Flash uploader, which was rather good, but still had some problems. HTML markup, graphics, business logic and even localization were all built into it, and it made the uploader pretty bloated. Furthermore, only a Flash developer could make any changes to it. We realized that we needed to build something new and different. This article covers all of our steps in creating what we consider to be a better tool for the job.
Anyone who has ever written a Flash uploader knows what problems it always brings:
- Cookies for authentication are difficult to manage because depending on browser and operating system they have erratic behaviour in Flash (i.e. cookies are not shared between HTTP requests and FileReference upload/download). Officially Flash supports cookies only in IE and they will not be shared among other browsers, or they will be retrieved from IE;
- There are assumptions that with Flash, cookies are read from Internet Explorer although it’s not officially confirmed;
- Proxy settings are quite inconvenient to update; with Flash, they are always retrieved from IE, independent of the browser used;
- Errors #2038 and #2048, elusive errors that appear in some combinations of network settings, browser and Flash player version;
- AdBlock and the like (no comment).
So, we decided that it was the right time for a change. Here’s a list of features that we wanted to have with a new approach to this problem:
- Select multiple files;
- Get file information (name, type and mini-type);
- Preview images before uploading;
- Resize, crop and rotate images client-side;
- Upload results to the server, plus CORS;
- Make it independent of external libraries;
- Make it extensible.
Over the last four years, we’ve all read heated debates about various features and options of HTML5, including the File API. Many publications touch on this API, and we have a few functioning examples of it. One would think, “Here’s a tool that solves the problem.” But is it as easy as it looks?
Well, let’s look at the browser statistics for Mail.Ru. We have selected only browser versions that support the File API, although in some cases these browsers do not provide full support for the API.
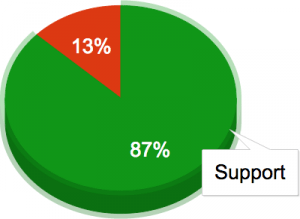
The diagram shows that a bit more than a whopping 87% of browsers indeed support the File API:
- Chrome 10+
- Firefox 3.6+
- Opera 11.10+
- Safari 5.4+
- IE 10+
Also, we shouldn’t forget about mobile browsers, which are becoming more popular by the day. Take iOS 6+, for example, which already supports the File API. However, 87% is not 100% and in our case it wasn’t feasible to entirely abandon Flash at this point.
So, our task evolved to building a tool that combines two techniques (File API and Flash) and that lets the developer kind of… ignore the way files are actually uploaded. During the development process we decided to combine all preliminary development into a separate library (a unified API) that would work independent of the environment and could be used wherever you like, not only in our service.
So let’s go into detail on a few specifics of the development process and see what we’ve built, how we built it and what we’ve learned along the way.
Retrieve File List
Basics first. Here is how files are received in HTML5. Very simple.
<input id="file" type="file" multiple="multiple" />
<script>
      var input = document.getElementById("file");
      input.addEventListener("change", function (){
           var files = input.files;
      }, false);
</script>
But what do you do if you have only Flash support and no File API? The basic idea that we had for users with Flash support was to make all interactions go through Flash. You couldn’t simply call up a file-selection dialog. Due to the security policy, the dialog would open only after the Flash object has been clicked.
This is why the Flash object would be positioned above your target input. Then, you would attach a mouseover event handler to the document, and put the Flash object into the input’s parent element when the user hovers over it.
The user would click the Flash object, open the file-selection dialog and select a file. Data would be transferred from Flash to JavaScript using ExternalInterface. The JavaScript would bind the data received with the input element and emulate the change event.
[[Flash]] --> jsFunc([{
     id: "346515436346", // unique identifier
     name: "hello-world.png", // file name
     type: "image/png", // mime-type
     size: 43325 // file size
   }, {
     // etc.
 }])
All further interactions between JavaScript and Flash are performed through the only available method in Flash. The first argument is a command name. The second parameter is an object with two mandatory fields: the file id and the callback function. The callback is called from Flash once the command is executed.
flash.cmd("imageTransform", {
    id: "346515436346",    // file identification
    matrix: { },    // transformation matrix
    callback: "__UNIQ_NAME__"
});
The combination of the two methods results in the API, which is very similar to native JavaScript. The only difference is in the way files are received. Now we use the API method because the input has the files property only when the browser supports HTML5 and the File API. In the case of Flash, the list is taken from the data associated with it.
<span class="js-fileapi-wrapper" style="position: relative">
    <input id="file" type="file" multiple />
</span>
<script>
    var input = document.getElementById("file");
    FileAPI.event.on(input, "change", function (){
        var files = FileAPI.getFiles(input);
    });
</script>
Filter
Usually, file uploading comes with a set of restrictions. The most common restrictions are on file size, image type and dimensions (width and height). If you look around solutions for this issue, you’ll notice that validation is usually done on the server, and the user would receive an error message if the file doesn’t match any restrictions. I tried to solve this problem in another way, by validating files on the client side — before the file has started uploading.
What’s the catch? The catch is that when we initially get the list of files, we have only the bare minimum of information about the files: name, size and type. To get more detailed information, we need to actually read the files. To do that, we can use FileReader.
So if we play around with FileReader, we’ll probably come up with the following filtering technique:
FileAPI.filterFiles(files, function (file, info){
    if( /^image/.test(file.type) ){
        return info.width > 320 && info.height > 240;
    } else if( file.size ){
        return file.size < 10 * FileAPI.MB;
     } else {
         // Unfortunately, there is no support for File API or Flash. We have to validate on the server.
         // This case is rather rare, but we must consider it as part of the project.
         return true;
     }
 }, function (files, ignore){
     if( files.length > 0 ){
        // ...
    }
});
You can get the file’s dimensions “out of the box,” as well as a way to collect all of the data you’ll need:
FileAPI.addInfoReader(/^audio/, function (file, callback){
    // collect required information
    // and call it back
    callback(
        false,    // or error message
        { artist: "...", album: "...", title: "...", ... }
    );
});
Process Images
In developing the API, we also wanted a convenient and powerful tool that would allow us to work with images — to create previews, crop, rotate and resize, for example — and whose functionality would be supported in both HTML5 and Flash.
Flash
First, we needed to understand how to do this via Flash — that is, what to send to JavaScript to build the image. As we of course know, this is usually done using the data URI. Flash reads the file as Base64 and transfers it to JavaScript. So we add data:image/png;base64 to it, and use this string as the src.
A happy ending? Unfortunately, IE 6 and 7 do not support the data URI, and IE 8+, which supports the data URI, cannot process more than 32 KB. In this case, JavaScript would create a second Flash object and transfer the Base64-encoded content into it. This Flash object would restore the image.
HTML5
In the case of HTML5, we would get the original image first, and then perform all required transformations using the canvas. Getting the original image can be done in one of two ways. The first is to read the file as a dataURI using FileReader. The second is to use URL.createObjectURL to create a link to the file, which is bound to the current tab. Of course, the second option is good and is enough to generate a preview, but not all browsers support it. Opera 12, for example, does not support the accompanying URL.revokeObjectURL, which informs the browser that there is no need to keep a link to the file anymore.
When we combine all of these methods, we get a class of FileAPI.Image:
crop(x, y, width, height)resize(width,[height])rotate(deg)preview(width, height)— crop and resizeget(callback)— get final image
All of these techniques fill the transformation matrix, which is applied only when the get() method is called. Transformations are performed using the HTML5 canvas or in Flash (when the file is uploaded through the Flash interface).
Here is our description of the matrix:
{   // parameters fragment of original
   sx: Number,
   sy: Number,
   sw: Number,
   sh: Number,

   // destination size
   dw: Number,
   dh: Number,
   deg: Number
}
And here is a short example:
FileAPI.Image(imageFle) // returns FileAPI.Image instance
   .crop(300, 300)      // crop the image width and height
   .resize(100, 100)    // resize to 100x100px
   .get(function (err, img){
      if( !err ){
        // Append the result in the DOM-node (<div id="images">).
         images.appendChild(img);
      }
   });
Resize
Digital cameras emerged long ago and are still very popular. Some cost about $20 to $30 and can take photos with a resolution of 10 MP and up. We tried to downsize photos taken with such cameras, and this is what we ended up with:

As you can see, the quality is rather poor. However, if we first resize it in half and then do it again several times until we get the desired dimensions, then the quality is much better. This method is actually quite old, and in fact a consequence of the “nearest neighbor” interpolation; when compressing images at once, we are losing the quality of the image really “quickly”.

The difference is evident:

Apply a slight sharpening effect, and the image will be ideal.
We also tried other variations, such as bicubic interpolation and the Lanczos algorithm. The result was a bit better, but the process took more time: 1.5 seconds versus 200 to 300 milliseconds. This method also yielded the same results in canvas and Flash.
Uploading Files
Now let’s sum up our various options for uploading a file to the server.
iframe
Yes, we still use this many years later:
<form
   target="__UNIQ__"
   action="/upload"
   method="post"
   enctype="multipart/form-data"><!-- This bit is often forgotten -->
        <iframe name="__UNIQ__" height="240" width="320"></iframe>
        <input type="file" name="files" />
        <input type="hidden" name="foo" value="bar" />
</form>
At first, we create а form element with a nested iframe inside. (The form’s target attribute and the name of the iframe should be the same.) After that, we move the input[type=“file”] into it because if you put a clone there, it will turn up empty.
To illustrate this issue, imagine that you load a file via iframe. We could use something like this:
    var inp = document.getElementById('photo');
    var form = getIFrameFormTransport();
    form.appendChild(inp.cloneNode(true)); // send a "clone"
    form.submit();
However, such input would be “empty” in IE, i.e. it wouldn’t contain the selected file, which is why we need to “send” the original file and replace it with a clone.
That is why we subscribe to events via API methods, to save them during cloning. Then, we call form.submit(), and put the contents of the form through the iframe. We’ll get the results using JSONP.
    var inp = document.getElementById('photo');
    var cloneInp = inp.cloneNode(true);
    var form = getIFrameFormTransport();

    // Insert the "clone" after the "original"
    inp.parentNode.insertBefore(cloneInp, inp);

    form.appendChild(inp); // Send the "original
    form.submit();
Yes, erratic indeed.
Flash
In principle, everything is quite simple: JavaScript calls the method from the Flash object and passes the ID of the file to be uploaded. Flash, in turn, duplicates all states and events in JavaScript.
XMLHttpRequest and FormData
Now we can send binary data, not just text data. This is easy:
// collect data to be sent
var form = new FormData
form.append("foo", "bar"); // the first parameter is the name of POST-parameter,
form.append("attach", file); // the second parameter is the string, file or Blob

// send to server
var  xhr = new XMLHttpRequest;
xhr.open("POST", "/upload", true);
xhr.send(form);
What if, for example, we want to send not a file, but canvas data? There are two options. The first, which is easiest and correct, is to convert canvas to Blob:
canvasToBlob(canvas, function (blob){
    var form = new FormData
    form.append("foo", "bar");
    form.append("attach", blob, "filename.png"); //not all support the third parameter

    // ...
});
As you can see, this trick is not universal. In case canvas doesn’t have Canvas.toBlob() (or it cannot be implemented), we will choose another option. This option is also good for browsers that do not support FormData. The point is to create the multipart request manually and then send it to the server. The code for the canvas would look like this:
var dataURL = canvas.toDataURL("image/png"); // or result from FileReader
var base64 = dataURL.replace(/^data:[^,]+,/, ""); // cut the beginning
var binaryString = window.atob(base64); // decode Base64

// now get together multipart, nothing complicated
var uniq = '1234567890';
var data = [
      '--_'+ uniq
    , 'Content-Disposition: form-data; name="my-file"; filename="hello-world.png"'
    , 'Content-Type: image/png'
    , ’
    , binaryString
    , '--_'+ uniq +'--'
].join('rn');

var xhr = new XMLHttpRequest;
xhr.open('POST', '/upload', true);
xhr.setRequestHeader('Content-Type', 'multipart/form-data; boundary=_'+uniq);

if( xhr.sendAsBinary ){
  xhr.sendAsBinary(data);
} else {
  var bytes = Array.prototype.map.call(data, function(c){
     return c.charCodeAt(0) & 0xff;
  });
  xhr.send(new Uint8Array(bytes).buffer);
}
Finally, our efforts result in the following method:
var xhr = FileAPI.upload({
   url:  '/upload',
   data:  { foo: 'bar' },
   headers:  { 'Session-Id': '...' },
   files:   { images: imageFiles, others: otherFiles },
   imageTransform:  { maxWidth: 1024, maxHeight: 768 },
   upload: function (xhr){},
   progress: function (event, file){},
   complete: function (err, xhr, file){},
   fileupload: function (file, xhr){},
   fileprogress: function (event, file){},
   filecomplete: function (err, xhr, file){}
});
This has a lot of parameters, but the most important one is imageTransform. It transforms images on the client, and it operates via both Flash and HTML5.
And that’s not even half of the story. We can have multiple imageTransforms:
{
     huge:   { maxWidth: 800, maxHeight: 600, rotate: 90 },
     medium: { width: 320, height: 240, preview: true },
     small:  { width: 100, height: 120, preview: true }
}
This means that three copies (besides the original) will be sent to the server. What for? If you can transfer the load from the server to the client, it’s a good idea to do it. The server should probably only minimally validate input files. First of all, you are not only removing the load, but also avoid logic on the server, completely moving it to the client.
Second, if the file doesn’t have to get uploaded to the server, we save bandwidth. In addition, there are often problems when it isn’t possible to make further processing on the server, such as integration with third-party services (Amazon S3, for example). In our experience, it’s OK to move the additional logic that previously was managed server-side to the client.
The upload function also calls back an XMLHttpRequest-like object; that is, it assumes some properties and methods of XMLHttpRequest, such as:
statusHTTP status codestatusTextHTTP status textresponseTextserver’s replygetResponseHeader(name)get header of the server’s replygetAllResponseHeaders()get all headersabort()abort upload
Although HTML5 allows you to upload several files in one request, standard Flash allows only file-by-file uploading. Moreover, in our opinion, uploading files in a batch proved not to be a good idea. For one, Flash doesn’t support this, and we wanted to have an identical behavior for both Flash and HTML5. Second, the user might simply run out of memory and the browser will fail.
XMLHttpRequest, which has called back the upload, is a proxy XMLHttpRequest, in fact. Its methods and properties reflect states in the file currently being uploaded.
Final Word
I’ll end with a small example of how we let users upload files using drag’n’drop:
<div id="el" class="dropzone"></div>
<script>
    if( FileAPI.support.dnd ){
        // element where you can drop the files
        var el = document.getElementById("el");

        // subscribe to events associated with Drag'n'Drop
        FileAPI.event.dnd(el, function (over){
            // method will be activated when you enter/leave the element
            if( over ){
                el.classList.add("dropzone_hover");
            } else {
                el.classList.remove("dropzone_hover");
            }
        }, function (dropFiles){
            // the user has dropped the files
            FileAPI.upload({
                url: "/upload",
                files: { attaches: dropFiles },
                complete: function (err, xhr){
                    if( !err ){
                        // files are uploaded
                    }
                }
            });
        });
    }
</script>
It took us quite some time to develop the library. We worked on it for about 5 months since it was a little side thing that we had to finish aside from the regular work. The main headache was caused by the little details that different browsers had. Chrome, Firefox and IE10+ were just fine, but Safari and Opera had very different behaviors from version to version, including inconsistencies on Win/Mac platforms. Still, the main problem was to actually combine all three technologies — iframe, Flash, HTML5 — to create a bulletproof file uploader.
The library is available on GitHub and we’ve published a documentation as well. Bug reports and pull requests are more than welcome!
Useful Links
- FileAPI (and demo), Mail.ru, GitHub
- Mail.ru, GitHub Find Tarantool, fest and much else.
- “HTML5 Form Features,” Can I Use…? See the support for
input[type="file" multiple]. - “File API,” Can I Use…?
- “FileReader,” Mozilla Developer Network
- “URL.createObjectURL” and “URL.revokeObjectURL,” Mozilla Developer Network
- “XMLHttpRequest,” Mozilla Developer Network
- “FormData,” Mozilla Developer Network
This article has been reviewed and edited by Andrew Sumin, a front-end engineer working on Mail.ru front-end team.
Further Reading
- How Mail.Ru Reduced Email Storage From 50 To 32 PB
- Product Design Unification Case Study: Mobile Web Framework
- How To Improve Your Email Workflow With Modular Design
- Making Responsive HTML Email Coding Easy With MJML


