Varnish – Speed Up Your Mobile Website

Email Newsletter
Weekly tips on front-end & UX.
Trusted by 182,000+ folks.
 Register for Free
 Celebrating 10 million developers


 Custom Web Forms for Angular, React, & Vue. Your backend.
Imagine that you have just written a post on your blog, tweeted about it and watched it get retweeted by some popular Twitter users, sending hundreds of people to your blog at once. Your excitement at seeing so many visitors talk about your post turns to dismay as they start to tweet that your website is down — a database connection error is shown.

Keep calm and try Varnish to optimize mobile websites. (Image source)
Or perhaps you have been working hard to generate interest in your startup. One day, out of the blue, a celebrity tweets about how much they love your product. The person’s followers all seem to click at once, and many of them find that the domain isn’t responding, or when they try to sign up for the trial, the page times out. Despite your apologies on Twitter, many of the visitors move on with their day, and you lose much of the momentum of that initial tweet.
These scenarios are fairly common, and I have noticed in my own work that when content becomes popular via social networks, the proportion of mobile devices that access that content is higher than usual, because many people use their mobile devices, rather than desktop applications, to access Twitter and other social networks. Many of these mobile users access the Web via slow data connections and crowded public Wi-Fi. So, anything you can do to ensure that your website loads quickly will benefit those users.
In this article, I’ll show you Varnish Web application accelerator, a free and simple thing that makes a world of difference when a lot of people land on your website all at once.
Introducing The Magic Of Varnish
For the majority of websites, even those whose content is updated daily, a large number of visitors are served exactly the same content. Images, CSS and JavaScript, which we expect not to change very much — but also content stored in a database using a blogging platform or content management system (CMS) — are often served to visitors in exactly the same way every time.
Visitors coming to a blog from Twitter would likely not all be served exactly the same content — including not only images, JavaScript and CSS, but also content that is created with PHP and with queries to the database before being served as a page to the browser. Each request for that blog’s post would require not only the Web server that serves the file (for example, Apache), but also PHP scripts, a connection to the database, and queries run against database tables.
The number of database connections that can be made and the number of Apache processes that can run are always limited. The greater the number of visitors, the less memory available and the slower each request becomes. Ultimately, users will start to see database connection errors, or the website will just seem to hang, with pages not loading as the server struggles to keep up with demand.
This is where an HTTP cache like Varnish comes in. Instead of requests from browsers directly hitting your Web server, making the server create and serve the pages requested, requests would first hit the cache. If the requested page is in the cache, then it is served directly from memory, never touching Apache or the database. If the page is not in the cache, then the request is handed over to Apache as usual, whereupon Apache will create and serve the page, which is then stored in the cache, ready for the next request.
Serving a page from memory is a lot faster than serving it from disk via Apache. In addition, the page never needs to touch PHP or the database, leaving those processes free to handle traffic that does require a database connection or some processing. For example, in our second scenario of a startup being mentioned by a celebrity, the majority of people clicking through would check out only a few pages of the website — all of those pages could be in the cache and served from memory. The few who go on to sign up would find that the registration form works well, because the server-side code and database connection are not bogged down by people pouring in from Twitter.
How Does It Work?
The diagram below shows how a blog post might be served when all requests go to the Apache Web server. This example shows five browsers all requesting the same page, which uses PHP and MySQL.
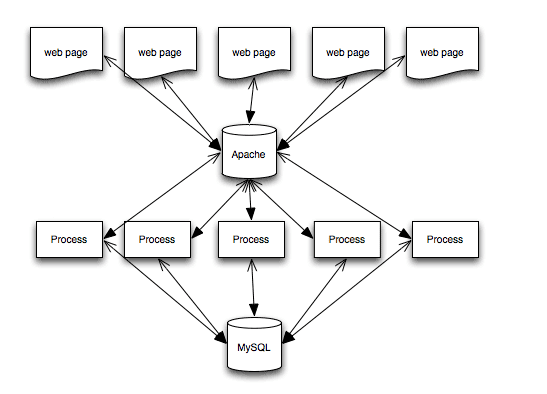
Every HTTP request is served by Apache — images, CSS, JavaScript and HTML files. If a file is PHP, then it is parsed by PHP. And if content is required from the database, then a database connection is made, SQL queries are run, and the page is assembled from the returned data before being served to the browser via Apache.
If we place Varnish in front of Apache, we would instead see the following:
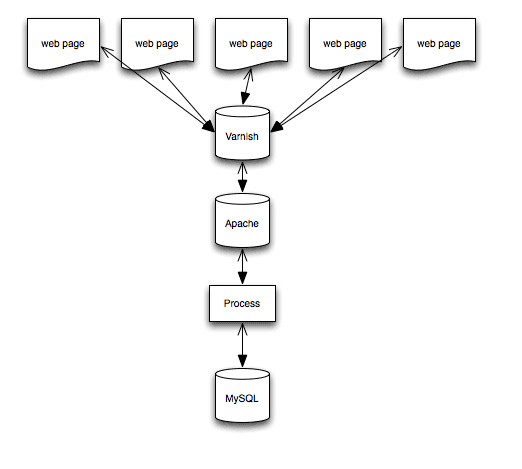
If the page and assets requested are already cached, then Varnish serves them from memory — Apache, PHP and MySQL would never be touched. If a browser requests something that is not cached, then Varnish hands it over to Apache so that it can do the job detailed above. The key point is that Apache needs to do that job only once, because the result is then stored in memory, and when a second request is made, Varnish can serve it.
The tool has other benefits. In Varnish terminology, when you configure Apache as your Web server, you are configuring a “back end.” Varnish allows you to configure multiple back ends. So, you might want to run two Web servers — for example, using Apache for PHP pages while serving static assets (such as CSS files) from nginx. You can set this up in Varnish, which will pass the request through to the correct server. In this tutorial, we will look at the simplest use case.
I’m Sold! How Do I Get Started?
Varnish is really easy to install and configure. You will need root, or sudo, access to your server to install things on it. Therefore, your website needs to be hosted on a virtual private server (VPS) or the like. You can get a VPS very inexpensively these days, and Varnish is a big reason to choose a VPS over shared hosting.
Some CMS’ have plugins that work with Varnish or that integrate it in the control panel — usually to make clearing the cache easier. But you can put Varnish in any CMS or any static website, without any particular integration with other systems.
I’ll walk you through installing Varnish, assuming that you already run Apache as a Web server on your system. I run Debian Linux, but packages for other distributions are available. (The paths to files on the system will vary with the Linux distribution.)
Before starting, check that Apache is serving your website as expected. If the server is brand new or you are trying out Varnish on a local virtual machine, make sure to configure a virtual host and that you can view a test page on the server using a browser.
Install Varnish
Installation instructions for various platforms are in Varnish’s documentation. I am using Debian Wheezy; so, as root, I followed the instructions for Debian. Once Varnish is installed, you will see the following line in the terminal, telling you that it has started successfully.
[ ok ] Starting HTTP accelerator: varnishd.
By default, Apache listens for requests on port 80. This is where incoming HTTP requests go, because we want Varnish to essentially sit in front of Apache. We need to configure Varnish to listen on port 80 and change Apache to a different port — usually 8080. We then tell Varnish where Apache is.
Reconfigure Apache
To change the port that Apache listens on, open the file /etc/apache2/ports.conf as root, and find the following lines:
NameVirtualHost *:80
Listen 80
Change these lines to this:
NameVirtualHost *:8080
Listen 8080
If you see the following lines, just change 80 to 8080 in the same way.
NameVirtualHost 127.0.0.1:80
Listen 80
Save this file and open your default virtual host file, which should be in /etc/apache2/sites-available. In this file, find the following line:
<VirtualHost *:80>
Change it to this:
<VirtualHost *:8080>
You will also need to make this change to any other virtual hosts you have set up.
Configure Varnish
Open the file /etc/default/varnish, and scroll down to the uncommented section that starts with DAEMON_OPTS. Edit this so that it looks like the following block, which will make Varnish listen on port 80.
DAEMON_OPTS="-a :80
-T localhost:1234
-f /etc/varnish/default.vcl
-S /etc/varnish/secret
-s malloc,256m"
Open the file /etc/varnish/default.vcl, and check that the default back end is set to port 8080, because this is where Apache will be now.
backend default {
  .host = "127.0.0.1";
  .port = "8080";
}
Restart Apache and Varnish as root with the following commands:
service apache2 restart
service varnish restart
Check that your test website is still available. If it is, then you’ll probably be wondering how to test that it is being served from Varnish. There are a few ways to do this. The simplest is to use cURL. In the command line, type the following:
curl https://yoursite.com --head
The response should be something like Via: 1.1 varnish.
You can also look at the statistics generated by Varnish. In the command line, type varnishstat, and watch the hit rate increase as you refresh your page in the browser. Varnish refers to something it can serve as a “hit” and something it passes to Apache or another back end as a “miss.”
Another useful tool is varnish-top. Type varnishtop -i txurl in the command line, and refresh your page in the browser. This tool shows you which files are being served by Varnish.
Purging The Cache
Now that pages are being cached, if you change an HTML or CSS file, you won’t see the changes immediately. This trips me up all of the time. I know that a cache is in front of Apache, yet every so often I still have that baffled moment of “Where are my changes?!” Type varnishadm “ban.url .” in the command line to clear the entire cache.
You can also control Varnish over HTTP. Plugins are available, such as Varnish HTTP Purge for WordPress, that you can configure to purge the cache directly from the administration area.
Some Simple Customizations
You’ll probably want to know a few things about how Varnish works by default in order to tweak it. Configuring it as described above should cause most basic assets and pages to be served from the cache, once those assets have been cached in memory.
Varnish will only cache things that are safe to do so, and it might not cache some common things that you think it would. A good example is cookies.
In its default configuration, Varnish will not cache content if a cookie is set. So, if your website serves different content to logged-in users, such as personalized content, you wouldn’t want to serve everyone content that is meant for one user. However, you’d probably want to ignore some cookies, such as for analytics. If the website does not serve any personalized content, then the only cookies you would probably care about are those set for your admin area — it would be inconvenient if Varnish cached the admin area and you couldn’t see changes.
Let’s edit /etc/varnish/default.vcl. Assuming your admin area is at /admin, you would add the following:
sub vcl_recv {
  if ( !( req.url ~ ^/admin/) ) {
    unset req.http.Cookie;
  }
}
Some cookies might be important — for example, logged-in users should get uncached content. So, you don’t want to eliminate all cookies. A trip to the land of regular expressions is required to identify the cookies we’ll need. Many recipes for doing this can be found with a quick search online. For analytics cookies, you could add the following.
sub vcl_recv {
  // Remove has_js and Google Analytics __* cookies.
  set req.http.Cookie = regsuball(req.http.Cookie, "(^|;s*)(_[_a-z]+|has_js)=[^;]*", "");
  // Remove a ";" prefix, if present.
  set req.http.Cookie = regsub(req.http.Cookie, "^;s*", "");
}
Varnish has a section in its documentation on “Cookies.”
In most cases, configuring Varnish as described above and removing analytics cookies will dramatically speed up your website. Once Varnish is up and running and you are familiar with the logs, you can start to tweak the configuration and get more performance from the cache.
Next Steps
To learn more, go through Varnish’s documentation. You should understand enough of Varnish’s basics by now to try some of the examples. The section on “Achieving a High Hit Rate” is well worth a read for the simple tips on tweaking your configuration.
Further Reading
- Controlling The Cache: Using Edge Side Includes In Varnish
- How To Speed Up Your WordPress Website
- HTTPS Everywhere With Nginx, Varnish And Apache
- A Look At The Modern WordPress Server Stack


