How To Create An Admin-Manageable Magento Entity For Brands

Email Newsletter
Weekly tips on front-end & UX.
Trusted by 182,000+ folks.
 Register for Free
 Custom Web Forms for Angular, React, & Vue. Your backend.


 Celebrating 10 million developers
In this tutorial, we will create a new “brand” entity in Magento that can be managed through the admin panel. Once we are finished, you will be able to create, update and delete brands that can be viewed in the front-end independently, much in the same way that you can interact with existing entities such as “products” and “categories.”
In addition, we will associate our new brand entity with other Magento entities, such as products. The process itself is quite lengthy because I will explain each step in detail, but it really is easy once you know how, and it’s a great example of how powerful the Magento platform can be with minimal effort.
We will cover the following topics:
- Create a new brand entity in Magento.
- Browse, filter and sort brands in Magento’s admin panel.
- Create, update and delete brands in the admin panel.
- Create a brand list, and view pages in the front-end.
- Associate brands with products.
- Display a product-brand association in the front-end.
- Include images throughout.
This tutorial refers to the Magento Community Edition 1.8.0.0, the latest version available at the time of writing. But the code and principles apply to all recent Magento versions, both Community and Enterprise.
While I have tried to be as thorough as possible in my explanations, documenting the code is sometimes the best way to explain certain things, so you will find a lot of comments in the code snippets. The code snippet linked to at the end contains more usages and items than are covered in this tutorial, to show you how to extend the things that you will learn about here.
Creating Our Module
Start by creating the following folder and file structure. For the time being, all files will be empty. Normally, these files and folders would be created one at a time as needed, but for the sake of this tutorial, we will put everything in place up front.
As usual, I assume you already know the basics of creating a Magento module and are comfortable with this step, with no explanation required.
app
  - code
      - community
          - SmashingMagazine
              - BrandDirectory
                  - Block
                      - Adminhtml
                          - Brand
                              - Edit
                                  - Form.php
                              - Edit.php
                              - Grid.php
                          - Brand.php
                  - Helper
                      - Data.php
                  - Model
                      - Resource
                          - Brand
                              - Collection.php
                          - Brand.php
                      - Brand.php
                  - controllers
                      - Adminhtml
                          - BrandController.php
                  - etc
                      - adminhtml.xml
                      - config.xml
                  - sql
                      - smashingmagazine_branddirectory_setup
                          - install-0.0.1.php
  - etc
      - modules
          - SmashingMagazine_BrandDirectory.xml
Module Setup Scripts
For our module to be of any use, we need somewhere to store our data. Therefore, we need to write a module setup script to create a database table to hold information about our brand entity. Setup scripts are stored in two places within the module, /sql and /data. The former is for physical changes to your Magento instance, such as database schema updates, and the latter is for populating or removing entries from the existing schema.
In our case, we are adding a new table. So, edit the file at sql/smashingmagazine_branddirectory_setup/install-0.0.1.php with the following code:
<?php
$this->startSetup();

/**
 * Note: there are many ways in Magento to achieve the same result of
 * creating a database table. For this tutorial, we have gone with the
 * Varien_Db_Ddl_Table method, but feel free to explore what Magento
 * does in CE 1.8.0.0 and earlier versions.
 */
$table = new Varien_Db_Ddl_Table();

/**
 * This is an alias of the real name of our database table, which is
 * configured in config.xml. By using an alias, we can refer to the same
 * table throughout our code if we wish, and if the table name ever has
 * to change, we can simply update a single location, config.xml
 * - smashingmagazine_branddirectory is the model alias
 * - brand is the table reference
 */
$table->setName($this->getTable('smashingmagazine_branddirectory/brand'));

/**
 * Add the columns we need for now. If you need more later, you can
 * always create a new setup script as an upgrade. We will introduce
 * that later in this tutorial.
 */
$table->addColumn(
    'entity_id',
    Varien_Db_Ddl_Table::TYPE_INTEGER,
    10,
    array(
        'auto_increment' => true,
        'unsigned' => true,
        'nullable'=> false,
        'primary' => true
    )
);
$table->addColumn(
    'created_at',
    Varien_Db_Ddl_Table::TYPE_DATETIME,
    null,
    array(
        'nullable' => false,
    )
);
$table->addColumn(
    'updated_at',
    Varien_Db_Ddl_Table::TYPE_DATETIME,
    null,
    array(
        'nullable' => false,
    )
);
$table->addColumn(
    'name',
    Varien_Db_Ddl_Table::TYPE_VARCHAR,
    255,
    array(
        'nullable' => false,
    )
);
$table->addColumn(
    'url_key',
    Varien_Db_Ddl_Table::TYPE_VARCHAR,
    255,
    array(
        'nullable' => false,
    )
);
$table->addColumn(
    'description',
    Varien_Db_Ddl_Table::TYPE_TEXT,
    null,
    array(
        'nullable' => false,
    )
);
$table->addColumn(
    'visibility',
    Varien_Db_Ddl_Table::TYPE_BOOLEAN,
    null,
    array(
        'nullable' => false,
    )
);

/**
 * These two important lines are often missed.
 */
$table->setOption('type', 'InnoDB');
$table->setOption('charset', 'utf8');

/**
 * Create the table!
 */
$this->getConnection()->createTable($table);

$this->endSetup();
Initializing Our Module
At this point, we still do not have an active Magento module; we just have a number of folders and empty files and an installation setup script that does not do anything yet. This is on purpose. In the next steps, we will populate the app/etc/modules XML file and configure config.xml so that Magento knows where to look for our setup script, after which the next visit to the website will trigger the content of our setup script to run.
If we had performed these tasks the other way round (that is, configured the module first and then populated the setup script), then there is a chance Magento would think that our module was on version 0.0.1 and that our setup script was still empty and, as a result, that the script would effectively have to be skipped. So, to limit face-palm moments for you guys, I’ve tried to keep the order of steps as safe as possible.
Configuring Our Module
Edit the file at app/etc/modules/SmashingMagazine_BrandDirectory.xml, and add the following to enable our module:
<?xml version="1.0"?>
<config>
    <modules>
        <SmashingMagazine_BrandDirectory>
            <active>true</active>
            <codePool>community</codePool>
        </SmashingMagazine_BrandDirectory>
    </modules>
</config>
You will notice we are using the community codepool. This BrandDirectory module will not contain any client-specific code or customizations. Instead, it will contain the building blocks for our new entity, which can be used in other modules, depending on the use case. Therefore, this community module may be dropped into any Magento instance and used as is, without any code needing to be changed. If code changes were required for each use, then this would be more suitable to the local code pool.
Now, we tell Magento that we have a module with a version number, which in fact will determine which setup scripts are run and where to find the setup scripts. Edit etc/config.xml with the following:
<?xml version="1.0"?>
<config>
    <modules>
        <SmashingMagazine_BrandDirectory>
            <!--
            This is the version number that our module is currently at. In
            order for setup scripts to run, their version number must be less
            than or equal to this value.

            As we add upgrade scripts, we increment this value. The next time
            your Magento instance is accessed, Magento will compare values in
            the DB table 'core_resource' against this value. If the DB is
            lower, it will attempt to run any setup scripts for the module
            and then update the database table to match this value.
            -->
            <version>0.0.1</version>
        </SmashingMagazine_BrandDirectory>
    </modules>
    <global>
        <models>

            <!--
            This is the Model alias referred to in install-0.0.1.php.
            -->
            <smashingmagazine_branddirectory>

                <!--
                This tells Magento where to find
                resource materials for this module.
                -->
      <resourceModel>smashingmagazine_branddirectory_resource</resourceModel>

            </smashingmagazine_branddirectory>

            <!--
            This alias must match the above <resourceModel/> value.
            -->
            <smashingmagazine_branddirectory_resource>

                <entities>

                    <!--
                    This is the table alias referred to in install-0.0.1.php.
                    -->
                    <brand>

                        <!--
                        This is the actual name of the database table.
                        -->
                        <table>smashingmagazine_branddirectory_brand</table>

                    </brand>

                </entities>

            </smashingmagazine_branddirectory_resource>

        </models>

        <resources>

            <!--
            This must match our folder name in the module sql folder.
            -->
            <smashingmagazine_branddirectory_setup>

                <setup>

                    <!--
                    This defines which module the setup
                    scripts in this location belong to.
                    -->
                    <module>SmashingMagazine_BrandDirectory</module>

                    <!--
                    In each setup script, this
                    value determines the class of $this.
                    -->
                    <class>Mage_Core_Model_Resource_Setup</class>

                </setup>

                <!--
                This is only relevant if you have
        multiple database connections.
                -->
                <connection>
                    <use>core_setup</use>
                </connection>

            </smashingmagazine_branddirectory_setup>

        </resources>

    </global>
</config>
Is Everything Working So Far?
Go ahead and access any page of your website — the home page will do. Magento will find that it has a new module at version 0.0.1, yet it has no record of this module in the core_resource database table. This missing entry will trigger Magento to look for an installation setup script and execute its contents.
If All Goes Well…
If all goes well, then it will seem like nothing has happened. The Magento page might take a few moments longer to load while the contents of our setup script is run (i.e. while the new database table is created), and then the page will continue to load as normal. You now have two tasks to perform to check that everything has gone as expected:
- Ensure that Magento knows about your module and that the module is enabled by going to
System → Configuration → Advanced → Advanced. - Access your database via either the terminal or something like PHPMyAdmin to see whether Magento has created a new table,
smashingmagazine_branddirectory_brand.
If All Does Not Go Well…
If all does not go well, then it might also seem like nothing has happened, only this time nothing really has happened! The reason for this could be typos in config.xml, badly named folders or files (take care with case-sensitivity) or something else. Go through the previous steps and double-check that everything is as it should be.
On the other hand, you might see an error message — perhaps a “PHP Fatal Error” or a report page, depending on the severity of the error. Use your debugging skills to identify the problem and correct it, again double-checking all previous steps in this tutorial.
“It Went Wrong. How Do I Try Again?”
To try again from scratch, you can perform the following actions — not all may be required, depending on how far Magento got before things went wrong. You will need to access your database directly because this cannot be performed through Magento:
- In the
core_resourcetable, delete the single rowsmashingmagazine_branddirectory_setup. - Delete the
smashingmagazine_branddirectory_brandtable.
Creating Our Helper
We don’t actually need to define any custom functionality in a helper for this tutorial. But we will be adding menu items to the admin panel that use a helper for translation purposes, so we can simply create one in Helper/Data.php and forget about it.
<?php
class SmashingMagazine_BrandDirectory_Helper_Data
    extends Mage_Core_Helper_Abstract
{

}
Creating Our Models
Next, we need to create models and resource models so that we can persist brand data to the database upon creating and saving, display information about our brands in the Magento admin panel grids, and display our brands to the customer in the front-end.
Brand Model
We need to define a model to enable developers to interact with our brand entities. I won’t go into any more detail than that because people smarter than me have no doubt already explained what a model does, so feel free to search out some articles. For now, I will stick to getting our model to do the job we need in order to continue our tutorial. So, edit Model/Brand.php with this:
<?php
class SmashingMagazine_BrandDirectory_Model_Brand
    extends Mage_Core_Model_Abstract
{
    const VISIBILITY_HIDDEN = '0';
    const VISIBILITY_DIRECTORY = '1';

    protected function _construct()
    {
        /**
         * This tells Magento where the related resource model can be found.
         *
         * For a resource model, Magento will use the standard model alias -
         * in this case 'smashingmagazine_branddirectory' - and look in
         * config.xml for a child node <resourceModel/>. This will be the
         * location that Magento will look for a model when
         * Mage::getResourceModel() is called - in our case,
         * SmashingMagazine_BrandDirectory_Model_Resource.
         */
        $this->_init('smashingmagazine_branddirectory/brand');
    }

    /**
     * This method is used in the grid and form for populating the dropdown.
     */
    public function getAvailableVisibilies()
    {
        return array(
            self::VISIBILITY_HIDDEN
                => Mage::helper('smashingmagazine_branddirectory')
                       ->__('Hidden'),
            self::VISIBILITY_DIRECTORY
                => Mage::helper('smashingmagazine_branddirectory')
                       ->__('Visible in Directory'),
        );
    }

    protected function _beforeSave()
    {
        parent::_beforeSave();

        /**
         * Perform some actions just before a brand is saved.
         */
        $this->_updateTimestamps();
        $this->_prepareUrlKey();

        return $this;
    }

    protected function _updateTimestamps()
    {
        $timestamp = now();

        /**
         * Set the last updated timestamp.
         */
        $this->setUpdatedAt($timestamp);

        /**
         * If we have a brand new object, set the created timestamp.
         */
        if ($this->isObjectNew()) {
            $this->setCreatedAt($timestamp);
        }

        return $this;
    }

    protected function _prepareUrlKey()
    {
        /**
         * In this method, you might consider ensuring
         * that the URL Key entered is unique and
         * contains only alphanumeric characters.
         */

        return $this;
    }
}
Brand Resource Model
As in my introduction to the model above, I won’t go into any more detail than to say that the job of the resource model is to persist and retrieve data from the database. So edit Model/Resource/Brand.php with this:
<?php
class SmashingMagazine_BrandDirectory_Model_Resource_Brand
    extends Mage_Core_Model_Resource_Db_Abstract
{
    protected function _construct()
    {
        /**
         * Tell Magento the database name and primary key field to persist
         * data to. Similar to the _construct() of our model, Magento finds
         * this data from config.xml by finding the <resourceModel/> node
         * and locating children of <entities/>.
         *
         * In this example:
         * - smashingmagazine_branddirectory is the model alias
         * - brand is the entity referenced in config.xml
         * - entity_id is the name of the primary key column
         *
         * As a result, Magento will write data to the table
         * 'smashingmagazine_branddirectory_brand' and any calls
         * to $model->getId() will retrieve the data from the
         * column named 'entity_id'.
         */
        $this->_init('smashingmagazine_branddirectory/brand', 'entity_id');
    }
}
Brand Resource Collection
Finally, we need a resource collection to allow iteration through our brands for things like admin panel grids and front-end listing pages. Edit Model/Resource/Brand/Collection.php with this:
<?php
class SmashingMagazine_BrandDirectory_Model_Resource_Brand_Collection
extends Mage_Core_Model_Resource_Db_Collection_Abstract
{
protected function _construct()
{
parent::_construct();
/**
* Tell Magento the model and resource model to use for
* this collection. Because both aliases are the same,
* we can omit the second paramater if we wish.
*/
$this->_init(
'smashingmagazine_branddirectory/brand',
'smashingmagazine_branddirectory/brand'
);
}
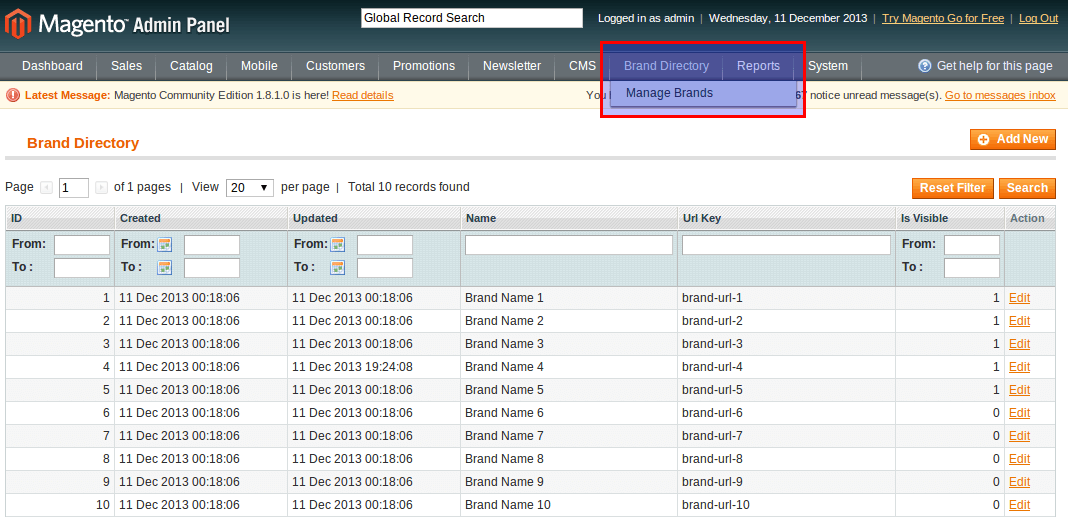
}Creating Our Admin Blocks
Most of the grunt work is now done. A database is ready to be populated, and models and resource models are ready to populate them. We just need to create the interface to do so. We’ll start by creating and configuring admin blocks to display our brands as grids in the admin panel and allowing them to be created and updated.
Grid Container Block
The job of the grid container is to house the individual rows of brand entries to be displayed in Magento’s admin panel. The grid container is like a wrapper and includes the buttons in the top right (for example, “Add”). Edit Block/Adminhtml/Brand.php with this:
<?php
class SmashingMagazine_BrandDirectory_Block_Adminhtml_Brand
    extends Mage_Adminhtml_Block_Widget_Grid_Container
{
    protected function _construct()
    {
        parent::_construct();

        /**
         * The $_blockGroup property tells Magento which alias to use to
         * locate the blocks to be displayed in this grid container.
         * In our example, this corresponds to BrandDirectory/Block/Adminhtml.
         */
        $this->_blockGroup = 'smashingmagazine_branddirectory_adminhtml';

        /**
         * $_controller is a slightly confusing name for this property.
         * This value, in fact, refers to the folder containing our
         * Grid.php and Edit.php - in our example,
         * BrandDirectory/Block/Adminhtml/Brand. So, we'll use 'brand'.
         */
        $this->_controller = 'brand';

        /**
         * The title of the page in the admin panel.
         */
        $this->_headerText = Mage::helper('smashingmagazine_branddirectory')
            ->__('Brand Directory');
    }

    public function getCreateUrl()
    {
        /**
         * When the "Add" button is clicked, this is where the user should
         * be redirected to - in our example, the method editAction of
         * BrandController.php in BrandDirectory module.
         */
        return $this->getUrl(
            'smashingmagazine_branddirectory_admin/brand/edit'
        );
    }
}
Grid Block
When rendering the grid, Magento will expect to find a grid block in the _controller location defined in the grid container above, so we will create this now. Here, we can define which fields to retrieve from the database and show in the admin panel grid, and Magento will automatically allow these columns to be searched and filtered. Edit Block/Adminhtml/Brand/Grid.php with this:
<?php
class SmashingMagazine_BrandDirectory_Block_Adminhtml_Brand_Grid
extends Mage_Adminhtml_Block_Widget_Grid
{
protected function _prepareCollection()
{
/**
* Tell Magento which collection to use to display in the grid.
*/
$collection = Mage::getResourceModel(
'smashingmagazine_branddirectory/brand_collection'
);
$this->setCollection($collection);
return parent::_prepareCollection();
}
public function getRowUrl($row)
{
/**
* When a grid row is clicked, this is where the user should
* be redirected to - in our example, the method editAction of
* BrandController.php in BrandDirectory module.
*/
return $this->getUrl(
'smashingmagazine_branddirectory_admin/brand/edit',
array(
'id' => $row->getId()
)
);
}
protected function _prepareColumns()
{
/**
* Here, we'll define which columns to display in the grid.
*/
$this->addColumn('entity_id', array(
'header' => $this->_getHelper()->__('ID'),
'type' => 'number',
'index' => 'entity_id',
));
$this->addColumn('created_at', array(
'header' => $this->_getHelper()->__('Created'),
'type' => 'datetime',
'index' => 'created_at',
));
$this->addColumn('updated_at', array(
'header' => $this->_getHelper()->__('Updated'),
'type' => 'datetime',
'index' => 'updated_at',
));
$this->addColumn('name', array(
'header' => $this->_getHelper()->__('Name'),
'type' => 'text',
'index' => 'name',
));
$this->addColumn('lastname', array(
'header' => $this->_getHelper()->__('Url Key'),
'type' => 'text',
'index' => 'url_key',
));
$brandSingleton = Mage::getSingleton(
'smashingmagazine_branddirectory/brand'
);
$this->addColumn('visibility', array(
'header' => $this->_getHelper()->__('Visibility'),
'type' => 'options',
'index' => 'visibility',
'options' => $brandSingleton->getAvailableVisibilies()
));
/**
* Finally, we'll add an action column with an edit link.
*/
$this->addColumn('action', array(
'header' => $this->_getHelper()->__('Action'),
'width' => '50px',
'type' => 'action',
'actions' => array(
array(
'caption' => $this->_getHelper()->__('Edit'),
'url' => array(
'base' => 'smashingmagazine_branddirectory_admin'
. '/brand/edit',
),
'field' => 'id'
),
),
'filter' => false,
'sortable' => false,
'index' => 'entity_id',
));
return parent::_prepareColumns();
}
protected function _getHelper()
{
return Mage::helper('smashingmagazine_branddirectory');
}
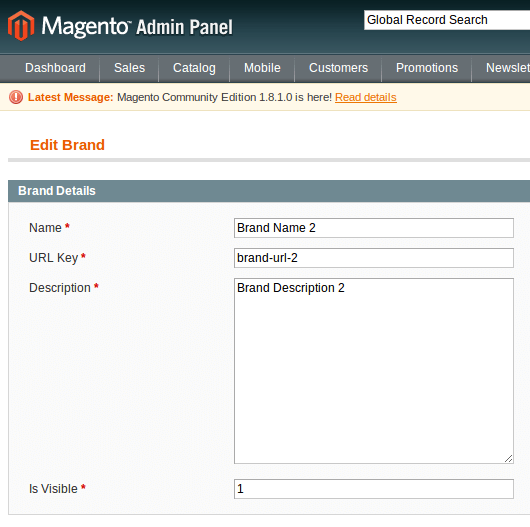
}Form Container Block
The form container block has a function similar to that of the grid container but is used to create or edit an entity. Edit Block/Adminhtml/Brand/Edit.php with this:
<?php
class SmashingMagazine_BrandDirectory_Block_Adminhtml_Brand_Edit
    extends Mage_Adminhtml_Block_Widget_Form_Container
{
    protected function _construct()
    {
        $this->_blockGroup = 'smashingmagazine_branddirectory_adminhtml';
        $this->_controller = 'brand';

        /**
         * The $_mode property tells Magento which folder to use
         * to locate the related form blocks to be displayed in
         * this form container. In our example, this corresponds
         * to BrandDirectory/Block/Adminhtml/Brand/Edit/.
         */
        $this->_mode = 'edit';

        $newOrEdit = $this->getRequest()->getParam('id')
            ? $this->__('Edit')
            : $this->__('New');
        $this->_headerText =  $newOrEdit . ' ' . $this->__('Brand');
    }
}
Form Block
In the form block, we define which fields may be managed when creating or editing an entity. Edit Block/Adminhtml/Brand/Edit/Form.php with this:
<?php
class SmashingMagazine_BrandDirectory_Block_Adminhtml_Brand_Edit_Form
    extends Mage_Adminhtml_Block_Widget_Form
{
    protected function _prepareForm()
    {
        // Instantiate a new form to display our brand for editing.
        $form = new Varien_Data_Form(array(
            'id' => 'edit_form',
            'action' => $this->getUrl(
                'smashingmagazine_branddirectory_admin/brand/edit',
                array(
                    '_current' => true,
                    'continue' => 0,
                )
            ),
            'method' => 'post',
        ));
        $form->setUseContainer(true);
        $this->setForm($form);

        // Define a new fieldset. We need only one for our simple entity.
        $fieldset = $form->addFieldset(
            'general',
            array(
                'legend' => $this->__('Brand Details')
            )
        );

        $brandSingleton = Mage::getSingleton(
            'smashingmagazine_branddirectory/brand'
        );

        // Add the fields that we want to be editable.
        $this->_addFieldsToFieldset($fieldset, array(
            'name' => array(
                'label' => $this->__('Name'),
                'input' => 'text',
                'required' => true,
            ),
            'url_key' => array(
                'label' => $this->__('URL Key'),
                'input' => 'text',
                'required' => true,
            ),
            'description' => array(
                'label' => $this->__('Description'),
                'input' => 'textarea',
                'required' => true,
            ),
            'visibility' => array(
                'label' => $this->__('Visibility'),
                'input' => 'select',
                'required' => true,
                'options' => $brandSingleton->getAvailableVisibilies(),
            ),

            /**
             * Note: we have not included created_at or updated_at.
             * We will handle those fields ourself in the model
       * before saving.
             */
        ));

        return $this;
    }

    /**
     * This method makes life a little easier for us by pre-populating
     * fields with $_POST data where applicable and wrapping our post data
     * in 'brandData' so that we can easily separate all relevant information
     * in the controller. You could of course omit this method entirely
     * and call the $fieldset->addField() method directly.
     */
    protected function _addFieldsToFieldset(
        Varien_Data_Form_Element_Fieldset $fieldset, $fields)
    {
        $requestData = new Varien_Object($this->getRequest()
            ->getPost('brandData'));

        foreach ($fields as $name => $_data) {
            if ($requestValue = $requestData->getData($name)) {
                $_data['value'] = $requestValue;
            }

            // Wrap all fields with brandData group.
            $_data['name'] = "brandData[$name]";

            // Generally, label and title are always the same.
            $_data['title'] = $_data['label'];

            // If no new value exists, use the existing brand data.
            if (!array_key_exists('value', $_data)) {
                $_data['value'] = $this->_getBrand()->getData($name);
            }

            // Finally, call vanilla functionality to add field.
            $fieldset->addField($name, $_data['input'], $_data);
        }

        return $this;
    }

    /**
     * Retrieve the existing brand for pre-populating the form fields.
     * For a new brand entry, this will return an empty brand object.
     */
    protected function _getBrand()
    {
        if (!$this->hasData('brand')) {
            // This will have been set in the controller.
            $brand = Mage::registry('current_brand');

            // Just in case the controller does not register the brand.
            if (!$brand instanceof
                    SmashingMagazine_BrandDirectory_Model_Brand) {
                $brand = Mage::getModel(
                    'smashingmagazine_branddirectory/brand'
                );
            }

            $this->setData('brand', $brand);
        }

        return $this->getData('brand');
    }
}
Creating Our Admin Controller
Now, we need a controller to accept requests and render the container blocks from above. The controller will also handle POST requests to create, update and delete brands as required. Edit controllers/Adminhtml/BrandController.php with this:
<?php
class SmashingMagazine_BrandDirectory_Adminhtml_BrandController
    extends Mage_Adminhtml_Controller_Action
{
    /**
     * Instantiate our grid container block and add to the page content.
     * When accessing this admin index page, we will see a grid of all
     * brands currently available in our Magento instance, along with
     * a button to add a new one if we wish.
     */
    public function indexAction()
    {
        // instantiate the grid container
        $brandBlock = $this->getLayout()
            ->createBlock('smashingmagazine_branddirectory_adminhtml/brand');

        // Add the grid container as the only item on this page
        $this->loadLayout()
            ->_addContent($brandBlock)
            ->renderLayout();
    }

    /**
     * This action handles both viewing and editing existing brands.
     */
    public function editAction()
    {
        /**
         * Retrieve existing brand data if an ID was specified.
         * If not, we will have an empty brand entity ready to be populated.
         */
        $brand = Mage::getModel('smashingmagazine_branddirectory/brand');
        if ($brandId = $this->getRequest()->getParam('id', false)) {
            $brand->load($brandId);

            if ($brand->getId() _getSession()->addError(
                    $this->__('This brand no longer exists.')
                );
                return $this->_redirect(
                    'smashingmagazine_branddirectory_admin/brand/index'
                );
            }
        }

        // process $_POST data if the form was submitted
        if ($postData = $this->getRequest()->getPost('brandData')) {
            try {
                $brand->addData($postData);
                $brand->save();

                $this->_getSession()->addSuccess(
                    $this->__('The brand has been saved.')
                );

                // redirect to remove $_POST data from the request
                return $this->_redirect(
                    'smashingmagazine_branddirectory_admin/brand/edit',
                    array('id' => $brand->getId())
                );
            } catch (Exception $e) {
                Mage::logException($e);
                $this->_getSession()->addError($e->getMessage());
            }

            /**
             * If we get to here, then something went wrong. Continue to
             * render the page as before, the difference this time being
             * that the submitted $_POST data is available.
             */
        }

        // Make the current brand object available to blocks.
        Mage::register('current_brand', $brand);

        // Instantiate the form container.
        $brandEditBlock = $this->getLayout()->createBlock(
            'smashingmagazine_branddirectory_adminhtml/brand_edit'
        );

        // Add the form container as the only item on this page.
        $this->loadLayout()
            ->_addContent($brandEditBlock)
            ->renderLayout();
    }

    public function deleteAction()
    {
        $brand = Mage::getModel('smashingmagazine_branddirectory/brand');

        if ($brandId = $this->getRequest()->getParam('id', false)) {
            $brand->load($brandId);
        }

        if ($brand->getId() _getSession()->addError(
                $this->__('This brand no longer exists.')
            );
            return $this->_redirect(
                'smashingmagazine_branddirectory_admin/brand/index'
            );
        }

        try {
            $brand->delete();

            $this->_getSession()->addSuccess(
                $this->__('The brand has been deleted.')
            );
        } catch (Exception $e) {
            Mage::logException($e);
            $this->_getSession()->addError($e->getMessage());
        }

        return $this->_redirect(
            'smashingmagazine_branddirectory_admin/brand/index'
        );
    }

    /**
     * Thanks to Ben for pointing out this method was missing. Without
     * this method the ACL rules configured in adminhtml.xml are ignored.
     */
    protected function _isAllowed()
    {
        /**
         * we include this switch to demonstrate that you can add action
         * level restrictions in your ACL rules. The isAllowed() method will
         * use the ACL rule we have configured in our adminhtml.xml file:
         * - acl
         * - - resources
         * - - - admin
         * - - - - children
         * - - - - - smashingmagazine_branddirectory
         * - - - - - - children
         * - - - - - - - brand
         *
         * eg. you could add more rules inside brand for edit and delete.
         */
        $actionName = $this->getRequest()->getActionName();
        switch ($actionName) {
            case 'index':
            case 'edit':
            case 'delete':
                // intentionally no break
            default:
                $adminSession = Mage::getSingleton('admin/session');
                $isAllowed = $adminSession
                    ->isAllowed('smashingmagazine_branddirectory/brand');
                break;
        }

        return $isAllowed;
    }
}
Completing The Configuration
That’s all the code we need for the back end. We just need to make a few changes to config.xml to tell Magento where to find our controller, blocks, models and helper. We also have to add a menu item to the admin panel for easy access to manage our brand entity.
config.xml
We need to add block, helper and model definitions to our module configuration so that Magento knows where to locate these files, as well as an admin router so that Magento knows where to locate our controller for the menu items that we are about to add in the next step. The final version of our etc/config.xml file will look as follows:
<?xml version="1.0"?>
<config>
    <modules>
        <SmashingMagazine_BrandDirectory>
            <!--
            This is the version number that our module is currently at.
            In order for setup scripts to run, their version number must
            be less than or equal to this value.

            As we add upgrade scripts, we increment this value. The next time
            your Magento instance is accessed, Magento will compare values in
            the database table 'core_resource' against this value. If the
            database is lower, it will attempt to run any setup scripts for
            the module and then update the database table to match this value.
            -->
            <version>0.0.1</version>
        </SmashingMagazine_BrandDirectory>
    </modules>
    <global>

        <!--
        add an adminhtml block definition
        -->
        <blocks>
            <smashingmagazine_branddirectory_adminhtml>
               <class>SmashingMagazine_BrandDirectory_Block_Adminhtml</class>
            </smashingmagazine_branddirectory_adminhtml>
        </blocks>

        <!--
        Add a helper definition for use in adminhtml.xml menu translation.
        -->
        <helpers>
            <smashingmagazine_branddirectory>
                <class>SmashingMagazine_BrandDirectory_Helper</class>
            </smashingmagazine_branddirectory>
        </helpers>

        <models>

            <!--
            This is the model alias referred to in install-0.0.1.php.
            -->
            <smashingmagazine_branddirectory>
                <!--
                This tells Magento where to find models for this module.
                -->
                <class>SmashingMagazine_BrandDirectory_Model</class>

                <!--
                This tells Magento where to find resource
                materials for this module.
                -->
      <resourceModel>smashingmagazine_branddirectory_resource</resourceModel>

            </smashingmagazine_branddirectory>

            <!--
            This alias must match the <resourceModel/> value above.
            -->
            <smashingmagazine_branddirectory_resource>
                <!--
                This tells Magento where to find resource
                models for this module.
                -->
                <class>SmashingMagazine_BrandDirectory_Model_Resource</class>

                <entities>

                    <!--
                    This is the table alias referred to in install-0.0.1.php.
                    -->
                    <brand>

                        <!--
                            This is the name of the database table itself.
                        -->
                        <table>smashingmagazine_branddirectory_brand</table>

                    </brand>

                </entities>

            </smashingmagazine_branddirectory_resource>

        </models>

        <resources>

            <!--
            This must match our folder name in the module sql folder.
            -->
            <smashingmagazine_branddirectory_setup>

                <setup>

                    <!--
                    This defines which module the setup
                    scripts in this location belong to.
                    -->
                    <module>SmashingMagazine_BrandDirectory</module>

                    <!--
                    In each setup script, this
                    value determines the class of $this.
                    -->
                    <class>Mage_Core_Model_Resource_Setup</class>

                </setup>

                <!--
                This is relevant only if you have multiple database connections.
                -->
                <connection>
                    <use>core_setup</use>
                </connection>

            </smashingmagazine_branddirectory_setup>

        </resources>

    </global>

    <!-- Add a router for access to our admin panel controller. -->
    <admin>
        <routers>

            <!-- This is the alias for this router. -->
            <smashingmagazine_branddirectory_admin>

                <!--
                This basically informs Magento to use the
                admin scope for requests to this router.
                -->
                <use>admin</use>

                <args>
                    <!--
                    This tells Magento where to find
                    adminhtml controllers for this module.
                    -->
                   <module>SmashingMagazine_BrandDirectory_Adminhtml</module>

                    <!-- This is the term used in the actual URL. -->
                    <frontName>brand-directory-admin</frontName>
                </args>

            </smashingmagazine_branddirectory_admin>

        </routers>
    </admin>

</config>
adminhtml.xml
Adding menu items to Magento’s admin panel is straightforward. We simply have to create an adminhtml.xml file, define which items should appear and where they should lead to when clicked. Edit etc/adminhtml.xml with this:
<?xml version="1.0"?>
<config>
<!-- We are defining a new menu item for the admin panel. -->
<menu>
<!--
First, create a top-level menu item, which will appear alongside CMS
-->
<smashingmagazine_branddirectory translate="title"
module="smashingmagazine_branddirectory">
<title>Brand Directory</title>
<sort_order>75</sort_order>
<depends>
<module>SmashingMagazine_BrandDirectory</module>
</depends>
<!-- Under this top-level menu, create a child menu item. -->
<children>
<brand translate="title"
module="smashingmagazine_branddirectory">
<title>Manage Brands</title>
<sort_order>10</sort_order>
<!--
When the menu is clicked, take the user here.
-->
<action>smashingmagazine_branddirectory_admin/brand</action>
</brand>
</children>
</smashingmagazine_branddirectory>
</menu>
<!-- Define ACL for access to these menu items. -->
<acl>
<resources>
<admin>
<children>
<smashingmagazine_branddirectory translate="title"
module="smashingmagazine_branddirectory">
<title>Brand Directory</title>
<sort_order>75</sort_order>
<children>
<brand translate="title"
module="smashingmagazine_branddirectory">
<title>Manage Brands</title>
</brand>
</children>
</smashingmagazine_branddirectory>
</children>
</admin>
</resources>
</acl>
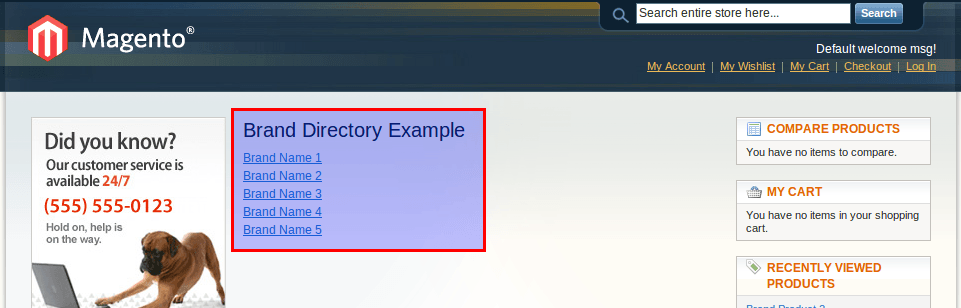
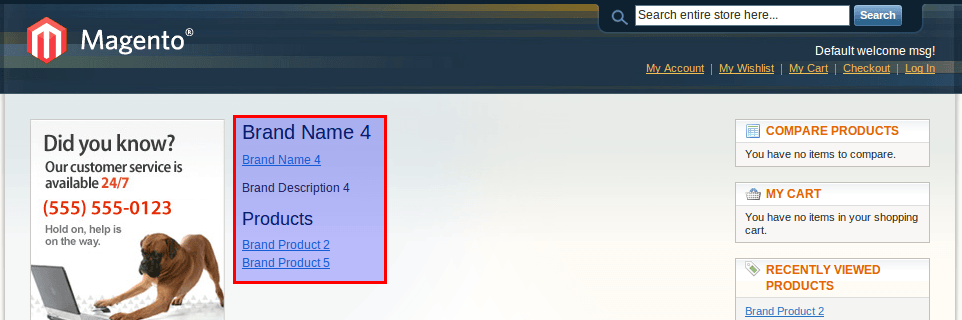
</config>Displaying Brands In The Front-End
We have reached the end of this tutorial on how to create an entity that is manageable from the admin panel. By now, you should be able to create, update and delete brands and to have those changes reflected in the database. You have a fully functioning brand entity, but it doesn’t actually do anything. The next step is to integrate this new entity in the rest of your Magento code.

Rather than continue to ramble about how to do this, I have included in the attached source code an additional local module, named “BrandExample,” which contains examples of how to achieve this.
Upon inspecting the attachment, you will notice I have kept this supplemental front-end example as a separate local module, in order for it not to be confused with the admin panel management sections covered above. Once you are more familiar, then by all means, bundle both modules into one if you wish.
I won’t go into much detail with the example usages, but feel free to ask any questions in the comments section below.
Feel free to view or download the source code (Github), which contains the following additional content:
- the completed tutorial from above;
- a new product attribute to associate products with brands;
- inclusion of brands on the product view page, once associated;
- a brands listing and brands landing page, including related products;
- data setup scripts to create dummy products and brands.
Further Reading
- How To Create An Affiliate Tracking Module In Magento
- The Basics Of Creating A Magento Module
- How To Create Custom Shipping Methods In Magento
- Using Composer With WordPress


