Case Study: PixelMogul, A Simulation Game For iOS

Email Newsletter
Weekly tips on front-end & UX.
Trusted by 182,000+ folks.
 Register for Free
 Custom Web Forms for Angular, React, & Vue. Your backend.

 Celebrating 10 million developers
Are you a web designer or developer who dreams about creating a mobile game and bringing it to the app store? We have good news: Your road to the app store might be shorter than you think! And if you can recall your experience with ActionScript and the Flash platform from days of old, then you’ll even have a shortcut.
Building a native app with Flash might sound weird at first. In this article, we will share some insights on how we built a game for iOS that is written entirely in ActionScript.
First things first. Before getting to the technical aspects, let’s talk about general considerations that every game developer has to face, as well as some design decisions we were confronted with.
Developer’s Dilemmas
Android, iOS Or Both?
Making a game sounds fun — and it really is! But a bunch of important decisions need to be made that do not directly relate to the game itself. Let’s start with the decision about which platform(s) to support. Even if most game ideas are not strictly bound to one platform (for example, due to hardware requirements), focusing on a single platform for launch is a good approach. This will reduce the time and expense of the initial development cycle.
From a developer’s perspective, iOS-first is definitely the preferable path. Just think of the fragmentation in the Android universe: a huge range of screen sizes, processors and OS versions to deal with. iOS users are easier to serve: just a handful of devices, standardized screen proportions, a user base that updates the OS very quickly, and the certainty that the next generation of devices won’t veer out of line dramatically. Development is certainly easier if all supported devices fit on your desk.
On top of this, research as of late 2012 shows that Apple’s App Store pulls in far more revenue than Google’s Play store, although Google is catching up. Our conclusion was to go with iOS first, but to be prepared to port to Android quickly. The ease of porting the app was an important factor when the time came to choose a framework.
If you’re interested in some figures on how the market evolved while we were working on the game, check out Distimo’s “2013 Year in Review” and App Annie’s “Top Trends of 2013.”
Which Business Model To Choose
We hear you saying, “What business model?! Games are fun, not business!” We’re with you. If making games is not fun, one should surely stay away from it. However, building a game is also a challenging and time-consuming adventure, and some sort of financial compensation should be involved. The question of how to make money from it will bring you to four common business models. Pick the right one early on, because this decision will determine how focused your design and development process is:
- paid apps
- freemium (i.e. free app that offers in-app purchases)
- paid apps with in-app purchases
- in-app advertising
We spoke with a few people who play games on iOS, and it turns out that most prefer the paid model because it is the most transparent deal up front. Sounds tempting to a developer because the paid model doesn’t require any extra effort, like implementing in-app purchases or advertising. But we were surprised to find that the freemium model makes up the biggest share in revenue by far (92% in November 2013, according to Distimo’s report mentioned above). So, we decided to give it a try.
A huge concern for us was scaring away players or even getting bad reviews for offering in-app purchases, which some players still think are a scam — probably because some publishers went too far with them. To prevent such a hassle, we aimed for customer-friendly in-app purchases and tried to avoid critical mistakes.
- Recurring payments (such as for consumables) can generate a continual stream of income, but they also risk annoying people if implemented aggressively.
- The moment at which a player decides to spend money is very personal. Paywalls will scare away some players if set too early. On the other hand, players might lose interest in the game before reaching the paywall if it is set too late.
- In-app purchases that give paying players unbeatable advantages over non-paying players could lead to frustration. This factor is especially important in multiplayer games in which players are in direct competition.
- An unclear description on what’s included in in-app purchases forces players to think instead of buy.
- Some games get bad reviews for excessive pricing. Sounds obvious, but what’s “excessive”? Mobile games have gotten really inexpensive, and players are used to getting great games for little money. For example, $10 feels expensive for a game that one will have fun with for hours, while the same person will easily spend $8 for a movie ticket (which is only 90 minutes of fun).
We’re new to the business and we’re still learning. At the moment, attracting as many people as possible and getting positive reviews is more important than squeezing every last penny out of the game. Hence, we might optimize the pricing model in future.
How To Introduce Players To The App?
When you visit a city you’ve never been to before, having someone introduce you to the neighbourhood and the people makes you feel welcome and confident. The same goes for jumping into a new game — welcoming new players with a guided tour is common. Such tours are often presented by a character in the game. Guess why?!
As nice as a guided tour of a city is, on the second day you’ll probably want a few hours to explore the city on your own, right? This applies to players, too. They want to explore a game at their own pace. They’ll just skip a lengthy introduction. We kept the mandatory tutorial as brief as possible. The goal was to introduce the main mechanics and end it with a clear but easy-to-complete mission. However, after working on the game for quite a while, deciding which mechanics needed to be introduced was difficult because we were just too deep into it.
User testing is a helpful way to find out where players need hints. Some early testers played the game without any introduction or help. It turned out that the level of assistance they wanted was very personal. As a result of the feedback, we split the in-game help into four levels:
- New players are given a brief tutorial at the beginning of the game.
- Progress-aware hints appear only if required by the game’s state (for example, if a player misses an important action). Players who get it right from the beginning aren’t ever interrupted by these.
- User are guided in complex panels. An animated dot indicates where to tap when the player is using a panel for the first time.
- Gestures are shadowed. Swipeable elements are slightly animated to prompt the user to perform a swiping gesture.
- An in-game help menu explains the meaning of icons in the game and clarifies the game’s mechanics and UI elements.
- The splash screen (during loading) offers general hints.
Verify that your hints work as intended! One way would be to ask questions of your testers. Keep in mind that testers usually won’t say things like, “I can’t find the turbo boost,” because in most cases they won’t even realize that there is turbo boost!
Ask your questions thoughtfully. A question like “Which button activates the turbo booster?” will force the tester to think, and you’ll get vague feedback. Ask for the player’s fastest lap time instead. Based on the answer, you’ll be able to determine whether they used the turbo boost, thus sparing them from frustration and the pressure to give the correct answer.
Of course, watching testers play is even better than asking questions. But from our experience, looking over their shoulder will make most testers feel uncomfortable and will influence their behaviour. In this case, ask to capture their sessions. If you’re on site, AirPlay mirroring is great for testing. We used Apple TV to mirror on a TV. You can also use a tool like Reflector, which turns your PC into an AirPlay receiver. As a last resort, find gameplay videos published by players on YouTube and Twitch.

We optimized the in-game guidance based on feedback but did not accurately verify the result. After the first version was publicly released, some players still got stuck because they didn’t get enough assistance. A reviewer in the US App Store summarized his review as, “Great but needs help.” We addressed the issue in two updates, and the majority of players seem to feel comfortable now.
Design And Graphics
Combining Interface Styles
What’s the first thing that comes to mind when you’re thinking of making a game? The user interface, perhaps! Of course, the UI will not be the reason that people consciously choose to play your game, but depending on the type of game, the UI could be critical (perhaps the panels or settings are complex). A neat UI could also help your game stand out from competitors. And, hey, UI design is your domain as a screen designer, and you can bring your full experience from the web!
When designing for small touchscreens, avoid clutter. You might not rely on gestures for basic tasks on a mobile website, except if it’s a common gesture (such as pinch to zoom). In a game native to the OS, you have the opportunity to take things one step further because you can introduce the user to the game through a guided tour.
We drew the illustration layer in our game, which primarily defines the look, in a pixelated style. Adopting a pixelated style for the UI seemed obvious at first, but we quickly realized that this was not the best choice, particularly for the more complex panels. We ended up with a clean flat design and anti-aliased type for the UI, which gives the game a contemporary and app-like look. (The combination of pixelated art and flat anti-aliased design had a few consequences for how we handled textures. We’ll cover this in the technical section below.)
Multi-Resolution Design
Is there such a thing as responsive design for games? Yes… kind of. Mobile games are displayed in full screen on all devices. If you’re targeting iOS, then you’ll be dealing with three screen proportions: iPad (4:3), iPhone (3:2) and iPhone 5+ (16:9). Sounds like paradise for a web designer or developer, right? However, this calls for some important design decisions, and keeping Android’s more fragmented universe in mind could save you much trouble if you decide to port the game later.
For games with simple interfaces, scaling is a good option. But scaling alone won’t do because screen proportions vary. In addition to taking care of the additional space (for example, by repeating the background pattern), our team had to reposition various elements based on screen size (for example, the player’s score had to persist in the upper-right corner).
PixelMogul is displayed at the same scale on all devices. iPad users have a larger viewport and, thus, benefit from a better overall view and less scrolling.
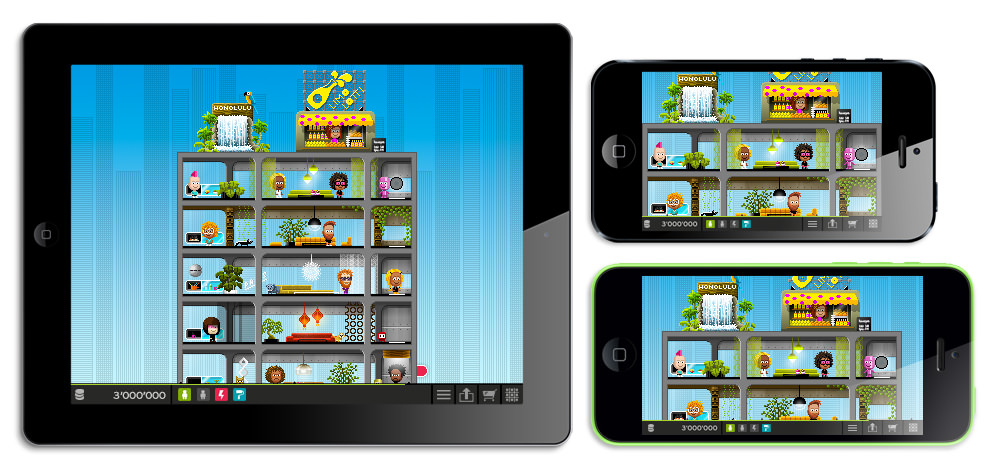
The design process focused on the iPad, but we had “passe-partout” layers in our Photoshop files, which enabled us to quickly check whether the design works on smaller iPhone screens, too. This approach required us to fit key elements on the smallest screen (480 × 320 pixels). In some cases, we used the extra room on larger screens for design enhancements, and then “compressed” the design for smaller devices.
Usability Of The City Map
We mentioned earlier what it feels like to visit a new city. Losing one’s orientation is quite easy. That’s exactly how our early testers felt when they arrived on the city map, one of the main elements of the game. The map is 37 × 37 blocks and almost 4 pixels in width and height. Getting lost on it is quite easy, especially on a small screen, which provides just a peek at a tiny portion of the enormous map.
Our first solution was to enable users to pinch to zoom out from the map. But around the same time, we were confronted by another problem: Players earned way too much money as soon as they owned around a dozen buildings. We analyzed the math model and discussed the issue with a real estate professional, who explained to us that this is just the way the business works. Good to know!
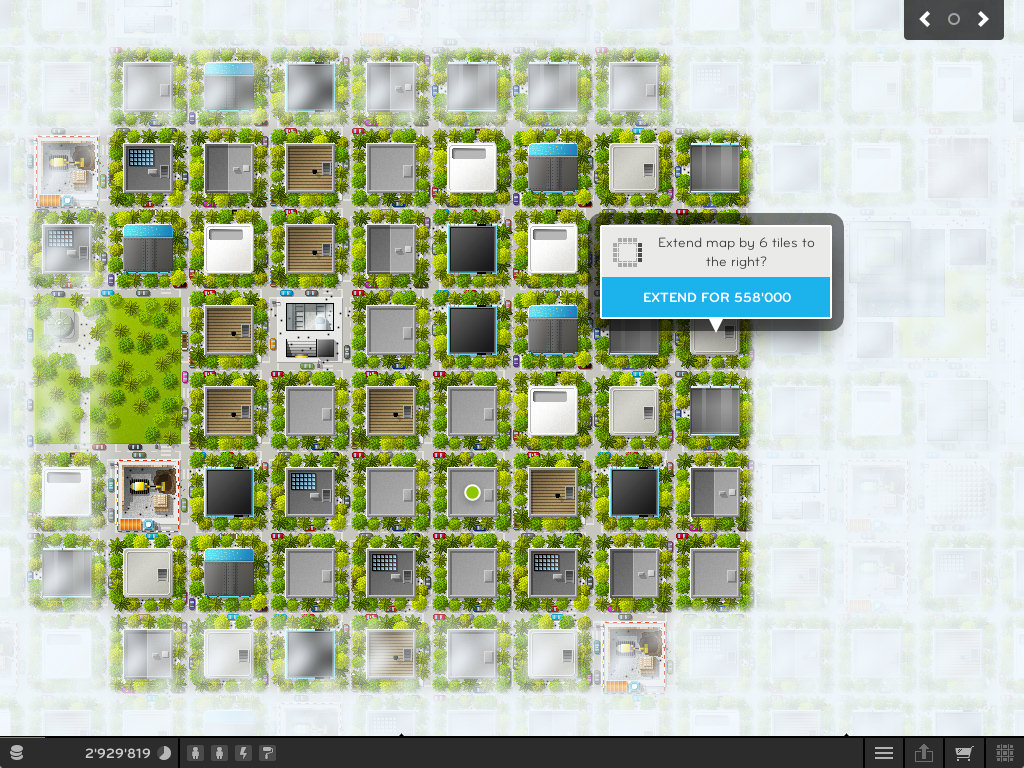
We found a simple solution to both issues. At the very beginning of the game, all buildings on the map except the initial four are covered by clouds and cannot be accessed. The player is forced to focus on the four buildings, which helps to maintain their attention. Because removing clouds and expanding the accessible buildings requires in-game money, increased earnings are rewarded to a certain extent.
Technology
Choosing The Right Framework
Picking a game engine or framework has similarities to dating. In “The Game Engine Dating Guide: How to Pick Up an Engine for Single Developers,” Steffen Itterheim covers important points on how to “date” frameworks. We followed some of the key recommendations, which helped a lot. The tips are not specific to games and could be applied when you have to pick a framework of any kind.
- Choose a familiar programming language. Learning the basics of a programming language might not be a big deal, but it takes experience to learn all of the nitty-gritty details that lead to better code, fewer bugs, faster performance and tighter security. Use your experience whenever possible!
- Match the framework to your needs, not to the project. Mastering the tools you have is more important than obtaining the perfect tools. And the only way to master a tool is to use it frequently. Choose a framework that’s flexible enough to serve a wide range of projects. Low-level frameworks are usually more versatile than full-blown engines. Don’t look for sophisticated built-in features — rather, look for frameworks that can be extended with custom features.
- Documentation, maintenance, community and support. Before you shortlist a framework, drop by the documentation. Check the change logs, repositories and forums for activity. Make sure you get support that is adequate and that fits your needs and budget.
You will probably have additional requirements. In our case, we were looking for a framework that works with both iOS and Android.
Our Choice: Starling
The Starling framework seemed to be the perfect fit. It’s a pure ActionScript framework that mimics the DisplayList architecture of Flash, while rendering all content directly from the GPU. That’s great news for ActionScript veterans, who get to work with a familiar API and get wonderful rendering performance as a bonus.
GPU rendering is based on Stage3D, which became part of the Flash platform in 2011. It’s way faster than the classic DisplayObject rendering but uses Adobe’s Graphics Assembly Language (AGAL), a low-level cross-platform shader language, instead of the beloved DisplayList architecture. Like most ActionScript developers, we’re really into the DisplayList concept, and that’s one way Starling came in very handy.
Because Starling takes care of all things AGAL, it enabled us to take advantage of our ActionScript experience and to work with the DisplayList architecture that we’re used to, while enjoying the advantages of GPU rendering. Even better is that Starling is built on top of Adobe Flash and AIR and runs for iOS and Android (both wrapped in a native app) and in the browser (via a Flash plugin).
Convenience comes at a price, though. ActionScript does not provide the developer with access to all device-specific features and libraries as the native SDK would (for example, battery level or GameCenter on iOS). AIR native extensions (ANE) bridge that gap. An ANE is a package containing native code and an ActionScript API. Several commercial and open-source ANEs are available for common tasks, but you can always write your own.
Improving Performance
Optimizing the performance of Flash content often feels like looking for a needle in a haystack. Isolating and identifying problems can be particularly time-consuming and frustrating. Adobe Flash Builder (an ActionScript-flavoured version of Eclipse) has a profiling tool that provides insight into the layer of your own ActionScript code, but all of the internal operations of the Flash player are hidden.
Scout, Adobe’s new profiling tool, comes in handy here. Scout gives complete insight into every detail of your app’s inner life: frame rate, GPU and CPU memory usage, a breakdown of ActionScript performance, rendering details (DisplayList and GPU), plus debugging output. All of the information is organized in a timeline, which gives a rough overview and allows you to focus on individual frames or sequences of frames.
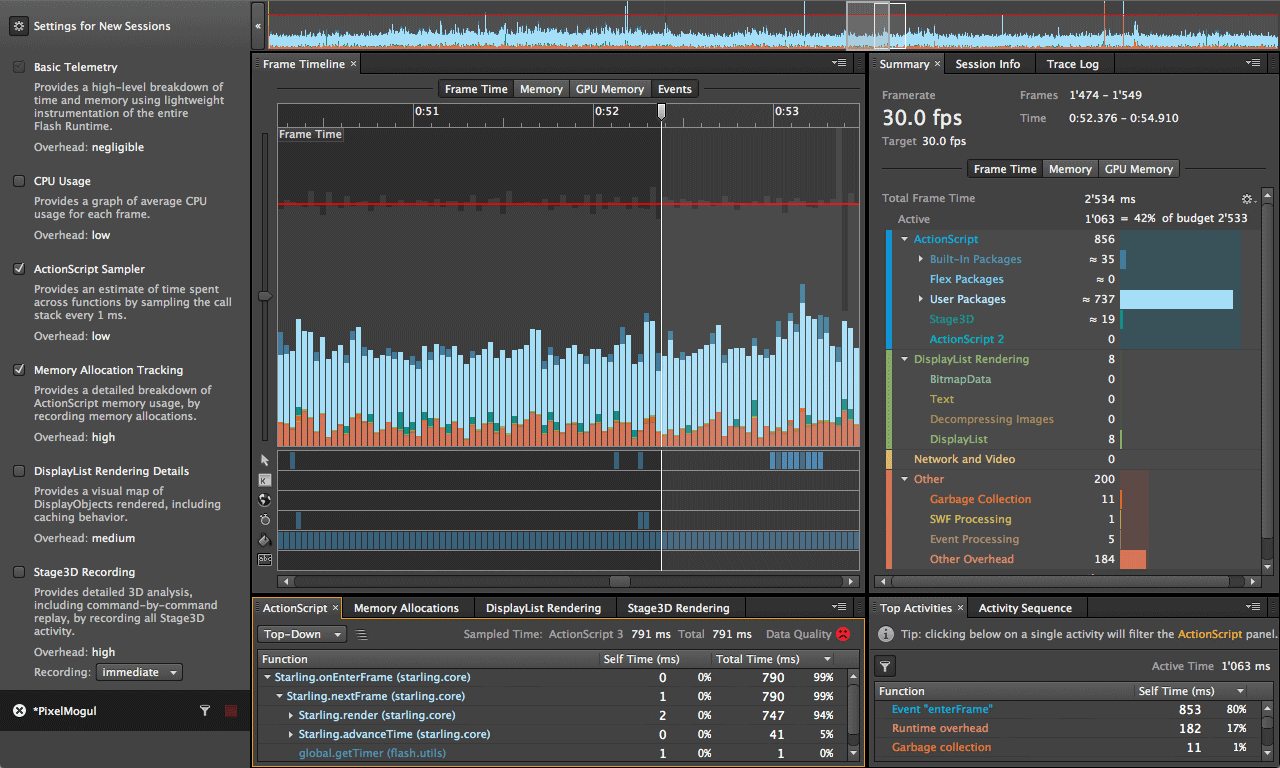
In the timeline, every frame is visualized as a vertical bar. A horizontal red line marks the maximum execution time for a frame (for example, around 17 milliseconds for a frame rate of 60 frames per second). This enables you to quickly identify the most important performance issues (i.e. the highest spikes) and prioritize your efforts.
The GPU renders every frame step by step (similar to the layers in a Photoshop document). Fewer layers usually means faster rendering. Enabling Stage3D recording allows you to recreate every single frame and see how the GPU renders the frame by toggling through every step (i.e. layer) manually. Aside from performance optimization, this “replay” functionality comes in handy when you’re fine-tuning things like collision detection (“Did the bullet really hit that obstacle?”).
Scout comes with companion apps for iOS, Android and Kindle, enabling you to profile content running on devices in addition to the content on your local machine. Thibault Imbert’s article “Getting Started With Adobe Scout” offers a complete introduction.
Multilingual Interface
The ability to offer apps in the native languages of users has been a major factor in the success of the global App Store. Aside from the obvious advantage of multi-language support, localization provides the infrastructure to separate content from logic.
Our team works with plain-text files, which is handy because we can simply email the files to our translators. When the translated files are returned, we just drop them in the project and register the new language in the program.
Localization is a common task, and the ActionScript API even offers a ResourceManager class that takes care of loading and parsing resources and delivering localized content. The first implementation took us less than a day, and it worked — most of the time. For some reason, the app sometimes picked a wrong locale and displayed the content in a random language. Other developers have had similar unsolved problems and have ended up writing their own ResourceManager.
We would have preferred to rely on the built-in class, but we couldn’t find the problem after debugging for almost three days. So, we ended up — you guessed it! — writing our own AS3-ResourceManager, available on GitHub.
Tabular Data
Technically speaking, our game is a complex UI that manages a simple database. Many user actions require data from the database or update that data, so we need a reliable and fast connection. ActionScript works hand in hand with local SQLite databases, which perform great if you follow some simple rules:
- Access asynchronously. Accessing the database synchronously might look tempting at first because it’s easier to implement (no listeners or callbacks required). But be aware that AIR runs single-threaded (workers are in development at time of writing). Thus, code will stop executing while accessing the database synchronously, and even the UI will be blocked. This is a deal-breaker for any app.
Reuse statements. In AIR, SQL statements are prepared (i.e. compiled) before execution. As long as a statement’s text (i.e. the query) does not change, the compiled statement will be reused, which results in faster execution. Parameterized queries are reusable for different data sets, as shown in the sample code below:
    // Create the statement if not available
    if (addStmt == null)
    {
    	addStmt = new SQLStatement();
    	addStmt.sqlConnection = conn;

    	// query with parameters
    	addStmt.text =
    		"INSERT INTO tenants (name, income)" +
        	"VALUES (:name, :income)";
    }

    // set parameter values
    addStmt.parameters[":name"]   = "Mark";
    addStmt.parameters[":income"] = "4000";

    addStmt.execute();
Use transactions instead of single statements. Every time data is updated or added, the database file must be written to disk. This is usually the most time-intensive part of the whole operation. When you use transactions, all statements in the transaction are executed in memory before the database file is written — a major time-saver! Be sure to add a queuing system to your abstraction layer, because SQLite will throw an error if you start a new transaction while another is still executing. A simple vector or array will do fine.
Do not omit database or column names. This is a minor enhancement, but explicitly specifying databases and column names minimizes runtime processing.
    // DON'T
    SELECT * FROM tenants;

    // DO
    SELECT name, income FROM gameDB.tenants;
Retrieve large result sets in parts. When you need to present query results immediately to the user, it might be worth breaking apart large result sets and presenting the initial results while processing the rest. In the sample code below, we’re fetching the results in blocks of 10 rows at a time:
    // Create the statement if not available
    if (getTenants == null)
    {
    	getTenants = new SQLStatement();
    	getTenants.sqlConnection = conn;
    	getTenants.text = "SELECT name, income FROM gameDB.tenants";
    }

    getTenants.addEventListener(SQLEvent.RESULT, buildTenants);
    getTenants.execute(10); // returns 10 rows (or fewer)

    function buildTenants(event:SQLEvent):void
    {
       var result:SQLResult = getTenants

    .getResult();
       if (result.data != null)
       {
          // Loop through the result rows and process row by row

          if (!result.complete)
          {
             getTenants.next(10); // retrieve the next 10 rows
          }
          else
          {
             getTenants.removeEventListener(SQLEvent.RESULT, buildTenants);
          }
       }
    }
Non-Tabular Data
When developing a game, you typically have to deal with non-tabular data. When a user closes our game, we store the x and y position of the city map within the viewport, so that we can display the same clipping of the map view when they return.
In our first prototype, we stored all non-database data in text files, which were written whenever a given object was disposed or the app was deactivated. We thought this approach would provide the most flexibility. But it turned out not to be reliable enough. Sometimes when the app deactivated unexpectedly (for example, because of an incoming phone call), the task of writing the files was invoked but not successfully completed, with the result being corrupted data files.
We didn’t manage to reproduce the problem properly because it rarely occurred, and so we replaced the text files with local SharedObjects (LSO). When working with an LSO, keep in mind that it can hold only the primitive data types (such as string, array and date) and is limited to 100 KB in size. Do not store any objects (in our case, the tenants) — only store an object’s properties (for example, tenant.name and tenant.income), and recreate the object from those properties when needed.
Avoid Overhead With Texture Atlases
When dealing with GPU-based rendering, images (i.e. textures) are typically organized in texture atlases (or sprite sheets). Similar to how atlases in CSS reduce HTTP requests, atlases reduce the time used to upload images to the GPU and reduce draw calls (i.e. the number of layers the GPU has to draw in a frame).
Supporting high-resolution (i.e. Retina) screens is a piece of cake. Just load the texture atlas according to the device’s resolution. The AssetManager class, which is part of the Starling framework (represented as assets in the sample code below), offers a contentScale property that you can use for this purpose.
// Loading assets from "atlas1x/" or "atlas2x/" according to screen resolution
assets.enqueue(
   File.applicationDirectory.resolvePath(
      "assets/atlas" + assets.scaleFactor + "x/",
   )
);
If your style of graphics is pixelated, then preparing high-resolution artwork for high-resolutions screens would not make sense, because the graphic would stay the same but at double the size (i.e. four times the surface area). It’s a waste of disk space and processing time.
To avoid overhead, we separated the pixelated textures from the UI textures, which contain anti-aliased graphics. A single set of pixelated textures is used for all resolutions but then is scaled up for high-resolution displays at runtime, while the UI textures are resolution-aware (i.e. separate textures for high-resolution devices).
By default, Starling uses bilinear filtering, which creates smooth transitions between pixels when textures are scaled. That’s perfect in most cases, but it looks blurry when applied to pixelated art. If you turn off smoothing in the Image class, you’ll end up with nearest-neighbor scaling for all images.
mSmoothing = TextureSmoothing.NONE;
Conclusion
PixelMogul is the first game that we created entirely in house. Adobe AIR and Starling made it possible for us to carry over our experience with ActionScript and the Flash platform and to focus on development. The fast-growing and active Starling community was a big plus, too. We would definitively go the same route for another project of comparable scope.
What do you think? We look forward to hearing your opinions!
Other Resources
- PixelMogul, iTunes App Store
- Starling Wiki This manual is the perfect starting point.
- Gamua This HTML5 framework in the making uses the same API as Starling.
- TexturePacker This is a versatile tool to create texture atlases. It can even be used to create CSS sprite sheets for the web, as explained in “Creating CSS Sprites With TexturePacker.”
Further Reading
- How To Design An Open-Source iPhone Game
- Building “Topple Trump”, An Interactive Web-Based Quiz Game
- What Web Designers Can Learn From Video Games
- How To Build A SpriteKit Game In Swift 3


