Building An Advanced Notification System For WordPress

Email Newsletter
Weekly tips on front-end & UX.
Trusted by 182,000+ folks.


 Register Free Now
 Try ProtoPie AI free →
 SurveyJS: White-Label Survey Solution for Your JS App

A lot of tools enable us to distribute a website’s content, but when we need to promptly reach a target group, an email notification system might be the best option. If your website is not frequently updated, you could notify all subscribers each time a post is published. However, if it’s updated frequently or it covers several topics, you could filter subscribers before mailing them.
If you opt for the latter, you could set up a user meta field that stores a bit of information to identify the subscribers to be notified. The same bit of information would label the posts you’re publishing. Depending on the website’s architecture, you could store the metadata in a category, a tag, a custom taxonomy or a custom field. In this article we’ll show you how to let your website’s subscribers decide when they want notifications, and linked to a particular location.
Can I Use A Plugin?
If WordPress is your CMS, you can choose from a number of plugins, such as the comprehensive JetPack or the more specialized Subscribe 2.
Jetpack is easy to use, whereas Subscribe 2 is specialized and full-featured. Both plugins enable you to send email notifications to subscribers whenever a post is published. Unfortunately, neither allows you to notify specific users about specific content. And we want to select posts based on custom fields, mailing them to specific groups of users. Unfortunately, no plugin seems able to help us with this.
Things To Do
We are going to add several functionalities to WordPress’ core, and the CMS allows us to declare our own custom functions in the main file of a plugin. We’re not going to dive deep into plugin development, but you can get the information you need directly from the Codex.
We have to accomplish the following tasks:
- add two meta fields to the user’s profile, the first of which stores the name of a location and the second of which determines whether the user will receive emails;
- add a custom meta box to the post-editing page containing the location-related custom field;
- select the users to be notified and send an email to them.
Add Meta Fields To User Profiles
WordPress stores user data in the wp_users and wp_usermeta tables.
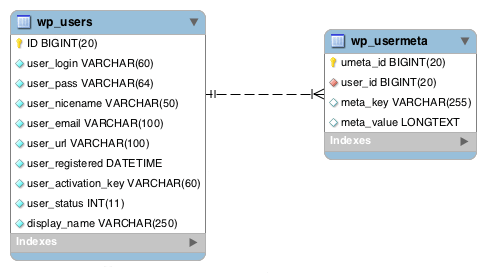
Here, wp_users holds the list of all website users, while wp_usermeta contains all meta data associated with each user’s profile. Meta data is registered as key-value pairs in the meta_key and meta_value fields.
WordPress generates a bunch of meta data, such as nickname, first_name, last_name, description and wp_capabilities. Much of this data is automatically assigned to each user’s profile, and a user is able to edit it later from their profile page.
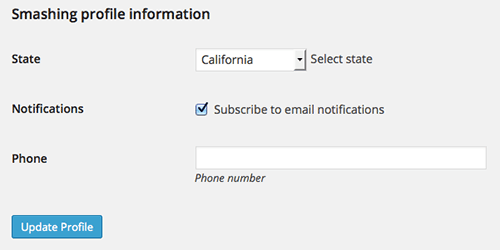
To perform our first task, we’ll add two meta fields to the profile pages of users. These fields will store the name of a geographic location and will allow the user to activate (or deactivate) the notification feature.
In the main file of the plugin, let’s define a global associative array whose elements consist of the names of US states:
$smashing_notification_states = array( 'AL' => 'Alabama', 'AK' => 'Alaska', 'AZ' => 'Arizona', 'AR' => 'Arkansas', 'CA' => 'California', 'CO' => 'Colorado', 'CT' => 'Connecticut', 'DE' => 'Delaware', 'FL' => 'Florida', 'GA' => 'Georgia', 'HI' => 'Hawaii', 'ID' => 'Idaho', 'IL' => 'Illinois', 'IN' => 'Indiana', 'IA' => 'Iowa', 'KS' => 'Kansas', 'KY' => 'Kentucky', 'LA' => 'Louisiana', 'ME' => 'Maine', 'MD' => 'Maryland', 'MA' => 'Massachusetts', 'MI' => 'Michigan', 'MN' => 'Minnesota', 'MS' => 'Mississippi', 'MO' => 'Missouri', 'MT' => 'Montana', 'NE' => 'Nebraska', 'NV' => 'Nevada', 'NH' => 'New Hampshire', 'NJ' => 'New Jersey', 'NM' => 'New Mexico', 'NY' => 'New York', 'NC' => 'North Carolina', 'ND' => 'North Dakota', 'OH' => 'Ohio', 'OK' => 'Oklahoma', 'OR' => 'Oregon', 'PA' => 'Pennsylvania', 'RI' => 'Rhode Island', 'SC' => 'South Carolina', 'SD' => 'South Dakota', 'TN' => 'Tennessee', 'TX' => 'Texas', 'UT' => 'Utah', 'VT' => 'Vermont', 'VA' => 'Virginia', 'WA' => 'Washington', 'WV' => 'West Virginia', 'WI' => 'Wisconsin', 'WY' => 'Wyoming' );
Thanks to this array, we will generate a select menu to avoid input errors by users. Now, we need to add two form fields to the user’s profile page. To do this, we will use two action hooks:
add_action( 'show_user_profile', 'smashing_show_user_meta_fields' );
add_action( 'edit_user_profile', 'smashing_show_user_meta_fields' );
Here, show_user_profile is triggered when a user is viewing their own profile, while edit_user_profile is triggered when a user is viewing another user’s profile.
The callback function prints the markup.
/**
 * Show custom user profile fields.
 *
 * @param obj $user The user object.
 */
function smashing_show_user_meta_fields( $user ) {
    global $smashing_notification_states;
    ?>
    <h3><?php _e( 'Smashing profile information', 'smashing' ); ?></h3>
    <table class="form-table">
        <tr>
            <th scope="row"><?php _e( 'State', 'smashing' ); ?></th>
            <td>
                <label for="state">
                    <select name="state">
                        <option value="" <?php selected( get_user_meta( $user->ID, 'state', true ), "" ); ?>>Select</option>
                        <?php foreach ($smashing_notification_states as $key => $value) { ?>
                            <option value="<?php echo $key; ?>" <?php selected( esc_attr( get_user_meta( $user->ID, 'state', true ) ), $key ); ?>><?php echo $value; ?></option>
                        <?php } ?>
                    </select>
                    <?php _e( 'Select state', 'smashing' ); ?>
                </label>
            </td>
        </tr>
        <tr>
            <th scope="row"><?php _e( 'Notifications', 'smashing' ); ?></th>
            <td>
                <label for="notification">
                    <input id="notification" type="checkbox" name="notification" value="true" <?php checked( esc_attr( get_user_meta( $user->ID, 'notification', true ) ), 'true' ); ?> />
                    <?php _e( 'Subscribe to email notifications', 'smashing' ); ?>
                </label>
            </td>
        </tr>
    </table>
<?php }
This table contains two custom meta fields. The first is a select menu whose options are generated by a foreach loop that iterates over the $smashing_notification_states global array. This way, the user doesn’t have to type the name of their state, but instead chooses it from a dropdown list.
As you can see, we’re calling the selected() function twice from inside two <option> tags; selected() is a WordPress function for comparing two strings. When the strings have the same value, the function prints selected=‘selected’; otherwise, it echoes an empty string.
The first time we call selected(), we’re comparing the current option’s value (‘state’) with an empty string (which means no state was selected). When iterating over the $smashing_notification_states array, we’re comparing the value of each element to the current value of the ‘state’ meta field. This way, we can automatically select the option corresponding to the existing ‘state’ value.
The second meta field to be added to users’ profiles is a checkbox. Its value will be ‘true’ or ‘false’ depending on whether the user chooses to receive notifications. Similar to selected(), checked() prints out the string checked=‘checked’ when its two arguments have the same value. Of course, checked() applies to checkboxes and radio buttons.
Now that we’ve got the fields, we can save the user’s input. We need two action hooks to store the user data:
add_action( 'personal_options_update', 'smashing_save_user_meta_fields' );
add_action( 'edit_user_profile_update', 'smashing_save_user_meta_fields' );
Here, personal_options_update is triggered when the user is viewing their own profile page, while edit_user_profile_update is triggered when a user with sufficient privileges is viewing another user’s profile page. We have two hooks but just one callback:
/**
 * Store data in wp_usermeta table.
 *
 * @param int $user_id the user unique ID.
 */
function smashing_save_user_meta_fields( $user_id ) {

    if ( !current_user_can( 'edit_user', $user_id ) )
        return false;

    if( isset($_POST['state']) )
        update_user_meta( $user_id, 'state', sanitize_text_field( $_POST['state'] ) );

    if( !isset($_POST['notification']) )
        $_POST['notification'] = 'false';

    update_user_meta( $user_id, 'notification', sanitize_text_field( $_POST['notification'] ) );

}
This function verifies whether the user is allowed to edit_user, and if current_user_can is true, it checks the data and saves it in the wp_usermeta table.
Custom Meta Box And Custom Fields
We have to decide what kind of content should be included in the notification to subscribers. This decision will depend on your website’s architecture. In this example, we’ll go for regular posts, but you could choose a custom post type instead. The choice depends on your needs.
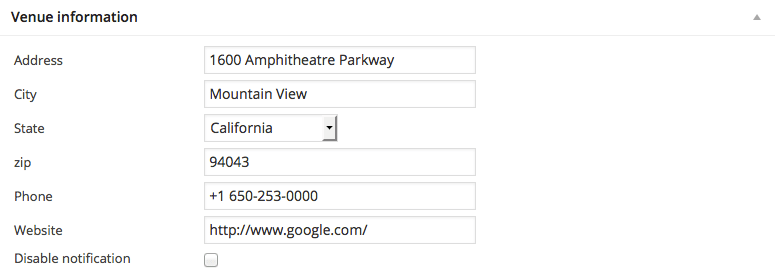
That being said, we are going to build a custom meta box containing a set of custom fields. These fields will be used to store an address, city, state and some other data related to location. Two other custom fields will enable and disable notifications on a per-post basis, and they will register the number of emails sent to users whenever a new post has been published. Let’s put another action hook to work:
add_action( 'add_meta_boxes', 'smashing_add_meta_box' );
function smashing_add_meta_box(){

    $screens = array( 'post' ); // possible values: 'post', 'page', 'dashboard', 'link', 'attachment', 'custom_post_type'

    foreach ($screens as $screen) {
        add_meta_box(
            'smashing_metabox',                     // $id - meta_box ID
            __( 'Venue information', 'smashing' ),  // $title - a title for the meta_box container
            'smashing_meta_box_callback',           // $callback - the callback that outputs the html for the meta_box
            $screen,                                // $post_type - where to show the meta_box. Possible values: 'post', 'page', 'dashboard', 'link', 'attachment', 'custom_post_type'
            'normal',                               // $context - possible values: 'normal', 'advanced', 'side'
            'high'                                  // $priority - possible values: 'high', 'core', 'default', 'low'
            );
        }
}
Here, add_meta_box accepts seven arguments: a unique ID for the meta box, a title, a callback function, a value for screen, the context (i.e. the part of the page where to show the meta box), and priority and callback arguments. Because we are not setting a value for the callback argument parameter, the $post object will be the only argument passed to smashing_meta_box_callback. Finally, let’s define the callback function to print out the meta box:
/*
 * Print the meta_box
 *
 * @param obj $post The object for the current post
 */
function smashing_meta_box_callback( $post ){
    global $smashing_notification_states;

    // Add a nonce field
    wp_nonce_field( 'smashing_meta_box', 'smashing_meta_box_nonce' );

    $address = esc_attr( get_post_meta( get_the_ID(), 'address', true ) );
    $city = esc_attr( get_post_meta( get_the_ID(), 'city', true ) );
    $state = esc_attr( get_post_meta( get_the_ID(), 'state', true ) );
    $zip = esc_attr( get_post_meta( get_the_ID(), 'zip', true ) );
    $phone = esc_attr( get_post_meta( get_the_ID(), 'phone', true ) );
    $website = esc_attr( get_post_meta( get_the_ID(), 'website', true ) );
    $disable = esc_attr( get_post_meta( get_the_ID(), 'disable', true ) );
    ?>
<table id="venue">
    <tbody>
        <tr>
            <td class="label"><?php _e( 'Address', 'smashing' ); ?></td>
            <td><input type="text" id="address" name="venue[address]" value="<?php echo $address; ?>" size="30" /></td>
        </tr>
        <tr>
            <td><?php _e( 'City', 'smashing' ); ?></td>
            <td><input type="text" id="city" name="venue[city]" value="<?php echo $city; ?>" size="30" /></td>
        </tr>
        <tr>
            <td><?php _e( 'State', 'smashing' ); ?></td>
            <td>
                <select name="venue[state]">
                    <option value="" <?php selected( $state, "" ); ?>>Select</option>
                    <?php foreach ($smashing_notification_states as $key => $value) { ?>
                        <option value="<?php echo $key; ?>" <?php selected( $state, $key ); ?>><?php echo $value; ?></option>
                    <?php } ?>
                </select>
            </td>
        </tr>
        <tr>
            <td><?php _e( 'Disable notification', 'smashing' ); ?></td>
            <td><input id="disable" type="checkbox" name="venue[disable]" value="true" <?php checked( $disable, 'true' ); ?> /></td>
        </tr>
    </tbody>
</table>
<?php
}
First, we’re initializing the global array and registering a nonce field. We then add two simple text fields. The name attribute is set in the form of an array element, while the value is set to the corresponding custom field’s value. Finally, the main custom fields are added.
Just like with the user’s meta data, we add a select menu whose options are echoed, iterating over the elements in the $smashing_notification_states global array. Once we have built the select menu, let’s continue with a checkbox to enable and disable the single post notification.
Now we have to save the data: Our action hook is save_post. We’ll perform a number of tasks with the callback function. Take a look at the inline documentation for more information.
add_action( 'save_post', 'smashing_save_custom_fields' );

/*
 * Save the custom field values
 *
 * @param int $post_id the current post ID
 */
function smashing_save_custom_fields( $post_id ){

    // Check WP nonce
    if ( !isset( $_POST['smashing_meta_box_nonce'] ) || ! wp_verify_nonce( $_POST['smashing_meta_box_nonce'], 'smashing_meta_box' ) )
        return;

    // Return if this is an autosave
    if ( defined( 'DOING_AUTOSAVE' ) && DOING_AUTOSAVE )
        return;

    // check the post_type and set the correspondig capability value
    $capability = ( isset( $_POST['post_type'] ) && 'page' == $_POST['post_type'] ) ? 'edit_page' : 'edit_post';

    // Return if the user lacks the required capability
    if ( !current_user_can( $capability, $post_id ) )
        return;

    if( !isset($_POST['venue']['disable']) )
        $_POST['venue']['disable'] = 'false';

    // validate custom field values
    $fields = ( isset( $_POST['venue'] ) ) ? (array) $_POST['venue'] : array();
    $fields = array_map( 'sanitize_text_field', $fields );

    foreach ($fields as $key => $value) {
        // store data
        update_post_meta( $post_id, $key, $value );
    }
}
Our custom meta box is up and running, and it looks like this:
Building The Notification System
If you were working with custom post types, you would need the publish_{$post_type} hook (i.e. publish_recipes, publish_events, etc.). But since we are working with posts, publish_post is the hook for us:
add_action( 'publish_post', 'smashing_notify_new_post' );

/*
 * Notify users sending them an email
 *
 * @param int $post_ID the current post ID
 */
function smashing_notify_new_post( $post_ID ){
    global $smashing_notification_states;

    $url = get_permalink( $post_ID );
    $state = get_post_meta( $post_ID, 'state', true );

    if( 'true' == get_post_meta( $post_ID, 'disable', true ) )
        return;

    // build the meta query to retrieve subscribers
    $args = array(
            'meta_query' => array(
                    array( 'key' => 'state', 'value' => $state, 'compare' => '=' ),
                    array( 'key' => 'notification', 'value' => 'true', 'compare' => '=' )
                ),
            'fields' => array( 'display_name', 'user_email' )
        );
    // retrieve users to notify about the new post
    $users = get_users( $args );
    $num = 0;
    foreach ($users as $user) {

        $to = $user->display_name . ' <' . $user->user_email . '>';

        $subject = sprintf( __( 'Hei! We have news for you from %s', 'smashing' ), $smashing_notification_states[$state] );

        $message = sprintf( __( 'Hi %s!', 'smashing' ), $user->display_name ) . "\r\n" .
        sprintf( __( 'We have a new post from %s', 'smashing' ), $smashing_notification_states[$state] ) . "\r\n" .
        sprintf( __( 'Read more on %s', 'smashing' ), $url ) . '.' . "\r\n";

        $headers[] = 'From: Yourname <you@yourdomain.com>';
        $headers[] = 'Reply-To: you@yourdomain.com';

        if( wp_mail( $to, $subject, $message, $headers ) )
            $num++;
    }
    // a hidden custom field
    update_post_meta( $post_ID, '_notified_users', $num );
    return $post_ID;
}
Once again, we declare the global array $smashing_notification_states. The two variables $url and $state will store the post’s permalink and state. The succeeding condition checks the value of the disable custom field: If it’s ‘true’, we exit the function. We have to retrieve from the database all users whose state meta field has the same value as the state custom field of the current post, and we use the get_users() function to accomplish this.
The wp_mail function accepts five arguments: recipient(s), subject, message, headers, attachments. The recipients could be passed as an array or as a comma-separated strings of addresses. So, we could have passed to the function all of the addresses together, but doing so would have made them publicly visible (this is the way wp_mail() works).
So, we’ll iterate over the $users array and call wp_mail repeatedly (which shouldn’t be done with a huge number of emails, as we’ll see in a moment). In case of success, wp_mail returns true. The counter is incremented by 1, and the loop continues with the next user.
When the foreach cycle ends, the current value of $num is registered in the hidden _notified_users custom field (notice the underscore preceding the name of the custom field).
Unfortunately, a loop iterating over and over hundreds of times could considerably slow down the script, as pointed out in the reference on the PHP mail() function:
"It is worth noting that the mail() function is not suitable for larger volumes of email in a loop. This function opens and closes an SMTP socket for each email, which is not very efficient.
For the sending of large amounts of email, see the » PEAR::Mail, and » PEAR::Mail_Queue packages."We could work around this, passing to the function the email addresses as BCCs, setting them in the headers, as shown here:
function smashing_notify_new_post( $post_ID ){
    global $smashing_notification_states;

    $url = get_permalink( $post_ID );
    $state = get_post_meta( $post_ID, 'state', true );

    if( 'true' == get_post_meta( $post_ID, 'disable', true ) )
        return;

    // build the meta query to retrieve subscribers
    $args = array(
            'meta_query' => array(
                    array( 'key' => 'state', 'value' => $state, 'compare' => '=' ),
                    array( 'key' => 'notification', 'value' => 'true', 'compare' => '=' )
                ),
            'fields' => array( 'display_name', 'user_email' )
        );
    // retrieve users to notify about the new post
    $users = get_users( $args );

    $num = 0;

    $to = 'Yourname <you@yourdomain.com>';

    $subject = sprintf( __( 'Hei! We have news for you from %s', 'smashing' ), $smashing_notification_states[$state] );

    $message = __( 'Hi ', 'smashing' ) . "\r\n" .
        sprintf( __( 'We have a new post from %s', 'smashing' ), $smashing_notification_states[$state] ) . "\r\n" .
        sprintf( __( 'Read more on %s', 'smashing' ), $url ) . '.' . "\r\n";

    $headers[] = 'From: Yourname <you@yourdomain.com>';
    $headers[] = 'Reply-To: you@yourdomain.com';

    foreach ($users as $user) {
        $headers[] = 'Bcc: ' . $user->user_email;
        $num++;
    }

    if( wp_mail( $to, $subject, $message, $headers ) )
        update_post_meta( $post_ID, '_notified_users', $num );

    return $post_ID;
}
As you can see, in case of wp_mail()’s success, we update the _notified_user custom field with $num’s value. However, in the code above, $num stores the number of retrieved users, not the number of times we call wp_mail().
Finally, if none of the solutions presented fit your needs, you could consider a third-party email notification system, such as MailChimp or FeedBurner, which enable you to deliver notifications from a website’s feed.
A Note About Status Transitions
We hooked the smashing_notify_new_post callback to the publish_post action. This hook is triggered each time the status of an existing post is changed to publish. Unfortunately, publish_post is not fired when a new post is published. So, to send notifications, first save the post as “draft” (or “pending”). If you prefer to email subscribers each time a post is published, consider calling the save_post action instead:
add_action( 'save_post', 'smashing_notify_new_post' );
/*
 * Save the custom field values
 *
 * @param int $post_id the current post ID
 */
function smashing_notify_new_post( $post_ID ){
    global $smashing_notification_states;

    if( 'publish' != get_post_status( $post_ID ) )
        return;

    ...
}
Check the Codex for further information about status transitions and the save_post action hook.
A Confirmation Message
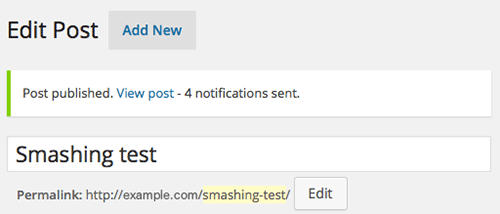
When you work with the publish_post action hook, you will soon realize that testing your scripts can get a little tricky. When a new post is published, WordPress loads a script that saves data and, when it is done, redirects the user to the post-editing page. This double redirection does not allow variable values to be printed on the screen.
A confirmation message could be a good workaround. This solution allows us to check a variable’s values and to give the publisher useful information: specifically, the number of times wp_mail has been called (or the number of users to be notified).
Remember the $num variable? Its value was stored in a hidden custom field, _notified_users. Now we have to retrieve that value and print it out in a message using a filter hook.
Thanks to the post_updated_messages filter, we can customize WordPress confirmation messages and output them to the screen whenever a new post is saved or published (the Codex does not provide a reference for this filter hook, only an example of usage). Here is the callback function we can use to customize the message when a post is published:
add_filter( 'post_updated_messages', 'smashing_updated_messages' );

/**
 * Post update messages.
 *
 * See /wp-admin/edit-form-advanced.php
 *
 * @param array $messages Existing post update messages.
 *
 * @return array Amended post update messages with new update messages.
 */
function smashing_updated_messages( $msgs ){

    $post = get_post();
    $post_type = get_post_type( $post );
    $post_type_object = get_post_type_object( $post_type );

    $num = get_post_meta( $post->ID, '_notified_users', true );

    if ( $post_type_object->publicly_queryable ) {
        $msgs[$post_type][6] .= ' - ' . $num . __( ' notifications sent.', 'smashing' );
    }
    return $msgs;
}
wp_mail Function And SMTP
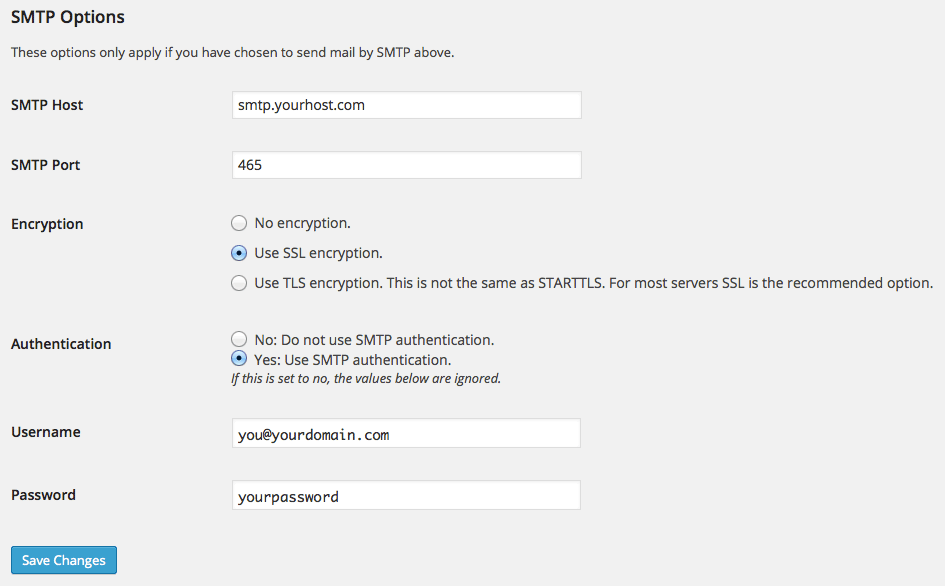
WordPress’ wp_mail() function works the same way as PHP’s mail() function. Whether an email has been successfully sent will depend on php.ini’s settings, but most hosts include SMTP in their services. If you aren’t able to set that up, you could choose an external SMTP service and use it in tandem with the WP Mail SMTP plugin, which routes your emails through an SMTP service.
Be careful when you save data: the “from” field should have the same value as your account’s email address; otherwise, the server might respond with an error message.
Be aware that a plugin is not necessary: WordPress allows for the possibility of overwriting php.ini’s settings from within a script, with the phpmailer_init action hook. This hook allows us to pass our own parameters to the PHPMailer object. See the Codex for more information on this.
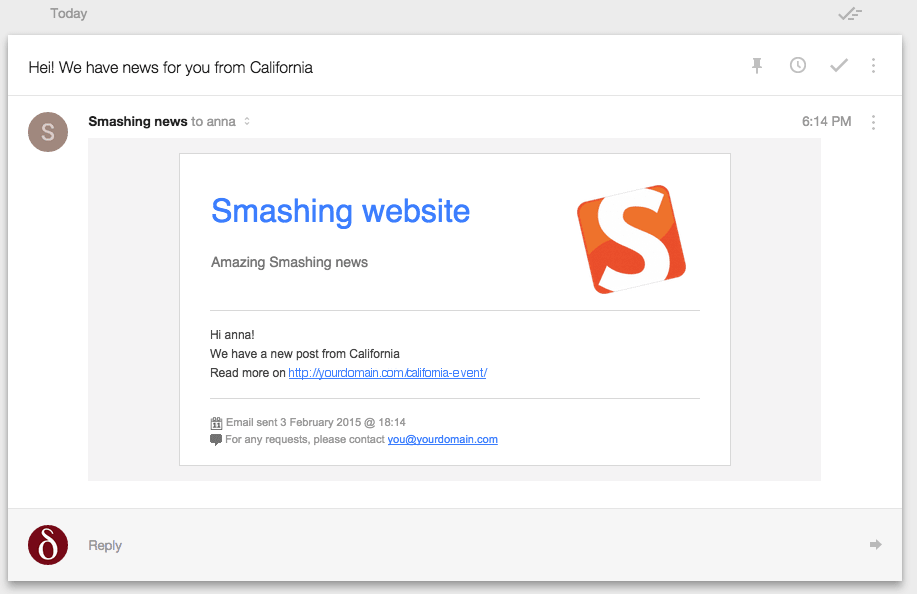
Designing Better Emails
Just like the PHP mail() function, wp_mail()’s default Content Type is text/plain. And just like the mail() function, wp_mail() allows us to set the Content Type to text/html. You can specify a different Content Type using the wp_mail_content_type filter or by setting the following headers:
$headers[] = "MIME-Version: 1.0";
$headers[] = "Content-Type: text/html; charset=ISO-8859-1";
Of course, a number of plugins allow you to manage your email’s Content Type from the administration panel. WP Better Emails is just one, but it’s one of the most appreciated. This plugin forces WordPress to send HTML emails, but it’s not its only feature. It also allows administrators to build their own email templates and to send arbitrary emails for testing purposes.
Finally, the following image shows what will be delivered to a Gmail user’s inbox.
Conclusion
Our notification system is ready to be used. In building it, we’ve toured many of WordPress’ core features: user meta fields, custom meta boxes, custom queries, the mailing from script and more. If you’re interested, download the full code (ZIP file), and remember to switch each occurrence of the you@yourdomain.com string with your own email address.
You can expand on this a lot more. You could integrate this system with a third-party email management application such as MailChimp or Mad Mimi. You could design flashy email templates. Or you could create even more personalized notifications.
Other Resources
- “Create Perfect Emails For Your WordPress Website,” Daniel Pataki, Smashing Magazine
- “Post Status Transitions,” WordPress Codex
- “Plugin API/Action Reference,” WordPress Codex
- “Plugin API/Filter Reference,” WordPress Codex
- “Custom Fields,” WordPress Codex
- “Creating Custom Meta Boxes,” Plugin Handbook, WordPress
- “Validating Sanitizing and Escaping User Data,” WordPress Codex
- “Data Validation,” WordPress Codex
Further Reading
- Ten Things Every WordPress Plugin Developer Should Know
- Making A WordPress Plugin That Uses Service APIs
- How Commercial Plugin Developers Are Using The Repository
- How To Improve Your WordPress Plugin’s Readme.txt


