Efficient Image Resizing With ImageMagick

Email Newsletter
Weekly tips on front-end & UX.
Trusted by 182,000+ folks.

 Custom Web Forms for Angular, React, & Vue. Your backend.
 Celebrating 10 million developers

The way responsive images work is that an appropriately sized image is sent to each user — small versions for users on small screens, big versions for users on big screens. It’s fantastic for web performance, but we have to face the grim reality that serving different sizes of images to different users means that we first need to create all of those different files, and that can be a huge pain.
Many tools out there automate image resizing, but too often they create large files that cancel out the performance benefits that responsive images are supposed to deliver. In this article, we’ll see how we can use ImageMagick — an open-source command-line graphics editor — to quickly resize your images, while maintaining great visual quality and really tiny file sizes.
Big Images == Big Problem
The average web page is about 2 MB in size, and about two thirds of that weight is from images. At the same time, millions of people are accessing the Internet on 3G-or-worse connections that make a 2 MB website a horror show to use. Even on a fast connection, a 2 MB website can wreak havoc on your users’ data plans and cost them real money. Improving web performance and giving a better experience to our users is our job as developers and designers.
Responsive images to the rescue! Right? Well, yes, but first we have to generate our responsive image assets, and we have to make sure those assets look good and have a small enough footprint to improve the website’s performance.
For a very small website, saving a few different sizes of each image directly in our image editor is trivial — Photoshop even provides a handy “Save for Web” option that keeps file sizes low. But what about a large website with a lot of images? An online store, for example, might have hundreds or thousands of image assets, and having to create different sizes of each of these is an enormous task.
ImageMagick
This is where automated image resizing comes in handy. A bunch of tools out there do this, including GD and GraphicsMagick, but ImageMagick strikes a good balance between power and availability in hosting environments. ImageMagick has been around for almost 25 years and is a full-fledged command-line image editor. It is widely supported by content management systems (CMS) such as WordPress and Drupal, integrated with task runners such as Grunt, and used on its own to automate image editing — including resizing.
It’s also available on desktop systems (Mac, Windows and Linux). If you use Homebrew on a Mac, you can install it like this:
brew install imagemagickOtherwise, look for it in your favorite package manager, or download it directly from the ImageMagick website.
ImageMagick provides a fast, simple way to automate image resizing. Unfortunately, with the default settings, the resized files it outputs are often really big — sometimes bigger than the inputted image, even though the output has fewer pixels. These big files completely negate the performance gains you’d expect to get from responsive images and, in fact, can make things worse for your users than if you’d simply loaded the huge unshrunk assets.
Below, I’ll describe why this problem exists and show you how to change ImageMagick’s default settings to solve this problem and get small, great-looking images.
How Image Resizing Works
The best way to solve the problem is to understand why it’s happening, and that means understanding the basics of how image resizing works.
By definition, when a computer resizes an image, the number of pixels in that image will change. If the image is being enlarged, the output will have more pixels than the input; if the image is being shrunk, the output will have fewer pixels than the input. The challenge is in figuring out the best way to store the original image’s content in this different number of pixels. In other words, we need to figure out the best way to add or remove pixels without changing what the image looks like.
Although not as common a use case, image upsampling (i.e. making images larger) can be a little easier to visualize, so let’s start with that. Consider an image of a blue 4 × 4 pixel square that we want to double in size to 8 × 8 pixels. What we’re doing is taking the same image and applying it to a new pixel grid; this is called resampling and is usually what we mean when we talk about resizing images. To resample our 4 × 4 blue square to 8 × 8 pixels, we need to add 48 extra pixels somewhere. Those pixels will need some color value, and the process of determining that color value is called interpolation. When you’re resampling, the algorithm for determining how the interpolation works is called a resampling filter.
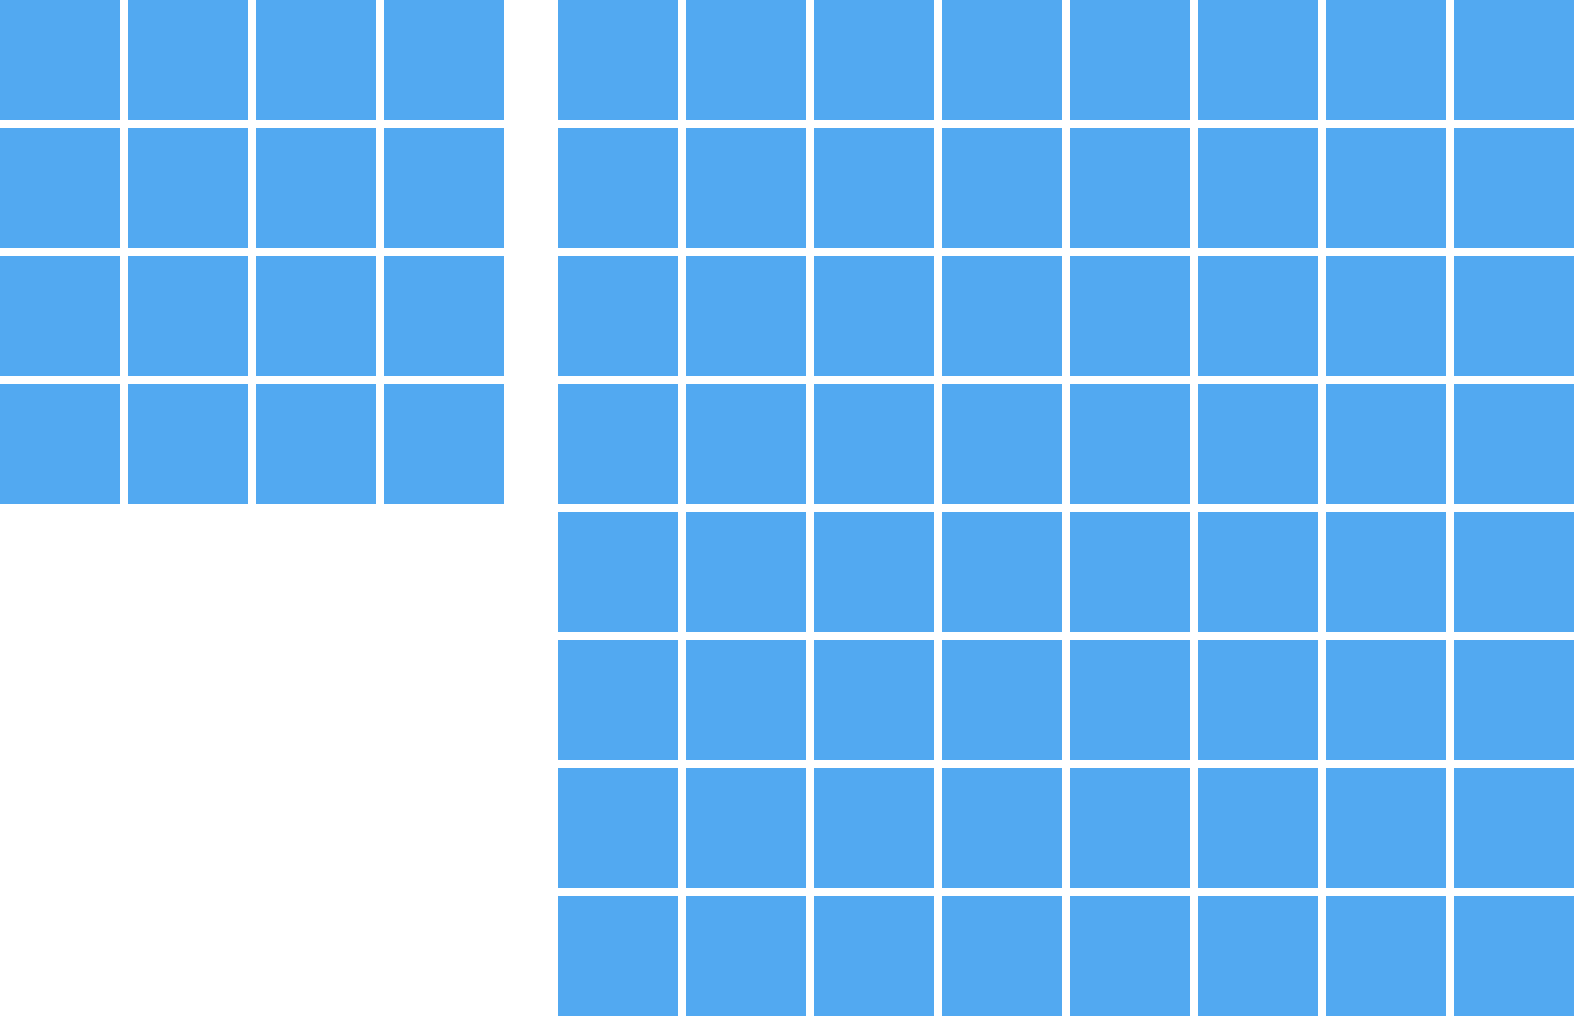
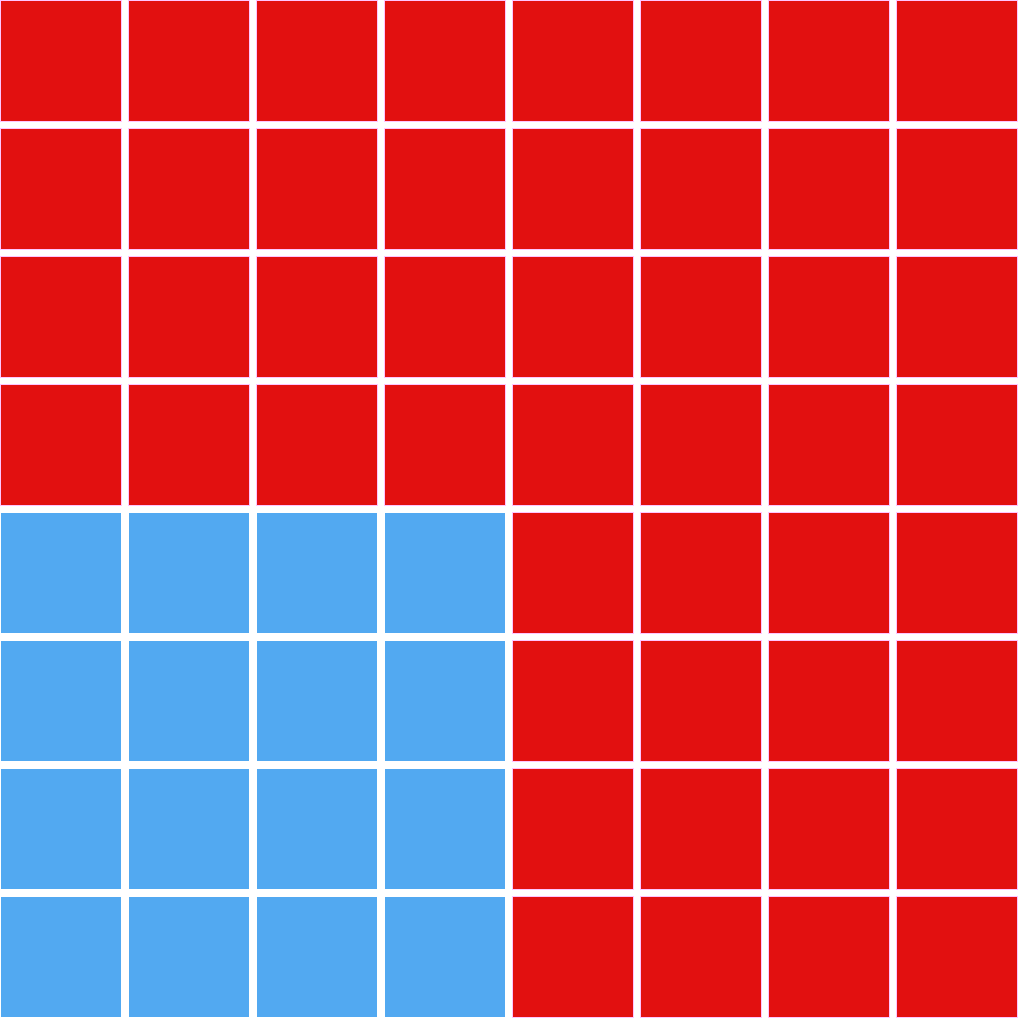
We could use all sorts of resampling filters and interpolation methods to figure out those 48 extra pixels. The absolute simplest thing we could do is to add four more rows and four more columns of pixels in some arbitrary color — say, red. This is called background interpolation, because the empty pixels are simply exposing a background color (red). This is what you’re doing in Photoshop when you resize using “Image” → “Canvas Size,” instead of “Image” → “Image Size.”
This, of course, is a terrible outcome when we want to resize an image: we don’t perceive the new outputted image to really look like the original inputted image at all; the original square is blue, the new one is blue and red. Background interpolation is only possible when adding pixels (i.e. when making the image bigger or when upsampling), and even then it is essentially useless for resizing, except as a means to show where the new pixels are.
Another very simple interpolation method is to make our new pixels the same color as their neighboring pixels; this is called nearest-neighbor interpolation. This produces a much better result than background interpolation, especially for a simple square like this.

Downsampling (i.e. making the image smaller) with nearest-neighbor interpolation is not as intuitive as upsampling, but it helps to remember that the math involved is OK with fractional pixels. First, the new pixel grid gets applied to the orignal image. Because there are fewer pixels to store the image information, some of the pixels in this new grid will contain multiple colors; in the example below, some pixels contain both blue and white.
Outputting the image in this way to the physical pixels in the real world isn’t possible, though — each pixel can be only one color. The final color of each pixel in the new grid is determined by the color at its center point. In other words, that center point is sampled to determine the final color, which is why nearest-neighbor interpolation is sometimes called point sampling.
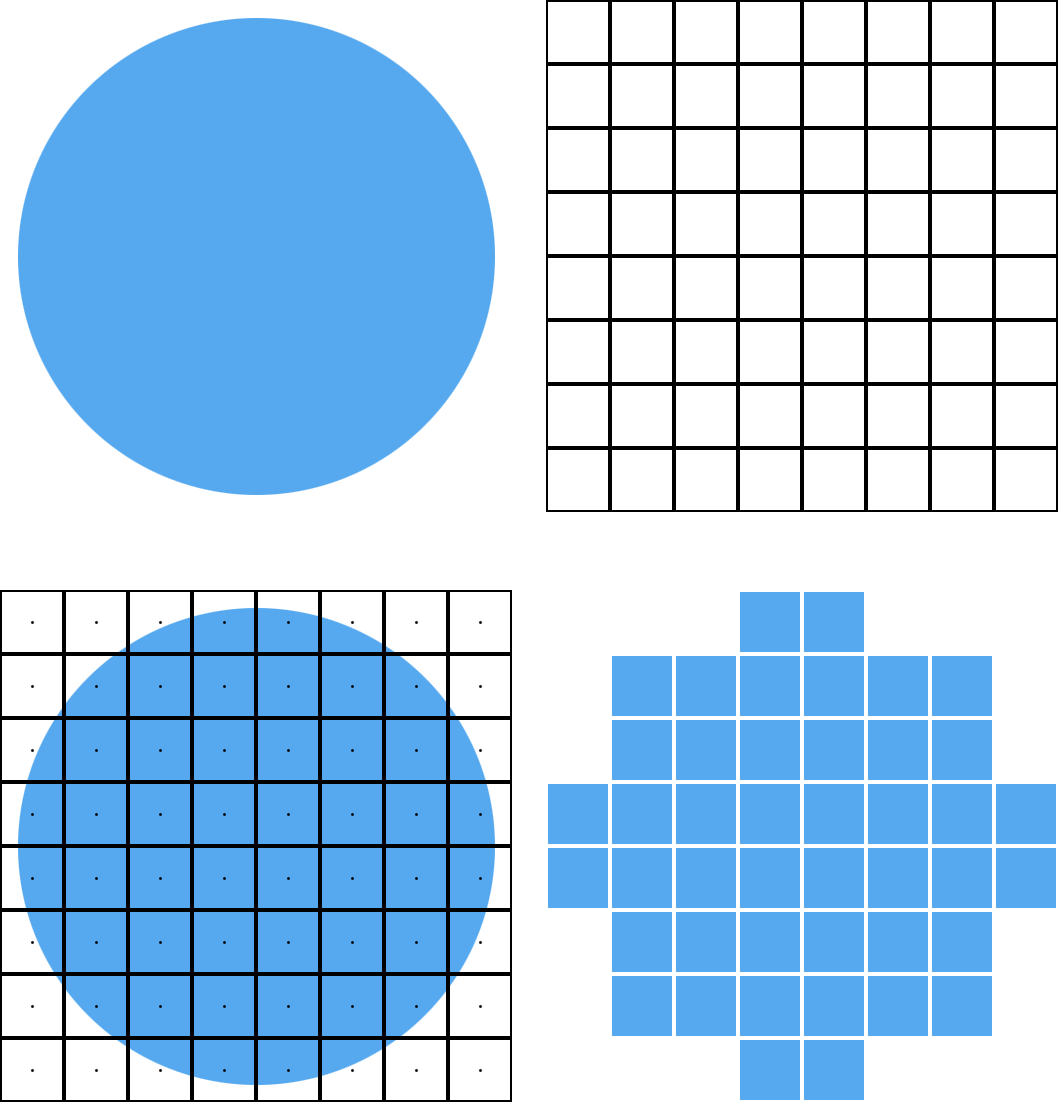
For anything more complicated than a line or square, nearest-neighbor interpolation produces very jagged, blocky images. It’s fast and creates small files but doesn’t look very good.
Most resampling filters use some sort of variation on nearest-neighbor interpolation — they sample multiple points to determine the color of a pixel and use math to try to come up with a smart compromise for those values. Bilinear interpolation, for example, creates a weighted average of colors. It produces much nicer results than nearest-neighbor interpolation.
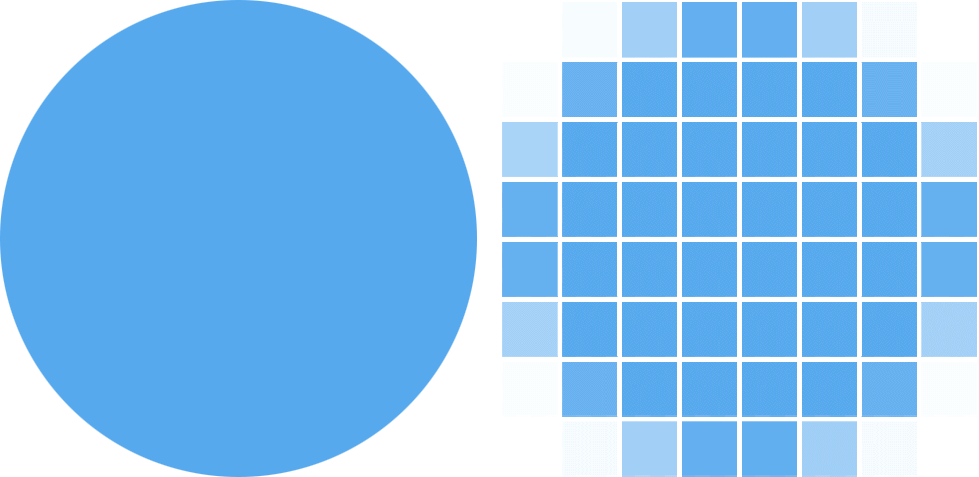
One way that resampling — and the specific resampling filter used — can affect file size is by affecting the colors in the image. Bilinear interpolation gives the circle smooth edges, but that means giving the image more colors. The original blue circle has two colors, blue and white. The resized circle has more — some pixels are a pale bluey-white. All else being equal, more colors in an image will make the file size bigger. This is one reason why resizing an image to have fewer pixels sometimes gives it more bytes.
What All This Means For Us
In order to make our outputted images smaller, we’ll want to look at ways to reduce the number of colors without sacrificing quality. Choosing an appropriate resampling filter has one of the biggest effects, but other settings can affect the number of colors in the output as well. I’ll also discuss settings that control file compression and quality and that eliminate extraneous data.
Optimal Settings For ImageMagick
ImageMagick Basics
ImageMagick has a ton of options and functions, and finding a good combination of these can be tricky.
Two main ImageMagick settings are of interest to us, convert and mogrify. Both of these perform similar operations, but mogrify is intended to be used with multiple files at once, while convert handles only one image at a time.
A simple ImageMagick operation might look like this:
convert input.jpg -resize 300 output.jpgThis says that we want ImageMagick’s convert function to take input.jpg and resize it to 300 pixels wide, and then save that to output.jpg. The -resize 300 part is an example of one of ImageMagick’s many built-in functions. Each function uses the same format: -functionName option.
Using mogrify is similar, but with the syntax reordered a bit:
mogrify -path output/ -resize 300 *.jpgThis says that we want ImageMagick’s mogrify function to take all JPEG files in the current directory (*.jpg), resize them to 300 pixels wide and then save them in the output directory.
Functions can be combined for more complex results:
convert input.jpg -resize 300 -quality 75 output.jpgAs before, this resizes input.jpg to 300 pixels wide, but this time it also sets the JPEG quality to 75 before saving it to output.jpg.
I’ve performed hundreds of tests to see which combinations of functions and options produce the smallest results at an acceptable quality.
Testing And Results
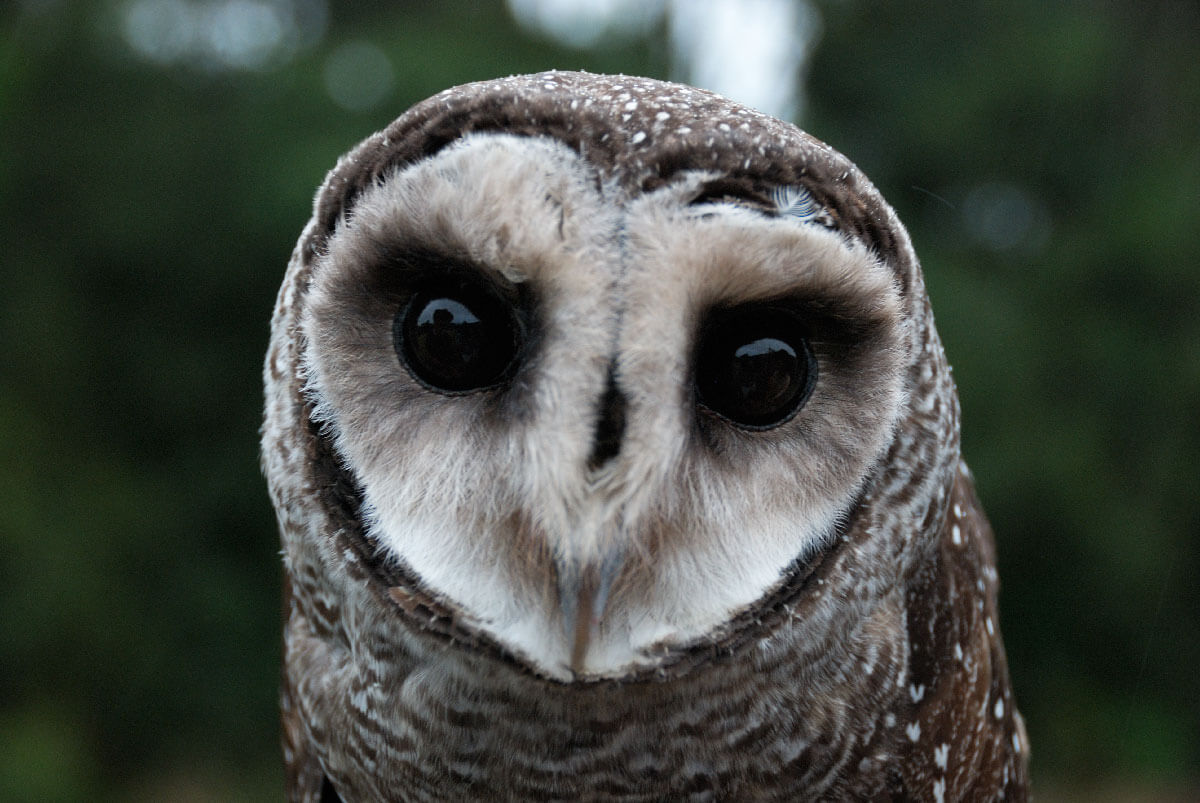
I wanted to keep the file size as low as possible but keep the quality high — indistinguishable from Photoshop’s “Save for Web.” To do this, I used both a subjective quality measure — my own opinion on whether the output looks good — and an objective quality measure — structural dissimilarity (DSSIM). DSSIM compares two images — in this case, my test image and a control generated by Photoshop’s “Save for Web” — and generates a score. The lower the score, the more the images resemble each other; a score of zero means they are identical. To make sure test images look the same as Photoshop’s output, I wanted a mean DSSIM score of 0.0075 or lower. In research released last year, RadWare found that image pairs with a DSSIM score of 0.015 were indistinguishable to their test users.
To make sure the results weren’t biased by outliers, I tested on 40 images that are a mixture of JPEGs and PNGs; photos, drawings and line art; color and monochrome; transparent and opaque. I also tested at three output sizes (300, 600 and 1200 pixels wide) from a variety of input sizes. Finally, I tested both with and without image optimization.
From my tests, running ImageMagick with the following settings produced the smallest results, while generally being visually indistinguishable from Photoshop’s output:
mogrify -path OUTPUT_PATH -filter Triangle -define filter:support=2 -thumbnail OUTPUT_WIDTH -unsharp 0.25x0.25+8+0.065 -dither None -posterize 136 -quality 82 -define jpeg:fancy-upsampling=off -define png:compression-filter=5 -define png:compression-level=9 -define png:compression-strategy=1 -define png:exclude-chunk=all -interlace none -colorspace sRGB -strip INPUT_PATH
That’s a lot to take in, so let’s go through each bit and see what it means.
Mogrify Vs. Convert
As mentioned, ImageMagick provides two similar tools for manipulating images: convert is the basic image editor and works on one image at a time; mogrify is mostly used for batch image manipulation. In an ideal world, these two tools would produce identical results; unfortunately, that’s not the case — convert has a bug that makes it ignore one of the settings I recommend using (the -define jpeg:fancy-upsampling=off setting, discussed below), so using mogrify is better.
Resampling
Choosing a resampling filter in ImageMagick is surprisingly complicated. There are three ways you can do this:
- with the resizing function you choose,
- with the
-filtersetting, - or with the
-interpolatesetting.
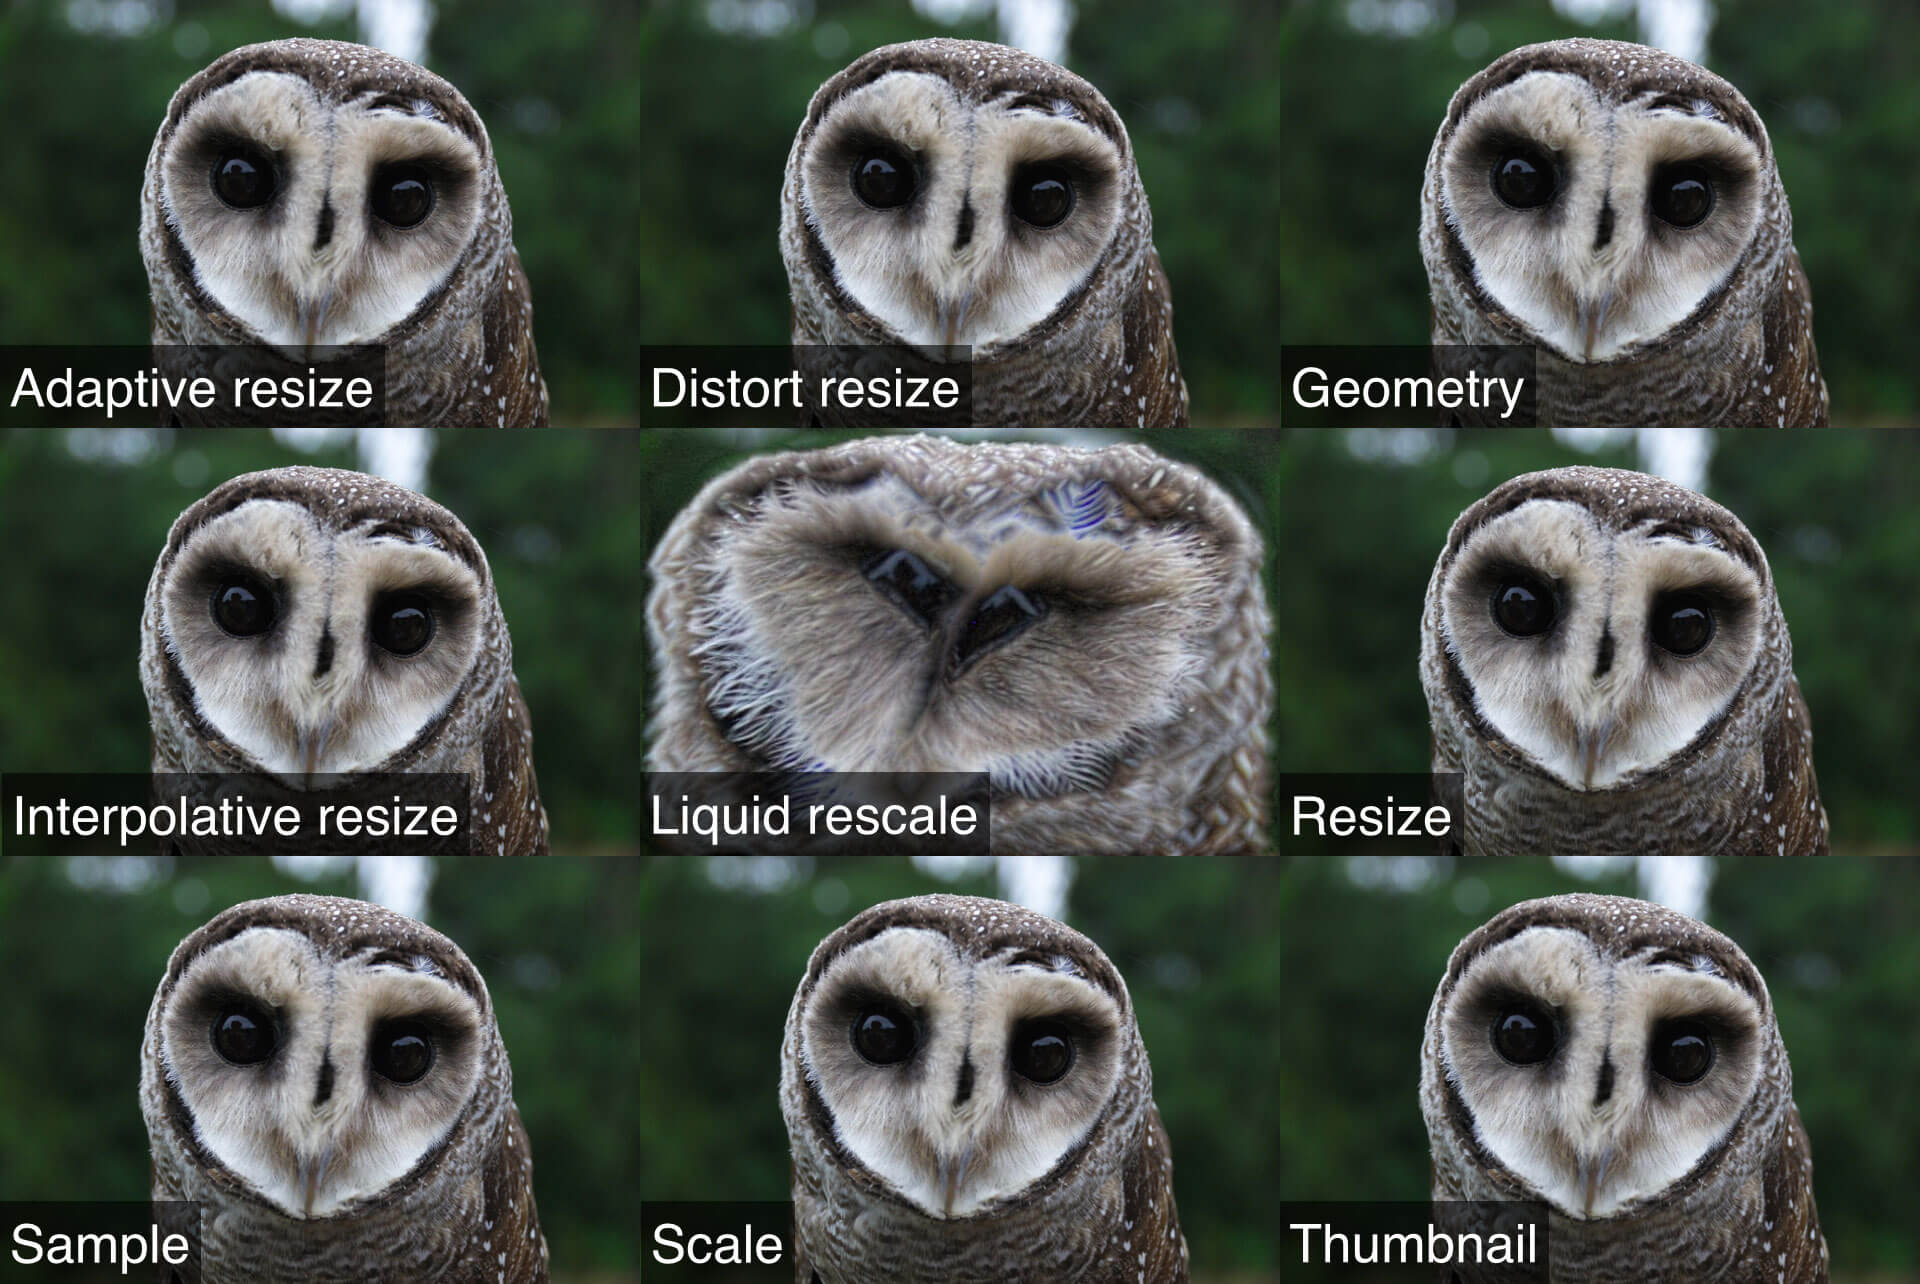
The most obvious resizing function to use is -resize, but it creates files that are too large. I looked at 11 different functions and found that -thumbnail does the best job of optimizing quality and file size. In most cases, the -thumbnail function uses a three-step process to resize images:
- It resizes the image to five times the output size using the
-samplefunction, which has its own built-in resampling filter that’s similar to the nearest-neighbor approach discussed above. - It resizes the image to its final output size using the basic
-resizefilter. - It strips meta data from the image.
This means that if we were resizing an image to be 500 pixels wide, -thumbnail would first resize it to 2,500 pixels wide using -sample; the result might be blocky and pixelated, as we saw in the examples above, but the operation would be fast and would produce a result with a small file size. Then, ImageMagick would resize this image from 2,500 pixels wide to 500 pixels wide using -resize. This smooths out the blockiness, but the file size stays pretty low. Finally, ImageMagick would remove meta data to get an even smaller file.
The second way to choose a resampling filter in ImageMagick is with the -filter setting. Some resizing functions (such as -sample) have a built-in resampling function that’s always used, but others (such as -resize) have defaults that can be overridden with -filter. The -filter setting gets used in -thumbnail’s second step, because that step uses -resize.
I tested 31 different settings for -filter and got the best results with Triangle. The Triangle resampling filter is also known as bilinear interpolation, which I discussed above. It determines pixel color by looking at a support area of neighboring pixels and produces a weighted average of their colors. I found it best to specify this support area at two pixels using the -define filter:support=2 setting.
The third way to choose a resampling filter, the -interpolate setting, is ignored by -thumbnail, so it’s not needed here.
In addition to the settings above, by default ImageMagick also uses something called JPEG fancy upsampling, an algorithm that tries to produce better-looking JPEGs. I’ve found that it produces larger files and that the quality difference is negligible, so I recommend turning it off with -define jpeg:fancy-upsampling=off.
Sharpening
Images pretty often get a little blurry when resized, so programs such as Photoshop will often apply some sharpening afterwards to make the images a little crisper. I recommend using an unsharp filter — which, despite its name, actually does sharpen the image — with the setting -unsharp 0.25x0.25+8+0.065.
Unsharp filters work by first applying a Gaussian blur to the image. The first two values for the unsharp filter are the radius and sigma, respectively — in this case, both have a value of 0.25 pixels. These values are often the same and, combined, tell ImageMagick how much to blur the image. After the blur is applied, the filter compares the blurred version to the original, and in any areas where their brightness differs by more than a given threshold (the last value, 0.065), a certain amount of sharpening is applied (the third value, 8). The exact meanings of the threshold and numerical amounts aren’t very important; just remember that a higher threshold value means that sharpening will be applied less often, and a higher numerical amount means that the sharpening will be more intense wherever it is applied.
Color Reduction
I mentioned that one of the biggest reasons why resized images get bloated is because of all the extra colors in them. So, try to reduce the number of colors — but not so much that the quality suffers.
One way to reduce colors is with posterization, a process in which gradients are reduced to bands of solid color. Posterization reduces colors to a certain number of color levels — that is, the number of colors available in each of the red, green and blue color channels that images use. The total number of colors in the final image will be a combination of the colors in these three channels.
Posterization can drastically reduce file size, but can also drastically change how an image looks. With only a few color levels, it creates an effect like what you might see in 1970s rock posters, with a few discrete bands of color. With many color levels — for example, 136, as I’m suggesting — you get a smaller file without losing much image quality.
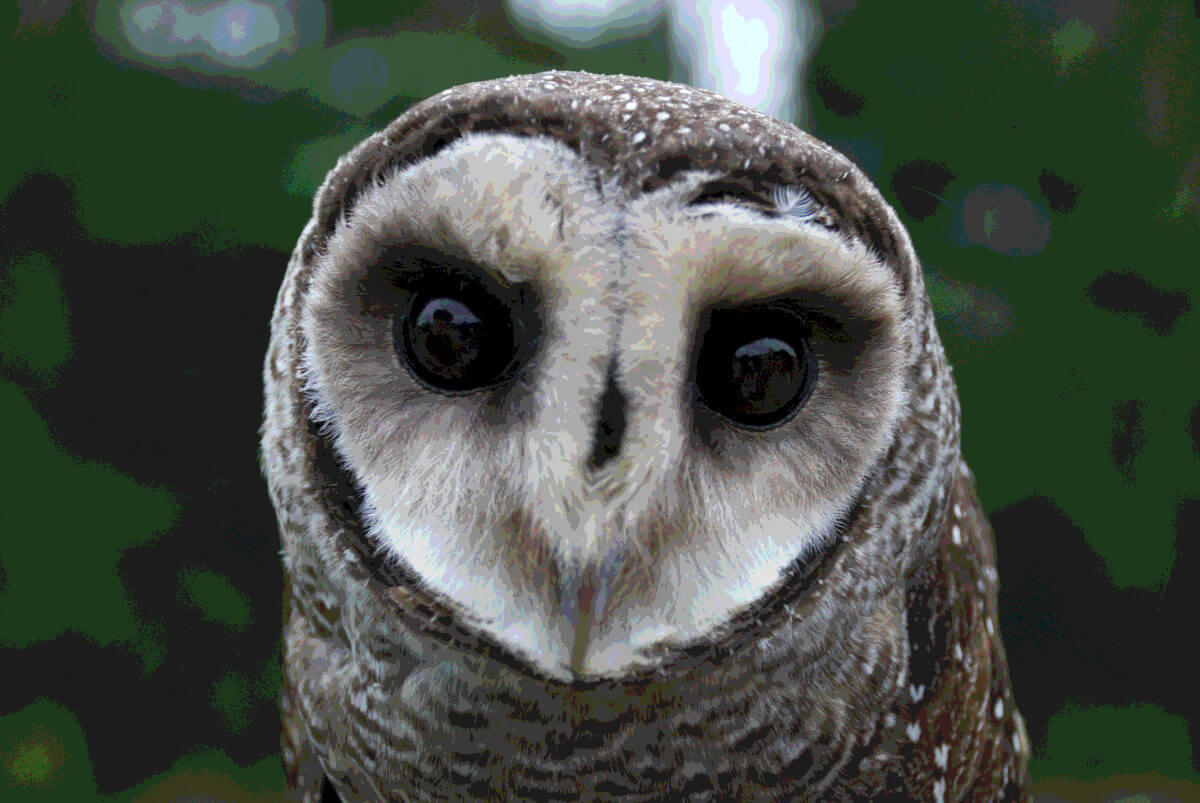
Dithering is a process that is intended to mitigate color banding by adding noise into the color bands to create the illusion that the image has more colors. In theory, dithering seems like a good idea when you posterize; it helps the viewer perceive the result as looking more like the original.
Unfortunately, ImageMagick has a bug that ruins images with transparency when dithering is used like this. So, it’s best to turn dithering off with -dither None. Luckily, even without dithering, the posterized images still look good.

Color Space
While not strictly a matter of color reduction, setting an image’s color space is a related concept. The color space defines what colors are available for an image. The image below shows that the ProPhoto RGB color space contains more colors than the Adobe RGB color space, which in turn contains more colors than the sRGB color space. All of these contain fewer colors than are visible to the human eye.

sRGB was created to be the one true king of color spaces on the Internet. It has been endorsed by the W3C and other standards bodies; it is the required color space in the CSS Color Module Level 3 and the SVG specification and is the assumed color space of the WebP specification; and it is explicitly referenced in the PNG specification. It’s also the default color space in Photoshop. In short, sRGB is the color space of choice for the web platform, and, assuming you want your images to render predictably, using it is probably a good idea.
Quality And Compression
With lossy image formats such as JPEG, quality and compression go hand in hand: the higher the compression, the lower the quality and the lower the file size. We could drastically reduce file size by setting a high JPEG compression factor, but this would also drastically reduce quality. A balance is needed.
When I was doing my tests, the control images I created with Photoshop had a JPEG quality setting of high, or 60. I’ve found that this setting works well for me and strikes the right balance between quality and file size. However, in my ImageMagick settings, I’m recommending -quality 82. Why?
It turns out that JPEG quality scales are not defined in a specification or standard, and they are not uniform across encoders. A quality of 60 in Photoshop might be the same as a quality of 40 in one program, quality B+ in another and quality fantastico in a third. In my tests, I found that Photoshop’s 60 is closest to -quality 82 in ImageMagick.
For non-lossy image formats, such as PNG, quality and compression are not related at all. High compression doesn’t change how an image looks at all and only comes at the expense of processing load (in terms of CPU usage, memory usage and processing time). Assuming that our computers can handle this load, there’s no reason not to max out PNG compression.
PNG compression in ImageMagick can be configured with three settings, -define png:compression-filter, -define png:compression-level and -define png:compression-strategy. Compression filtering is a pre-compression step that reorganizes the image’s data so that the actual compression is more efficient; I got the best results using adaptive filtering (-define png:compression-filter=5). Compression level is the amount of compression that gets applied; I recommend maxing this out to 9 (-define png:compression-level=9). Finally, the compression strategy setting determines the actual algorithm that’s used to compress the files; I got the best result with the default compression strategy (-define png:compression-strategy=1).
Meta Data
In addition to the actual image data, image files can contain meta data: information about the image, such as when it was created and the device that created it. This extra information could take up space without providing any benefit to our users and should usually be removed. Above, when describing the -thumbnail function that handles the actual resizing of the image, I mentioned that its third step involves stripping meta data. Even though that’s true, -thumbnail doesn’t remove all of the meta data, and there are gains to be had by using -strip and -define png:exclude-chunk=all as well. Neither of these should affect quality at all.
Progressive Rendering
JPEGs and PNGs can be saved to use either progressive or sequential rendering. Sequential rendering is usually the default: The image will load pixels row by row from top to bottom. Progressive rendering means the image is delivered and rendered in stages.
For JPEGs, progressive rendering can happen in any number of stages, as determined when the file is saved. The first stage will be a very low-resolution version of the full image; at each subsequent stage, a higher-resolution version is delivered until, in the last stage, the full-quality version is rendered.

PNGs use a type of progressive rendering called Adam7 interlacing, in which the pixels of the image are delivered in seven stages based on an 8 × 8 pixel grid.

Both types of progressive rendering can be controlled in ImageMagick using the -interlace setting. But should progressive rendering be turned on or not?
For both JPEGs and PNGs, progressive rendering increases the file size, but for a long time conventional wisdom held that it was worth turning on because it delivered a better experience to the user. The idea is that even if the full, perfect image doesn’t load quite as quickly, users would be able to see something earlier, and that something is probably better than nothing.
Last year, though, Radware released research on progressive JPEGs that shows users actually tend to prefer sequential image rendering. This is just one study (and one that hasn’t gone through a formal peer review process), but the results are interesting. Radware’s results, combined with the fact that sequential images have smaller file sizes, lead me to recommend the -interlace none setting in ImageMagick.
Image Optimization
I mentioned above that I ran tests both with and without image optimization. All of the settings I’ve described so far are what I’d recommend if you’re not optimizing your images. If you can optimize them, though, my recommendations would change slightly: I found that slightly different -unsharp settings work better (-unsharp 0.25x0.08+8.3+0.045 versus -unsharp 0.25x0.25+8+0.065 without optimization) and that there’s no need to use -strip.
mogrify -path OUTPUT_PATH -filter Triangle -define filter:support=2 -thumbnail OUTPUT_WIDTH -unsharp 0.25x0.08+8.3+0.045 -dither None -posterize 136 -quality 82 -define jpeg:fancy-upsampling=off -define png:compression-filter=5 -define png:compression-level=9 -define png:compression-strategy=1 -define png:exclude-chunk=all -interlace none -colorspace sRGB INPUT_PATH
A lot of different image optimizers are out there. I tested image_optim, picopt and ImageOptim, all of which run images through a battery of different optimization steps. I tested these tools both individually and in combination, and I found that the best results come from running files through all three, in the order listed above. That said, there are diminishing returns: After the first round of optimization with image_optim, the extra compression that picopt and ImageOptim achieve is quite small. Unless you have a lot of time and processing power, using multiple image optimizers is probably overkill.
The Results (Or, Is This Even Worth It?)
The settings I’m recommending are, admittedly, complicated, but they are absolutely worthwhile for your users. When I set out to do these tests, I did so hoping that I’d be able to drastically reduce file size without sacrificing image quality. I’m happy to report that, using the settings described above, I was successful.
On average, my recommended settings and optimizations reduced file sizes by 35% compared to Photoshop’s “Save for Web”:
| Condition | File size: mean | File size: % difference |
|---|---|---|
| My settings, with optimization | 218,274 bytes | |
| My settings, without optimization | 259,852 bytes | 19.05% |
| Photoshop CC, with optimization | 260,305 bytes | 19.28% |
| Photoshop CC, without optimization | 299,710 bytes | 35.26% |
My settings without optimization even beat Photoshop’s output with optimization!
Compared to ImageMagick’s default image resizing, my recommendations resulted in file sizes that were 82% smaller on average:
| Condition | File size: mean | File size: % difference |
|---|---|---|
| My settings, with optimization | 218,274 bytes | |
| My settings, without optimization | 259,852 bytes | 19.05% |
-resize | 397,588 bytes | 82.15% |
Compared to WordPress’s default image resizing (which uses ImageMagick under the hood), my recommendations resulted in file sizes that were 77% smaller on average:
| Condition | File size: mean | File size: % difference |
|---|---|---|
| My settings, with optimization | 218,274 bytes | |
| My settings, without optimization | 259,852 bytes | 19.05% |
| WordPress* | 385,795 bytes | 76.75% |
| * Simulation using ImageMagick with the settings that these CMS’ use by default. The specific settings used can be found in the GitHub repository for these tests. | ||
Compared to other CMS’ and tools that use ImageMagick, my recommendations resulted in file sizes that were up to 144% smaller:
| Condition | File size: mean | File size: % difference |
|---|---|---|
| My settings, with optimization | 218,274 bytes | |
| My settings, without optimization | 259,852 bytes | 19.05% |
| CodeIgniter/ExpressionEngine* | 340,461 bytes | 55.98% |
| TYPO3.CMS* | 359,112 bytes | 64.52% |
| Drupal* | 397,588 bytes | 82.15% |
| Perch* | 416,790 bytes | 90.95% |
| Craft CMS* | 425,259 bytes | 94.83% |
| grunt-responsive-images | 533,030 bytes | 144.20% |
| * Simulation using ImageMagick with the settings that these CMS’ use by default. The specific settings used can be found in the GitHub repository for these tests. | ||
And remember, this is all with the images being visually indistinguishable from the Photoshop output, on average.
Using the settings I described above can get you huge file size savings without hurting quality. This can be a huge boon to your website’s performance!
How To Implement This In Your Projects
I hope the benefits of using this technique are obvious. Luckily for you, the hard part — figuring all of this out — is all done. Despite the apparent complexity of the recommended settings, implementing this in your own projects can be fairly quick and easy. Although running this whopper of a command from the terminal every time you want to resize an image may be inconvenient, there are simpler options that require very little muss or fuss.
bash shell
Most command-line shells allow you to setup aliases and functions for complicated commands. If you use a bash shell, you can add a function to your .bash_aliases (or .bashrc) file that acts as an alias for my recommended command:
smartresize() {
   mogrify -path $3 -filter Triangle -define filter:support=2 -thumbnail $2 -unsharp 0.25x0.08+8.3+0.045 -dither None -posterize 136 -quality 82 -define jpeg:fancy-upsampling=off -define png:compression-filter=5 -define png:compression-level=9 -define png:compression-strategy=1 -define png:exclude-chunk=all -interlace none -colorspace sRGB $1
}
Then, you can call it like this:
smartresize inputfile.png 300 outputdir/Node.js
An npm package called, unsurprisingly, imagemagick allows you to use ImageMagick via Node.js. If you’re using this module, you can add resizing using my recommended settings like this:
var im = require('imagemagick');

var inputPath = 'path/to/input';
var outputPath = 'path/to/output';
var width = 300; // output width in pixels

var args = [
   inputPath,
   '-filter',
   'Triangle',
   '-define',
   'filter:support=2',
   '-thumbnail',
   width,
   '-unsharp 0.25x0.25+8+0.065',
   '-dither None',
   '-posterize 136',
   '-quality 82',
   '-define jpeg:fancy-upsampling=off',
   '-define png:compression-filter=5',
   '-define png:compression-level=9',
   '-define png:compression-strategy=1',
   '-define png:exclude-chunk=all',
   '-interlace none',
   '-colorspace sRGB',
   '-strip',
   outputPath
];

im.convert(args, function(err, stdout, stderr) {
   // do stuff
});
Grunt
If you use Grunt as a task runner, good news: I’ve built a Grunt task named grunt-respimg (npm) that handles everything I’ve described above. You can include it in your projects by running:
npm install grunt-respimg --save-devThen, you can run it in your Grunt file like this:
grunt.initConfig({
  respimg: {
    default: {
      options: {
        widths: [200, 400]
      },
      files: [{
        expand: true,
        cwd: 'src/img/',
        src: ['**.{gif,jpg,png,svg}'],
        dest: 'build/img/'
      }]
    }
  },
});
grunt.loadNpmTasks('grunt-respimg');
PHP
PHP has ImageMagick integration called Imagick that makes it relatively easy to run ImageMagick operations from within your PHP scripts. Unfortunately, Imagick is a bit limited and doesn’t let you do some things that I recommend, like setting a resampling filter to be used with the thumbnail function.
But, again, you’re in luck: I’ve created a composer package called php-respimg (packagist) that handles everything described above. You can include it in your projects with Composer by running:
composer require nwtn/php-respimg
Then, you can resize your images like this:
require_once('vendor/autoload.php');
use nwtn\Respimg as Respimg;
$image = new Respimg($input_filename);
$image->smartResize($output_width, 0, false);
$image->writeImage($output_filename);
Content Management Systems
If you use a CMS, you might want to take advantage of these savings for the thumbnails and other resized images that get generated when users upload images. A few options are available to you.
If your CMS is built on PHP, you could bake the PHP stuff above into a theme or plugin. However, if your PHP-based CMS happens to be WordPress, then there’s no need for you to do that work: This is now integrated into the Responsive Issues Community Group’s plugin RICG Responsive Images as an experimental feature. After you install the plugin, all you’ll need to do to activate these ImageMagick settings is add the following lines to your functions.php file:
function custom_theme_setup() {
   add_theme_support( 'advanced-image-compression' );
}
add_action( 'after_setup_theme', 'custom_theme_setup' );
If you don’t use WordPress and don’t want to try to hack this into your CMS, most CMS’ include some way to modify image defaults (especially for quality). You might be able to get a lot of these benefits with a few simple changes to your CMS’ configuration. Check out the documentation and see what options are available to you.
Performance
The settings I’m recommending are obviously far more complex than simply using -resize, and this complexity brings a performance hit with it. Using my recommendations will take longer and use more resources on your computer or server. In my tests, I found that memory and CPU usage peaks were comparable but that my settings took an average of 2.25 times longer to render an image than from just using -resize alone.
Conclusion
As designers and developers, we have an enormous amount of power to shape how — and how well — the web works. One of the biggest impacts we can have is to make our websites more performant, which will improve our users’ experiences and even make our content available to whole new markets. Cutting image weight is a relatively simple and hugely impactful way to increase performance, and I hope the information outlined above helps you make a difference to your users.
Links
- grunt-respimg
- php-respimg
- RICG Responsive Images plugin
Thank you to Mat Marquis for reviewing a draft of this article.
Further Reading
- Automatically Art-Directed Responsive Images? Here You Go.
- Leaner Responsive Images With Client Hints
- Choosing A Responsive Image Solution
- Responsive Image Container: A Way Forward For Responsive Images?


