12 Principles For Clean HTML Code

Email Newsletter
Weekly tips on front-end & UX.
Trusted by 182,000+ folks.


 Celebrating 10 million developers
 Custom Web Forms for Angular, React, & Vue. Your backend.
Beautiful and clean HTML is the foundation of a beautiful website. When I teach people about CSS, I always begin by telling them that good CSS can only exist with equally good HTML markup. A house is only as strong as its foundation, right? The advantages of clean, semantic HTML are many, yet so many websites suffer from poorly written markup.
Let’s take a look at some poorly written HTML, discuss its problems, and then whip it into shape! Bear in mind, we are not passing any judgment on the content or design of this page, only the markup that builds it. If you are interested, take a peek at the bad code and the good code before we start so you can see the big picture. Now let’s start right at the top.
Further Reading on SmashingMag:
- Why Coding Style Matters
- 7 Principles Of Clean And Optimized CSS Code
- ESLint: The Next-Generation JavaScript Linter
- An Introduction To PostCSS
1. Strict DOCTYPE
If we are going to do this, let’s just do it right. No need for a discussion about whether to use HTML 4.01 or XHTML 1.0: both of them offer a strict version that will keep us nice and honest as we write our code.
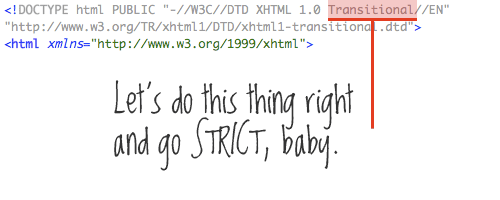
Our code doesn’t use any tables for layout anyway (nice!), so there really is no need for a transitional DOCTYPE.
Resources:
- W3C: Recommended DTDs to use in your Web document
- Fix Your Site With the Right DOCTYPE!
- No more Transitional DOCTYPEs, please
2. Character set & encoding characters
In our <head> section, the very first thing should be the declaration of our character set. We’re using UTF-8 here, which is swell, but it’s listed after our <title>. Let’s go ahead and move it up so that the browser knows what character set it’s dealing with before it starts reading any content at all.
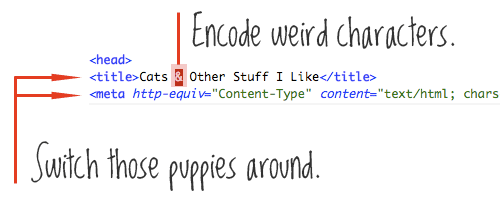
While we’re talking about characters, let’s go ahead and make sure any funny characters we are using are properly encoded. We have an ampersand in our title. To avoid any possible misinterpretation of that, we’ll convert it to & instead.
Resources:
3. Proper indentation
All right, we are about three lines in and I’m already annoyed by the lack of indentation. Indentation has no bearing on how the page is rendered, but it has a huge effect on the readability of the code. Standard procedure is to indent one tab (or a few spaces) when you are starting a new element that is a child element of the tag above it. Then move back in a tab when you are closing that element.
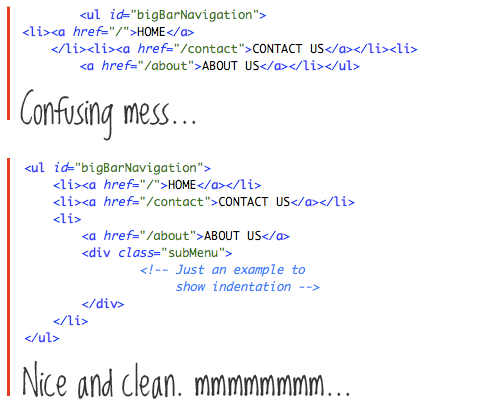
Indentation rules are far from set in stone; feel free to invent your own system. But I recommend being consistent with whatever you choose. Nicely indented markup goes a long way in beautifying your code and making it easy to read and jump around in.
Resources:
4. Keep your CSS and JavaScript external
We have some CSS that has snuck into our <head> section. This is a grievous foul because not only does it muddy our markup but it can only apply to this single HTML page. Keeping your CSS files separate means that future pages can link to them and use the same code, so changing the design on multiple pages becomes easy.
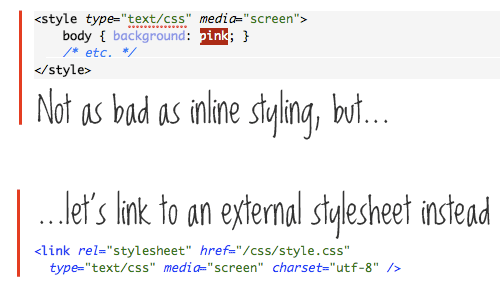
This may have happened as a “quick fix” at some point, which is understandable and happens to all of us, but let’s get that moved to a more appropriate place in an external file. There is no JavaScript in our head section, but the same goes for that.
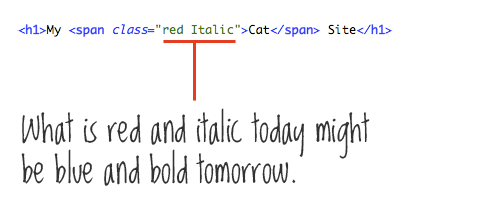
5. Nest your tags properly
The title of our site, “My Cat Site,” is properly inside <h1> tags, which makes perfect sense. And as per the norm, the title is a link to the home page. However, the anchor link, <a>, wraps the header tags. Easy mistake. Most browsers will handle it fine, but technically it’s a no-no. An anchor link is an “inline” element, and header tags are “block” elements. Blocks shouldn’t go inside inline elements. It’s like crossing the streams in Ghostbusters. It’s just not a good idea.
6. Eliminate unnecessary divs
I don’t know who first coined it, but I love the term “divitis,” which refers to the overuse of divs in HTML markup. Sometime during the learning stages of Web design, people learn how to wrap elements in a div so that they can target them with CSS and apply styling. This leads to a proliferation of the div element and to their being used far too liberally in unnecessary places.

In our example, we have a div (“topNav”) that wraps an unordered list (“bigBarNavigation”). Both divs and unordered lists are block-level elements. There really is no need whatsoever for the <ul> to be wrapped in a div; anything you can do with that div you can do with the <ul>.
Resources:
7. Use better naming conventions
This is a good time to bring up naming conventions, as we have just talked about that unordered list with an id of “bigBarNavigation.” The “Navigation” part makes sense, because it’s describing the content that the list contains, but “big” and “Bar” describe the design not the content. It might make sense right now because the menu is a big bar, but if you change the design of the website (and, say, change the website navigation to a vertical style), that id name will be confusing and irrelevant.
Good class and id names are things like “mainNav,” “subNav,” “sidebar,” “footer,” “metaData,” things that describe the content they contain. Bad class and id names are things that describe the design, like “bigBoldHeader,” “leftSidebar,” and “roundedBox.”
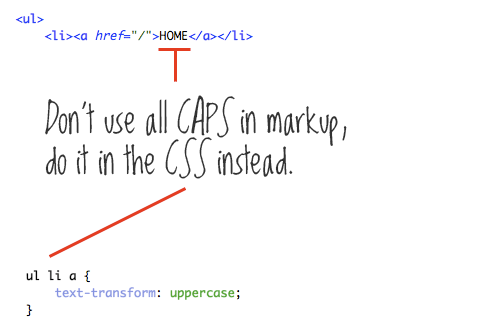
8. Leave typography to the CSS
The design of our menu calls for all-caps text. We just dig how that looks, and more power to us. We have achieved this by putting the text in all-caps, which of course works; but for better, future extensibility, we should abstract typographic choices like this one to the CSS. We can easily target this text and turn it to all-caps with {text-transform: uppercase}. This means that down the road, if that all-caps look loses its charm, we can make one little change in the CSS to change it to regular lowercase text.
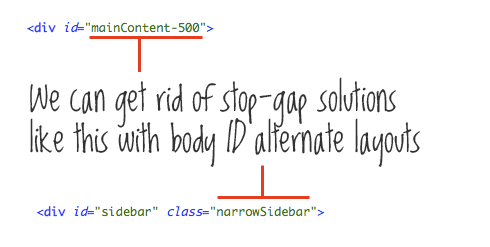
9. Class/id the
By “class the body,” I literally mean apply a class to the body, like <body class=“blogLayout”>. Why? I can see two things going on in this code that lead me to believe that this page has a layout that is different than other pages on the website. One, the main content div is id’d “mainContent-500.” Seems like someone had a “mainContent” div at one point and then needed to alter its size later on and, to do so, created a brand new id. I’m guessing it was to make it larger, because further in the code we see <class=“narrowSidebar”> applied to the sidebar, and we can infer that that was added to slim down the sidebar from its normal size.
This isn’t a very good long-term solution for alternate layouts. Instead, we should apply a class name to the body as suggested above. That will allow us to target both the “mainContent” and “sidebar” divs uniquely without the need for fancy new names or class additions.
Having unique class and id names for the body is very powerful and has many more uses than just for alternate layouts. Because every bit of page content lies in the “body” tag, you can uniquely target anything on any page with that hook; particularly useful for things like navigation and indicating current navigation, since you’ll know exactly what page you are on with that unique body class.
Resources:
10. Validate
Kind of goes without saying, but you should run your code through the ol’ validator machine to pick up small mistakes. Sometimes the mistakes will have no bearing on how the page renders, but some mistakes certainly will. Validated code is certain to outlive non-validated code.
If for no other reason, seeing that green text on the W3C validator tool just makes you feel good inside.
Resources:
11. Logical ordering
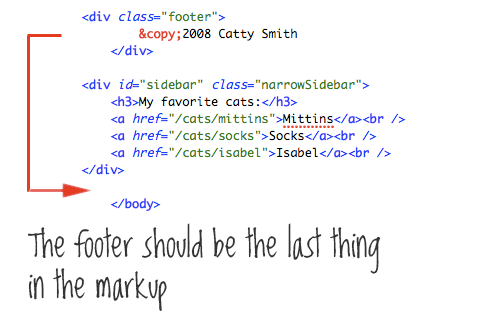
If it is at all possible, keeping the sections of your website in a logical order is best. Notice how the footer section lies above the sidebar in our code. This may be because it works best for the design of the website to keep that information just after the main content and out of the sidebar. Understandable, but if there is any way to get that footer markup down to be the last thing on the page and then use some kind of layout or positioning technique to visually put it where you need it, that is better.
12. Just do what you can
We’ve covered a lot here, and this is a great start to writing clean HTML, but there is so much more. When starting from scratch, all of this seems much easier. When trying to fix existing code, it feels a lot more difficult. You can get bogged down in a CMS that is forcing bad markup on you. Or, there could be just so many pages on your website that it’s hard to think of even where to begin. That’s OK! The important thing is that you learn how to write good HTML and that you stick with it.
The next time you write HTML, be it a small chunk in a huge website, or the beginning of a fresh new project, just do what you can to make it right.

(al)


