How To Use Photoshop Masks [+Keyboard Shortcuts]

Email Newsletter
Weekly tips on front-end & UX.
Trusted by 182,000+ folks.
 Register for Free


 Custom Web Forms for Angular, React, & Vue. Your backend.
 Celebrating 10 million developers
In this article, we’ll explore the technical aspects and creative advantages of incorporating masks into your workflow. [Updated February/02/2017]
Photoshop offers five methods of masking: Pixel Masks, Vector Masks, Quick Masks, Clipping Masks and Clipping Paths, all of which define pixel opacities without affecting the original data. Each of them has its own pros and cons, and knowing which method to use is extremely important for creating clean, flexible and properly masked layers.
Pixel Masks
Pixel masks determine opacity values based on a raster image with grayscale values that correspond pixel for pixel to the original layer. This makes them ideal for masking complex photographic imagery (e.g. the hair on a model or leaves on a tree). Pixel masks allow 100 shades of gray, which correspond directly to opacity percentages. The ability to vary opacities is unique to pixel masks, making them an invaluable tool.
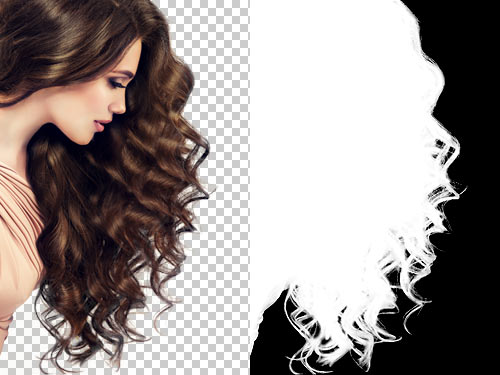
Pixel Masks are ideal for extracting complex photographic imagery.
While pixel masks can be easily modified, they aren’t ideal for every situation. Because of their raster format, scaling them can cause unwanted artifacts and interpolated bluriness. Smooth curves and perfect edges can also be tricky to create when painting a mask. Under such circumstances, vector masks would be preferable.
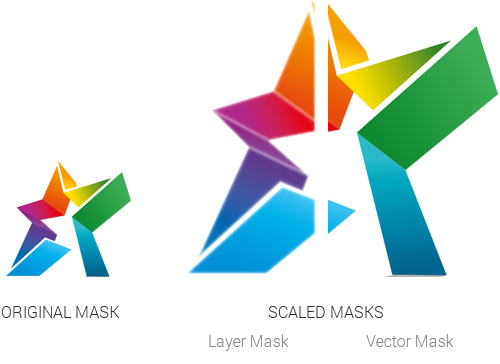
Pixel masks should not be used when you might have to rescale.
Creation
Creating a pixel mask is as easy as selecting the layer or layer group and clicking the “Add Layer Mask” button at the bottom of the layer’s palette. A second thumbnail will be added to the layer, giving you a preview of the mask. By default, this will be entirely white. However, if you happen to have a selection active when creating the mask, the selection will be used to define the grayscale values of the mask.
Once a mask is created, it can be edited as if it were any other pixel data by clicking on the mask’s thumbnail. You can then paint in black to hide areas or white to show them. The mask can also be tweaked using adjustments and filters such as Curves, Threshold, Unsharp mask and Gaussian blur.
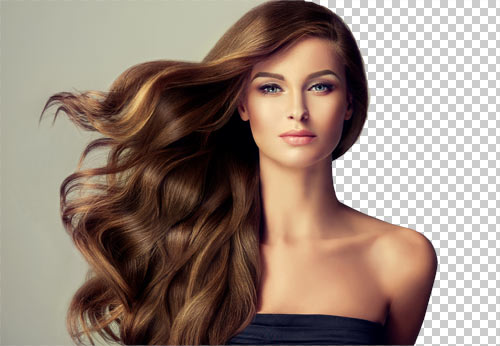
Painting the mask black is much like using the eraser tool.
View Modes
While creating a mask, there are a number of ways to view the mask data. Option + clicking on the thumbnail will display only the mask on the canvas; this is great for fine-tuning areas but doesn’t allow you to see the actual layer as you work. If you’d like to see both the mask and the layer at the same time, you can view the mask as a Ruby overlay. Simply press with the layer selected to toggle the overlay on and off. The color and opacity of the overlay can also be changed by double-clicking the mask’s thumbnail. Additionally, if you’d like to temporarily remove the mask, you can toggle it on and off by Shift + clicking on the mask’s thumbnail.
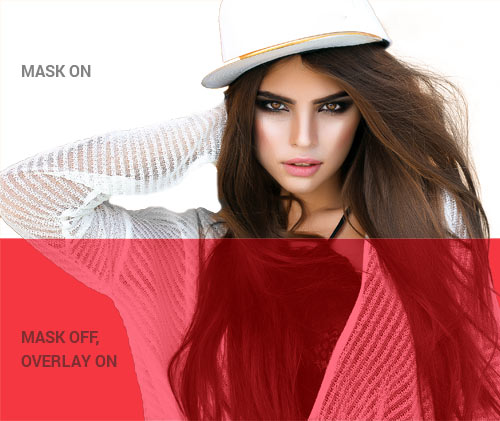
Turning the mask off and the overlay on can help with fine-tuning.
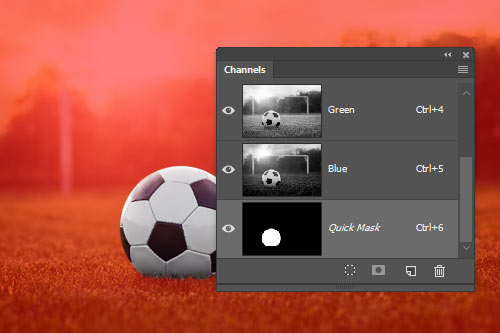
Channels
Every time a layer with a mask is selected, the mask is shown as a temporary alpha channel in the Channels palette. From here, you can save the channel for later use by dragging the channel to the “Create new channel” button at the bottom of the palette or by selecting “New Channel” from the fly-out menu. You can also change the mask’s Ruby overlay settings by double-clicking the channel’s thumbnail. Because a temporary channel becomes available whenever a masked layer is selected, you can use some keyboard shortcuts to toggle between the actual layer and its mask. Pressing Command + will select the mask and Command + 2 will bring you back to the layer data.
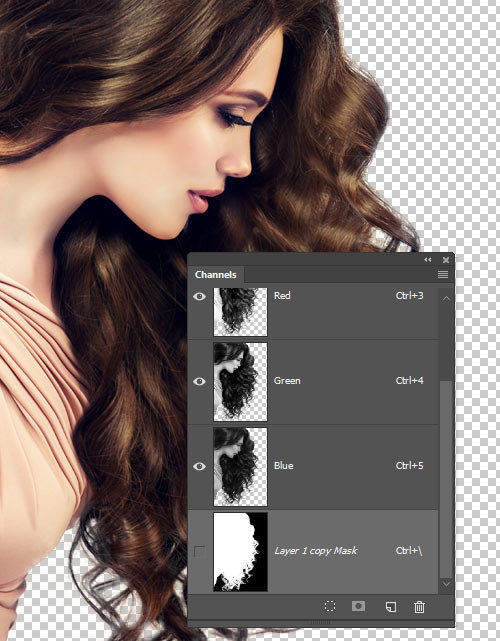
A temporary channel is available whenever a layer with a mask is selected.
Vector Masks
Vector masks pick up where pixel masks fall short. By defining the mask’s shape using paths, vector masks provide a superior level of finesse and flexibility. They’re ideal for defining shapes with clean, crisp lines, such as interface elements.
Vector Masks are ideal for masking crisp-edged objects.
The disadvantage of vector masks is that they are unable to vary pixel opacities; they are basically either 0 or 100. For this reason, many masking jobs require a hybrid implementation. By using a vector mask to define the solid edges and a pixel mask for the more complex areas or for varying opacities, you can effectively extract objects while maximizing flexibility.
Creation
To add a vector mask to an existing layer, simply Command + Click the “Add Layer Mask” button at the bottom of the layer’s palette. If a path is currently active, the mask will be created using it. Otherwise, the mask will be empty. Paths can then be added, subtracted or modified by clicking the mask’s thumbnail.
Being able to create flexible interface elements is one of the best advantages of vector masks. Using the Shape Tool (U) set to Shape Layers allows you to quickly create a fill layer with a Vector Mask. These layers are far more flexible than a raster level and are perfect for creating buttons, rules and other elements that can be resized without interpolating data.
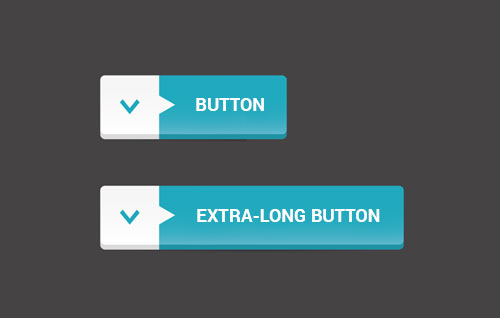
The flexibility offered by Vector Masks make them perfect for interface elements such as buttons.
View Modes
By clicking on the Vector Mask’s thumbnail in the the Layer’s palette, you can show or hide the paths saved in the mask. These paths can also be accessed from the Path’s palette, but only if the layer itself is selected. Toggling the mask on and off can be done by Shift + clicking the thumbnail.
Paths
Much like how layer masks appear in the Channels palette, a temporary work path would be displayed in the Paths palette when a layer with a vector mask is selected. You can then save the mask by dragging it to the “Create new path” button at the bottom of the palette or selecting “Save Path” from the fly-out menu. This temporary path can be accessed at any time by first selecting the Path Selection tool (A) and then pressing Enter; it can be dismissed by pressing Enter again. You can also quickly create a selection from an active path by pressing Command + Enter.
Applying
Before a vector mask can be applied to a layer it must first be rasterized by right-clicking the vector mask thumbnail and choosing Rasterize Vector Mask. If the layer already has a pixel mask, the two masks will be composited together to create a single pixel mask. It can then be applied like any other layer mask (right-clicking the thumbnail and choosing “Apply Layer Mask”).
Quick Masks
The Quick Mask mode allows you to create a selection using pixel editing tools as opposed to the primitive selection tools. This is a more logical approach to creating a complex mask with variable opacity. You can access this mode by clicking on the “Quick Mask” button in the Tools bar or by pressing Q.
Once in Quick Mask mode, you’ll no longer be editing the current layer. Instead, you’ll be editing a Ruby overlay that can be edited as if it were regular pixel data. By default, entering this mode will cover the entire canvas with a semi-transparent red color. You can then paint white to remove the overlay and black to add it back. The Quick Mask is essentially a more visual representation of a selection. Therefore, every area that you remove from the overlay is added to the selection.

Quick Mask mode allows you to quickly paint a selection.
Options
You can modify how the Quick Mask mode is displayed by double-clicking the “Quick Mask” button in the Tools bar. Here you can change the color and opacity of the mask as well as whether the mask color indicates masked areas or selected areas. Personally, I find painting selected areas more intuitive than painting masked areas, which is the default.
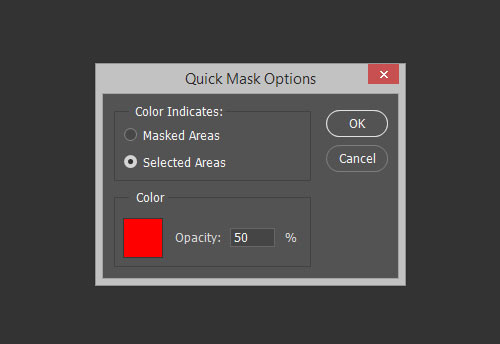
The Quick Mask Options menu allows you to change the color, opacity and target of the overlay.
Saving
After creating a quick mask, you can immediately apply it to a layer by creating a layer mask or save it for later use. By selecting Selection → Save Selection, you can save your selection as a new channel or apply it to an existing channel. This allows you to come back to the selection at any time by Control + clicking the channel in the Channel’s palette or by selecting Selection → Load Selection
Saving a Quick Mask creates a new channel.
Clipping Masks
You’ll often run into situations in which multiple layers require the same mask. You could group the layers and mask the layer group, but that is not always ideal. Clipping masks allows for a layer simply to adopt the opacity of an underlying layer. This is extremely helpful when using adjustment layers; by clipping them to a layer, you can apply adjustments to a single layer without affecting those below it.
The easiest way to create a clipping mask is to Option + click between the two layers in the Layer’s palette when the clipping mask cursor appears. Alternatively, you could press Command + Option + G to clip a layer to the one below it. Any number of layers can be clipped to one master layer, but a clipped layer can’t be used as a clipping mask itself.
Clipping Masks are great for constraining Adjustment Layers. (Image Source)
Clipping Paths
Clipping Paths are a lot like Vector Masks except that they apply to an entire document rather than a layer or layer group. They are primarily used by print designers to specify uniquely shaped objects that are imported into a page layout program. The path is imported along with the image to ensure a crisp clean edge.
To create a clipping path, first be sure that you have a path saved; having a temporary Work Path does not suffice. You must select “Save Path” from the fly-out menu in the Paths palette if your path is not saved. Then, from the fly-out menu, choose “Clipping Path.” Your document’s appearance will not change, but if you were to import the document into Illustrator using the Place command, it would be clipped to the path.
Select and Mask
The Masks palette, introduced in CS4, adds some useful features to help with creating and refining both pixel and vector masks. For the first time, you can feather a mask and change its density without losing the original mask.
Select and Mask was a great addition to Photoshop CC.
Create/View Buttons
At the top of the palette are two buttons that can be used to select the layer mask or vector mask or to create one if one doesn’t exist.
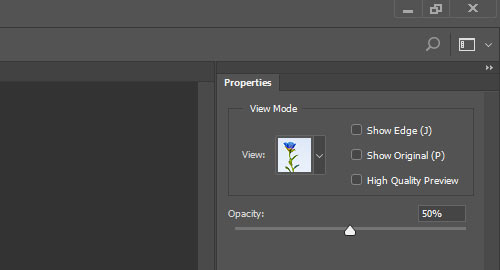
Density
The density slider basically controls how strong the mask is. At 100%, fully masked areas will be completely transparent. When density is set to 50%, those same areas would be only 50% transparent.
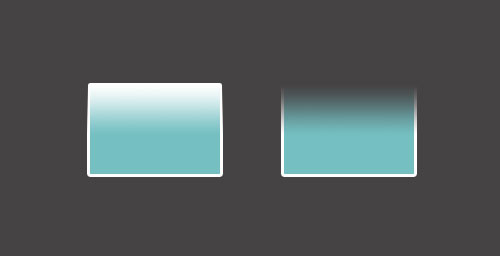
Feather
Feathering the edges of a mask used to require applying a Gaussian Blur, which would destroy the original mask shape. With the Masks palette you can now change the amount of feathering at any time while maintaining the original mask data.
With the Feather slider, you can now change the mask’s softness on the fly.
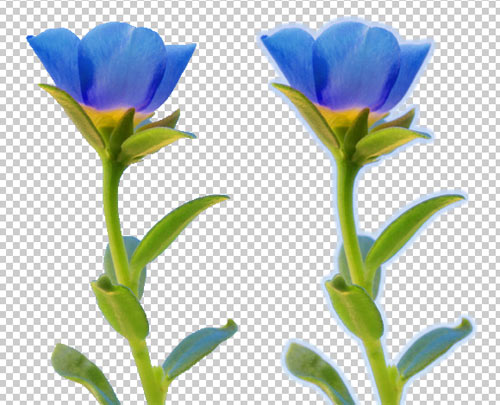
Mask Edge
The Mask Edge menu provides some long-desired features that aid in refining a mask’s perimeter. They come in extremely handy when the extracted object is still picking up color from the masked background.
Radius The Radius setting is similar to feathering, but it retains some of the edge’s crispness. This can be helpful with reducing awkward or overly sharp edges on complex shapes.
Contrast Contrast simply modifies the contrast of edge elements, which helps crispen any soft edges. Using this in conjunction with Radius can help remove unwanted artifacts in the mask.
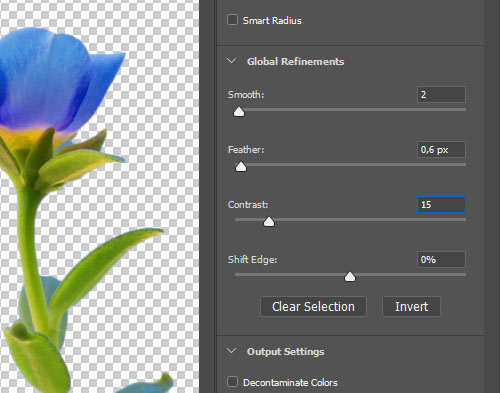
Radius and Contrast can be used to remove unwanted artifacts.
Smooth Smooth simplifies the complexity of the mask’s edges. This can be useful if you’ve painted the mask by hand and need to quickly clean up some rough edges.
Feather This feather command is nearly identical to the Mask palette’s primary feather command, but it restricts the blur more to the edge of the mask. The difference is slight yet noticeable.
Contract/Expand The Contract and Expand slider allows you to grow and shrink the edges of the mask. This is extremely useful for reducing unwanted color fringes.
Preview Mode At the top of the palette are five different preview modes that allow you to view the mask as a selection with marching ants, quick mask ruby overlay, black matte, white matte or grayscale mask.
Color Range
The Color Range menu is one of the most powerful ways to extract an image from an evenly colored background. With only a few clicks and adjustments, even the most complex object can be cleanly masked. For further details, see the “Techniques” section just below.
Techniques
Each masking job is unique and requires a different method of creation and refinement. However, some common techniques can drastically improve the efficiency and maximize the flexibility of your masks.
Color Range
When your masking task requires an object to be extracted from an evenly colored background (much like the video editing process of Chroma keying), the quickest means is often the Color Range command. First, use the Eyedropper Tool to select the primary color of the background. Then, you can use the “Add to sample” and “Remove from sample” tools to refine the color selection. The fuzziness slider lets you broaden the range of colors selected. If the color data is there to support it, this process makes short work of an otherwise tedious task.
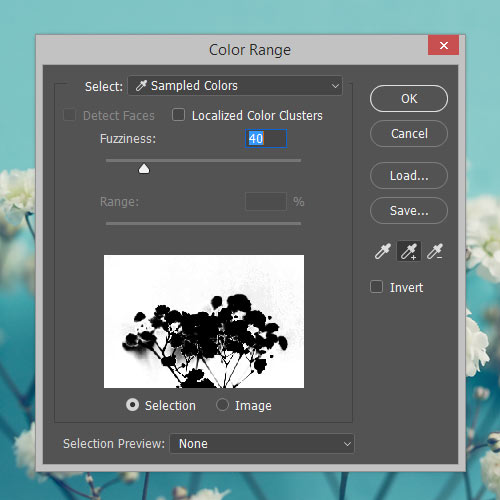
The Eyedropper tools allow you to easily select the sky in the photo.
Channels
A mask is often hiding in one of the layer’s channels, just waiting to be unlocked. Depending on the image you’re using, you may be able to find a channel with strong contrast between the target object and its surroundings. You may even want to try temporarily changing the color mode to Lab or CMYK to provide alternative channel options. Once you find a channel with a strong enough contrast, Command + click it to create a selection. Then, apply the selection as a layer mask. You’ll then be able to tweak it as you would any other mask.
- The original image has strong vibrant colors, making it a great opportunity to create a mask using channels.
- The red channel has the foreground-to-background contrast, so we’ll start there. We’ve copied and pasted it onto a new layer and then inverted it.
- The green cup is still very prominent, so we’ve converted the blue channel to a layer and will use it to negate the green and red cups.
- By setting the Blending Mode on the blue channel’s layer to Multiply, we can effectively erase any extraneous white areas.
- The two layers are then flattened and applied as a layer mask to the original image. This leaves us with a cleanly masked blue mug.
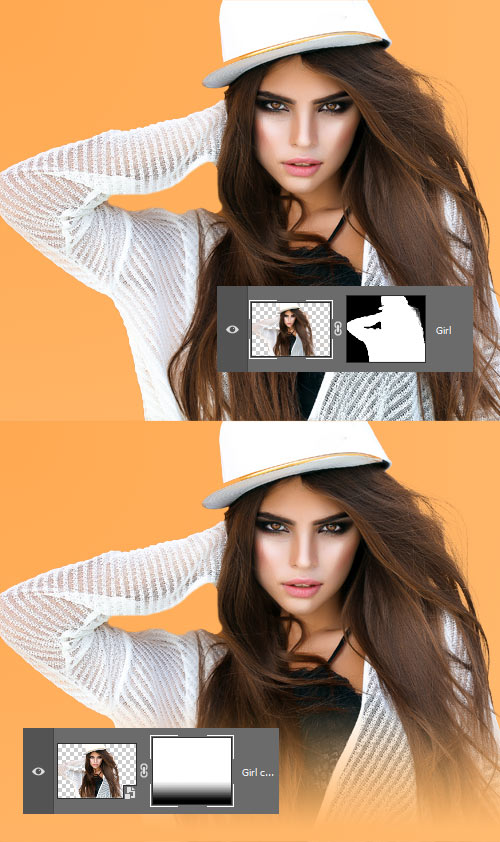
Pixel/Vector Hybrid
Objects will quite often have a combination of sharp edges and soft feathered edges. In instances like these, using both a pixel and a vector mask may be best. One common example of this is extracting a figure. You can use the pen tool to draw all of the smooth edges along the figure’s body and then use a pixel mask to paint in the fine details such as hair.
Multiple Masks
There may be times when you want to apply more than one mask to a layer. You could choose to apply the mask by right-clicking the layer and selecting Apply Layer Mask, after which you could apply a new mask. This, however, is not ideal because the data behind the mask will be lost.
A far better method is to create a Smart Object from the layer and mask the new layer. This allows you to apply two masks to one layer without losing data. In fact, if needed, you could repeat this process over and over.
Converting a layer to a Smart Object allows you to add multiple masks without losing data.
Layer Styles
If you have ever added a mask to a layer with layer styles, things may have gotten messy, especially if the mask had soft edges or varying opacities. This is because, by default, Photoshop uses a composite of the layer’s opacity along with any masks on it to define the area used by the layer styles. This is desirable but can also be a nuisance. To counter the default behavior, open the Blending Options menu for the layer, and apply either “Layer Mask Hides Effects” or “Vector Mask Hides Effects.”
Messes can often be tidied by using the “Layer Mask Hides Effects” option.
Blend Clipped Layers as Group
By default, Photoshop assumes that all layers in a clipping stack should be blended with the base layer before the base layer is blended with the layers below it. This makes sense sometimes, but other times you may need the clipped layers to adopt the shape of the base layer but not the blend mode. To prevent this behavior, open the Blending Options menu for the base layer (right-click the layer and choose “Blending Options”), and uncheck the “Blend Clipped Layers as Group” option. Now, each of the clipped layers will blend with underlying layers as if they weren’t clipped.
Type Masks
Grouped with the Type tool in the Tools bar is the deceptively named Type Mask tool. It allows you to create type just like the regular type tool; but once committed, the type is converted to a selection. This selection can be converted to a layer mask but will no longer be editable. This is not ideal. If editability is important, you may want to create a regular type layer and use it as the base of a clipping mask. This is the only way to mask objects to the shape of type without losing the ability to edit the text. Perhaps someday Photoshop will let us create an editable Type Mask for a layer.
Removing Edge Fringes
Even after using the “Refine Edge” command in the Masks palette, you may find random color fringes left along the edge of your mask. This is where some manual brushwork comes in handy. The Paintbrush tool can be used here, but I recommend the Healing Brush, Stamp Tool or Smudge Tool because they will blend better with the subject.
First, create a new layer and clip it to the masked layer. Then, set your tool of choice to sample all layers. You can now select your sample area and paint the fringes out; the original layer data will be preserved. Often, changing the brush’s Blend Mode will help preserve the detail of the layer.
Keyboard Shortcuts
- View Layer Mask as an overlay
- Command +
Set layer focus to Layer Mask - Command + 2
Set layer focus to layer data - Command + Option +
Create selection from Layer Mask - Command + Option + G
Make/Release Clipping Mask - A, then Enter
Activate/Dismiss Vector Mask - Command + Enter
Create selection from active vector mask - Command + Click Mask Thumbnail
Create selection from mask - Command + Option + Click Mask Thumbnail
Subtract mask from selection - Command + Option + Shift + Click Mask Thumbnail
Intersect mask from selection - Q
Toggle Quick Mask mode
Inside the Color Range Menu
- Option
Toggle the Reset button and the “Subtract from Sample” tool - Command
Toggle between the Selection view and Image view - Shift
Toggle the “Add to Sample” tool
Further Reading
- Mastering Photoshop With Paths You may want to take a look at related Photoshop articles:
- Top 10 Killer Combo Moves
- Unknown Tricks And Time Savers
- Mastering Layer Styles


