!important CSS Declarations: How and When to Use Them

Email Newsletter
Weekly tips on front-end & UX.
Trusted by 182,000+ folks.

 Celebrating 10 million developers

 Custom Web Forms for Angular, React, & Vue. Your backend.
!important declarations that would help developers and users easily override normal specificity when making changes to their stylesheets. For the most part, !important declarations have remained the same, with only one change in CSS2.1 and nothing new added or altered in the CSS3 spec in connection with this unique declaration.When the CSS1 specification was drafted in the mid-to-late 90s, it introduced !important declarations that would help developers and users easily override normal specificity when making changes to their stylesheets. For the most part, !important declarations have remained the same, with only one change in CSS2.1 and nothing new added or altered in the CSS3 spec in connection with this unique declaration.
Let’s take a look at what exactly these kinds of declarations are all about, and when, or if, you should use them.
A Brief Primer on the Cascade
Before we get into !important declarations and exactly how they work, let’s give this discussion a bit of context. In the past, Smashing Magazine has covered CSS specificity in-depth, so please take a look at that article if you want a detailed discussion on the CSS cascade and how specificity ties in.
Below is a basic outline of how any given CSS-styled document will decide how much weight to give to different styles it encounters. This is a general summary of the cascade as discussed in the spec:
- Find all declarations that apply to the element and property
- Apply the styling to the element based on importance and origin using the following order, with the first item in the list having the least weight:
- Declarations from the user agent
- Declarations from the user
- Declarations from the author
- Declarations from the author with
!importantadded - Declarations from the user with
!importantadded
- Apply styling based on specificity, with the more specific selector “winning” over more general ones
- Apply styling based on the order in which they appear in the stylesheet (i.e., in the event of a tie, last one “wins”)
With that basic outline, you can probably already see how !important declarations weigh in, and what role they play in the cascade. Let’s look at !important in more detail.
What is “Important” CSS?
An !important declaration provides a way for a stylesheet author to give a CSS value more weight than it naturally has. When we add the keyword to a style declaration, we’re essentially bumping up its specificity, giving it higher priority over other matching styles when it comes to applying styles.
Syntax and Description
It should be noted here that the phrase “!important declaration” is a reference to an entire CSS declaration, including property and value, with !important added (thanks to Brad Czerniak for pointing out this discrepancy). Here is a simple code example that clearly illustrates how !important affects the natural way that styles are applied.
See the Pen Untitled by Geoff Graham (@geoffgraham) on CodePen.
It makes sense that the article headings in this example are orange — the second style rule is not only lower in order but also more specific because a child combinator (article h2) has a higher specificity score than the single element selector (h2).

If we were to slap !important on the first style, however, it sort of brute forces its way in front and overrides the seconde style.See the Pen Default Specificity Example by Geoff Graham (@geoffgraham) on CodePen.
We’ve essentially turned the CSS cascade on its head, making the first style declaration more “important” than the second style declaration that would otherwise “win” without the !important keyword in the mix.
Some things to note about !important declarations:
- When
!importantwas first introduced in CSS1, an author rule with an!importantdeclaration held more weight than a user rule with an!importantdeclaration; to improve accessibility, this was reversed in CSS2 - If
!importantis used on a shorthand property, this adds “importance” to all the sub-properties that the shorthand property represents - The
!importantkeyword must be placed at the end of the line, immediately before the semicolon, otherwise it will have no effect (although a space before the semicolon won’t break it) - If for some particular reason you have to write the same property twice in the same declaration block, then add
!importantto the end of the first one, the first one will have more weight in every browser except Internet Explorer 6 (IE6) (which is no longer a support browser, anyway). - In IE6 and IE7, if you use a different word in place of
!important(like!hotdog), the CSS rule will still be given extra weight, while other browsers ignore it.
When Should !important Be Used?
As with any technique, there are pros and cons depending on the circumstances. So when should it be used, if ever? Here’s my subjective overview of potential valid uses.
Never
The first rule of !important is to not use !important for overriding styls by brute force.
!important declarations should not be used unless they are absolutely necessary after all other avenues have been exhausted. If you use !important out of laziness, to avoid proper debugging, or to rush a project to completion, then you’re abusing it, and you (or those that inherit your projects) will suffer the consequences.
If you include it even sparingly in your stylesheets, you will soon find that certain parts of your stylesheet will be harder to maintain. As discussed above, CSS property importance happens naturally through the cascade and specificity. When you use !important, you’re disrupting the natural flow of your rules, giving more weight to rules that are undeserving of such weight.
If you never use !important, then that’s a sign that you understand CSS and give proper forethought to your code before writing it.
That being said, the old adage “never say never” would certainly apply here. So below are some legitimate uses for !important.
Debugging Layouts & Accessibility
There is one thing that declaring !important can be good for, and that’s identifying issues with your CSS. For example, we can make sure we force a red border on any image that does not include proper alt text so they are easy to identify and fix.
Can you spot which image is missing it in the following demo?
See the Pen Untitled by Geoff Graham (@geoffgraham) on CodePen.
You may find similar CSS snippets that apply a border instead of an outline. I prefer using outline since it does not contribute to the image’s size. Borders are part of the CSS Box Model, where the border-box adds to the overall size of elements.

This same idea can be used to troubleshoot layout issues in your CSS as well. Adding outlines to elements helps visualize their dimensions when they are out of position to see exactly where things are crossed up, especially when an element overflows another one.
See the Pen Highlight Images Without `alt` Text by Geoff Graham (@geoffgraham) on CodePen.
Of course, you’ll probably only want to do that when developing locally in a safe environment. If you do it on your live site, well, that will be visible to everyone.
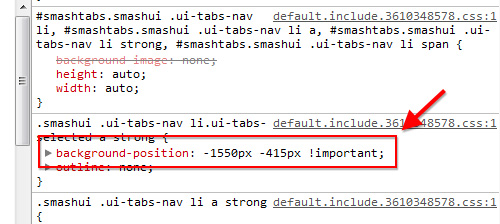
To Override Styles in DevTools
Inspecting an element in your browser’s DevTools allows you to edit styles on the fly to test things out, debug, and so on, without directly editing your stylesheet for all the world to see.

For Print Stylesheets
Although this wouldn’t be necessary in all cases, and might be discouraged in some cases for the same reasons mentioned earlier, you could add !important declarations to your print-only stylesheets to help override specific styles without having to repeat selector specificity.
Alternative Ways to Manage Specificity
It’s worth calling out once again that !important is an old tool that’s been around since the days of CSS1. More recently, CSS provides features that can help override styles without brute-forcing that breaks the natural flow of the cascade and how it calculates specificity. You will be much better off reaching for any of the following methods than resorting to !important.
Cascade Layers
We can organize styles into layers that are, in turn, organized by priority.
@layer: base, layout, template;

@layer base {
  /* Base styles: Least specific */
}

@layer layout {
  /* Layout styles */
}

@layer template {
  /* Template styles: Most specific */
}
The order of the layers declared at the top determines the order of specificity, where the the first layer (base) is the least specific and the last layer (template) is the most specific. So, even if we were to shuffle the styles in reverse order like this:
@layer base, layout, template;

@layer template {
  /* Template styles: Still the most specific */
}

@layer layout {
  /* Layout styles */
}

@layer base {
  /* Base styles: Still the least specific */
}
…the template layer still gets the highest priority, even if it appears last in the stylesheet. If we truly want to make the base layer the most specific, all we have to do is reorder the @layer declarations at the top.
The following demo is a over-simplified example showing how the first layer of styles overrides the layer of styles, even though the second layer comes before the first layer in order. Thanks to cascade layers, we can write our most important styles up top and maintain their specificity over other styles.
See the Pen Untitled by Geoff Graham (@geoffgraham) on CodePen.
I’ll also call out that unnamed layers over more specific than named layers, so if you need a wuick bump in specity. simply start writing your styles in a new layer:
@layer {
  /* Unnamed layer styles: Most specific */
}

@layer base {
  /* Base styles: Next most specific */
}

body {
  /* Unlayered styles: Least specific */
}
You might be wondering what happens if you try using !important in a cascade layer. It’s weird, really, because it reversees the layer order and style rules.
There’s much, much more to know about CSS Cascade Layers and you will be doing yourself a solid by reading “Getting Started With Cascade Layers” here on Smashing Magazine.
Functional Pseudo-Classes
The :is, :where and :not pseudo-classes affect the specificty of any elements they select:
:is()- The specificity score equals the specificity score of the most specific selector in its argument list. So, if we have
:is(#id, .class, article), then the specificity is equal to the#idbecause it has the highest score of the three selectors. :where()- The specificity score equals zero, no matter what. In otgher words,
:where()effectively strips out specificity completely. So, if we have:where(#id, .class, article), then the specificity is equal to zero, even though we have the same#idas we did in the last example. :not()- Like
:is(), the specificity score of the most specific selector in its argument list. So, if we have:not(#id, .class, article), then the specificity is equal to the#idbecause it has the highest score of the three selectors. - CSS2.1 specification (W3C)
- “CSS Specificity And Inheritance” (Smashing Magazine)
- Everything You Need to Know About !important CSS Declarations
- “When Using !important is the Right Choice” (Chris Coyier)
- The New !important (Geoff Graham)
- “A Complete Guide to CSS Cascade Layers” (Miriam Suzanne)
Complex Combinators
This isn’t anything new, as we’ve always been able to increase the specifity of a selector by combining them with other selectors.
.parent {
  /* Specificity: 0 1 0 */
}

.child {
  /* Specificity: 0 1 0 */
}

.parent .child {
  /* Specificity: 0 2 0 */
}
I suppose you could use an ID instead of a class to increase the score, but that’s a heavy-handed approach. IDs are so difficult to override, so the better route is to increase it incrementally to keep things managable.
The class doesn’t even have to be a real one! For example, we can make up ficntional classes that are purely used to bump specificity up one or two notches:
.child {
  /* Specificity: 0 1 0 */
}

.child:not(.specificity) {
  /* Specificity: 0 2 0 */
}

.child:not(.specificity):not(.extra-specificity) {
  /* Specificity: 0 3 0 */
}
This works nicely for a couple of reasons. First, :not() ensures that the specificity of the faux classes is enforced. Second, :not() prevents an accidental case where maybe you create a set of styles with one of those classes, preventing those styles from being added to the selector.
Conclusion
!important declarations are best reserved for special tasks, like debugging layouts and accessibility in your work. The best thing possible is to leverage the cascade’s default behavior and leave it in tact as best you can, as its the most managable and maintainble way to keep specificty low. So you should do your best to give your CSS proper forethought and avoid using !important wherever possible. You’ll be way better off using one of the alternative approaches we covered in the last section before you reach for !important.
Nonetheless, !important is valid CSS. You might inherit a project wherein the previous developers used it, or you might have to patch something up quickly — so it could come in handy. It’s certainly beneficial to understand it better and be prepared to use it should the need arise.
Do you ever use !important in your stylesheets? When do you do so? Are there any other circumstances you can think of that would require its use?


