How To Create Wordpress Meta Boxes

Email Newsletter
Weekly tips on front-end & UX.
Trusted by 182,000+ folks.
 Register for Free
 Celebrating 10 million developers


 Custom Web Forms for Angular, React, & Vue. Your backend.
What seems like one of the most complicated bits of functionality in WordPress is adding meta boxes to the post editing screen. This complexity only grows as more and more tutorials are written on the process with weird loops and arrays. Even meta box “frameworks” have been developed.
(This article has been last updated on April 13, 2017.)
Creating custom meta boxes is extremely simple, at least it is once you’ve created your first one using the tools baked into WordPress’ core code. In this tutorial, I’ll walk you through everything you need to know about meta boxes:
- Creating meta boxes.
- Using meta boxes with any post type.
- Handling data validation.
- Saving custom meta data.
- Retrieving custom meta data on the front end.
Note: When I use the term “post” throughout this tutorial, I’m referring to a post of any post type, not just the default blog post type bundled with WordPress.
What Is A Post Meta Box?
A post meta box is a draggable box shown on the post editing screen. Its purpose is to allow the user to select or enter information in addition to the main post content. This information should be related to the post in some way.
Generally, two types of data is entered into meta boxes:
- Metadata (i.e. custom fields),
- Taxonomy terms.
Of course, there are other possible uses, but those two are the most common. For the purposes of this tutorial, you’ll be learning how to develop meta boxes that handle custom post metadata.
What Is Post Metadata?
Post metadata is data that’s saved in the wp_postmeta table in the database. Each entry is saved as four fields in this table:
meta_id: A unique ID for this specific metadata.post_id: The post ID this metadata is attached to.meta_key: A key used to identify the data (you’ll work with this often).meta_value: The value of the metadata.
In the following screenshot, you can see how this looks in the database.

When you get right down to it, metadata is just key/value pairs saved for a specific post. This allows you to add all sorts of custom data to your posts. It is especially useful when you’re developing custom post types.
The only limit is your imagination.
Note: One thing to keep in mind is that a single meta key can have multiple meta values. This isn’t a common use, but it can be extremely powerful.
Working With Post Metadata
By now, you’re probably itching to build some custom meta boxes. However, to understand how custom meta boxes are useful, you must understand how to add, update, delete, and get post metadata.
I could write a book on the various ways to use metadata, but that’s not the main purpose of this tutorial. You can use the following links to learn how the post meta functions work in WordPress if you’re unfamiliar with them.
- add_post_meta(): Adds post metadata.
- update_post_meta(): Updates post metadata.
- delete_post_meta(): Deletes post metadata.
- get_post_meta(): Retrieves post metadata.
The remainder of this tutorial assumes that you’re at least familiar with how these functions work.
The Setup
Before building meta boxes, you must have some ideas about what type of metadata you want to use. This tutorial will focus on building a meta box that saves a custom post CSS class, which can be used to style posts.
I’ll start you off by teaching you to develop custom code that does a few extremely simple things:
- Adds an input box for you to add a custom post class (the meta box).
- Saves the post class for the
smashing_post_classmeta key. - Filters the
post_classhook to add your custom post class.
You can do much more complex things with meta boxes, but you need to learn the basics first.
All of the PHP code in the following sections goes into either your custom plugin file or your theme’s functions.php file.
Building A Custom Post Meta Box
Now that you know what you’re building, it’s time to start diving into some code. The first two code snippets in this section of the tutorial are mostly about setting everything up for the meta box functionality.
Since you only want your post meta box to appear on the post editor screen in the admin, you’ll use the load-post.php and load-post-new.php hooks to initialize your meta box code.
/* Fire our meta box setup function on the post editor screen. */
add_action( 'load-post.php', 'smashing_post_meta_boxes_setup' );
add_action( 'load-post-new.php', 'smashing_post_meta_boxes_setup' );
Most WordPress developers should be familiar with how hooks work, so this should not be anything new to you. The above code tells WordPress that you want to fire the smashing_post_meta_boxes_setup function on the post editor screen. The next step is to create this function.
The following code snippet will add your meta box creation function to the add_meta_boxes hook. WordPress provides this hook to add meta boxes.
/* Meta box setup function. */
function smashing_post_meta_boxes_setup() {

  /* Add meta boxes on the 'add_meta_boxes' hook. */
  add_action( 'add_meta_boxes', 'smashing_add_post_meta_boxes' );
}
Now, you can get into the fun stuff.
In the above code snippet, you added the smashing_add_post_meta_boxes() function to the add_meta_boxes hook. This function’s purpose should be to add post meta boxes.
In the next example, you’ll create a single meta box using the add_meta_box() WordPress function. However, you can add as many meta boxes as you like at this point when developing your own projects.
Before proceeding, let’s look at the add_meta_box() function:
add_meta_box( $id, $title, $callback, $page, $context = 'advanced', $priority = 'default', $callback_args = null );$id: This is a unique ID assigned to your meta box. It should have a unique prefix and be valid HTML.$title: The title of the meta box. Remember to internationalize this for translators.$callback: The callback function that displays the output of your meta box.$screen: The screen or screens on which to show the box (such as a post type,link, orcomment). Accepts a single screen ID,WP_Screenobject, or array of screen IDs. Default is the current screen.$context: Where on the page the meta box should be shown. The available options arenormal,advanced, andside.$priority: How high/low the meta box should be prioritized. The available options aredefault,core,high, andlow.$callback_args: An array of custom arguments you can pass to your$callbackfunction as the second parameter.
The following code will add the post class meta box to the post editor screen.
/* Create one or more meta boxes to be displayed on the post editor screen. */
function smashing_add_post_meta_boxes() {

  add_meta_box(
    'smashing-post-class',      // Unique ID
    esc_html__( 'Post Class', 'example' ),    // Title
    'smashing_post_class_meta_box',   // Callback function
    'post',         // Admin page (or post type)
    'side',         // Context
    'default'         // Priority
  );
}
You still need to display the meta box’s HTML though. That’s where the smashing_post_class_meta_box() function comes in ($callback parameter from above).
/* Display the post meta box. */
function smashing_post_class_meta_box( $post ) { ?>

  <?php wp_nonce_field( basename( __FILE__ ), 'smashing_post_class_nonce' ); ?>

  <p>
    <label for="smashing-post-class"><?php \_e( "Add a custom CSS class, which will be applied to WordPress' post class.", 'example' ); ?></label>
    <br />
    <input class="widefat" type="text" name="smashing-post-class" id="smashing-post-class" value="<?php echo esc_attr( get_post_meta( $post->ID, 'smashing_post_class', true ) ); ?>" size="30" />
  </p>
<?php }
What the above function does is display the HTML output for your meta box. It displays a hidden nonce input (you can read more about nonces on the WordPress Codex). It then displays an input element for adding a custom post class as well as output the custom class if one has been input.
At this point, you should have a nice-looking meta box on your post editing screen. It should look like the following screenshot.

The meta box doesn’t actually do anything yet though. For example, it won’t save your custom post class. That’s what the next section of this tutorial is about.
Saving The Meta Box Data
Now that you’ve learned how to create a meta box, it’s time to learn how to save post metadata.
Remember that smashing_post_meta_boxes_setup() function you created earlier? You need to modify that a bit. You’ll want to add the following code to it.
/* Save post meta on the 'save_post' hook. */
add_action( 'save_post', 'smashing_save_post_class_meta', 10, 2 );
So, that function will actually look like this:
/* Meta box setup function. */
function smashing_post_meta_boxes_setup() {

  /* Add meta boxes on the 'add_meta_boxes' hook. \*/
  add_action( 'add_meta_boxes', 'smashing_add_post_meta_boxes' );

  /* Save post meta on the 'save_post' hook. */
  add_action( 'save_post', 'smashing_save_post_class_meta', 10, 2 );
}
The new code you’re adding tells WordPress that you want to run a custom function on the save_post hook. This function will save, update, or delete your custom post meta.
When saving post meta, your function needs to run through a number of processes:
- Verify the nonce set in the meta box function.
- Check that the current user has permission to edit the post.
- Grab the posted input value from
$_POST. - Decide whether the meta should be added, updated, or deleted based on the posted value and the old value.
I’ve left the following function somewhat generic so that you’ll have a little flexibility when developing your own meta boxes. It is the final snippet of code that you’ll need to save the metadata for your custom post class meta box.
/* Save the meta box’s post metadata. */
function smashing_save_post_class_meta( $post_id, $post ) {

  /* Verify the nonce before proceeding. \*/
  if ( !isset( $\_POST['smashing_post_class_nonce'] ) || !wp_verify_nonce( $_POST['smashing_post_class_nonce'], basename( \__FILE\__ ) ) )
    return $post_id;

  /* Get the post type object. \*/
  $post_type = get_post_type_object( $post->post_type );

  /* Check if the current user has permission to edit the post. \*/
  if ( !current_user_can( $post_type->cap->edit_post, $post_id ) )
    return $post_id;

  /* Get the posted data and sanitize it for use as an HTML class. \*/
  $new_meta_value = ( isset( $\_POST['smashing-post-class'] ) ? sanitize_html_class( $\_POST['smashing-post-class'] ) : ’ );

  /* Get the meta key. \*/
  $meta_key = 'smashing_post_class';

  /* Get the meta value of the custom field key. \*/
  $meta_value = get_post_meta( $post_id, $meta_key, true );

  /* If a new meta value was added and there was no previous value, add it. \*/
  if ( $new_meta_value && ’ == $meta_value )
    add_post_meta( $post_id, $meta_key, $new_meta_value, true );

  /* If the new meta value does not match the old value, update it. \*/
  elseif ( $new_meta_value && $new_meta_value != $meta_value )
    update_post_meta( $post_id, $meta_key, $new_meta_value );

  /* If there is no new meta value but an old value exists, delete it. \*/
  elseif ( ’ == $new_meta_value && $meta_value )
    delete_post_meta( $post_id, $meta_key, $meta_value );
}
At this point, you can save, update, or delete the data in the “Post Class” meta box you created from the post editor screen.
Using The Metadata From Meta Boxes
So you have a custom post meta box that works, but you still need to do something with the metadata that it saves. That’s the point of creating meta boxes. What to do with your metadata will change from project to project, so this is not something I can answer for you. However, you will learn how to use the metadata from the meta box you’ve created.
Since you’ve been building a meta box that allows a user to input a custom post class, you’ll need to filter WordPress’ post_class hook so that the custom class appears alongside the other post classes.
Remember that get_post_meta() function from much earlier in the tutorial? You’ll need that too.
The following code adds the custom post class (if one is given) from your custom meta box.
/* Filter the post class hook with our custom post class function. */
add_filter( 'post_class', 'smashing_post_class' );
function smashing_post_class( $classes ) {
/* Get the current post ID. \*/
$post_id = get_the_ID();
/* If we have a post ID, proceed. \*/
if ( !empty( $post_id ) ) {
/* Get the custom post class. \*/
$post_class = get_post_meta( $post_id, 'smashing_post_class', true );
/* If a post class was input, sanitize it and add it to the post class array. \*/
if ( !empty( $post_class ) )
$classes[] = sanitize_html_class( $post_class );
}
return $classes;
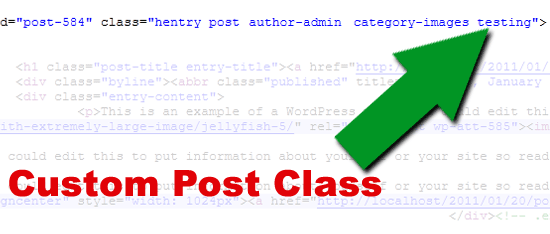
}If you look at the source code of the page where this post is shown on the front end of the site, you’ll see something like the following screenshot.
Pretty cool, right? You can use this custom class to style posts however you want in your theme’s stylesheet.
Security
One thing you should keep in mind when saving data is security. Security is a lengthy topic and is outside the scope of this article. However, I thought it best to at least remind you to keep security in mind.
You’ve already been given a link explaining nonces earlier in this tutorial. The other resource I want to provide you with is the WordPress Codex guide on data validation. This documentation will be your best friend when learning how to save post metadata and will provide you with the tools you’ll need for keeping your plugins/themes secure.
Bonus points to anyone who can name all of the security measures used throughout this tutorial.
Create A Custom Meta Box
Once you’ve copied, pasted, and tested the bits of pieces of code from this tutorial, I encourage you to try out something even more complex. If you really want to see how powerful meta boxes and post metadata can be, try doing something with a single meta key and multiple meta values for that key (it’s challenging).
I hope you’ve enjoyed the tutorial. Feel free to post questions about creating meta boxes in the comments below.
Further Reading
- Extend WordPress With Custom Fields
- Better Image Management With WordPress
- WordPress Power Tips For Template Developers And Consultants
- How To Integrate Facebook With WordPress
- A Detailed Guide To WordPress Custom Page Templates
- Building A Custom Archive Page For WordPress
- How To Use Autoloading And A Plugin Container In Plugins
- The Complete Guide To Custom Post Types


