How To Turn Small Projects Into Big Profit - A Case Study

Email Newsletter
Weekly tips on front-end & UX.
Trusted by 182,000+ folks.

 Celebrating 10 million developers


 Custom Web Forms for Angular, React, & Vue. Your backend.
However, during the course of the first meeting, the client mentions that they don’t have a budget.
Being the inquisitive businessperson that you are, you say, “Well, we work with budgets of almost any size. What price range were you thinking of?” The owner of the coffee shop reveals that he has only $1500 to spend on the website. Thinking it would be a waste of time, you walk away.
Further Reading on SmashingMag:
- Selling Digital Goods Online
- Passive Income Strategies For Web Designers
- 8 Strategies For Successful Relations With Clients
- Designing With Your Clients
This is where our design studio found ourselves. We had potential projects all over the place, but the budgets were all smaller than we thought we could handle. In the Web world, demand for small websites is up. There are always start-up companies and small businesses around that need some form of a Web presence. And, as a Web design community, our job is to answer those needs in the most utilitarian way possible.
We began questioning our business practices. We knew that there was money to be made on smaller projects, but it wasn’t until we sat down and did some simple math that we realized the business opportunity we had been missing.
Here’s the simple premise on which we began to transform our business: if you turn away 10 to 15 small projects a year at $1500 per project, that’s declining between $15,000 and $22,500 every year.

Any amount of money adds up over time.
Our company was a start-up business once, too, and it still is. Perhaps we were delusional in our belief that big projects grow on trees. We were struggling to find work. It became clear to us that we needed to take a serious look at our business practices, our development and design processes, and ourselves. We needed to find a way to make money. Let’s take a few minutes to discuss how we overhauled our operations and started making a living off of small projects.
It’s All About The Process
As a Web community, we are well equipped to handle any low-budget projects that come our way. We have more frameworks and streamlined solutions than we’ve ever had access to in the past, such as WordPress, HTML5 Boilerplate and ThemeForest. Learning how to leverage these tools is key to understanding how to make money on small projects. And mastering these tools gives us the flexibility to stray from cookie-cutter solutions.
However, before you decide to take on a workload filled with small projects, let’s stress a key point. Some clients are extremely demanding about their design process and the functionality of their websites. Be careful to set clear boundaries with the client so that you don’t end up working for less than minimum wage. We’ll cover a few techniques for this below.
Over the years, we’ve picked up knowledge from many different sources. One of the best summaries of how we try to systematize our own workflow comes from Bill Beachy over at Go Media. He recently released a short podcast episode discussing business systems, which I strongly encourage you to check out.
But first, let’s look quickly at the various methods we use to cut down on our website build time.
Write Down Your Processes
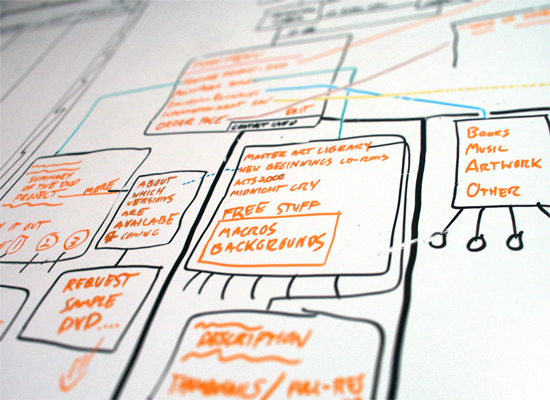
During the course of working on projects, we’ve developed a master document that we call the Low-Budget Guide. It details every single step of building a website on a budget. We have sections on the fastest ways to deploy a test WordPress installation on various hosting providers, documentation on common WordPress settings, plugins and problems, as well our standard step-by-step process. We’ll review this process in a case study later in the article.
The Low-Budget Guide helps us address several important aspects of our work. First, it prevents us from forgetting to do anything. Having a step-by-step guide eliminates any errors that might cost several hours of development time.
Mapping out your processes can save a lot of hassles down the road.
Secondly, by having the Low Budget Guide, we’re able to review which processes are efficient and which are time-consuming. Using this standard, we can minimize build time by adjusting our processes in certain areas. We’re basically fine-tuning ourselves into the fastest website builders we can be. And lowering build time directly increases the profit margin.
Finally, it ensures quality. Having a repeatable process means that every time you follow the guide, you become more proficient. This not only increases the speed at which you work, but decreases deviation from a tried and true standard. Practice makes you a whole lot better.
Choose a Framework
… Or choose several frameworks and tailor them to specific website types. For example, if you want to quickly implement a custom design on a WordPress website, check out Carrington JAM (short for “just add markup”). It’s a blank slate for custom WordPress themes, with a lot of the heavy lifting already handled. I personally use a version of Carrington JAM that I’ve converted to HTML5.
If you’re not using WordPress, I would recommend looking into the HTML5 Boilerplate. If you’re adventurous, you can apply the Boilerplate to a Drupal, Joomla or ExpressionEngine theme. Then, when you deploy the content management system, your front-end framework will already be in place. Django is another fantastic and fast framework, if you’re familiar with Python.
Use a Theme
There’s no shame in using a pre-built theme to construct a website for a client. In fact, you should be proud of doing so if the budget demands it. Using a theme can cut build time by at least half, if not more. Instead of spending 30 hours coding a website, you would be spending 15 hours fine-tuning a theme, tailoring it to your client’s branding and inserting content. At $1500, you’d be getting paid $100 per hour. How, from a business perspective, would turning an opportunity like that down be considered a good decision?
That being said, always follow the licensing agreement that comes with your theme. Honest people put hours of effort into building themes. Never, never, never break the copyright, and always adhere to intellectual property laws.
Work in a Modular Fashion
What exactly is modular coding? Looking at various websites, you’ll see that certain areas are common to all of them. WordPress serves as a good example of breaking a website down into “modules.”
At our studio, we have built a code library around modules. We have custom Twitter and Facebook widgets, custom post templates, image gallery widgets, the list goes on. When you write new code, think of it as a module that needs to be flexible enough to function on other websites with as little customization as possible. For example, instead of having to write an image slider from scratch, we’d be able to pop in a tiny PHP function, pass along a few variables, set a few styles in CSS, and we’d be done in less than 20 minutes.
Building a code library over months and years enables your business to cut down on major coding time. And if you refine the module every time you use it, you will ensure that the product grows ever higher in quality.
Get Familiar With Less
Less, in simple terms, makes CSS more like a coding language. We could argue whether style sheets should even do that, semantically speaking. But the fact of the matter is that it has shaved off at least 10% of the time that I spend writing CSS.
Perhaps one of my favorite features of Less is Mixins. These allow you to embed the CSS from one class into another. You can also use them as functions and allow them to take arguments. An example of this from Less’ website would be:
.rounded-corners (@radius: 5px) {
  border-radius: @radius;
  -webkit-border-radius: @radius;
  -moz-border-radius: @radius;
}

#header {
  .rounded-corners;
}

#footer {
  .rounded-corners(10px);
}
Preventive Measures Save Time And Money
One of the bigger issues that we frequently ran into with clients was diverging expectations of what their money would get them. Business owners need to be honest and up front about everything, which we were.
Yet something still wasn’t clicking. We were seeing scope creep, delays in communication, hold-ups in payment, and clients who just weren’t satisfied. I was kept up nights thinking, “Is this seriously what the business world is like? I can’t do this for the rest of my life!”
And then I realized something: if this was a recurring problem, chances are it wasn’t the fault of my clients, but that I was to blame.
So, I started thinking. How could I prevent these problems from coming about?
Simply put, preventative measures turned out to be the key. Standardizing basic business practices for all of your clients will ensure that your projects run smoothly. By avoiding these headaches, businesses will be able to dedicate their time to what actually brings in money. The less time wasted on dealing with scope creep, bickering over payment, and addressing client dissatisfaction means more money saved and also a more enjoyable working environment.
Show Websites With Similar Budgets
This is one of the best ways to give clients a good idea of what their website will be. I’ve found that this method, more than any other, is the best way to prevent trouble down the road.
Have the Client Prioritize
During your initial meeting with a client, help them to list all of the functionality they would like to see on the website. After the list has been generated, put each feature into one of three categories: “Essential,” “Highly desirable” or “Bell ’n’ whistles.” This way, you will be able not only to determine what needs to get done, but to trim the project to fit the budget.
Tell Them What You Can’t Do
Be honest with the client. This will save countless hours of frustration if the client keeps changing their mind about a font or background color. Tell them up front that you cannot include a photo gallery for such a low price, or that a blog would simply take too much time for the budget. By stating it from the beginning, they won’t think they can just add it later on.
Sign a Contract, With an Accompanying Scope
Just. Do. It. By detailing what you will do and how long it will take, you’re again setting realistic expectations. A contract protects both you and the client. We strongly suggest “lawyering up” before you have to. Even if the lawyer is expensive, preparing a solid contract should cost between $300 and $1000. That’s a heck of a lot less than court fees; and having a lawyer on your side from the beginning tends to keep you out of court in the first place.
Charge for Missed Meetings
Ever since we started stating this clearly in the contract, do you know how many meetings our clients have missed? A grand total of zero! Over the course of six months, not a single person has missed a meeting. No more headaches, no more lost time. To top it off, our clients are even happier now because we’re not hassling them for having missed meetings. All we had to do was put a fee in the contract. It doesn’t have to be much: we charge $50 for the first missed meeting, and $100 for every one thereafter.
Handle Payments Better
For small projects, I strongly recommend requiring a down payment. Clients who have made a down payment are much more apt to pay on time and pay the right amount later on in the project when you’re hitting your milestones. So, save yourself some headaches and get a deposit.
Secondly, be clear in your contract and invoices about when payment is due. Inform clients of what will happen if they neglect to pay on time. Charge a late fee if a payment doesn’t come on schedule.
We strongly recommend late fees. However, if you do charge them, give clients a courtesy phone call a week before the due date to remind them of both the payment and the late fee. The fee doesn’t have to be much: ours is 10% of the remaining balance on the invoice.
Case Study: Menno Tea
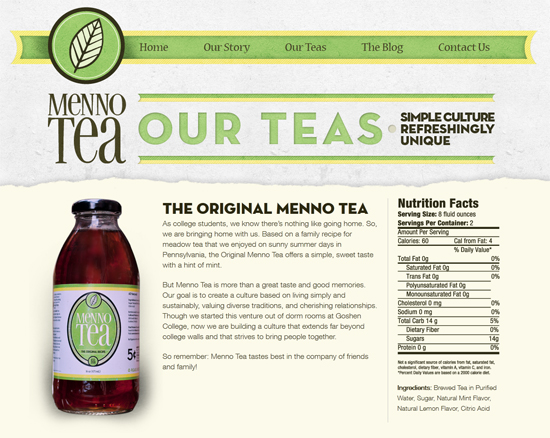
Several months ago, we were approached by Hans and Niles, the founders of Menno Tea. Menno Tea is small tea company based in Goshen, Indiana. Hans and Niles came to us looking to redesign their bottle’s label. They were in the process of expanding their market and were ready to develop a more consistent brand. In working with them, we eventually developed a new bottle to fit the feel of their tea, as well as more solid branding that could be applied to other areas.
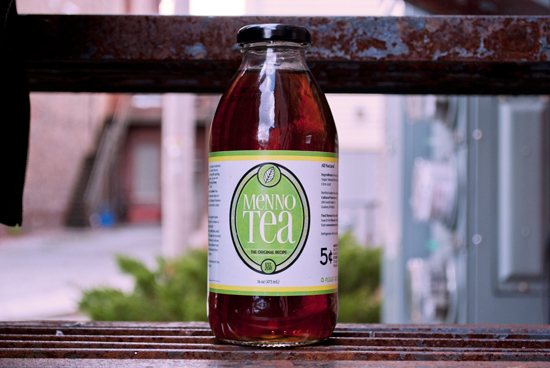
As soon as the bottle was designed and the labels were off to be printed, we realized that the updated brand needed to be applied to Menno Tea’s website. They were running a standard installation of WordPress with a slightly customized theme.
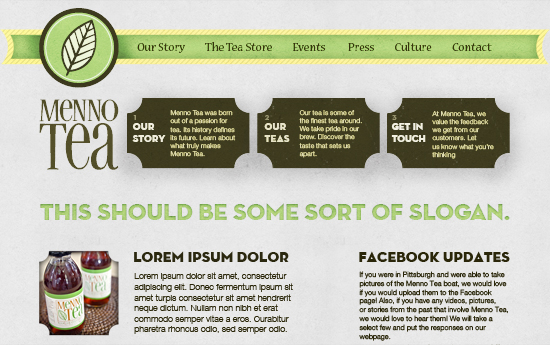
It might be helpful to see the final website before reading this case study.
Planning Phase
Hans and Niles requested that we look at their website and make a recommendation. They asked, though, that we keep the price relatively low. Being college students, Hans and Niles didn’t have much cash lying around for an extravagant solution. What they needed was a solid website that reinforced their brand’s identity and that provided key information to visitors.
Step 1: The proposal Our final proposal was for a five-page website that adopted the new branding requirements. After some negotiating, we settled on a final cost of $2000. At our standard rate of $100 per hour, that gave us 20 hours in which to complete the project. However, because Menno Tea was a frequent client of ours, we decided that we could provide up to 30 hours of work for $2000. We informed them that, beyond this number of hours, we would have to start billing above our estimate of $2000.
Step 2: The contract and down-payment After we agreed on the cost of the project, we pulled out our Low Budget Guide. Our first step was to sign a contract with Menno Tea and to get a down payment on the project.

After the contract was signed and the down payment was processed, we headed off to start the design. We explained to Menno Tea that, because the project’s budget was low, we could offer only two conceptual designs, with one round of revisions. Hans and Niles understood our reasoning and were even pleased that we were going so far as to provide two concepts. This goes back to the main point of this article: be clear with your clients. By setting limitations and explaining constraints, you will avoid giving clients unrealistic expectations that lead to headaches.
Hours spent on the planning phase: 3
Creative Phase
Step 3: Mock-ups After three hours of work on Menno Tea’s design, we developed two significantly different directions.
The first option had horizontal navigation.

The second option had a vertical navigation banner and emphasized key messaging.
After presenting these two options to the client, they took some time to review them. We had some free time every so often over the course of the project while waiting for feedback. During that time, we scheduled several other projects, so that we would have very little downtime.
We found that by scheduling projects asynchronously, we are able to fill our days with work. Some businesses work better by having fewer, more spaced out projects. We’ve discovered that we produce higher-quality work when switching between projects during the week, because it enables us to draw inspiration from all of them.
Step 4: Address feedback After a few days, Hans and Niles provided some feedback. They wanted a mock-up that combined the horizontal navigation with the key messaging from the second option. We always ask our clients to provide specific feedback so that our changes are efficient and to their liking. Here’s an example of the type of feedback we require:
Jon, I really like it! Here are some thoughts:Thanks, Hans
- Do we want the background to be that dark? What is your thinking behind that color gray?
- What will those ticket stub-shaped buttons be used for?
- Will our biographies be on the home page below the header? Or is that just an example of what the text will look like there.
- Would putting the Facebook, Twitter and RSS feed buttons at the top or bottom of the page be better?
- I like the format. Very fluid.
- I’m pleased by how all of our marketing is coming together.
Having gotten all of the feedback we needed, we opened Photoshop and started working on the mock-up. In an hour, we produced a happy medium between the two designs.
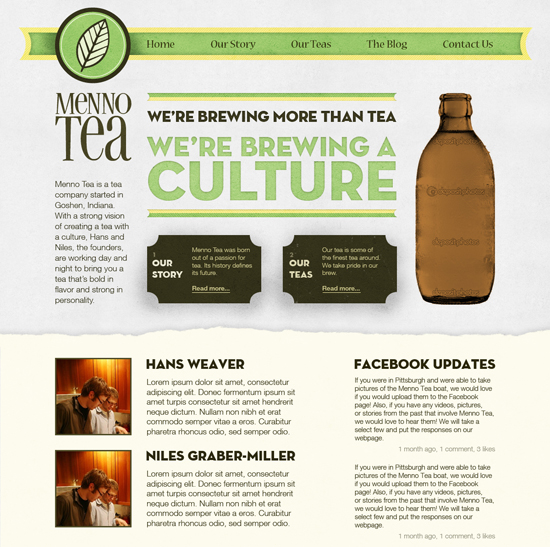
This was the design chosen for Menno Tea’s home page.
The folks at Menno Tea reviewed the design and asked for a few minor changes, which took only a few minutes, and then we were on our way to code.
Hours spent on the creative phase: 5
Development Phase
Before moving into the development phase of the project, we sat down with Hans and Niles for a brainstorming session to determine what the rest of the website would look like. We sketched out the pages and determined every last piece of content that would be needed for launch. We provided them with the list of content and let them know that the website would be ready for the content in less than a week.
They started assembling the content as soon as we started coding. By doing this, we avoided any lag from having a coded website without any content. The process became even more streamlined as Hans and Niles provided us with content consistently throughout the development phase.
Step 5: Set up a test environment For test environments, we simply create subdirectories on our local server. Because Menno Tea’s website was built on WordPress, we used our standard framework, which consists of Carrington JAM integrated with the HTML5 Boilerplate. We also uploaded several theme test packs so that we could test the blog quickly and easily. You can use the test pack provided by WordPress or the one developed by ThinkDesign. In addition, we use a set of reliable plugins to simplify common tasks, such as Contact Form 7 and WP-Blocks. Then, we go through and create the entire site map in WordPress’ Pages.

We did all of this — deployed a flexible framework with all of the required plugins and test content — in less than 45 minutes. This used to take us several hours just a year ago.
Step 6: Code the entire website The next step is fairly simple. We code the website in its entirety, checking cross-browser compatibility fairly often to avoid major hang-ups down the line. To save time, we always install the wonderful IE9.js by default. All of the pages are coded from top to bottom, and the client is notified once every page is complete. We ask that clients notify us of requests during this step of the process only if the changes are big. In general, we ask that they make a comprehensive list of all of the changes they would like to see and then send it to us at once at the end. This cuts down significantly on email and on time spent opening and closing files to make minor changes.
We coded the entire website in under six hours, except for the blog, which took another four.
Step 7: Address feedback As mentioned, we ask clients to request revisions in bulk sets to save time. Hans and Niles loved the work we had done. Luckily for us, the revisions were small and cosmetic. We addressed them rather quickly, as well as a few typos and content-related issues.
Hours spent on the development phase: 13
Launch and Test Phase
Step 8: Cross-browser and mobile compatibility As we geared up to deploy the website, we needed to ensure compatibility with most browsers. Obviously, on smaller projects, not as much time is available to ensure pixel-perfect rendering, but we try to get as close as possible. We had a minor hiccup with the top banner for the menu being too wide on tablet browsers; we ended up just setting the banner as a background image, which we should have done in the first place. As part of the process, we always have fun looking at our websites in Internet Explorer 6.
Needless to say, we did not support IE 6. Oh, the horror…
Step 9: Deploy the website Deploying websites is something that we’ve streamlined fairly well recently. We always back up the client’s current system. Luckily for us, in this case, Menno Tea was running WordPress. We backed up the current theme, their database and all of their WordPress posts. After updating their installation of WordPress, we moved the new theme over to their server and activated it. We already had a list of all of the plugins being used on the test website, and so we promptly installed them, configuring each one as we went. As soon as everything was set, we activated the theme and tested everything.
After an hour of testing in all major browsers, the website was ready to go live.
Step 10: Write the documentation We feel that documentation for our clients is extremely important. If we’ve given them a content management system, they will inevitably have questions on how to use it, even if we’ve trained them. Over time, we’ve developed a solid set of instructions on how to use various aspects of WordPress. We’ve found that this works much better than just pointing clients to WordPress’ website. Now, we just go into our repository of instructions and pull out everything we need. For a small website running WordPress, we generally have to write only one or two paragraphs in addition.

Step 11: Provide training Training saves time with clients who are not on retainer. And for small WordPress websites, it doesn’t take more than an hour. We go through our documentation step by step with clients and address any questions they have on the spot. Ever since we started using documentation and providing comprehensive training, our support calls and emails have dropped by over 80%. That amount is significant; I can’t believe we took almost 10 months of operating the business to figure that out.
Hours spent on the launch and test phase: 5
Case Study Wrap-Up
With the launch and training wrapped up, we declared the project finished and archived our files in case we ever needed them again. This process was fairly typical for our studio, but we still had a blast designing the website. With a total of 26 hours spent on the project, we came in under our 30-hour estimate. And if we hadn’t given the frequent-client discount, we would have made more than $100 per hour. With the discount, it worked out to $77 per hour — still not too shabby for a small project.
So, what did we learn from this project?
- Custom design can still be done on small projects, but only if the client’s requests are minimal. This might not work with every client, so discuss it up front.
- Good communication is the key to making rapid changes. We used bullet points in our emails with Menno Tea, which made discussions easier and faster.
- If the client is able to, get content from them as you’re designing. Working a design around existing content is much easier than guessing what the content will be. This streamlines the process and makes it simpler and faster for everyone.
- When sent in batches, revisions move along more quickly.
- Designing on a budget can still be a ton of fun. We loved this project and can’t wait to work with Menno Tea in the future.
Final Thoughts And Considerations
Obviously, we found these methods to work for us. Every project, client and situation is different. Use your judgment, and develop practices that fit your business’ style. If you’re a freelancer, do what fits your personality. Nothing is worse than trying to fit into someone else’s shoes.
Problems With a Streamlined Design Process
Needless to say, this particular approach to streamlined design has plenty of problems. Our biggest concern is that it takes a lot of the personality and art out of the work. Our passion for design is what drives us. Small projects tend to be much more rigid in their process, and we have to supplement them with work that allows our creativity to breathe.
With this process, we could also encounter issues with addressing the particular needs of clients. With budgets that are so low, not much time can be spent identifying the target audience, developing a unique design for the brand, or addressing any other things that are particular to your client’s situation. But we have found that, in most small projects, the client is never so demanding that you don’t have at least some time to address their concerns. In the case of Menno Tea, we had plenty of time to address their particular needs.
Finally, by no means do we wish to represent Web design as a cookie-cutter process. We hope this article serves as an overview of ways to cut down on cost and time, but never sacrifice too much of the organic and innovative processes required to be a quality Web worker. Whatever you do, don’t strip the soul out of design. Do what feels right. If you don’t feel right about your processes or feel confident that the client will be getting the quality that they’re paying for, then chances are you’re doing something wrong. After all, in order to succeed, you have to be true to yourself.
What Are Your Thoughts?
More importantly, what do you think about small projects? Are they worth taking on, or are they just too much of a hassle? How does a business handle a budget that isn’t ideal? And do you believe that providing low-cost solutions cheapens our work as designers and developers?


