Refining Your Design In Adobe Fireworks

Email Newsletter
Weekly tips on front-end & UX.
Trusted by 182,000+ folks.


 Custom Web Forms for Angular, React, & Vue. Your backend.
 Celebrating 10 million developers
While certainly not as well known as Photoshop, Adobe Fireworks is a great tool for creating user interfaces, website designs and mock-ups, wireframes, icons and much more. However, most designers who have been using Photoshop for years may find Fireworks a bit awkward at first. Fireworks does have a slightly different workflow and requires a slightly different approach than you may be used to.
In this article, I’ll share some tips that I use in my work in Adobe Fireworks that could help improve the quality of your designs and workflow. Some of these tips are just quick explanations of features that you might not be aware of, while some are techniques and methods to improve the default visual results. Let’s begin!
Further Reading on SmashingMag:
- Sketch, Illustrator or Fireworks?
- Switching From Adobe Fireworks To Sketch: Ten Tips And Tricks
- The Present And Future Of Adobe Fireworks
- The Power of Adobe Fireworks: What Can You Achieve With It?
Improve Fine Strokes
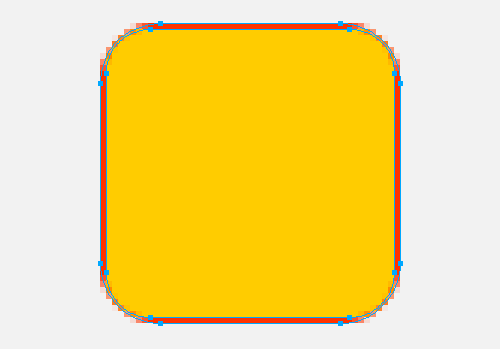
Fireworks’ stroke feature gives the user quite a lot of options. But one of the most important is missing: the ability to add a gradient to a stroke. Also, the effect from the Stroke tool isn’t always elegant — for example, when using an inset border with rounded corners.

Native stroke rendering in Fireworks. The rounded corners look a bit too thick.
Fireworks lets you specify the stroke’s position: outside, centered or inside. But the best results are when the stroke is outside.
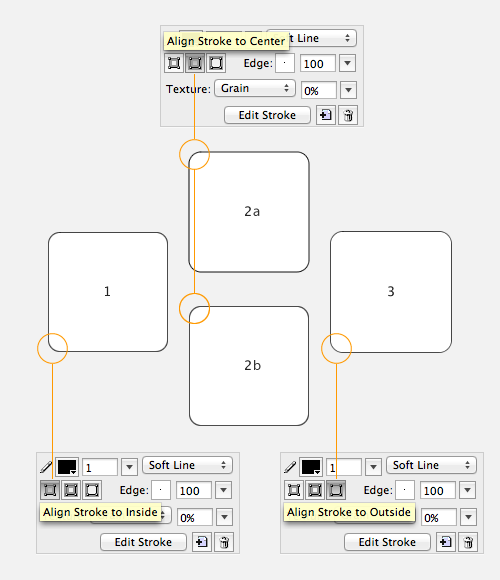
Stroke can be set to different alignments in the Properties panel. Outside (example 3) looks better for fine strokes than centered or inside.
But in such cases, I recommend a composite path instead of a stroke to get better control of the result and to be able to apply a gradient to it.
Start by drawing two rectangles with rounded corners, one of them 2 pixels taller and wider than the other. Put the smaller rectangle above the larger (you can verify that it’s above in the Layers panel), and make its border radius smaller by several pixels, as shown here:
We’ll need two vector shapes to create our custom stroke.
The purpose of the smaller shape (the one with the yellow-orange background) is to cut out (or “punch”) the interior of the red shape, resulting in a 1-pixel-wide object that can be used in place of a stroke. To achieve this, select the two rectangles and hit the “Punch Paths” tool icon in the Path panel:
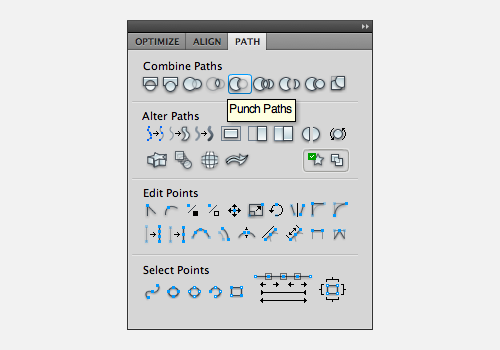
Punch Paths will help us get a better-looking stroke.
Alternatively, you could select the two rectangles and go to Modify → Combine Paths → Punch.

The stroke is now a composite path that you can easily edit and even apply a gradient fill to.
Bonus tip: Should you later decide that you need to resize this shape (without distorting its perfectly rounded corners), the “9-slice scaling tool” can come to your rescue:
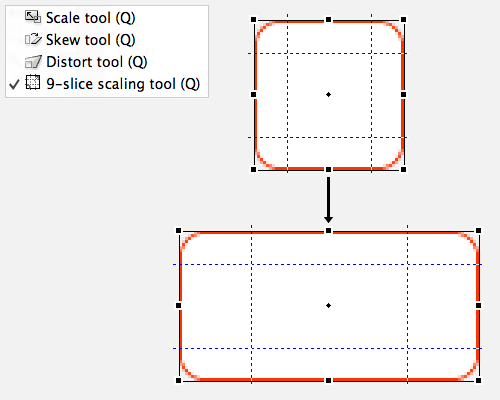
Distortion-free scaling is easily achieved with the 9-slice scaling tool.
Draw Better Triangles
Triangles are everywhere in user interfaces: arrows in buttons, breadcrumbs, pop-over indicators and so on.
While Fireworks provides built-in arrow and polygon vector drawing features, I recommend going the customized route and drawing those vector shapes yourself.
The Arrow vector autoshape in Fireworks. The yellow control points allow for easy customization of width and height, thickness, type of head, roundness, arrow size and more.
The Smart Polygon vector autoshape in Fireworks. You can easily transform it into a triangle!
To illustrate our new workflow, let’s draw a simple arrow like the one in Kickoff’s download button:

Kickoff’s download button
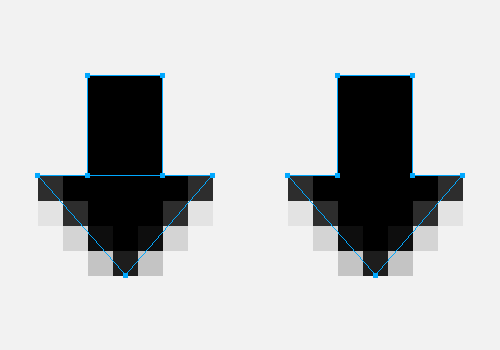
Let’s start by drawing a nice triangle. Most of the time, you’ll want an odd number of pixels for the triangle’s base so that its middle falls on a half-pixel, resulting in a sharp arrow:
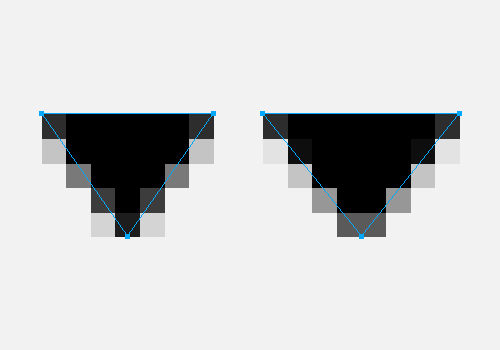
On the left, the triangle with an odd width. On the right, the triangle with an even width.
To create a triangle like the one on the left, we start by drawing a simple 7 × 7-pixel vector square using the Rectangle tool (found in the Tools panel, or simply press U). To delete its bottom-right point, use the Subselection tool (press A, or use the white arrow in the Tools panel), select the bottom-right node, then hit the Delete key; Fireworks will remind you that you are trying to change one point of a rectangle primitive and that it must be ungrouped for the change to occur; so, click “OK” to turn it into a vector, and delete the point. After deleting the corner, you’ll end up with this:
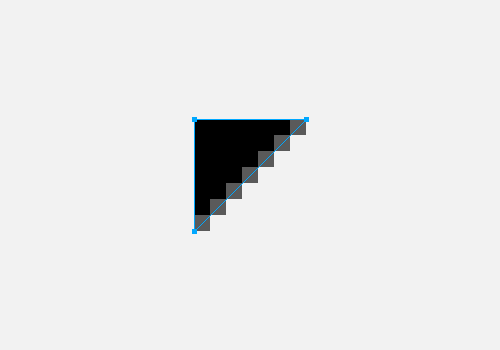
Our square with the bottom-right point deleted.
We now need to place the bottom-left point exactly at the center, which is located at 7 pixels ÷ 2 = 3.5 pixels from its current position. When you use your keyboard’s arrows, Fireworks moves the elements by full pixels only and aligns them perfectly to the pixel grid. This is convenient in most cases but not in this one. Luckily, Fireworks gives us a “Move Points” feature (in the Path panel) that lets us specify numeric values:

Moving horizontally by 3.5 pixels will center our bottom point.
If the triangle is now a bit too tall for our arrow, use the Subselection tool to select the center point again, and press the up arrow key twice to move the node up a couple of pixels.
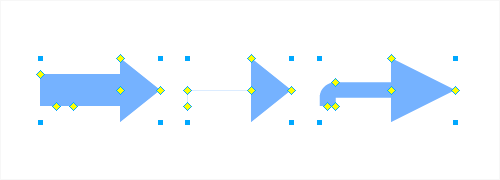
We’re almost done! We just need to draw the 3 × 5-pixel rectangle part of our arrow and then use the “Union Paths” command (Modify → Combine Paths → Union, or press Control/Command + Alt/Option + U) to combine our two paths into one final single vector shape:
The separated shapes are on the left, and the unified shape is on the right.
Draw Better Ellipses
For some reason, Fireworks has difficulty drawing elegant circles (especially small ones), and the circles tend to have too straight an edge:

A default circle in Fireworks. Note that the top, right, bottom and left edges aren’t rounded enough.
(Note: Fireworks is not the only app to have this problem. Illustrator has it, too.)
We’ll use the “Numeric Transform” window (Control/Command + Shift + T, or in the menu Modify → Transform → Numeric Transform) to make the circle just a tiny bit smaller:
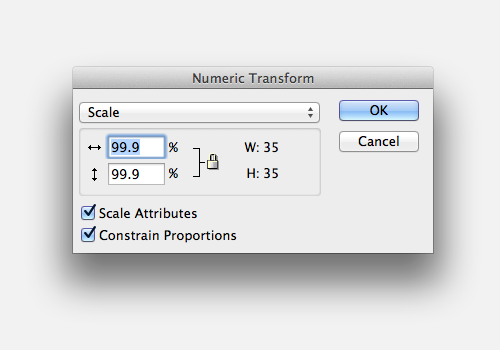
Decreasing the circle’s size by a bit will make it appear more rounded.

The original on the left, and our result after the transform on the right.
You will notice that the right circle is more elegant; that’s because we have fewer “full” pixels at the edges:

The original on the left, and our perfect circle (after the transform) on the right!
Fillet Points
One great feature of Fireworks that few people seem to know of is the Fillet Points path tool. Basically, it rounds any angle you select by a value that you specify. To use it, select any vector shape, and in the Path panel in the “Edit Points” section, choose “Fillet Points”:
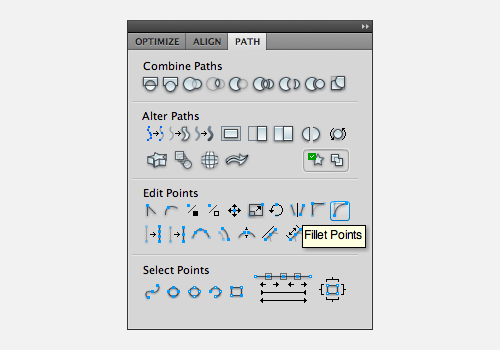
Fillet Points rounds all of your angles.
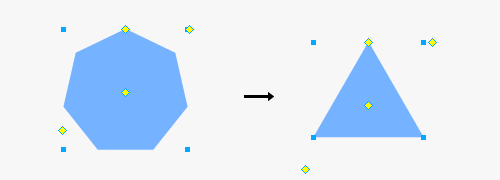
Let’s use the built-in vector Star autoshape as an example. Note that you need to ungroup autoshapes and rectangle primitives before using Fillet Points; then you can either select the entire vector shape to round all corners or use the Subselection tool to select certain points to round.

The original shape on the left, and with Fillet Points applied on the right.
This can be a huge time-saver when you want to modify complex shapes with many filters and effects. Now you won’t have to redraw shapes over and over again just because the radius is a few pixels off.
Inset Paths
Another useful vector tool many designers are unaware of is the Inset/Expand Paths feature.
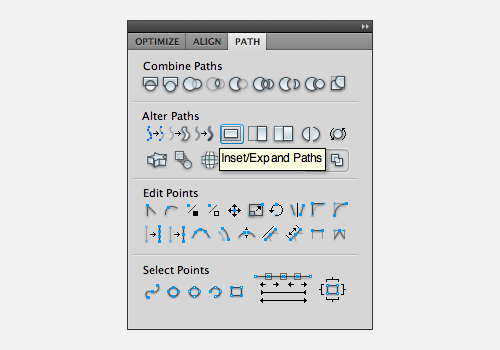
Inset/Expand Paths is also accessible via Modify → Alter Path → Inset Path.
As you’ve probably guessed by its name, this tool enables you to alter a vector path and make it either smaller (inset) or larger (expand) without losing its proportions.
Let’s say we want to make our Star autoshape from above 10 pixels smaller:
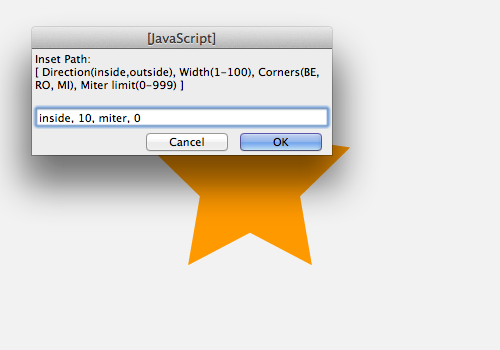
The Inset/Expand Paths prompt.
This dialog can be confusing if you do not know what all of the options and abbreviations mean. The third parameter (“Corners”) is the least obvious, because the meaning of “BE, RO, MI” is not defined. The letters are actually abbreviations of “Bevel,” “Round” and “Miter.” You can’t use those abbreviations in the text field, so you need to know the terms they represent. “Bevel” creates squared corners, “Round” creates rounded corners, and “Miter” creates pointed corners; the “Miter limit” specifies the maximum length of the pointed corners before Fireworks replaces them with clipped (or square) tips. We’ll use “Miter” in our example because we obviously want to keep our straight lines.

And voilà!
Gradient Dither
Adding a gradient between two similar colors (i.e. colors close in hue) in a big shape often produces an unsightly banding effect, as shown here:

Banding is visible in this gradient (especially on LCD screens of the common “twisted nematic” type, which display only 6 bits per pixel, not 8).
To prevent this, Fireworks introduced in CS5 a Gradient Dither option that can be used if the edges of the object are set to “Anti-alias” and if you use the “Radial” or “Linear” type of gradient fill.
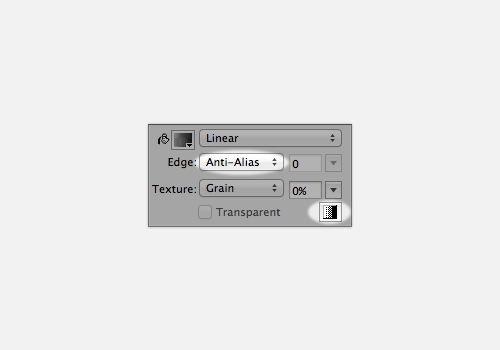
“Gradient Dither” (found in the Properties panel) makes gradients look better.
The result is a smooth, unified linear gradient, similar to what you would get with CSS browser rendering:

With the “Dither” option applied, the gradient becomes much smoother.
Similarly good results can be achieved by dithering radial gradients.
Avoid Large Shadows
Fireworks isn’t very good at rendering large shadows (if you use the “Drop Shadow” live filter). If you’re curious about the subtleties involved, a detailed article on WebDesignShock compares shadow and glow effects in Fireworks, Photoshop and Illustrator.
Instead of a beautiful shadow that slowly fades to a transparent value, the edge of the shadow might look like it has been cut off before fading to full transparency. The issue is particularly noticeable on the Mac version of Fireworks:

A shadow effect created with the Drop Shadow live filter. Notice the edges (in Fireworks CS5 on a Mac)—yikes!
Here are the settings to use to get this drop-shadow effect on Windows and Mac:
The settings for the drop-shadow live effect on a Mac. Again, notice the “cut” edges of the shadow.
The settings for the drop-shadow live effect on Windows. The settings are the same, but the edges of the shadow are almost perfect.
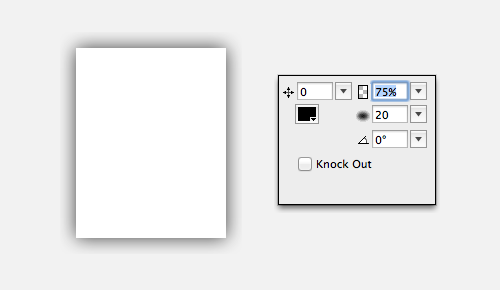
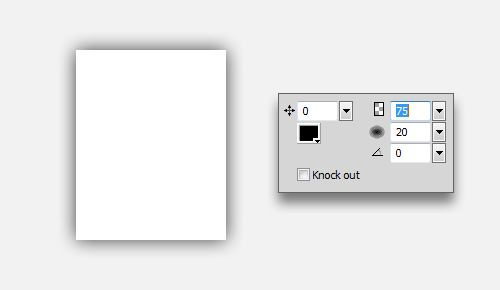
So, instead of using a live filter, I usually duplicate the shape (the white rectangle in this example), set its edge to “Feather” and fill it with black.
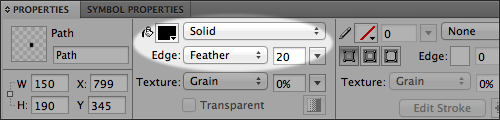
Possible settings for the “shadow” vector shape behind the object.
Putting this shape behind the white rectangle produces a better-looking large shadow than the built-in method:
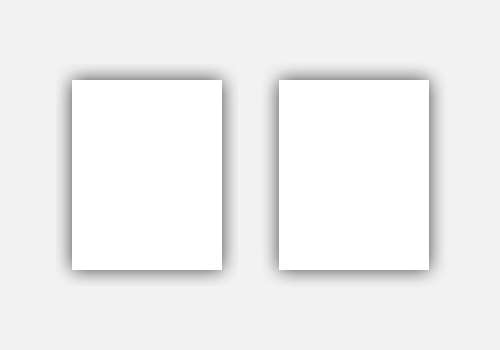
The original shadow on the left, and the “Feather method” on the right.
Practical Examples
A picture is worth a thousand words. – Fred Barnard
Talking about gradients, fills, strokes, vector autoshapes, rounded rectangles, pixels and half-pixels is exciting, but a few real examples would be even better. Below are some illustrations, icons and UI designs that I made exclusively with Fireworks. The tips and tricks covered above made the results more elegant and refined.

Folder icon
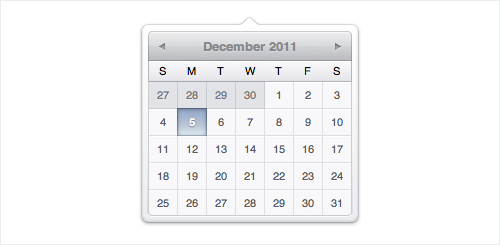
UI for a date picker

“Free” icon
![]()
Icons for an FAQ

Envelope icon
![]()
Monochrome icon set
![]()
Kickoff teaser icon

Email account icons
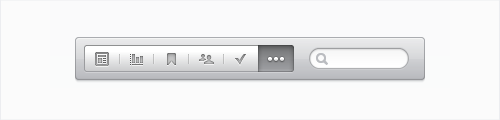
Toolbar with navigation icons
As you can see, it’s all about pixel-precision, and Fireworks delivers great results!
Conclusion
Adobe Fireworks is a powerful tool, offering both vector- and bitmap-editing capabilities and even hiding some gems. Yes, it imposes different workflows, and some of its default effects are disappointing, but the advantages outweigh the little quirks here and there.
Having to change one’s work habits is always frustrating. Perhaps actions that you once did in a few minutes with your old design tool will now feel incredibly slow. Getting used to a different workflow takes time, and you might not see the benefit of using Fireworks immediately. The best thing you can do is commit to designing an actual project from start to finish using only Fireworks. Choose a small project or a personal side project for this purpose. Get your hands dirty for a few hours (or a few days). It’s the only way to be able to judge whether Fireworks really suits your needs. If you’re into UI design, I’ll bet it does!
If you’re interested in learning more about Fireworks, I highly recommend watching the great screencasts produced by Rogie King. They offer many more tips and tricks for refining designs and achieving more polished results than this article.
Also, the work of others can be a good source of inspiration and knowledge, so have a look at the Fw PNG Week series by Craig Erskine, and download and deconstruct his free source PNG files.
Happy experimenting with Fireworks!
Further Reading
- Video tutorials, Rogie King, Komodo Media
- Fw PNG Week (Fireworks PNG files for downloading and learning), Craig Erskine
- “I Didn’t Know Fireworks Could Do That!” (video presentation and tutorial), Dave Hogue, from Adobe’s MAX 2011 conference
- “Design Learning Guide for Fireworks: Using the Path Panel,” Tommi West, Adobe Developer Connection
- Rapid Fire (Fireworks tutorials), Jose Olarte
- “Extracting Logos Using Levels In Adobe Fireworks,” Jose Olarte, Smashing Magazine
- “Mixing Up Illustration: Combining Analog And Digital Techniques,” David Mottram, Smashing Magazine
Note: A big thank you to our Fireworks editor, Michel Bozgounov, for preparing this article.


