iOS Prototyping With Adobe Fireworks And TAP (Part 3)

Email Newsletter
Weekly tips on front-end & UX.
Trusted by 182,000+ folks.

 Celebrating 10 million developers
 Custom Web Forms for Angular, React, & Vue. Your backend.

In the previous parts of this tutorial (part 1 and part 2, we looked in detail at the building blocks of our design in Fireworks (pages, shared layers, symbols, styles), and we started to make a demo prototype in Fireworks.
The demo prototype had six pages, linked together by hotspots, and each hotspot was customized for use with TAP. (Which page will the hotspot link to? Which gesture will initiate the hotspot link? Which transition will animate once the appropriate gesture is used?)
Now that the six-page Fireworks PNG file is ready, it’s time to prepare it to be exported as a click-through prototype and then converted (with the help of the TAP extension) to an animated, gesture-based prototype that we can use on an iOS device.
Exporting The Fireworks Project
Create The Project Folder
First, we create the project’s folder. This folder will contain and organize our Fireworks project, as well as the TAP assets needed to create the prototype:
- Create the project’s folder, and name it
CookbookApp. - In the folder, create another folder named
Library.
When you export the project from Fireworks, you will export into the Library folder. TAP will always look for project files in the Library folder, and it will create and place your prototype files in the project’s folder. If you forget to create a Library folder, Fireworks will remind you when you export the project.
Export As LBI
After you have created the project folder and have finished customizing all of your pages and hotspots, the next step is to export your Fireworks PNG in a format that TAP can understand. Ultimately, your work will be an HTML prototype (i.e. a set of HTML files) that can be viewed full screen on an iOS device; but because you will be using TAP to create the prototype, you cannot directly export to HTML in Fireworks.
Instead, export the project as a Dreamweaver Library (.lbi file format). While this format cannot be read directly by a browser, TAP will convert the LBI into HTML through the use of custom-developed PHP and JavaScript (jQTouch and jQuery) code later on.
Here are the steps:
- Start with the menu
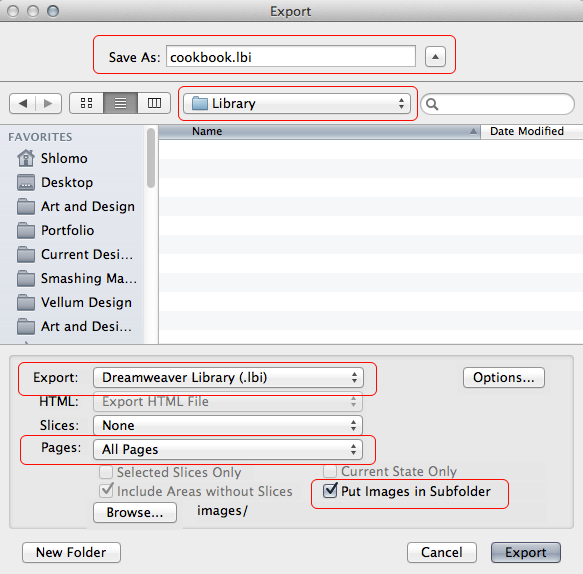
File → Export. - In the “Export” dialog box, use the following settings:
- In the “Save as” field, type
cookbook(the file extension is automatically added). - Navigate to the directory you wish to save your project to.
- The “Export” drop-down menu should be set to the Dreamweaver Library (LBI). Note: If a warning dialog box appears, click “OK” and continue with the export:
Warning dialog box in Fireworks when saving for the first time in the LBI file format.
- Create a new folder and name it “Library,” and then click “Choose.”
- In the “Pages” drop-down menu, select “All Pages.”
- Enable the “Put Images in Subfolder” option.
- Finally, when ready, click the “Export” button.
- In the “Save as” field, type
The “Export” dialog box should look similar to the one below:
Export your prototype as a Dreamweaver Library item (LBI) using the settings shown in the screenshot. The LBI file must be saved in a folder named “Library” in order for it to work properly.
Download TAP
At this point, you have completed most of the hard work required to make the prototype come to life. You are almost ready to export your work, but before doing so, download the TAP utility. This is a ZIP file with some folders containing PHP, jQuery and jQTouch scripts. Unzip the file; note that one of these folders is named “Library,” into which you will eventually copy (or directly export) your prototype’s LBI files.
Convert The Prototype Into A Working iOS Prototype
Upload
Your project is now uploaded to a Web server. Make sure that your Web server has PHP installed, because the TAP installation process requires it. First, we need to upload the TAP folder that we downloaded earlier (which now also has our project exported to the Library subfolder!) to a server that can execute PHP.
Set File Permissions
Next, to make TAP work correctly, we need to set the correct permissions (also known as CHMOD) to access the files and folders we have uploaded. You can set the file access properties using an FTP transfer program. No matter what software you use, the process is roughly the same. I use Transmit on the Mac, but you can use FileZilla (if you are on Windows) or another FTP client of your choice.
In Transmit, CHMOD is accessed via the “Get info” command:
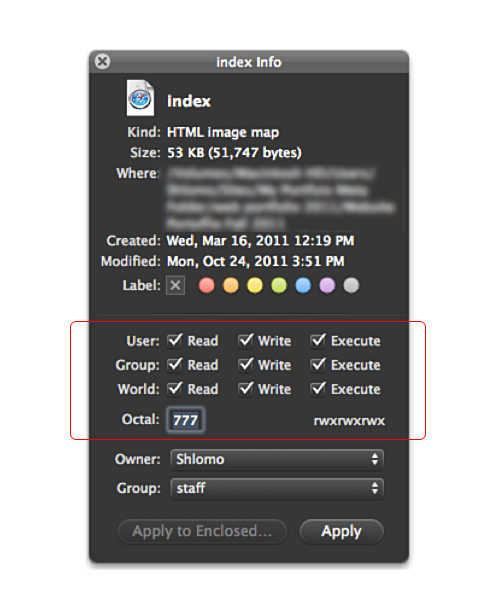
Set up the file permissions so that everyone can read, write and execute them (known as “777” in the octal numeral system) to ensure that the prototype runs correctly.
Set the access to “777,” either by typing 777 in the “Octal” field or by checking all of the boxes for “Read,” “Write” and “Execute.”
Note that for the purpose of this article, these file permissions are for use on the remote server on which you will be hosting the prototype, not for use on a local server (although you could, of course, run TAP on a local server, as long as you have Apache and PHP running on your Mac or Windows machine).
Convert To iOS Prototype
The next step is to open up the dashboard where all of the settings are available to convert your project into a real HTML website (i.e. HTML prototype).
First, load the “Build” panel in Safari on your iOS device by opening https://www.yourwebsite.com/path_to_prototype/foldername/build (see an example of a build panel).
This step can also be done by loading the Build panel on a desktop machine, but it is still recommended that you use the Safari browser.
TAP’s Build panel (Larger version)
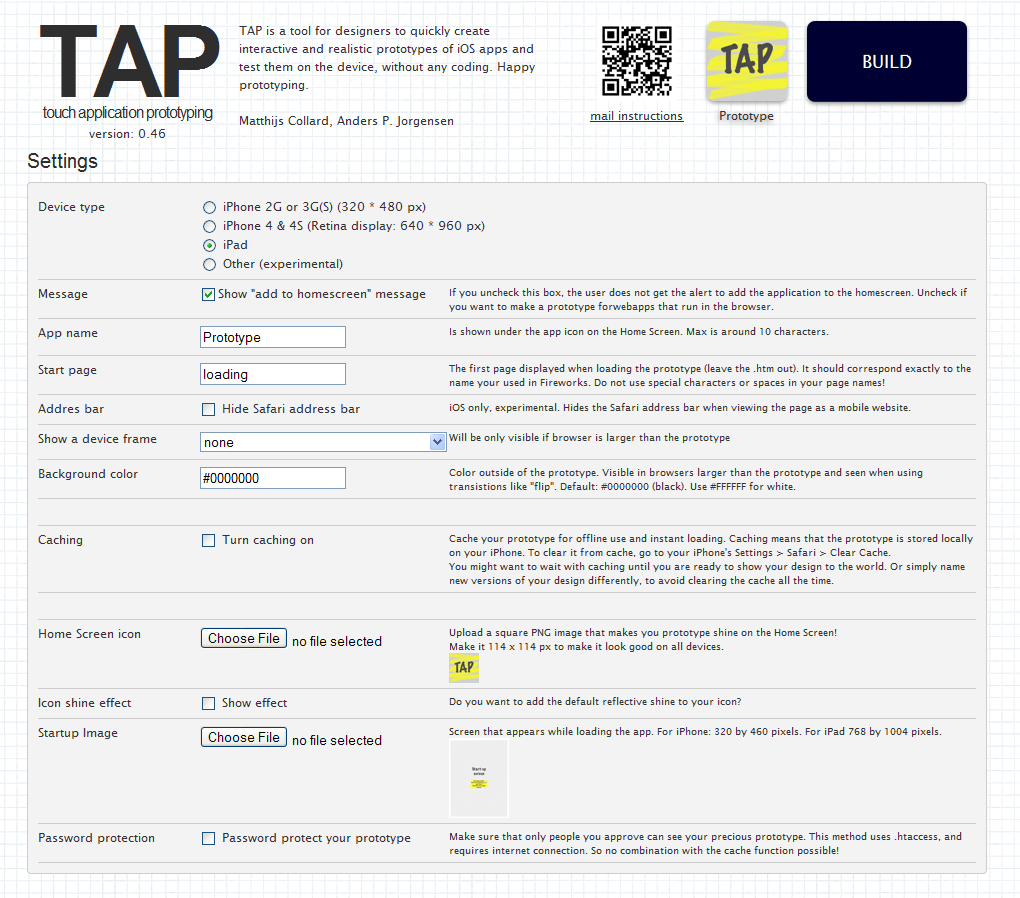
In the Build panel, you can configure the settings for the prototype. You can also upload the home-screen icon and the startup screen from here. To save your settings, click “Build prototype.” If you have made any mistakes in the previous steps of this tutorial, the page will notify you with a warning at this point.
If there are no errors, click the “Go there” link, which serves as a shortcut to the prototype.
Note: You can also manually go to the website by typing in the following address: https://www.yourwebsite.com/path_to_prototype/foldername/. This is useful for when you are using the Build panel on a desktop to set up the prototype.
You will see a black screen and maybe a brief flash of your website appear for a second, which is normal; this page is not yet your prototype. One final step is needed, although the step you take will depend on the browser you are using to view the prototype:
- Safari. To actually see your prototype, you must add a bookmark for this page and add the bookmark to the home screen.
- iCab Mobile. I have found that iCab Mobile is a better browser to showcase a prototype, because you can view it in full screen with no chrome, and also view it offline. (Details on using the browser will be shared later on.)
Note: While iCab provides a more robust and sophisticated environment to work with your prototype, as of the time of writing, the newest version of iCab can’t directly build the prototype. However, there is a workaround that allows you to use iCab. To use iCab, first open and run the Build panel in Safari. Once the “Build prototype” button has been pressed in Safari and the black screen appears with a brief flash of your prototype (as described earlier), you will be able to copy the URL into the address bar and then paste it into iCab Mobile.
Icon And Startup Image
Use the Build panel to upload the application’s icon and the startup image (you can do this only in the Safari browser on a PC or Mac, not on an iOS device). It does not matter how these files are named. Putting them in the add-ons folder is recommended.
Note that startup images do not load reliably for some reason. Sometimes they show up as the prototype is loading, and other times the startup image is skipped and the first page of the prototype is loaded instead. I am not sure why this happens, but whatever happens, your prototype will still load correctly.
Remember that the startup images have certain dimensions. For example:
- iPhone 3 320 × 460 pixels
- iPhone 4 and 4s (Retina) 640 × 920 pixels
- iPhone 5 (Retina) 640 × 1136 pixels
- iPad 2 768 × 1024 pixels
- iPad 3 (Retina) 1536 × 2048 pixels
(The newest version of TAP, 0.47, officially supports all Retina display resolutions.)
An example of an app icon that can be used when your HTML prototype is launched from the iOS home screen, to make it feel more like a real app.
Updating The Prototype When Changes Occur
Here are the steps for updating the prototype if needed:
- Make the changes in your Fireworks PNG document.
- Export the file again to the Dreamweaver Library format (LBI), and replace the folder on the server. (To be on the safe side, delete the folder on the server first and then upload the new folder.)
- Open the Build panel in your browser, and click “Build prototype.”
- Add the prototype to the home screen of your iOS device.
- Launch the prototype from the home screen. Done!
Some Tips
- When you are ready to export the new LBI files, delete all of the files in the “Library” folder before exporting from Fireworks. This will save you from having to OK a lot of messages later on.
- If you’ve fixed technical bugs in the prototype in Fireworks but don’t see them updated in the browser, try clearing the browser’s cache (the browser may be loading older cached files).
- Remember to rebuild new exports before testing changes in the browser.
Using The Prototype
Recommended Browsers
View the prototype that you export to your iOS device in the iCab Mobile browser, because it allows for full-screen viewing and offline Web caching. This makes for a reliable and more realistic experience when showing the work to clients.
To view and test the prototype on a desktop computer, Apple’s Safari browser (available for both Mac and Windows) is recommended.
Keep in mind that, from time to time, the browser on a desktop computer might render things slightly different than on an iOS device (in one case, my computer’s browser displayed a slide-in transition, whereas on the iPad a fade was displayed). In such instances, trust iOS’ rendering because that is what TAP was designed for.
Setting Up iCab Mobile’s Full-Screen Mode
Download iCab Mobile from the Appstore, and launch it.

Below is an example of a full-screen set-up. To get there, tap the settings button (i.e. the gear icon in the upper-right corner).

iCab settings
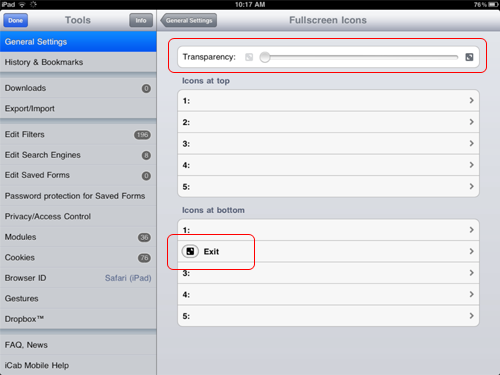
Configure the full-screen heads-up display (HUD) settings to match this screenshot, so that you can exit full screen without being distracted by extraneous buttons. You can experiment on the placement of the button to exit full screen if it is often accidentally pressed when users are testing the design.
Then, tap the button for the full-screen icon. Remove all buttons except for “Exit” (which returns the user to non-full-screen mode). To do this, click on the icon slot that you wish to change, and select none (represented by a -/- ) from the list of options to make that icon blank. Also, turn transparency all the way down to make this control as unobtrusive as possible.
Set Up Offline Viewing
If you want a bulletproof plan to show your prototype regardless of whether there is Wi-Fi or 3G access, then set up the HTML iOS prototype for offline viewing by saving it in iCab Mobile’s cache.
First, click the settings icon (the gear icon in the upper-right corner).
“General Settings” will automatically be selected. In the right pane, scroll down to the last section, and set the “Disk Cache” to 100 MB. This should be enough space for even the largest of prototypes (if this is the first time you are using iCab, click “Delete Disk Cache”).
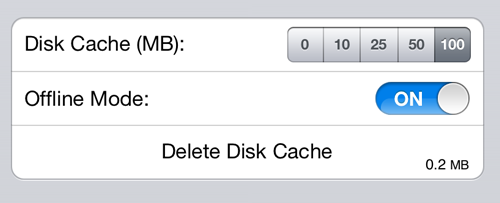
To set up iCab to for offline viewing, turn offline mode to “On,” and set the disk cache to the highest amount, which is 100 MB.
Now that the cache has been set up, you’ll need to create an offline bookmark to save the iOS prototype to the cache. Enter the URL of the page that you would like to bookmark, and then click on the “Send to” icon (i.e. the box with an arrow coming out of it). Next, select “Add to bookmarks,” and turn on “Offline bookmarks” in the pop-over.
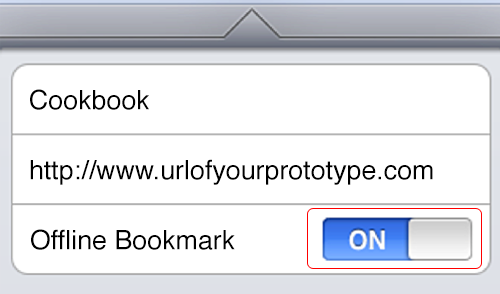
To create an offline bookmark, turn on the “Offline bookmark” option.
Finally, click “Save.”
Viewing Your Bookmarks Offline
By turning on offline mode, iCab Mobile will look for the cached offline bookmark, instead of going to the original online URL of your prototype. You need to explicitly switch on offline mode in the browser only when an active Internet connection is available but you still want to load the Web page offline from the cache. However, if no Internet connection is available (for instance, if airplane mode is on or no Wi-Fi or cellular connection is available), then iCab will automatically use offline mode, so you do not need to explicitly switch it on.
Open An Offline Bookmark
Tap the bookmarks icon to open the bookmarks pop-over. Then, click the “Offline” button next to the link that you want to browse offline. (Don’t click the title of the bookmark, because that would instruct the browser to open it from an online connection, not from the cache.)

Tapping the title of the bookmark will send you to the online version of the bookmark. Tapping the “Offline” button will send you to the saved offline version of your website via the cache.
When using offline mode, remember to set the cache to a larger size in the settings (bigger is better). If you add an offline bookmark, it will be saved to the cache; so, if you make changes or bug fixes to your website, remember to delete the cache and add the offline bookmark again so that the updated version will be loaded!
Conclusion
There are many ways to create wireframes, click-throughs and prototypes. In the end, what matters is that the process of creation is fast and accurate and that the output is of a high enough fidelity to generate the appropriate level of feedback.
Having tried many programs to design iOS prototypes, I have found that using Adobe Fireworks in conjunction with TAP is the most efficient and effective method available. In Fireworks, I can quickly and easily draw whatever I’ve dreamed up, and the pages, shared layers, symbols and styles ensure that my prototype works as a cohesive system that can be easily updated when needed.
Then, using TAP, I can bring my wireframes to life on an iOS device, using animated transitions initiated by gestures.
If you haven’t yet, try Adobe Fireworks together with TAP. The process of using Fireworks and TAP is so simple and fast that you will find you get feedback earlier in the design process and iterate with less effort than ever before, resulting in stronger and more refined designs.
Other Resources
The following articles, tutorials and video tutorials will help you get started with Adobe Fireworks.
General articles about Adobe Fireworks:
- “Adobe Fireworks for Beginners,” MediaLoot
- “Getting Started: Understanding Adobe Fireworks,” Jim Babbage, AdobeTV
- “Why Choose Fireworks?,” Stéphane Bergeron, Pixelyzed
- “Adobe Fireworks 101, Part 1,” Tom Green, Layers Magazine
- “Adobe Fireworks 101, Part 2,” Tom Green, Layers Magazine
- “Rapid Prototyping With Adobe Fireworks,” Danielle Beaumont, AdobeTV
- “Adobe Fireworks: The Things You Might Have Missed,” Trevor McCauley
- “Developing a Design Workflow in Adobe Fireworks,” Joshua Bullock, Smashing Magazine
- “Useful Fireworks Techniques and Features for Large Design Teams,” Kris Niles, Smashing Magazine
- “Refining Your Design in Adobe Fireworks,” Benjamin De Cock, Smashing Magazine
How Adobe Fireworks is used at Cooper (my place of work):
- “Designing Interactive Products With Fireworks,” Nick Myers, Adobe Developer Connection This presentation is also available as a video tutorial.
- “Industry Trends in Prototyping,” Dave Cronin, Adobe Developer Connection
Articles about Fireworks layers, pages and objects:
- “Adobe Fireworks: Pages,” Tom Green, Layers Magazine
- “Prototyping Websites and Interfaces Using Fireworks Pages,” Adobe Help
- “Layers in Adobe Fireworks,” Adobe Help
Articles about Fireworks symbols and styles:
- “Symbols in Adobe Fireworks,” Adobe Help
- “Understanding Styles and Symbols in Fireworks,” Jim Babbage, AdobeTV
- “Styles in Adobe Fireworks,” Adobe Help
- “The Power of Symbols in Adobe Fireworks,” Rogie King, Komodo Media
Articles about prototyping and wireframing with Fireworks:
- “Touch Application Prototypes (TAP) for iPhone and iPad, Using Adobe Fireworks.,” UNITiD
- “Create Interactive Prototypes With Adobe Fireworks,” André Reinegger, Smashing Magazine
- “Interactive Prototypes and Time-Savers With Adobe Fireworks,” Trevor Kay, Smashing Magazine
- “Interaction Design and Rapid Prototyping With Fireworks,” Dave Hogue, Adobe Developer Connection
- “Rapid Interactive Prototyping With HTML, CSS and JavaScript Using Fireworks and Dreamweaver,” Dave Hogue and Mariano Ferrario, Adobe Developer Connection
- “Setting Up a Fireworks Web Design Mock-Up for CSS and Images Export,” Michel Bozgounov, Adobe Developer Connection
Questions?
I know this has been a lengthy read, but hopefully fun, too.
Still, it’s possible that I’ve missed some things, so I’d love to answer any questions you may have or hear your feedback about this technique of prototyping with Fireworks and TAP for iOS.
Further Reading
- How To Create Your First iPhone App (2012 Edition)
- Get Started Writing iOS Apps With RubyMotion
- Interactive Prototypes And Time-Savers With Adobe Fireworks
- Developing A Design Workflow In Adobe Fireworks
- Switching From Adobe Fireworks To Sketch: Ten Tips And Tricks
- The Present And Future Of Adobe Fireworks
- The Power of Adobe Fireworks: What Can You Achieve With It?


