The Rainbow Spreadsheet: A Collaborative Lean UX Research Tool

Email Newsletter
Weekly tips on front-end & UX.
Trusted by 182,000+ folks.
 Celebrating 10 million developers
 Custom Web Forms for Angular, React, & Vue. Your backend.


Liverpool FC fans sing “You’ll Never Walk Alone” to their players during matches. UX research is best done when a team is involved. When you run UX research on your own without active observers, you are missing its point. This article describes and gives you a tool I created called the Rainbow Spreadsheet.
With it, you will be able to collaboratively observe UX research sessions with team members (or clients). You will be able to conduct research that involves the entire product team, with results that are turned around quickly and that team members will be committed to acting on. And all of this without writing a formal exhaustive research report that no one wants to read.
What Is The Rainbow Spreadsheet?
The Rainbow Spreadsheet, which takes its name from the different colors used in it to represent the study’s participants, is a spreadsheet with which all of the data collected during a UX study is centrally and simultaneously documented by a team of people; for example, through a Google Doc. It serves as the centerpiece for lessons learned from a study, and later turns into the final report.

Before The Study
As you prepare to run the study, your goal is to have a spreadsheet ready to be used, with all of the known information about participants and tasks entered. You also want your team to be well informed on how to use it and how to document its observations.
- Finalize your study’s protocol or discussion guide. Have a very good idea of what you will ask participants to do and what questions you will ask them to answer, and in what order.
- Schedule 45-minute breaks between study sessions. You will use those breaks not only to prepare for the next sessions but to discuss observations with your team. Here is how a four-participant, one-day study schedule might look like:
10:00 – 11:00 Participant 1 11:00 – 11:45 Break 1 11:45 – 12:45 Participant 2 12:45 – 1:45 Break 2 (including lunch) 1:45 – 2:45 Participant 3 2:45 – 3:30 Break 3 3:30 – 4:30 Participant 4 4:30 – 5:30 Summary - Make a copy of the master rainbow spreadsheet for your own use.
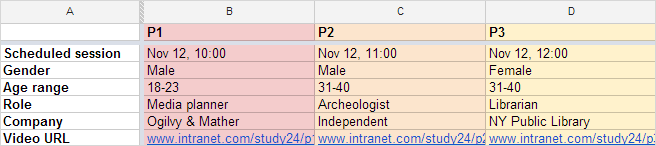
- Enter the information about participants that you collected during the recruiting stage in the sheet titled “Participants”:

The 'Participants' sheet: details of the characteristics of participants and links to session recordings. (Large preview) - Enter predetermined observations in the sheet titled “Observations.” These might be behaviors that you and your team (or client) expect participants to demonstrate; for example, “Noticed the green ‘Calculate’ button.” Do not enter double-barreled observations, such as “Noticed and used the green ‘Calculate’ button” because determining what to indicate in case a participant demonstrates only one of the behaviors is sometimes hard (in this case, either noticing or using the button).
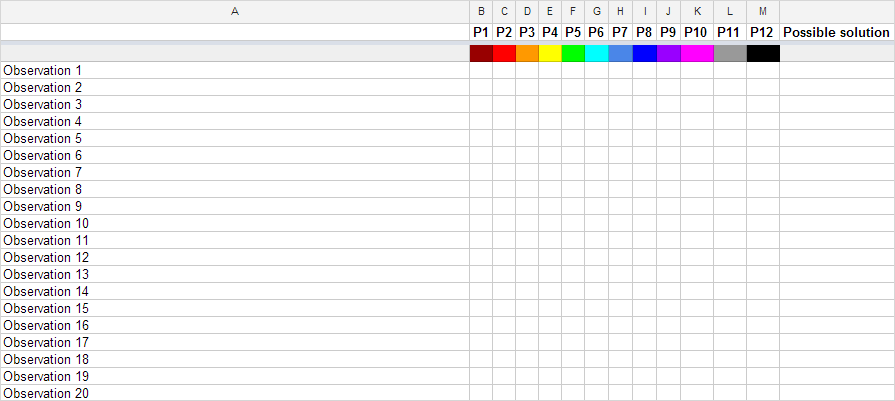
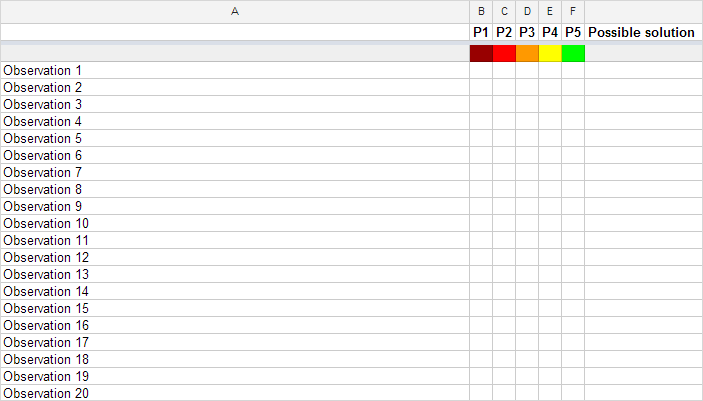
- Customize the columns for participants to match the number of the study’s participants. The master spreadsheet contains 10 columns, each in a different color. If you have five participants, remove (or hide) columns P6 to P10. If you have 12 participants, add two more colored columns.
- Share the spreadsheet with your team in an email or meeting. Explain what it is, and tell them it will serve as a summary for the study and that there will not be another report. Encourage them to attend as many study sessions as possible.

The “Observation” sheet, with 12 columns for participants. (Large preview) 
The “Observation” sheet, with five columns for participants. (Large preview) - Ask team members to read the “Participants” sheet prior to the study to better understand who participants are.
- Ask team members to use the “Observations” sheet during study sessions to note the behaviors of participants. Instruct them to color a participant’s cell when a certain behavior occurs. If a particular behavior repeats in sessions with other participants, ask team members to color the relevant participants’ cells, rather than add one more line for a behavior that’s already been noted. To clarify: there is only one spreadsheet, which everyone accesses and works on at the same time.
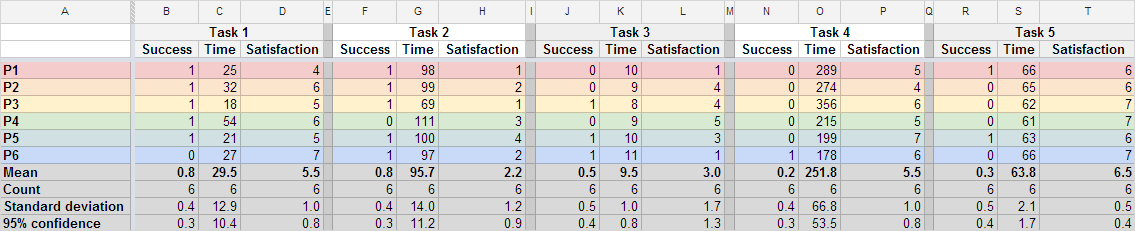
- Identify UX metrics to monitor during the study with your team, and prepare the sheet titled “Metrics” to collect them. The master spreadsheet is prepared to collect three basic metrics: the success rates of tasks, the time to complete tasks, and self-reported satisfaction ratings. Collect any metric you see fit.
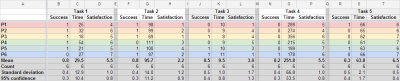
The metrics sheet with sample data for task success, time on task, and satisfaction. (Large preview) - Ask team members to add notes to the “Raw” sheet. Tell them it is there for anyone to add anything that doesn’t belong in the other sheets. My experience is that this sheet usually remains empty, but some people feel more comfortable taking notes there.
- Add sheets as you see fit. My team was once interested in what questions participants ask when they use a certain product, so we added a “Questions” sheet and assigned a “Chief Questions Officer” to log that data. There are no rules. Feel free to customize this spreadsheet to your team’s needs.
During The Study
As the day of the study begins, you and your team will begin entering data into the spreadsheet. As the day progresses, you’ll notice that your team is getting comfortable with the mechanics of using it and is doing an even better job of inputting its observations. Facilitating quick debriefings after each study session will increase the quality and tightness of the data entered.
- Enter data into the “Observations” sheet as soon as the first session of the study starts. Although moderating the session, paying attention to what participants say and do, taking notes and minding the observers is somewhat challenging, try to see if they are adding observations. If they aren’t, contact them through an instant messenger and remind them to feed the sheet with observations. If needed, pause the session, apologize to the participant, and finish the short IM conversation. Yes, it is that important.
- Don’t worry about overriding each other’s data. People usually self-manage their entries to prevent this from happening. Let it be.
- Fill in the “Metrics” sheet with data. You can definitely delegate this part to one of the observers, especially one who plans to attend the entire study. Another option is to assign metric-collecting responsibilities. So, for example, one team member would collect and log the success rates of tasks, another would take care of the time to complete tasks, and so on.
- Talk with your team between sessions. After the first session is over and after each session, break for a few minutes. Use this break to prepare the study room for the next participant and to collect your thoughts and organize your entries in the spreadsheet. Then, go to where your team is and discuss its observations. Help people understand observations that are not clear to them (rephrasing if needed). Tighten the list of observations by agreeing with team members on what should be removed. Candidates for removal from this sheet would be duplicate entries and any entry that cannot be considered an observation (such as a conclusion, thought, inference, solution to a problem or action item). Clarify to the team that, at this point, everyone should be entering only things that participants do or say, and that you’ll discuss everything else by the end of the study.
- Enter data into any other sheets you’ve created. Don’t feel bad if something doesn’t work out. This is a learning opportunity for you and your team. Maybe you should do something differently the next time around. Decide together.
After The Study
Although you and your team will be tired after a long day of research, it is time for one last effort to summarize, come to conclusions and assign action items. Here is what needs to be done to wrap up the study and to prepare the spreadsheet for future action:
- Assemble the team for a summary discussion as soon as the last participant has left the building. The goal of this discussion is to agree on the answers to the research questions that you defined in your study plan, to identify the primary findings of the study and to decide on the next steps.
- Add a “Summary” sheet as the first in the spreadsheet. This sheet will have four areas (see the sample rainbow spreadsheet):
- research questions,
- answers to research questions,
- action items,
- primary findings.

The summary sheet, with research questions, answers, action items and primary findings. (Large preview) - Facilitate the discussion until you reach the point that the team feels it has captured the essence of what happened during the study and is ready to take action. Don’t overanalyze. Avoid “analysis paralysis.” If you have 10 important action items, you are in a pretty good shape. There’s no need to exhaust every tiny detail of the study’s results.
- Add links to video recordings of the sessions (if you recorded them) to the “Participants” sheet.
- Declare the study done, and publish the spreadsheet. When you share the spreadsheet outside of your immediate team, don’t call it the “Rainbow Spreadsheet.” Instead, call it “the report.”

When To Use The Rainbow Spreadsheet?
The most appropriate kind of study in which to use the Rainbow Spreadsheet is one that involves live, moderated sessions; for example, a traditional usability test in which participants interact with a design, while other people (stakeholders, team members, the client) observe in the next room or remotely. Any other moderated research study is also appropriate.
The spreadsheet also works well for walkthroughs in which users show you how they use a product or interviews with a product’s users (while others observe).
When Not To Use It?
Because the spreadsheet is best used live, using it in any unmoderated activity would not work. It would be irrelevant, say, in an online study that uses a tool such as Userzoom, Usabilla or Loop11. Using it in fieldwork would also be hard unless the study is being broadcast live or being recorded for viewing later by people gathered together (which is feasible, yet usually harder to do).
Advantages
The Rainbow Spreadsheet has several advantages:
- It involves the entire team.
- Research results are turned around quickly.
- The team is committed to act on research results.
- The visual representation of observations helps people quickly understand what’s important.
- There is no formal report. When was the last time you heard someone say, “Yes! I get to read a report today!”
Disadvantages
There are also some drawbacks to keep in mind:
- It requires the team to stop whatever it is working on and observe the sessions. That might be too costly, or even unfeasible for small companies.
- There is no formal report. Some people in your organization might expect a formal, organized document to follow up the research.
- People who can’t observe the sessions will feel left out.
- It cannot be used in organizations that prohibit online collaborative documents.
What If Your Manager’s Manager’s Manager Asks For The Report?
Give it to them! If you feel uncomfortable sharing something that does not look like a report, you can do one (or more) of the following:
- Ask them what they wish to know, and meet them for a few minutes to address their need.
- Copy and paste the “Summary” sheet into an email, and send it to them.
- Copy and paste the “Summary” sheet into a Word document, make it look like a report (perhaps adding a screenshot of the “Observations” sheet), and send it to them.
- Present whatever you send or say as “the team’s deliverable” or “conclusions.” It’s not your research — it’s everyone’s.
Remember that people don’t come to work saying, “Yes! I get to read a report today!” So, chances are they’ll be thankful for a short document.
A Final Word
UX research is not about producing reports. It’s about answering people’s questions and helping the organization develop empathy for its customers. Deliverables and reports are means to that end. Don’t pay extra attention to them. Focus on your team’s learning. That can only happen in a collaborative way.
The rainbow spreadsheet is a tool to support such collaboration. If it doesn’t work for you, then customize it to your team’s needs or develop your own tools. Writing a report for a week will not serve your team’s needs very well. Find creative ways to learn about users together!
Rainbow Spreadsheet Templates
Further Reading
- The Lean UX Manifesto: Principle-Driven Design
- Lean UX: Getting Out Of The Deliverables Business
- Lean Startup Is Great UX Packaging
- Effectively Planning UX Design Projects


