Introduction To Photoshop Scripts

Email Newsletter
Weekly tips on front-end & UX.
Trusted by 182,000+ folks.


 Celebrating 10 million developers
 Custom Web Forms for Angular, React, & Vue. Your backend.
Automation is useful in the work of every designer. It saves precious time on repetitive tasks and helps us solve certain problems more quickly and easily.
You can automate your workflow in Photoshop with actions, which are pretty popular and which most of you already know about and use. Today, we’ll introduce you to an advanced automation technique: Photoshop Scripts. All you need for this is basic knowledge of JavaScript, which some of us Web designers already have.
I’ve known about Photoshop scripts for years but decided to really dive in a few months ago. I had avoided it because I thought it was the domain of smart math-minded programmers. I was wrong, and today I’ll show that, although it requires some basic programming skills, scripting isn’t hard to grasp.
But first, we have to answer the obvious question.
Why Do We Need Scripts?
Why should we would learn to script if Photoshop already has pretty nice actions? The answer is interactivity. When you use an action, you can’t really control how it behaves in different situations; it is like a videotape that just keeps playing again and again without any change.
A script is more dynamic; its behavior changes according to the parameters you input or the context of its application. Sounds useful, no?
Requirements
You don’t have to be an advanced programmer to be able to write scripts; I’m just a graphic designer, like most of you. But you should at least have a basic understanding of JavaScript and some experience with properties and methods to get the most out of this article.

If you are not familiar with JavaScript at all, fear not! There are plenty of places to learn the basics of programming. Codecademy, for example, has pretty neat interactive lessons.
I work in Adobe Photoshop CS5, but everything we’ll cover applies to newer versions, too; Adobe hasn’t made any major updates to its scripting API since CS5. I will refer to the latest version of the scripting documentation, though, which is CS6.
Getting Started
When you record actions in Photoshop, you set the order of the steps to achieve a certain result — that’s your algorithm. Then, you press “Record” and replicate them in Photoshop one by one. Scripting is similar, but instead of doing these steps in Photoshop, you write them down as lines of code. Most actions that you do in Photoshop have their own script equivalent as a function.

Let’s say you are creating an action that scales a document to 150% of its original size. You’d go through these steps:
- Open
Image → Image Size. - Enter
150%inwidthandheight. - Hit “OK.”
The same process with a script would look like this:
- Call the application:
app - Target a document:
activeDocument - Call the function to resize the image:
resizeImage(width, height)
And the code would look like this:
app.activeDocument.resizeImage("150%", "150%");
Language
There are three ways to write scripts for Photoshop: using AppleScript on Mac, VBScript on Windows or JavaScript on either platform. I use the third because it is cross-platform and I already have some experience with it.
Tools
Adobe has its own utility for writing scripts, called ExtendedScript Toolkit.
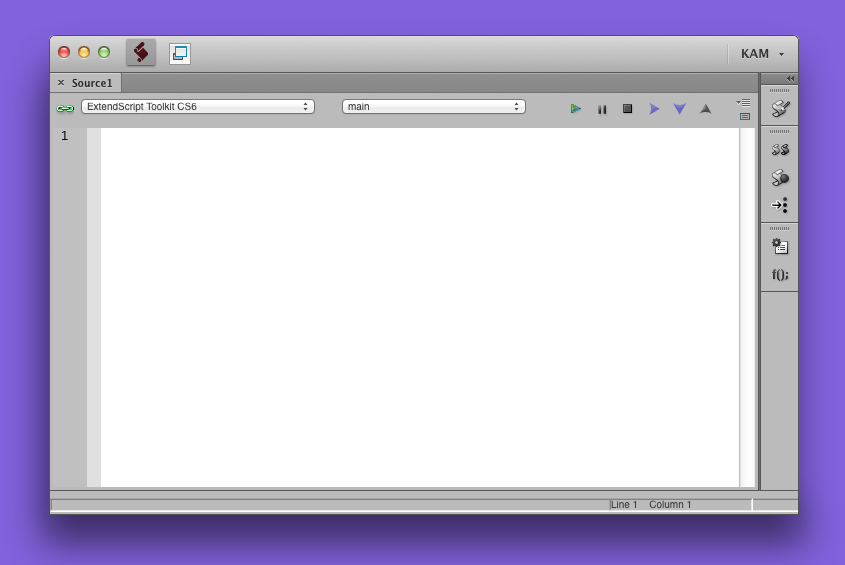
The main window for Adobe’s ExtendedScript Toolkit. (View large version.)
The toolkit comes with Photoshop, and you can find it in the following folder:
- Mac OS X
/Applications/Utilities/Adobe Utilities CS6/ExtendScript Toolkit CS6/ - Windows
C:Program FilesAdobeAdobe Utilities - CS6ExtendScript Toolkit CS6(orProgram Files (x86)for 64-bit machines)
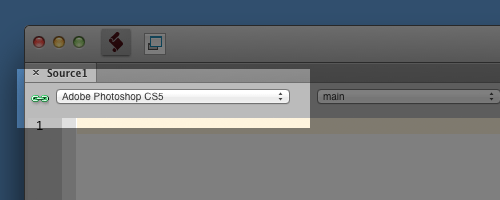
The user interface of the ExtendedScript Toolkit is pretty straightforward. To start writing scripts, first select the target application in the drop-down menu. If Photoshop is running, then look for the green chain icon near the drop-down menu:
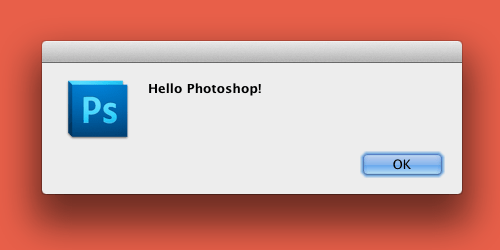
Now you can write something like this:
alert("Hello Photoshop!");
Press cmd + R (or just hit the “Play” button in the toolbar) to run your script. ExtendedScript Toolkit should switch to Photoshop and show an alert box:
ExtendedScript Toolkit has some other neat features for debugging scripts, but this is enough for this article. You can learn more about how to use it by going to Help → JavaScript Tools Guide.
You can use any plain-text editor to write a script; just save it as a .jsx file. To run it, you’ll have to go to File → Scripts → Browse in Photoshop and select it. Alternatively, just open the script file with Photoshop. You can also add a line of code at the top of the script so that the file always opens in Photoshop:
#target photoshop
Save your scripts in the Photoshop/Presets/Scripts/ directory, and access them with File → Scripts. You can also set up a hotkey; just go to Edit → Keyboard Shortcuts, navigate to File → Scripts → [your script’s name], and set the shortcut you want.
ExtendedScript Toolkit can run and debug code from the integrated development environment, and it has an object model viewer built in, which is useful. So, I recommend using the toolkit to write your scripts. Unfortunately, the Mac version crashes sometimes, so keep that in mind.
Photoshop Object Model
To make writing scripts easier, you should understand how things relate to each other in Photoshop’s Document Object Model (DOM). Understanding it is not so hard if you look at Photoshop itself. The main object in Photoshop’s DOM is the application. In the application, we have a collection of documents that are currently open in Photoshop.
Each document contains elements — such as layers (called ArtLayers), groups of layers (LayerSets), channels, history states and so on — just like in a regular PSD document.
A simplified visualization of Photoshop’s DOM is below. A more detailed containment hierarchy can be found on page 12 of “Adobe Photoshop CS6 Scripting Guide” (PDF).
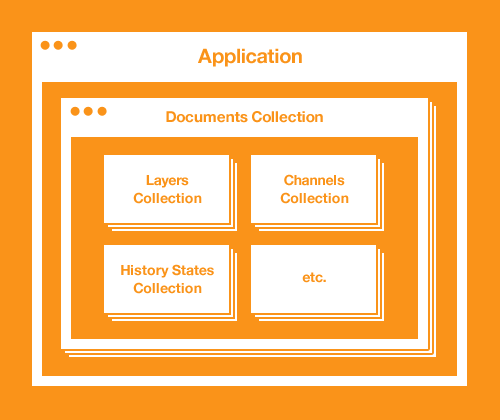
A simplified visualization of Photoshop’s DOM.
Each of these objects has its own properties and methods that you can work with. For example, to change the opacity of the selected layer in a document, you would go to Application → Document → Layer → Opacity and set the desired value. The code would look like this:
app.activeDocument.activeLayer.opacity = 50;
As you may have guessed, activeDocument and activeLayer determine the currently selected document and layer.
You can find descriptions of most objects and their properties and methods in “Adobe Photoshop CS6 JavaScript Scripting Reference” (PDF), or in ExtendedScript Toolkit by going to Help → Object Model Viewer.
Let’s see how this works in a real-world example. In this next section, we’ll write our own script based on an action.
Remastering The RotateMe Action As A Script
A few years ago at Christmas time, I had an idea for an action to help me draw snowflakes.
Drawing Snowflake 101
- Draw one stem of the snowflake with a pattern.

- Duplicate the stem, and rotate it a few degrees.

- Repeat the second step until you have a full circle.

Duplicating and rotating each stem manually is tedious, so I came up with an action to automate it. The algorithm looks like this:
- Duplicate the stem.
- Rotate it by however many degrees you’ve chosen, using the Transform tool.
- Duplicate the layer.
- Use the “Repeat Transform” function.
- Repeat steps 4 and 5 until you have a full circle.
Pretty neat. But the action had a disadvantage: You can set only a certain number of stems for the snowflake, according to the number of degrees you set in third step of the algorithm.
Back when I wasn’t familiar with scripting, I just made a few versions of the action, each of which produced a snowflake with a different number of stems.
Today, we will remaster this action as a dynamic script that takes your input on the number of stems. Let’s get started!
Algorithm
When you start writing a script, defining the algorithm first before digging into the code itself is always a good idea. In our case, the algorithm will work like this:
- Ask the user to enter the number of stems.
- Calculate the rotation angle.
- Duplicate and rotate the layer by the number set in the first step.
Let’s start with saving the current or selected layer to a variable for further use:
// Save selected layer to variable:
var originalStem = app.activeDocument.activeLayer;
Note that in JavaScript, you can mark a line with double slashes (//) to make it a comment. Comments are used to describe parts of code for future reference and don’t affect the behavior of the script.
Let’s move on to our algorithm now.
1. Ask User For Input
We can take input from the user with the prompt(message, default value[, title]) function. This function shows a dialog box with the message and an input field that contains the default value. When the user hits “OK,” the function returns the inputted value; so, we have to save it to the variable to be able to be used.
// Ask user for input by showing prompt box and save inputted value to variable:
var stemsAmount = prompt("Processing ""+originalStem.name+""nHow many stems do you need?", 12);
Note that I used originalStem.name in the message, so the dialog box will show the name of selected layer.
On Mac OS X, the first line of the message is in bold and functions as the title. So, our main message should be on the second line. To make a new line, type n.
In Windows, you can specify a third argument in the function to set the title:
// Ask user for input by showing prompt box and save inputted value to variable:
var stemsAmount = prompt("How many stems do you need?", 12, "Processing "+originalStem.name);
If we run the code in Photoshop, it will show this dialog box:

When the user hits “OK,” the inputted value will be saved to the stemsAmount variable. If the user clicks “Cancel,” then the function will return a null value. We’ll use this later.
2. Calculate The Rotation Angle
To calculate the rotation angle, we have to divide 360 degrees (a full circle) by the number of stems:
// Calculate the rotation angle
var angle = 360 / stemsAmount;
3. Duplicate And Rotate
Now we have everything we need to make duplicates of our stem. To do this, we’ll use the for loop. It lets us repeatedly run lines of code as many times as we’d like. Our loop will look like this:
for(var i = 1; i < stemsAmount; i++){
    // This code will run "stemAmount - 1" of times
};
Note that the first instance of an object in programming has the value of 0, but because our first layer is already on the canvas, we’re starting the loop from 1 instead.
To duplicate and rotate our layer, we will use the duplicate() and rotate(angle, AnchorPosition) methods: the number of layers to be rotated in angle multiplied by the indexed number of duplicates. AnchorPosition determines the point around which the layer will rotate. You can see this point when you use the Transform tool in Photoshop — it looks like a small circle with a crosshair. In scripting, it has only 9 specified values — i.e. the 9 positions of the anchor point:
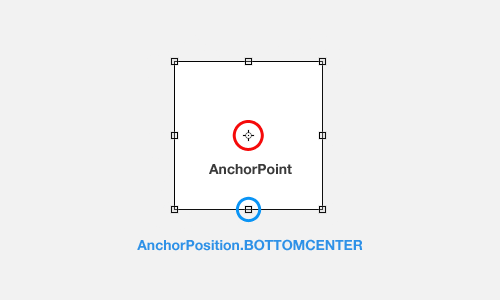
In our case, it is the bottom center of the layer, BOTTOMCENTER. Photoshop uses a lot of other constants here and there in some of the functions, which you can find on page 197 of “Adobe Photoshop CS6 JavaScript Reference” (PDF).
So, our loop will look like this:
// Duplicate and rotate layers:
for(var i = 1; i < stemsAmount; i++){
    // Duplicate original layer and save it to the variable
    var newStem = originalStem.duplicate();

    // Rotate new layer
    newStem.rotate(angle * i, AnchorPosition.BOTTOMCENTER);
};
And the completed code will look like the following. You can try to run it.
// Save selected layer to variable:
var originalStem = app.activeDocument.activeLayer;

// Ask user for input by showing prompt box and save inputted value to variable:
var stemsAmount = prompt("Processing ""+originalStem.name+""nHow many stems do you need?", 12);

// Calculate the rotation angle:
var angle = 360 / stemsAmount;

// Duplicate and rotate layers:
for(var i = 1; i < stemsAmount; i++){
    // Duplicate original layer and save it to the variable
    var newStem = originalStem.duplicate();

    // Rotate new layer
    newStem.rotate(angle * i, AnchorPosition.BOTTOMCENTER);
};
Final Touches
I’ll usually try to achieve the main goal with a script, and when everything works correctly, I’ll start to refine the code. In our case, we have to make sure that the user inputs a valid number in the prompt box — i.e. a positive integer, greater than one.
Also, to prevent Photoshop from going crazy, we will restrict the number of stems — let’s say, to 100. To do this, we will use a while loop to show the user an error message in the event of an invalid submission, and the prompt box will continue to be shown until the user enters a valid value or hits the “Cancel” button (remember that the prompt returns null if the user hits “Cancel”).
The new code looks like this:
// Save selected layer to variable:
var originalStem = app.activeDocument.activeLayer;

// Ask user for input by showing prompt box and save inputted value to variable:
var stemsAmount = prompt ("Processing ""+originalStem.name+""nHow many stems do you need? (From 2 to 100)", 12);

// Check that user entered a valid number and, if invalid, show error message and ask for input again
while(isNaN(stemsAmount) || stemsAmount <= 0 || stemsAmount > 100){
    // If user clicks "Cancel" button, then exit loop
    if(stemsAmount == null) break;

    // Show error message…
    alert("Please enter number in range from 2 to 100");
    // …and ask for input again
    stemsAmount = prompt("Processing ""+originalStem.name+""nHow many stems do you need? (From 2 to 100)", 12);
};

// Run the copying process
if(stemsAmount != null){
    // Calculate the rotation angle
    var angle = 360 / parseInt(stemsAmount);

    // Duplicate and rotate layers:
    for(var i = 1; i < stemsAmount; i++){
        // Duplicate original layer and save it to the variable
        var newStem = originalStem.duplicate();

        // Rotate new layer
        newStem.rotate(angle * i, AnchorPosition.BOTTOMCENTER);
    };
};
As you may have noticed, we’re using the isNaN(value) function, which returns true if value is “not a number” and parseInt(value) to convert the value to an integer when we calculate the rotation angle.
The next thing we will do is manage the layers, renaming our new layers by adding an index to them. Also to make sure that we do not mess up document’s layers, let’s place our stems in a group.
Renaming the layers is not a hard task. We will just use the name property of the layer and add an index number to it:
// Add index to new layers
newStem.name = originalStem.name + " " + (i+1);
A group in Photoshop’s API is called a LayerSet and we can access all groups of the document by calling the layerSets property. To add a new group to a document, we have to call the layerSets’ method add():
// Create a group for stems
var stemsGroup = app.activeDocument.layerSets.add();
    stemsGroup.name = originalStem.name + " ("+stemsAmount+" stems)";
Then, to add a layer to the group, we will use the move(relativeObject, ElementPlacement) function. Note that the move() function moves a layer in the layer stack, not on the canvas. (You can move a layer on the canvas with the translate(deltaX[, deltaY]) function.)
ElementPlacement is another constant, this one determining how we will place our layer relative to… well, relativeObject. In our case, we will use ElementPlacement.INSIDE to place the original layer inside a group:
// Place original layer in group
originalStem.move(stemsGroup, ElementPlacement.INSIDE);
We will place each new copy of the layer at the bottom of all layers in the group using ElementPlacement.PLACEATEND. The result is all of our layers arranged in ascending order, the first layer at the top and the last at the bottom:
// Place new layer inside stems group
newStem.move(stemsGroup, ElementPlacement.PLACEATEND);
You can read more about the ElementPlacement constant on page 202 of “Adobe Photoshop CS6 JavaScript Reference” (PDF).
Final Code
That’s it! RotateMe.jsx is done. Our final code looks like this:
// Save selected layer to variable:
var originalStem = app.activeDocument.activeLayer;

// Ask user for input by showing prompt box and save inputted value to variable:
var stemsAmount = prompt ("Processing ""+originalStem.name+""nHow many stems do you need? (From 2 to 100)", 12);

// Check that user entered a valid number and, if invalid, show error message and ask for input again
while(isNaN(stemsAmount) || stemsAmount <= 0 || stemsAmount > 100){
    // If user clicks "Cancel" button, then exit loop
    if(stemsAmount == null) break;

    // Show error message…
    alert("Please enter number in range from 2 to 100");
    // …and ask for input again
    stemsAmount = prompt("Processing ""+originalStem.name+""nHow many stems do you need? (From 2 to 100)", 12);
};

// Run the copying process
if(stemsAmount != null){
    // Calculate the rotation angle
    var angle = 360 / parseInt(stemsAmount);

    // Create a group for stems
    var stemsGroup = app.activeDocument.layerSets.add();
        stemsGroup.name = originalStem.name + " ("+stemsAmount+" stems)";
    // Place original layer in group
    originalStem.move(stemsGroup, ElementPlacement.INSIDE);

    // Duplicate and rotate layers:
    for(var i = 1; i < stemsAmount; i++){
        // Duplicate original layer and save it to the variable
        var newStem = originalStem.duplicate();

        // Rotate new layer
        newStem.rotate(angle * i, AnchorPosition.BOTTOMCENTER);

        // Add index to new layers
        newStem.name = originalStem.name + " " + (i+1);

        // Place new layer inside stems group
        newStem.move(stemsGroup, ElementPlacement.PLACEATEND);
    };

    // Add index to the original layer
    originalStem.name += " 1";
};
That wasn’t too hard, was it?

Now you can put it in the Photoshop/Presets/Scripts/ folder and run it by going to File → Scripts in Photoshop. Using different shapes with different values can yield interesting results:

- Download the source file (RotateMe.jsx)
Conclusion
As you can see from the number of links in the resources section below, there’s much more to say about scripting than can fit in an introductory article. But I hope the little that we’ve described today piques your interest and shows how powerful and helpful scripting is.

If you decide to dive into it, let’s learn together and share our experience. Ask your questions and share what you’ve done in the comments. If you are not a coder, consider leaving an idea for a script; maybe another reader will make it happen.
Let’s make Photoshop more useful together!
Resources
I’m still learning about Photoshop scripts, too, and here are some resources that are helping me along the way:
- “Adobe Photoshop Scripting,” Adobe Developer Connection
All of the documentation and utilities for scripting. - “Adobe Introduction to Scripting” (PDF) Adobe
Here are the basics on scripting for Adobe applications. The nice thing about scripting for Photoshop is that you can apply your knowledge to other Adobe products; you just need to learn the application’s DOM, and you’ll be ready to go. - “Adobe Photoshop CS6 Scripting Guide” (PDF), Adobe
In this introductory guide to scripting for Photoshop, you’ll find the basics on getting started with scripting. - “Photoshop CS6 JavaScript Reference” (PDF), Adobe
This describes all of the objects and their functions and methods that you can use in scripting for Photoshop. This is one of the documents I use most when writing scripts. - “JavaScript,” Mozilla Developer Network
Here are answers to all kinds of questions about general JavaScript functions and usage. - “JavaScript Tools Guide” (PDF), Adobe
This has basic information about ExtendedScript Toolkit and some advanced techniques, such as file system access and ScriptUI and working with XML, sockets and more. - PS-Scripts
An independent forum about scripting for Photoshop. I wasn’t able to sign up to participate in discussions (because of some kind of pre-moderation system), but it has plenty of answered questions and solved problems to discover. - Photoshop Scripting, Adobe Community
Adobe’s official forum for Photoshop scripting has some good discussion on problems encountered by users.
Further Reading
- The Ultimate Collection Of Useful Photoshop Actions
- Retinize It: Free Photoshop Action For Slicing Graphics For HD Screens
- Mastering Photoshop: Unknown Tricks and Time-Savers
- Taming Advanced Color Palettes In Photoshop, Sketch And Affinity Designer


