Peter Traeg is a Solutions Architect at Universal Mind where he brings his broad base of technical and business consulting skills to work for our clients. With …
In this article, Peter Traeg provides an overview of how to build a simple mobile application using each of the following approaches. Few developers have had the opportunity to develop for mobile using a variety of tools, and this series is intended to broaden your scope. Hopefully you will be in a better position to choose the right development tools for your mobile application’s needs!
The mobile application development landscape is filled with many ways to build a mobile app. Among the most popular are:
This article marks the start of a series of four articles covering the technologies above. The series will provide an overview of how to build a simple mobile application using each of these four approaches. Because few developers have had the opportunity to develop for mobile using a variety of tools, this series is intended to broaden your scope.
Hopefully, armed with this knowledge, you will be in a better position to choose the right development tools for your mobile application’s needs. In this first article in the series, we’ll start with some background and then dig into iOS.
I’ve built the same simple application with each technology to demonstrate the basic concepts of development and the differences between the platforms and development tools. The purpose of this series is not to convert you to a particular technology, but rather to provide some insight into how applications are created with these various tools, highlighting some of the common terms and concepts in each environment.
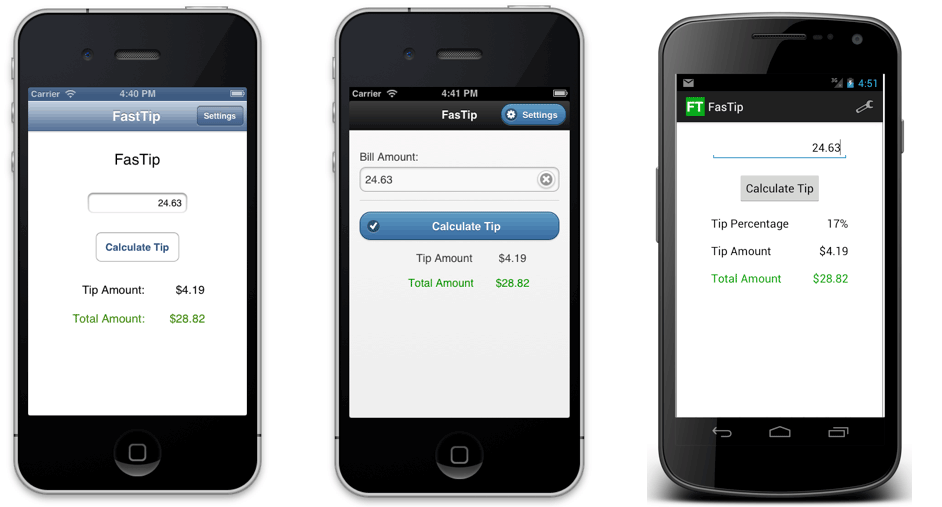
FasTip is a simple application to calculate tips. Because this is a simple example, it uses the standard UI controls of each platform:
The screenshots above show the application running as native iOS, PhoneGap and native Android applications. Appcelerator Titanium uses native controls, so it looks the same as the native iOS and Android applications. Our application has two screens: a main screen where the tips are calculated, and a settings screen that enables the user to set a tip percentage. To keep things simple and straightforward, we’ll use the default styles of each environment.
Most applications in Apple’s App Store are written in the Objective-C programming language, and developers typically use Xcode to develop their applications.
Obtaining The Tools
To build an iOS app, you must use Mac OS X; other operating systems are not supported. The development tools that you’ll need, iOS 7 SDK and Xcode 5, are free of charge, and you can run the app that you build in the iOS simulator, which is part of the iOS SDK. To run your app on a real device and make it available in Apple’s App Store, you must pay $99 per year.
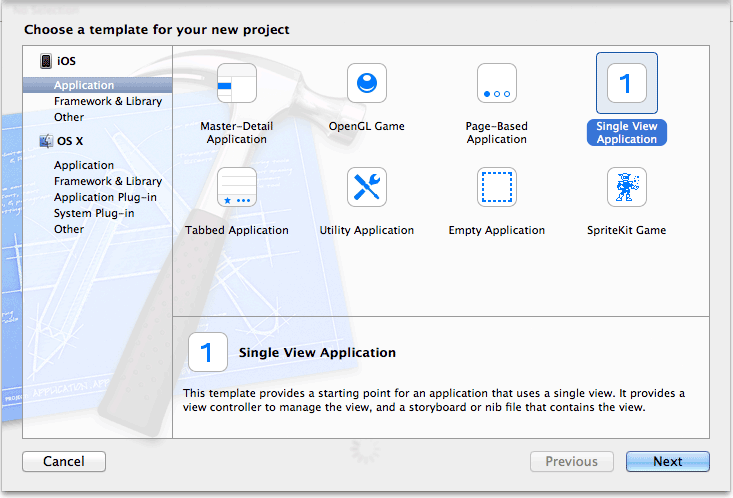
Once you have installed Xcode, you’ll want to create a new project. Choose “Create a new Xcode project” from the welcome screen or via File → New Project in the menu.
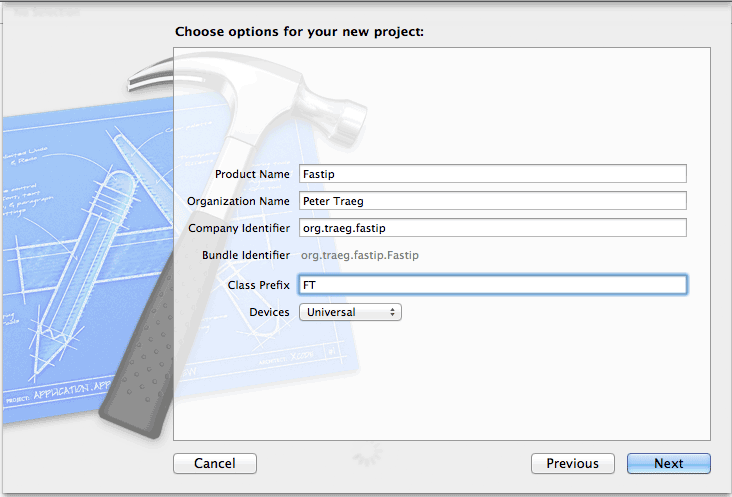
For a simple application such as this one, “Single View” is appropriate. Upon clicking “Next,” you will be presented with a dialog to enter some basic information about your application:
The value that you enter in the “Class Prefix” option tells Xcode to attach that unique prefix to every class that you generate with Xcode. Because Objective-C does not support “namespacing,” as found in Java, attaching a unique prefix to your classes will avoid naming conflicts. The “Devices” setting lets you restrict your application to run only on an iPhone or an iPad; the “universal” option will enable the application to run on both.
Navigation Controllers And View Controllers
The screen functionality of iOS applications is grouped into what are known as view controllers. Our application will have two view controllers: one for the main screen and one for the settings screen. A view controller contains the logic needed to interact with the controls on a screen. It also interacts with another component called the navigation controller, which in turn provides the mechanism for moving between view controllers. A navigation controller provides the navigation bar, which appears at the top of each screen. The view controllers are pushed onto a stack of views that are managed by the navigation controller as the user moves from screen to screen.
Storyboards: Building The User Experience Visually
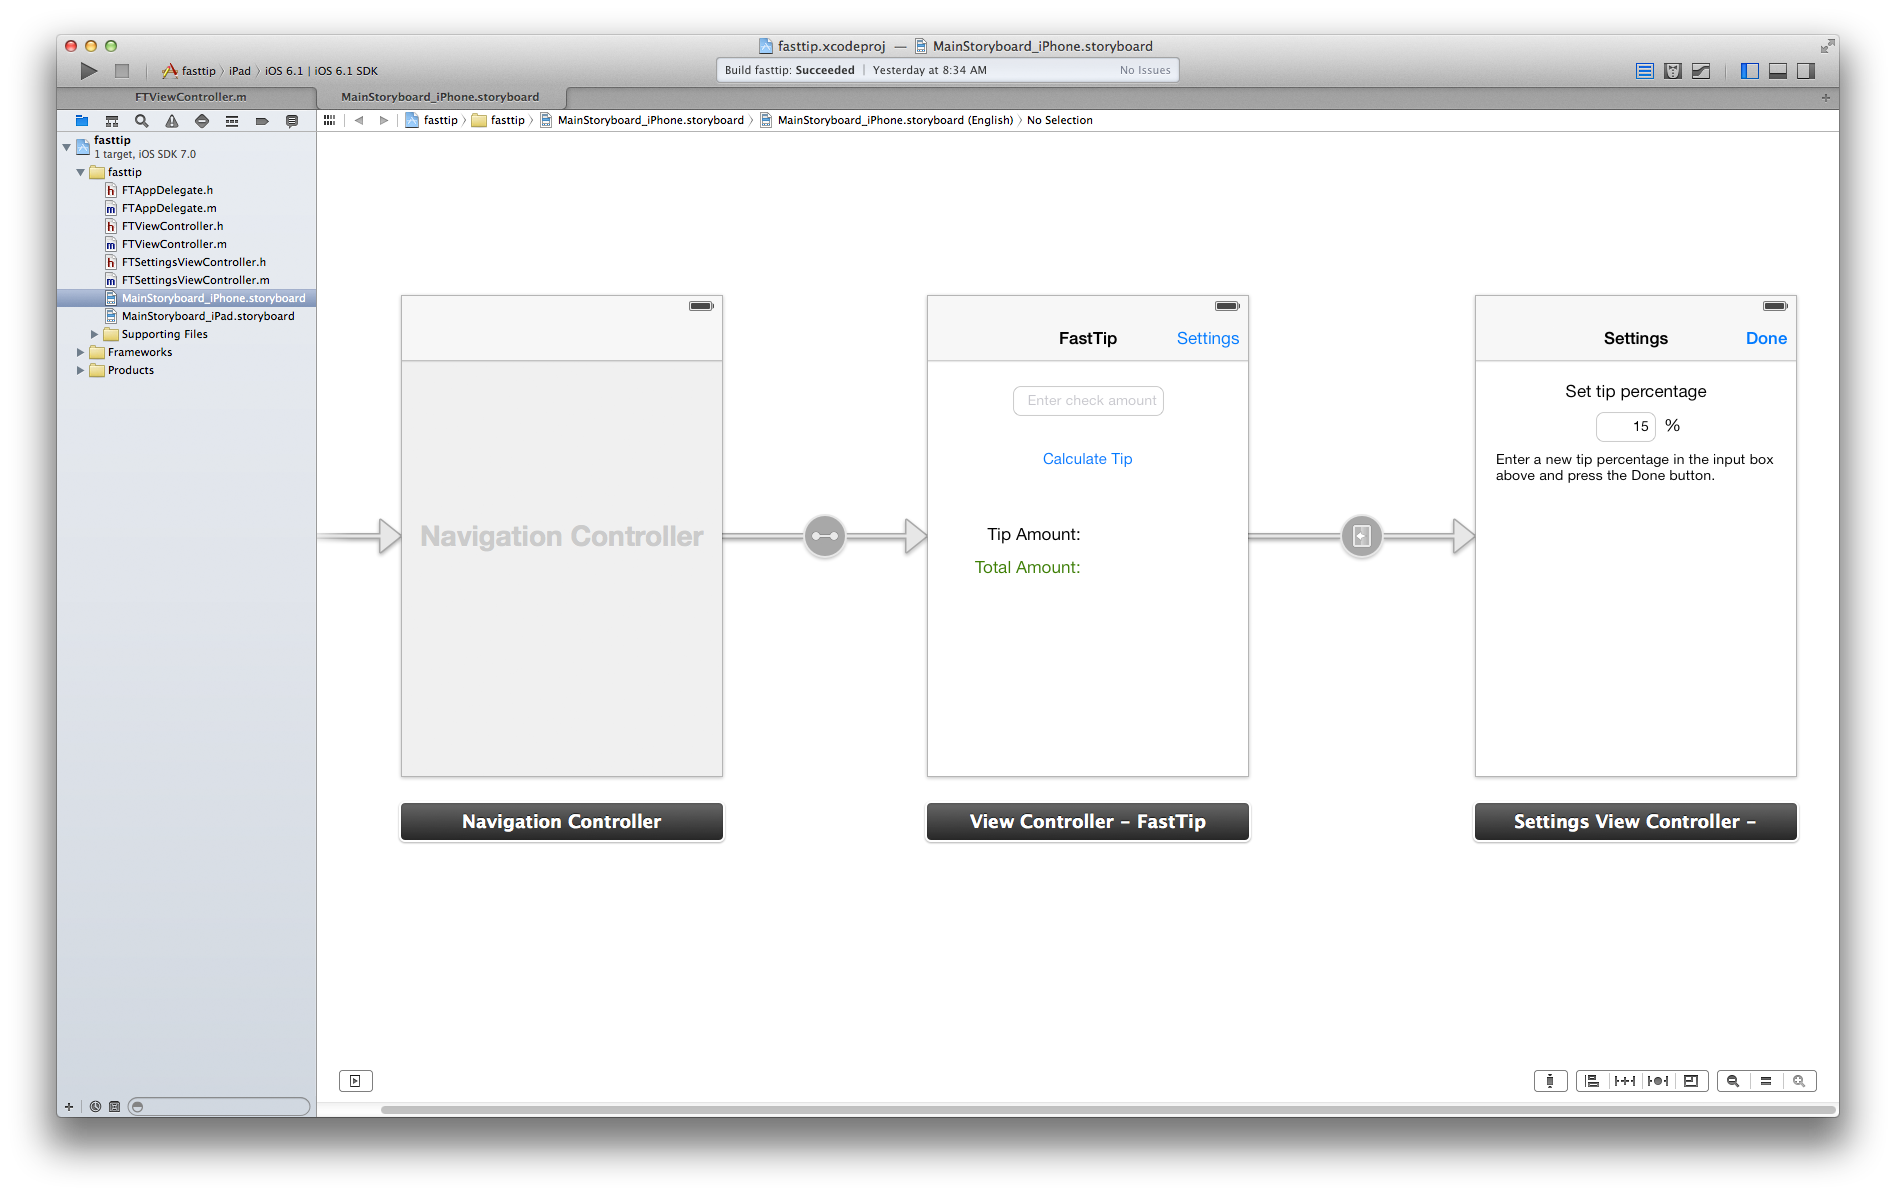
Starting with iOS 5, Xcode has had storyboards, which enable developers to quickly lay out a series of view controllers and define the content for each. Here’s our sample application in a storyboard:
The container on the left represents the navigation controller, which enables the user to move from screen to screen. The two objects on the right represent the two screens, or view controllers, that make up our app. The arrow leading from the main screen to the settings screen is referred to as a segue, and it indicates the transition from screen to screen. A new segue is created by selecting the button in the originating view and then, while the Control key is pressed, dragging the mouse to the destination view controller. Apple’s documentation provides more detail about this process.
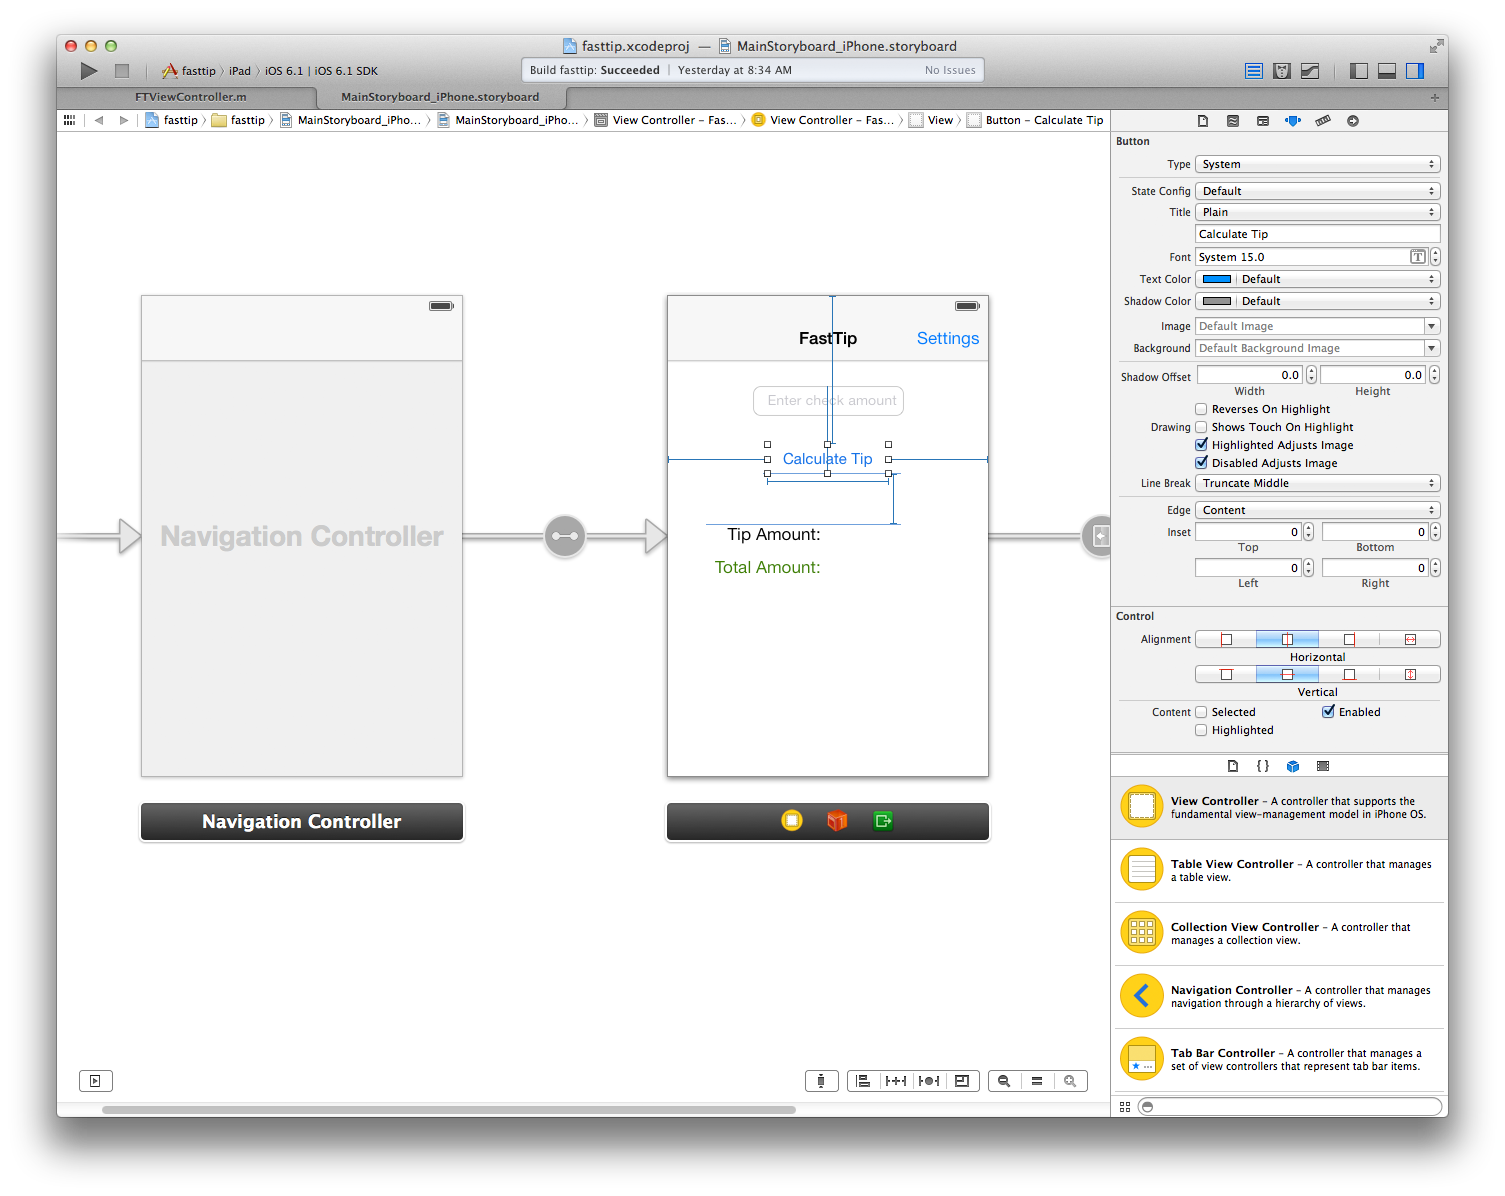
In the example above, we can see that a text field has been selected, and the property panel is used to adjust the various attributes of the controls. When this application was created, the “universal” app option was selected, enabling the app to run on both an iPhone and iPad. As a result, two versions of the storyboard file have been created. When the app is running on an iPhone or iPod Touch, the _iPhone version of the file will be used, and the _iPad version will be used for iPads. This allows a different layout to be used for the iPad’s larger display. The view controller will automatically load the appropriate layout. Keep in mind that if your storyboards expose different sets of controls for the iPad and the iPhone, then you must account for this in the code for your view controller.
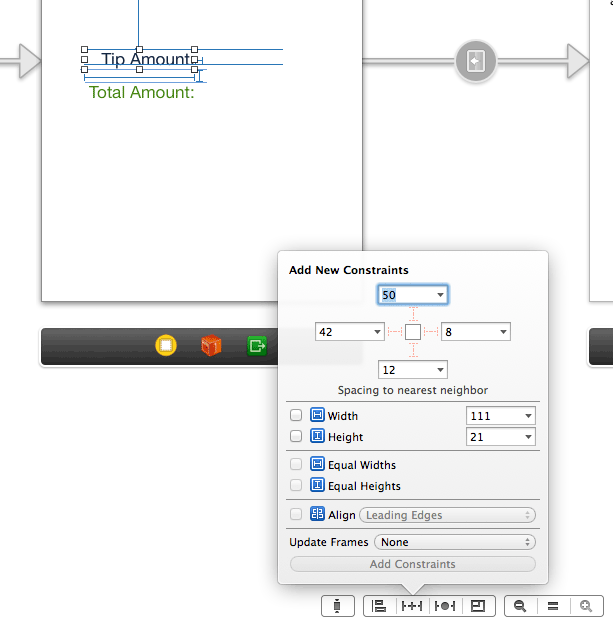
In addition to directly positioning items at particular coordinates on the screen, you can also use the Auto Layout system that was introduced in iOS 6. This enables you to define constraints in the relationships between controls in the view. The storyboard editor enables you to create and edit these constraints.
The constraints can also be manipulated programmatically. The Auto Layout mechanism is quite sophisticated and a bit daunting to use at first. Apple has an extensive guide on Auto Layout in its documentation.
Associating Storyboards With Your Code
To access the storyboard objects from the code, you must define the relationships between them. Connecting items from the storyboard to your code via Xcode is not obvious if you’re used to other development environments. Before you can do this, you must first create a view controller to hold these associations. This can be done with the following steps:
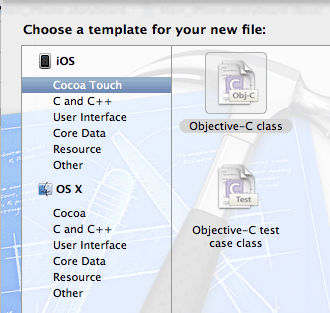
Choose File → New File.
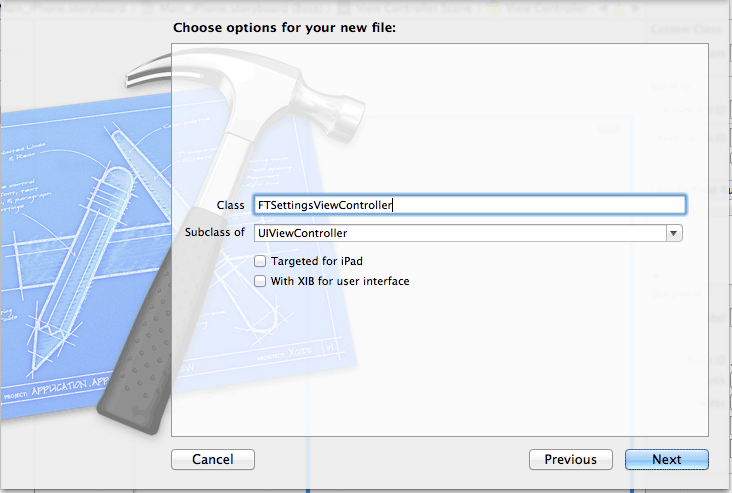
In the dialog that appears, choose “Objective-C class”:
In the next dialog, give your class a name and ensure that it inherits from UIViewController:
Upon clicking “Next,” you’ll be asked to confirm where in the project the file should be saved. For a simple project, picking the main directory of the app is fine.
Upon clicking “Next,” you’ll see that a new set of files has been created for your view controller. Now, associate that newly created view controller with the view controller in your storyboard.
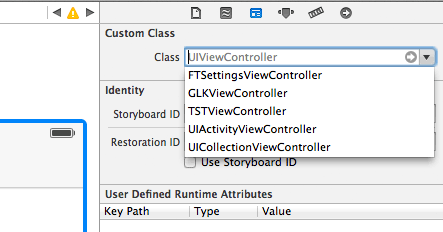
With the storyboard open, click on the view controller. In the “Identity Inspector” panel, pick the “Class” that this view controller is to be associated with:
Once this process is completed, the code for your view controller will be properly referenced by the storyboard entry.
To reference the controls that you’ve dragged onto a storyboard from your Objective-C code, you’ll need to define these relationships. The storyboard editor has an “assistant editor” view to help with this. Basically, it’s a split-pane view that shows both the storyboard and your code. In this example, we’ll reference a button that’s already been placed on the storyboard:
First, ensure that you’ve completed the steps above to associate the view controller class with the corresponding view controller in the storyboard.
Choose the assistant editor by clicking the icon that looks like this:
A split-pane view will open, with the storyboard on the left and your view controller class on the right.
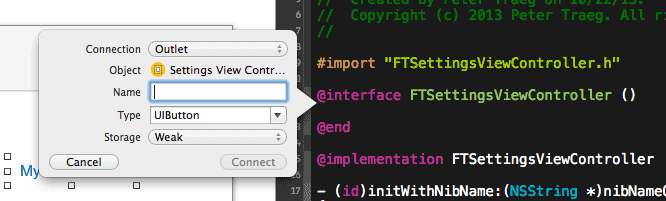
Select the button in your storyboard and, while holding down the Control key, drag from the button to the interface area of your code.
The resulting dialog will enable you to create an “outlet” for the button in your code. Simply give the button a name, and click the “Connect” button in the dialog. You may now reference the button in the view controller from your code.
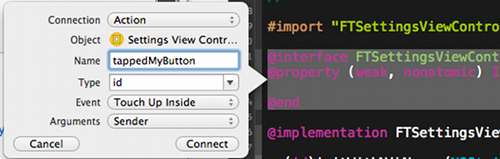
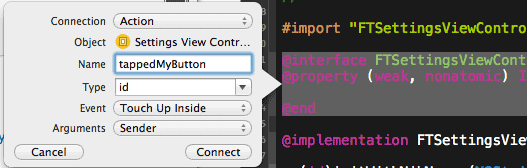
Let’s hook up a method to be invoked when a person taps on the button. Select the button again, and use the same Control-and-drag maneuver to drop a reference into the interface section of your view controller.
This time, in the dialog box that appears, we’ll associate an “action,” rather than an outlet. Choose “Action” from the “Connection” drop-down menu, and enter a name like this:For the “Event,” use the default of “Touch Up Inside,” and press the “Connect” button.
Note that your class now has an interface with two entries in it:
The IBOutlet item is used to identify anything that you’re referencing from the storyboard, and the IBAction is used to identify actions that come from the storyboard. Notice also that Xcode has an empty method where you can place the code to be run when the user taps on the control:
- (IBAction)tappedMyButton:(id)sender {
}
The process above does take some getting used to and could certainly be made more intuitive. After some practice, it will get less awkward. You might find it useful to bookmark the section of the Xcode documentation that describes how to “Connect User Interface Objects to Your Code.”
As we’ll see later, you can also add objects to the view and manipulate their properties programmatically. In fact, applications of even moderate complexity typically perform a lot of manipulation in code. For complex apps, some developers eschew the storyboard and use the code-based alternative almost entirely.
Getting Into The Code
For even the most basic of applications to function, some code must be written. So far in the storyboard, we’ve laid out our user interface and the interactions between the view controllers. But no code has been written to perform the calculations, to persist the settings of the tip percentage and so on. That is all done by you, the developer, in Objective-C.
When an application is running, its overall lifecycle is handled by something called an “application delegate.” Various methods in this delegate are called when key events in the application’s lifecycle occur. These events could be any of the following:
the application is started,
the application is moved to the background,
the application is brought to the foreground,
the application is about to be terminated,
a push notification arrives.
The events above are handled in a file called AppDelegate. For our sample application, the default handling of these events is just fine; we don’t need to take any special action. The documentation has an overview of the application’s lifecycle and of responding to changes in an app’s state.
The next area of attention is the view controller. Just as with the application delegate, the view controller has its own lifecycle. The view controller’s lifecycle includes methods that are invoked when the following happens:
the view controller has been loaded;
the view controller is about to appear or has appeared on the screen;
the view controller is about to disappear or has disappeared from the screen;
the bounds of the view have changed (for example, because the device has been rotated) and the view will be laid out again.
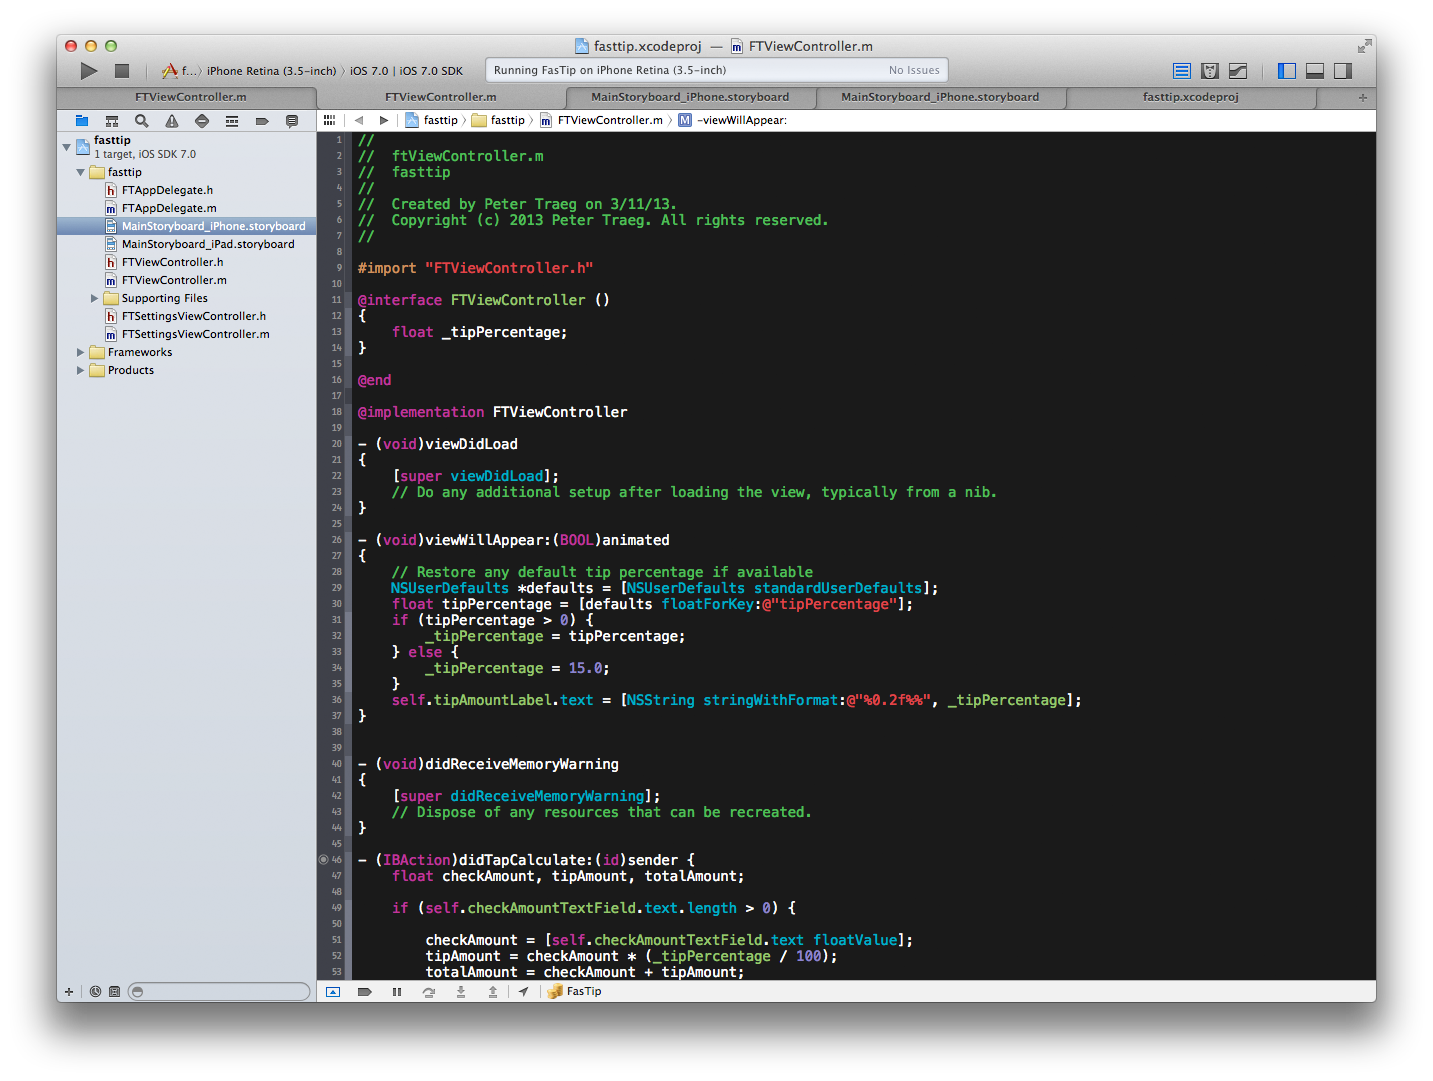
The main code for our application is in the FTViewController.m file. Here is the first bit of code that initializes our screen:
- (void)viewWillAppear:(BOOL)animated
{
    // Restore any default tip percentage if available
    NSUserDefaults *defaults = [NSUserDefaults standardUserDefaults];
    float tipPercentage = [defaults floatForKey:@"tipPercentage"];
    if (tipPercentage > 0) {
        _tipPercentage = tipPercentage;
    } else {
        _tipPercentage = 15.0;
    }
    self.tipAmountLabel.text = [NSString stringWithFormat:@"%0.2f%%", _tipPercentage];
}
In this application, we want to use whatever tip percentage value was stored in the past. To do this, we can use NSUserDefaults, which is a persistent data store to hold settings and preferences for an application. Keep in mind that these values are not encrypted in any way, so this is not the best place to store sensitive data, such as passwords. A KeyChain API is provided in the iOS SDK to store such data. In the code above, we’re attempting to retrieve the tipPercentage setting. If that’s not found, we’ll just default to 15%.
When the user taps the “Calculate Tip” button, the following code is run:
We’re simply reading the value that the user has inputted in the “Amount” field and then calculating the tip’s value. Note how the stringWithFormat method is used to display the tipAmount value as a currency value.
When the user taps the “Settings” button in the navigation controller, the segue that we established in the storyboard will push the settings’ view controller onto the stack. A separate view controller file, FTSettingsViewController, will now handle the interactions on this screen. Pressing the “Done” button on this screen will run the following code:
Here we’re retrieving the value from the text field and making sure that the inputted value is greater than 0. If it is, then we use NSUserDefaults to persist the setting. Calling the synchronize method is what will actually save the values to storage. After we’ve saved the value, we use the popViewControllerAnimated method on the navigation controller to remove the settings view and return to the prior screen. Note that if the user does not fill in the percentage correctly, then they will be shown the standard iOS UIAlertView dialog and will remain on the settings screen.
In the section above on view controllers and storyboards, I mentioned that the controls in a view can be manipulated programmatically. While that was not necessary for our application, the following is a snippet of code that creates a button and adds it to a particular location on the screen:
Generally speaking, all of the controls that you place in a view extend from an ancestor class named UIView. As such, buttons, labels, text-input fields and so on are all UIViews. One instance of a UIView is in the view controller. This can be referenced in your view controller’s code as self.view. The iOS SDK positions items in a view based on a frame, also referred to as CGRect, which is a structure that contains the x and y coordinates of the item, as well as the width and height of the object. Note in the code above that the button is instantiated and assigned a frame (location and size) and then added to the view controller’s view.
Running And Debugging An iOS Application
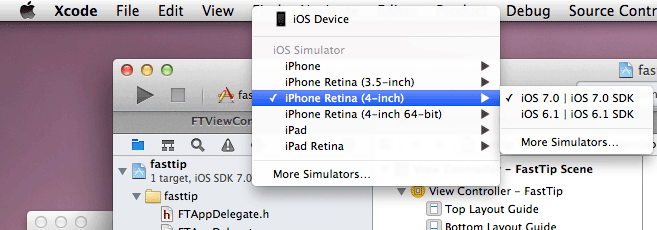
When Xcode and the iOS SDK are installed, so is the iOS simulator, which simulates an iOS device directly on your machine. Xcode has a drop-down menu that allows you to select different device configurations. Pressing the “Run” button in the upper-left corner will build the app and then run it in the chosen simulator.
Using the menu above, you can switch between iPhones and iPads of different sizes, as well as between Retina and non-Retina versions of each device.
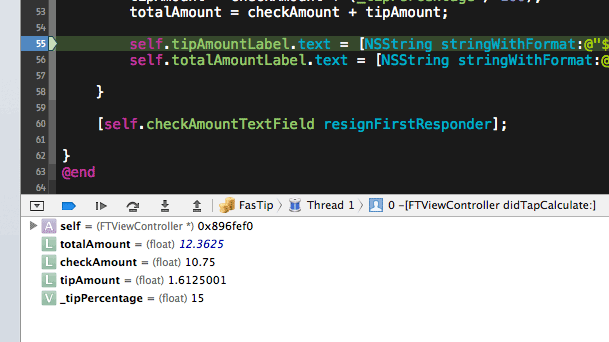
Debugging is done simply by clicking in the left margin of the code editor, where the line numbers appear. When the execution of your app reaches the breakpoint, the app will stop and the variable values in effect at that moment in time will appear below the code editor:
Some things, such as push notifications, cannot readily be tested in the simulator. For these things, you will need to test on a device, which requires you to register as an Apple developer for $99 a year. Once you have joined, you can plug in your device with a USB cable. Xcode will prompt you for your credentials and will offer to “provision” the device for you. Once the device is recognized, it will be shown in the same menu that allows you to switch between device simulators.
In Xcode, by going to Window → Organizer in the menu, you can display a tool that enables you to manage all of the devices visible in Xcode and to examine crash logs and more. The Organizer window also lets you take and export screenshots of your application.
Summary
Thus far, we’ve seen the basics of developing a simple native iOS application. Most applications are more complex than this, but these are the basic building blocks:
Xcode. The development environment
Storyboards. For laying out and configuring the user interface
View controllers. Provide the basic logic for interacting with each of the views defined in the storyboards
Navigation controllers. Enable the user to navigate between the different views
Learning Resources
To get started with iOS development, you might want to consult these useful resources:
iOS Programming: The Big Nerd Ranch Guide, Joe Conway and Aaron Hillegass This book is excellent. It guides you through both Objective-C and iOS development and will hold your interest with some nice functional examples.
Objective-C Programming: The Big Nerd Ranch Guide, Aaron Hillegass This book provides more detailed information about Objective-C, should you wish to delve into the language’s features, beyond what is covered in iOS Programming.
“WWDC 2013 Session Videos,” Apple After each Worldwide Developers Conference, Apple publishes videos of all of the sessions. iOS developers at every level will find something here.
“iOS 7 Design Resources,” Apple The documentation for iOS is quite good, and Apple has many well-written guides on key features of the iOS SDK.
This concludes the first segment of our tour of app development. I hope it has given you some insight into the basic concepts behind native app development on iOS. The next article in this series will cover how to build the same application using native Android development tools.


 Custom Web Forms for Angular, React, & Vue. Your backend.
 Celebrating 10 million developers