Four Ways To Build A Mobile Application, Part 3: PhoneGap

Email Newsletter
Weekly tips on front-end & UX.
Trusted by 182,000+ folks.


 Custom Web Forms for Angular, React, & Vue. Your backend.
 Celebrating 10 million developers
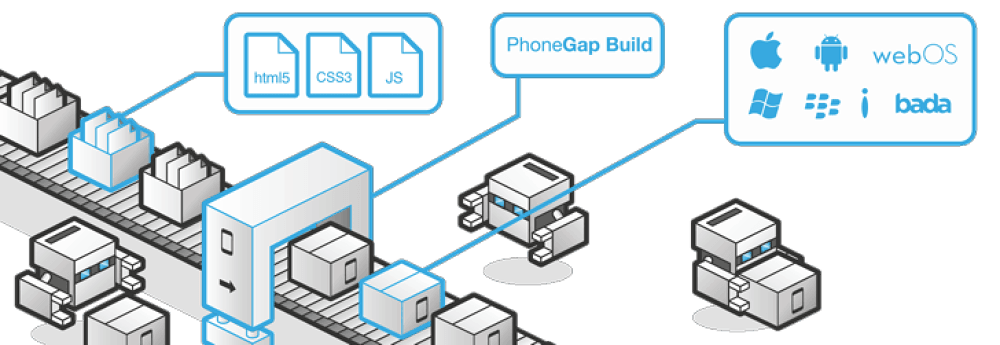
Adobe’s PhoneGap platform enables a developer to create an app that runs on a variety of mobile devices. The developer accomplishes this largely by writing the user interface portion of their application with Web technologies such as HTML, CSS and JavaScript. PhoneGap’s development tools then bundle the HTML, CSS and JavaScript files into platform-specific deployment packages. PhoneGap supports a wide variety of platforms:
- iOS
- Android
- Windows 8
- Windows Phone 7 and 8
- BlackBerry 5.x+
- WebOS
- Symbian
- Tizen
For this article, we’ll focus on getting our sample FasTip application running on iOS and Android:
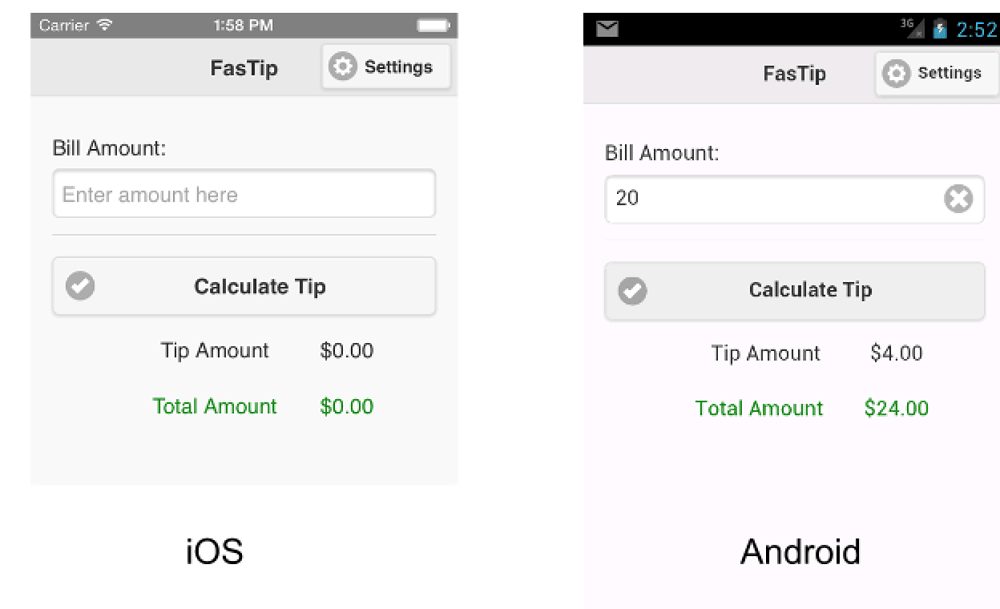
As with the previous articles in this series, all of the code for our application may be obtained from a GitHub repository.
Applications built with PhoneGap use the mobile platform’s Web view to render content. As such, the content will appear nearly identical on each platform, much as any Web page would. While you can style the controls differently on each platform, take care in doing this. This issue is covered in detail in the section below on multi-platform considerations.
Plugins: Closing The Gap On Native Features
PhoneGap essentially wraps a Web view of your HTML, CSS and JavaScript in a native application. This is required because the Web view in an application does not inherently support many device features, such as access to the file system or the camera. PhoneGap has a bridging mechanism that allows JavaScript running in the Web view to invoke native code contained in the application. PhoneGap comes complete with plugins to support device capabilities such as the following:
- accelerometer,
- camera,
- contacts,
- file system,
- media playback and recording,
- network availability.
A full list of capabilities for each platform is available on PhoneGap’s website. If these capabilities aren’t enough, PhoneGap may be extended with plugins that enable the developer to access more device features, including these:
- barcode scanning,
- Bluetooth,
- push notifications,
- text to speech,
- calendars,
- Facebook Connect.
In previous versions of PhoneGap, a GitHub repository contained a set of prebuilt plugins. With the arrival of PhoneGap 3, a new plugin architecture has resulted in the old repository being deprecated. A registry has been created for all plugins compatible with PhoneGap 3.
Some command-line tools are also provided to make it easy to add the plugins to the repository for your project. We’ll see these later on in this article. PhoneGap also publishes documentation and examples on how to write your own plugins. Of course, development of plugins assumes familiarity with the native platform on which the plugin is to be supported.
An HTML, CSS And JavaScript Foundation For Mobile Development
The majority of PhoneGap’s capabilities lie in non-visual components — things that access the file system, network availability, geolocation, etc. PhoneGap does not provide much assistance with building the user interface itself. For this, you must rely on the HTML and CSS foundation that you’ve built yourself or on a framework. Applications written for mobile browsers must respect the limitations of the given mobile platform (processing speed, screen size, network speed, touch events, etc.).
Unless you have been working with HTML and CSS for a long time and are well aware of these issues, developing an effective mobile application without some sort of framework can be daunting.
Fortunately, some mobile frameworks have arisen to help with this. Here are just some of the offerings in this area:
These frameworks vary from CSS-oriented libraries (like Topcoat) to complete MVC-based libraries with sets of mobile UI controls (like Sencha Touch). Discussing the differences between these frameworks in detail is beyond the scope of this article and would require an entire series of articles. Visit the websites above and try some of the demonstrations on several mobile devices.
One distinction to be made is that some frameworks support a wider variety of devices and device versions than others. Some mobile frameworks are built on a particular MVC platform. For example, Ionic is built on the AngularJS framework. This might make a particular library more attractive to developers who are already familiar with the respective MVC framework.
Frameworks such as Sencha Touch abstract the DOM from the developer through the use of APIs, freeing the developer from having to worry about details of browser vendor implementations. Sencha also provides graphic development tools, such as Sencha Architect, to aid the development process. Sencha provides commercial support and training, too, which are worth investigating.
I’m often asked to recommend a framework for mobile development. But the right tool depends largely on your application’s functionality, the mobile platforms you need to support, your demand for commercial support and your experience with Web and mobile development in general. I’m encouraged by some emerging frameworks, particularly Ionic, but as of the time of writing, Ionic is still in the alpha stage. If you are looking for something with a longer track record, then Sencha Touch or, for some cases, jQuery Mobile might be appropriate.
To be expedient and because of the wealth of tutorials and documentation available, I’ve written our FasTip application in jQuery Mobile, which provides a wide range of support for mobile devices. It’s a good choice for applications that do not require significant customization to the user interface. The simplicity of our application makes it well suited to jQuery Mobile.
PhoneGap Or Cordova: What’s In A Name?
In the process of learning about PhoneGap, you’ll encounter the name Cordova. In fact, the command-line tool that we’ll use in just a moment to create our PhoneGap project is named Cordova. Simply put, Cordova is the open-source project that is the basis of PhoneGap. Think of it as the engine that drives PhoneGap.
In most cases, the names may be used interchangeably. With “PhoneGap” already being trademarked, a new name was needed when the project was open-sourced — hence, Cordova. “PhoneGap” continues to be used by Adobe for commercial products. Most people still refer to the project as a whole as PhoneGap.

Installing PhoneGap
With the introduction of version 3, installing PhoneGap’s tools and setting up projects have been greatly simplified, thanks to the new command-line interface (or CLI). The command-line tools are based on Node.js; thus, you must install it before installing PhoneGap. Once Node.js is in place, simply run one command for the node package manager to install PhoneGap’s tools:
npm install -g cordova
Native SDKs: The Rest of the Equation
The command-line tools provide only the PhoneGap portion of the tools that are necessary for development. You will still need the mobile SDKs for the platforms that you wish to support. For this article, we’re mostly concerned with iOS and Android. For iOS, you’ll need to install the same developer toolset that we used when building native Objective-C applications.
Refer to the earlier article on native iOS development for instructions on installing those tools. This will give PhoneGap the tools necessary to compile and build your app into something that can be deployed to an iOS device. Likewise, to build applications for Android, you’ll need the Android SDK.
The previous article on native Android development provides some assistance in locating these tools and installing them. In addition, you may wish to consult PhoneGap’s documentation for details on installing for Android and iOS.
FasTip In PhoneGap
Given that FasTip is such a simple application, we don’t have to leverage much of PhoneGap’s functionality to access device features. Most of our time will be focused on the Web components needed to build the user interface. Unlike with native platforms, there is no vendor-supplied integrated development environment (IDE) for PhoneGap that is similar to Xcode or Eclipse.
Developers may use whichever IDE they please. I use JetBrains’ excellent WebStorm IDE for Web development because it suits PhoneGap development nicely. We’ve developed much of the FasTip application in WebStorm and tested it on the desktop version of Google’s Chrome browser, before packaging it for mobile devices in PhoneGap.
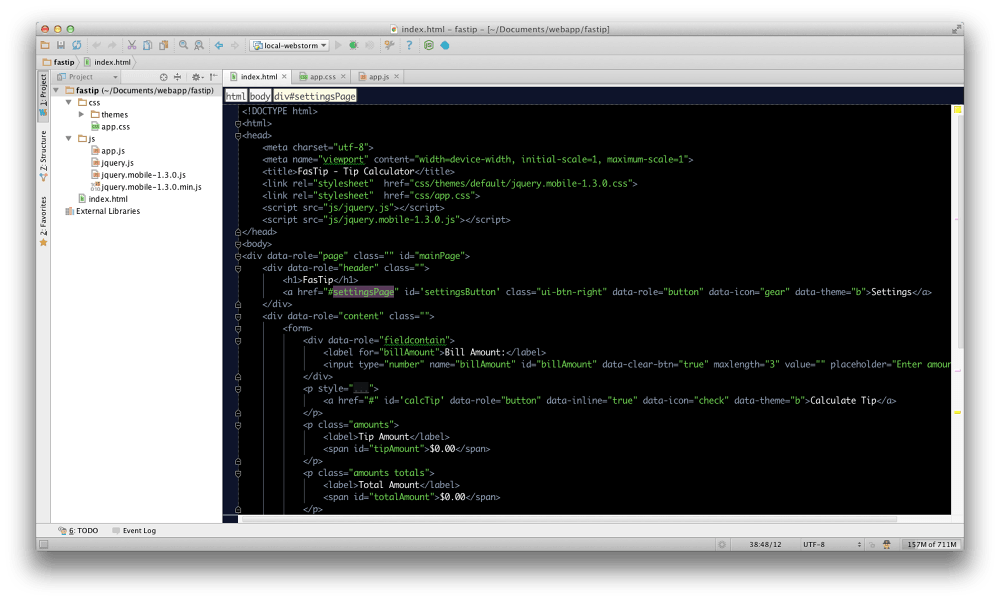
The figure above shows the FasTip application loaded in WebStorm. Note that relatively few files make up this project:
The user interface is shaped by index.html. This one file contains all of the HTML used by this application. The HTML starts out with this head section:
<head>
  <meta name="viewport"
    content="initial-scale=1, minimum-scale=1, maximum-scale=1">
  <meta charset="utf-8">
  <title>FasTip - Tip Calculator</title>
  <link rel="stylesheet" href="css/themes/default/jquery.mobile-1.4.0.css">
  <link rel="stylesheet" href="css/app.css">
  <script src="js/jquery.js"></script>
  <script src="js/jquery.mobile-1.4.0.js"></script>
</head>
The viewport meta tag scales the width of the page to match the width of the device’s browser. If this is not present, then the mobile browser wouldn’t know that the page is optimized for mobile use and would zoom out to display the page as though it were on a desktop browser.
Next, we load two style sheets. The vast majority of the CSS is contained in the jquery.mobile.css file, with a few minor application-specific CSS overrides in the app.css file. The head section then loads the scripts needed to support jQuery and jQuery Mobile.
Navigating Screens, jQuery Mobile-Style
Unlike our native apps, in which we had separate view controllers or activities for each screen, here we’ll place the HTML markup for both screens in one file. jQuery Mobile supports the concept of a page being divided into sections that make it appear to the user as though they are navigating between screens. In fact, the user would never leave this single Web page.
<div data-role="header">
<h1>FasTip</h1>
<a href="#settingsPage" id='settingsButton' class="ui-btn-right"
  data-role="button" data-icon="gear">Settings</a>
</div>
<div data-role="content">
<form>
<div data-role="fieldcontain">
<label for="billAmount">Bill Amount:</label>
Above is the code in the HTML file for the header of the main input form for the tip calculator. Note that many of the HTML elements have data- attributes. Pay particular attention to the data-role attribute, which indicates to jQuery Mobile the purpose of the various elements on the page. The data-role=“header” attribute defines the upper part of the page, which looks something like the UINavigationController in iOS apps. The data-role=“content” attribute is the main content of our page and displays the main form of the tip calculator.
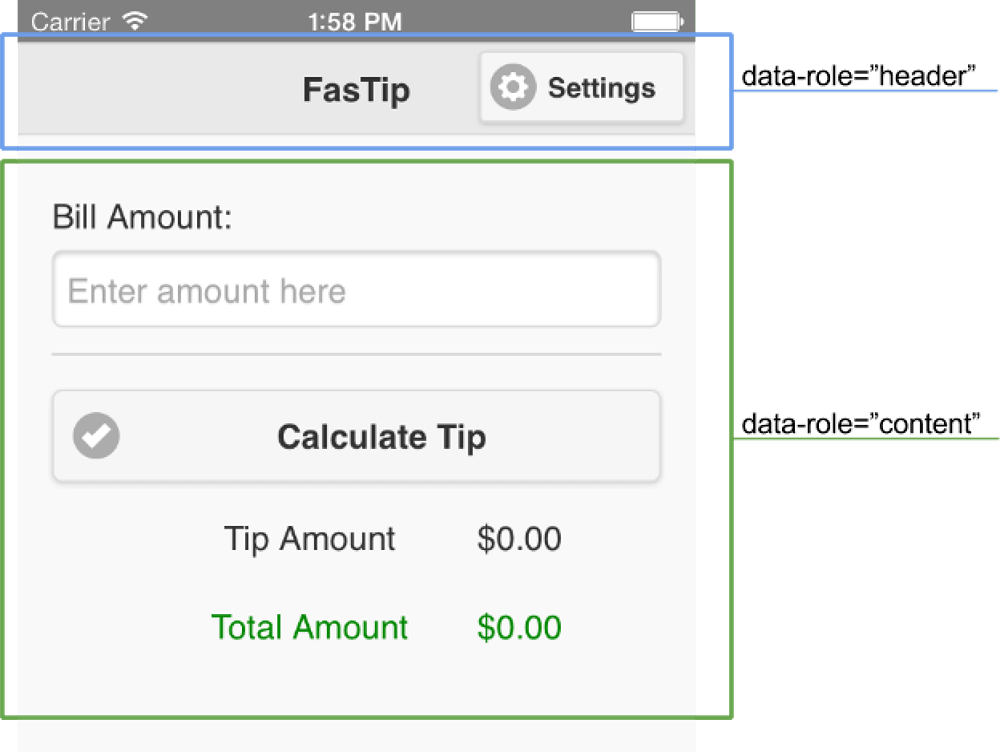
For our native iOS and Android apps, we had to write some code to enable the user to navigate between pages. In PhoneGap, a simple HTML anchor tag takes the user to the settings page:
<a href="#settingsPage" id='settingsButton' class="ui-btn-right"
data-role="button" data-icon="gear">Settings</a>
Further on in the HTML, we see this:
<div data-role="page" id="settingsPage" data-add-back-btn="true" >
  <div data-role="header">
   <a href="#mainPage" class="ui-btn ui-icon-delete ui-btn-icon-left"
    data-rel="back">Cancel</a>
   <h1>FasTip - Settings</h1>
  </div>
  <div data-role="content">
This div element defines the boundary of the settings page in our application. The page has a div in it for the header and the content, just like the main page. Note how the first anchor tag in the header div defines the “back” and “cancel” button that enables the user to return to the first screen. The data-rel=“back” attribute signifies that the link should close the current page and navigate to the main page, just like hitting the “back” button in a Web browser. In fact, pressing the dedicated “back” button on an Android device would perform the same function.
jQuery Mobile takes care of performing the transitions between these virtual “pages” in our application. Because much of the user interface and interaction between the controls is defined declaratively in our HTML, we have considerably less code to write to get the application running. All of our code is confined to a single app.js file that is just 41 lines long. The meat of our application starts with this snippet:
$( document ).on( "ready", function(){
  $('#calcTip').on('click', calcTip);
  $('#saveSettings').on('click', saveSettings);

  var tipPercentSetting = localStorage.getItem('tipPercentage');

  if (tipPercentSetting) {
   tipPercent = parseFloat(tipPercentSetting);
  }

  $('#tipPercentage').val(tipPercent);
});
When the document is ready, event handlers are attached to the buttons in order to calculate tips and save settings. In this example, we’re using HTML5’s localStorage object to persist the setting for a tip percentage. PhoneGap supports localStorage and will save the content in the proper directory of the native platform to ensure that the data is backed up with the device’s normal backup mechanism. When the user choses to save their settings, the following code is run:
var saveSettings = function() {
  try {
   var tipPct = parseFloat( $('#tipPercentage').val() );
   localStorage.setItem('tipPercentage', tipPct);
   tipPercent = tipPct;
   window.history.back();

  } catch (ex) {
   alert('Tip percentage must be a decimal value');
  }
};
Note the use of localStorage.setItem to write the tip percentage under the key of tipPercentage. Once the user has saved their tip percentage, they return to the previous screen. Because jQuery Mobile integrates with the browser’s History API when transitioning between pages, we can leverage the History API here and simply jump back to the previous page via window.history.back();. On Android where the device supports a “back” button, this will have the same effect as hitting the browser’s “back” button and moving back one screen.
For more complex apps, jQuery Mobile also enables you to dynamically load new pages, rather than place all of the markup in one file. This is the preferred approach if your application has several screens, because maintaining all of the markup in one file would become difficult and the mobile browser would have to parse that large document before rendering anything. Forcing the browser to process a large document would slow down the startup time of your application.
Calculating the value of the tip is done with the following code:
var calcTip = function() {

  var billAmt = Number( $('#billAmount').val() );
  var tipAmt = billAmt * tipPercent/100 ;
  var totalAmt = billAmt + tipAmt;
  $('#tipAmount').text('$' + tipAmt.toFixed(2));
  $('#totalAmount').text('$' + totalAmt.toFixed(2));

};
This is standard jQuery code for reading the bill amount, calculating the tip percentage and returning the results to the display fields on the page. When the user taps on the calcTip button, the calcTip function is invoked via an event handler that is attached when the DOM is loaded and ready:
$( document ).on( "ready", function(){
  $('#calcTip').on('click', calcTip);
  …
});
The interaction between the DOM and the HTML and CSS should be familiar to anyone who writes Web pages. Of course, other frameworks, such as Backbone.js and AngularJS, may be employed to bind data, render content from templates and so on. This is an important aspect of PhoneGap: It does not dictate that particular libraries or CSS be used. Use whatever tools you want to get the job done.
Getting Our Project Into PhoneGap
PhoneGap provides a command-line tool, named Cordova, to set up a new project, build an application, run the application and install plugins. Follows the steps below to set up a project in PhoneGap.
Step 1
To create our application, navigate to an empty directory and use the create command:
$ cordova create fastip org.traeg.fastip FastTip
This command will create a subdirectory, named fastip, to hold our application files and to establish a new application named FasTip, with an org.traeg.fastip namespace.
Step 2
Switch to the fastip directory that PhoneGap has just created from the command above.
Step 3
We’ll need to tell PhoneGap which platforms we want this app to run on. We’re supporting iOS and Android, so run the following two commands to support them:
$ cordova platform add ios
$ cordova platform add android
Step 4
We can test our project to see whether PhoneGap has been properly initialized:
$ cordova build ios
$ cordova emulate ios
This will compile the application for iOS and then run it in the iOS simulator.

To run the application on Android, you would use the following commands:
$ cordova build android
$ cordova emulate android
Note the directory structure that PhoneGap has established:
platforms/ios
platforms/android
Note also that the sample code is copied by PhoneGap into the respective iOS and Android subdirectories. When you run the build operation, PhoneGap updates the respective build directories and places the updated files in a project suitable for each platform. If you examine the iOS directory, you’ll see that an .xcodeproj file has been created.
In fact, this project may be opened in Xcode, like any other iOS project. Similarly, the Android project may be readily imported into Eclipse. Do not change the contents of your application’s files in the platform directories, or else they will be overwritten the next time the build process is run.
Step 5
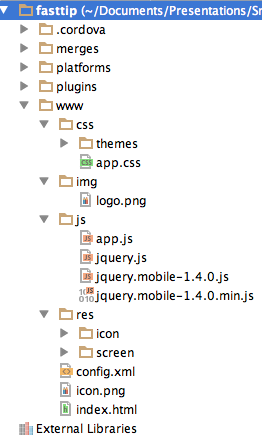
We can place the various files that comprise our application in the www folder directly in the project’s root. The next time the cordova build command is executed, the application’s content will be copied to the respective platform directories, and the application will be run with that new content.
Note that our Web application’s entire structure resides in this www directory. When you create a new PhoneGap project, it is preconfigured to run whatever is in the index.html file in the www directory. In addition to the Web files that we’ve added to the project, one more file is important to a PhoneGap application, config.xml. This file controls various options used in the build process, including the display of a startup splash screen, viewport scaling, supported device orientations, etc. The settings for this file will vary according to the platform, so review the settings for each.
Also, note that PhoneGap has a merges directory. In this directory you can place platform-specific files, which will be copied to the respective build directories. In this way, you can customize HTML, CSS and JavaScript files to each platform.
Considerations For Supporting Multiple Platforms
We’ve seen that, by using PhoneGap and a framework like jQuery Mobile, building a cross-device application is easy. One caveat with jQuery Mobile is that both iOS and Android users would see the same UX; that is, the UX would not be tailored to the respective platform, much like a Web page looks the same whether viewed on OS X or Windows.
Attempting to mimic the native platform controls in HTML and CSS is generally a bad idea. While you could approximate the look of the native platform, mimicking the feel of the platform is exceedingly difficult. The controls might not respond to taps and other gestures in exactly the same way. The result is usually a UX that just feels wrong. Successful PhoneGap projects generally eschew this approach in favor of a platform-independent UX.
If your project requires an experience that closely matches that of the native platform, PhoneGap might not be the right choice.
HTML5 capabilities vary widely across devices. While iOS and Android browsers are built on WebKit, some features are implemented only in the latest versions of the platforms. One useful website for checking browser version capabilities is Mobile HTML5. The browsers on some old platforms, particularly Android 2.x, have various rendering bugs, which could also hamper your development.
Frameworks such as jQuery Mobile and Sencha Touch take these compatibility issues into account. If you choose to roll your own solution, perhaps to gain greater control over the UX, then you will need to plan additional time for testing, particularly for old device versions, on which HTML5 support is less consistent.
jQuery Mobile makes it easy to get started and provides a good feature set for simple applications. Much of the functionality on the screens of our sample application is provided by jQuery Mobile itself, leaving us with less code to write. However, the speed of development with jQuery Mobile comes at the expense of customization. While jQuery Mobile does offer a “theme roller” tool to customize appearance, much of that is “chrome” related to colors and visual attributes like rounded corners.
Assess whether your application fits jQuery Mobile’s paradigm. The platform does offer some alternate layouts for things like forms, but the options are still somewhat limited. If your application requires a truly custom look or layout, then you might find jQuery Mobile too confining. Consider one of the frameworks suggested earlier. Or adopt a “best of breed” approach, mixing a CSS-oriented framework (such as Twitter Bootstrap, Zurb Foundation or with an MVC framework (such as AngularJS or Backbone.js).
Some of the large mobile solutions, such as Sencha Touch and Ionic, marry a powerful MVC platform to a set of prebuilt controls focused on mobile development. These tools are attractive and worthy of consideration. But bear in mind the different range of devices that each of these tools supports. At the moment, Sencha Touch supports more devices than Ionic, but jQuery Mobile supports even more. This should also factor in your selection process.
Using A Native Plugin
If you try our sample application on iOS 7, you’ll run into an issue with the device’s status bar that has affected many PhoneGap applications. That is, the status bar now overlaps the top of the application:
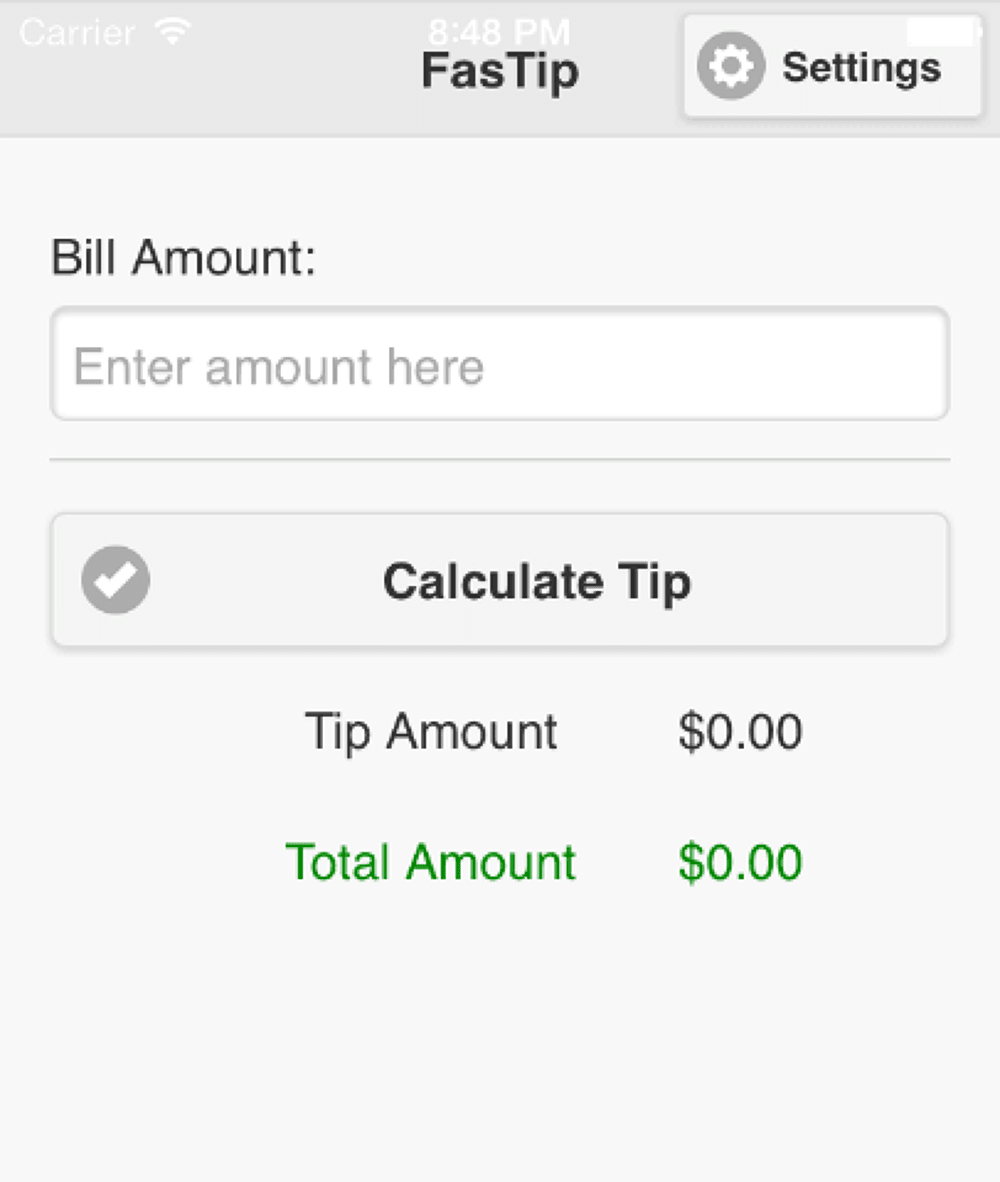
You could give the body tag a 20-pixel top margin to make the page clear the status bar, but that would cause problems on iOS 6 and Android. A cleaner solution is to use a native plugin that fixes this specific issue. To add the plugin to our sample project, we’ll use this command:
cordova plugin add org.apache.cordova.statusbar
This pulls the necessary code from the plugin repository into our application. Now we’re ready to invoke the plugin in our code:
$( document ).on( "deviceready", function(){
  StatusBar.overlaysWebView( false );
  StatusBar.backgroundColorByName( "gray" );
});
This snippet of code waits for the deviceready event from PhoneGap, which tells our application that the PhoneGap environment has been initialized and is ready to receive commands from the JavaScript. The StatusBar object has been added to the window namespace via the PhoneGap plugin system so that we can access it via JavaScript.
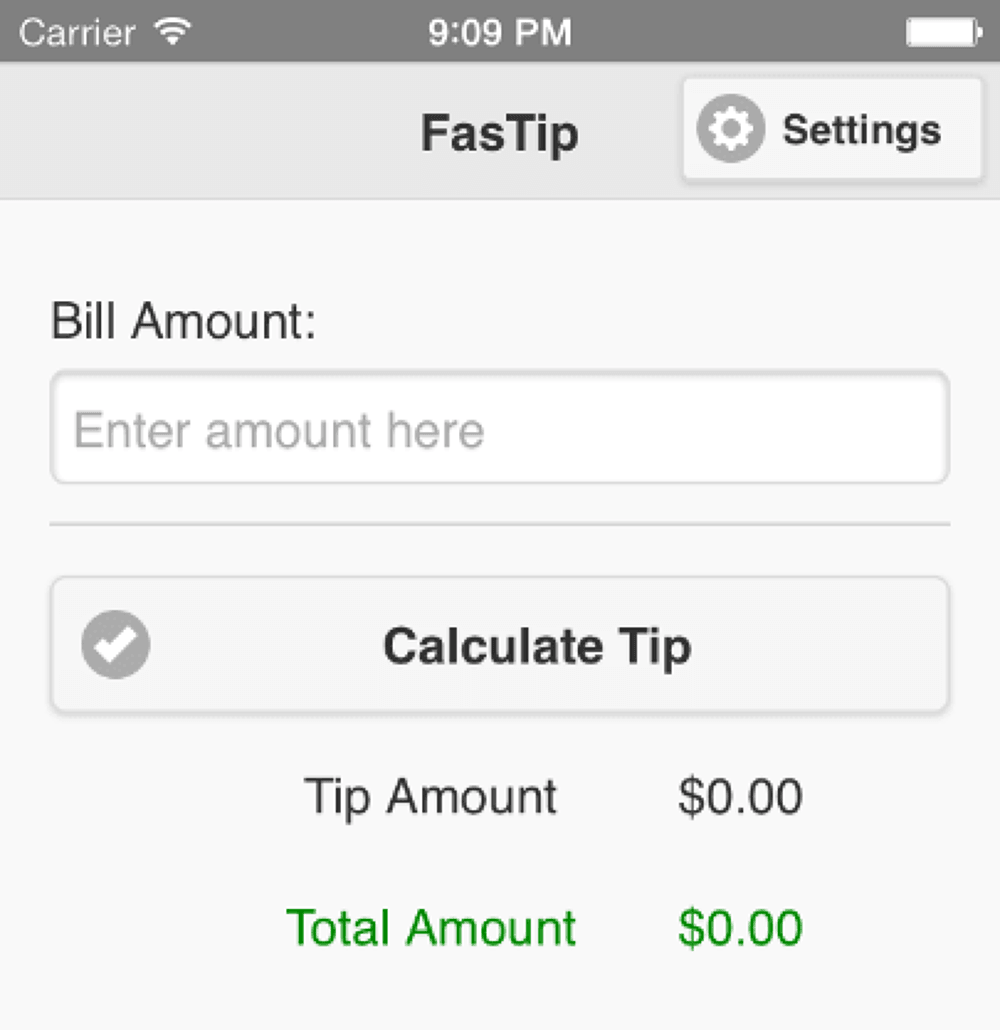
The following screenshot shows the status bar overlay being turned off, as well as the background color of the status bar being changed to better fit our application:
Building In The Cloud
Generally speaking, to build an application for a particular platform, you must install the SDK for that platform on your machine. This could be a problem if, for instance, you’re on a Mac and want to target Windows tablets, whose SDK requires you to be on a Windows machine. Adobe offers a service named PhoneGap Build to help in this situation.
PhoneGap Build enables you to upload a ZIP file containing the HTML, CSS and JavaScript of your application. Additionally, PhoneGap 3 enables you to submit an application to PhoneGap Build right from the command line; from there, PhoneGap Build takes over and produces a deployment bundle for the desired platform.
Once the build process is complete, you may either download the deployment bundle and manually install it to your device or take a picture of a QR code on PhoneGap Build’s website and download the deployment package directly to your mobile device. What’s more, PhoneGap Build supports a feature named Hydration, which enables the application to download updates to the HTML, CSS and JavaScript files whenever it launches.
This means that testers will always be running the latest version of your application, without having to go through the traditional updating process. Note that, at least for now, Hydration is meant for development and testing — not for final production code that will be submitted to the app store.
Development in the Cloud
You can do more than simply compile and package your application in the cloud. Cloud-based Icenium provides a browser-based IDE that lets you edit code in a browser and immediately turn those edits into a deployment package. Using an application in the iOS App Store named Icenium Ion, you can dynamically load updates to your application as you change the code in the Web-based IDE.
In addition, Icenium bundles a license to Telerik’s KendoUI library. I’ve used this to make changes to an iOS PhoneGap application while on a Windows-based laptop. Icenium also offers a Windows desktop IDE named Graphite, which expands on the capabilities of the browser-based tool.
Another alternative to PhoneGap Build is AppGyver. It is not an IDE like Icenium, but it does offer a UX library, named Steroids, that facilities navigation between Web views using some native controls. Note that for page content itself, you must still use HTML and CSS.
The main downside to cloud-based development services is that they have limited support for PhoneGap plugins. However, new plugins are being supported all the time. Determine your application’s needs to see whether a particular cloud-based tool supports the plugins you require.
Debugging Your Application
In most cases, when attempting to debug an application, you’ll be mostly concerned with debugging the JavaScript, examining the console log and perhaps doing some interactive inspection and manipulation of the DOM. Unfortunately, there is no integrated way to debug across all platforms. However, there are several useful techniques, covered below.
Chrome DevTools
I generally find it easiest to work with Chrome DevTools by treating my pages as standard Web pages loaded in a desktop browser (although this doesn’t help with the portions of code that rely on PhoneGap plugins). Chrome DevTools provides an emulation panel that simulates the aspect ratios, touch events and more of various mobile device screens.
Apache Ripple
Apache’s Ripple is a NodeJS project that serves PhoneGap content in a desktop browser. Ripple enables you to experiment with different screen sizes and orientations. It also allows you to simulate geolocation coordinates and network connectivity events, as well as allows JavaScript code to invoke many of PhoneGap’s core plugins while running in a desktop browser.
Do not confuse this newer NodeJS-based version of Ripple with the outdated Chrome browser extension. The Chrome extension is no longer supported and is not compatible with PhoneGap 3.
Using Desktop Safari to Debug Web Views in iOS Apps
Starting with Safari 6, Apple has included support for using the Web inspector in desktop Safari to debug Web views running in the simulator. With your app running in the simulator, simply go to the “Develop” menu in Safari and look for the “iPhone Simulator” option. This will connect the Web inspector to the running instance of your PhoneGap application and will allow to you manipulate the DOM, set breakpoints in JavaScript, etc.
Using Chrome DevTools to Debug Web Views in Android Apps
Starting with version 4.4, Android’s Web view is now based on Google Chrome. With this change comes the ability to connect to the Web view from DevTools and to debug interactively, just like you can with iOS. If you don’t have a 4.4 device, fear not: It works with the 4.4 emulator as well. Note that you’ll need to add a special plugin to your PhoneGap project to enable Web view debugging on Android.
Web Inspector Remote
Web Inspector Remote (WEINRE) provides a partial set of debugging features, including DOM manipulation and access to the console. However, it does not support JavaScript debugging. Add WEINRE to your application by including a script tag in your application’s HTML and running a NodeJS server that this script connects to. The main advantage of WEINRE is that it works with earlier versions of WebKit on mobile devices and is one way of debugging cross-platform.
The PhoneGap wiki also has a page on debugging, with links to other tools.
Learning More
Much of the work you’ll do with PhoneGap requires a strong understanding of HTML, CSS and JavaScript. Consult resources such as Nicholas Zakas’ excellent book Professional JavaScript for Web Developers to build a foundation for development with PhoneGap. Of course, other resources exist for jQuery Mobile, AngularJS, Backbone.js and other frameworks. Google and Udacity have recently teamed up to offer an online course on mobile Web development, whose content applies to PhoneGap applications as well.
As for PhoneGap itself, the project has some introductory guides for each platform. And Adobe publishes a free monthly digital magazine, Appliness, covering Web and PhoneGap development. The PhoneGap wiki covers issues such as debugging and security. Finally, some great blogs by Adobe’s technical evangelists cover PhoneGap and Web development:
- Andrew Trice provides a lot of sample code, along with some great performance tips.
- Christophe Conraets has a number of articles on ways to structure an application using MVC frameworks. He also covers how to integrate with server resources.
- Raymond Camden offers a variety of articles on PhoneGap plugins and PhoneGap Build.
- Holy Schinsky has a series of articles on how to use and write PhoneGap plugins, as well as on how to incorporate push notifications.
If you’d like to further explore the marriage of native code and Web code to produce mobile applications, my Smashing Magazine article on “Mixing HTML5 and Native Code” might be of interest.
In the next and final installment in this series, we’ll explore another way to develop an application for multiple platforms, with Appcelerator Titanium.
Further Reading
- Getting Started With The GetX Package In Flutter Applications
- How To Design An Effective User Onboarding Flow
- WWDC 2018 Diary Of An iOS Developer
- Bringing Your App’s Data To Every User’s Wrist With Android Wear


