How To Create A Self-Paced Email Course

Email Newsletter
Weekly tips on front-end & UX.
Trusted by 182,000+ folks.


 Celebrating 10 million developers
 Custom Web Forms for Angular, React, & Vue. Your backend.
When I realized I had written what seemed to be a course (i.e. not my usual article or book), I was left with a sense of panic. There are so many options for running an online email course, and all of them seem slightly confusing or time-intensive to set up.

Then I remembered the autoresponders feature in my newsletter application (I use MailChimp, although every newsletter software has it). I could trigger lessons with autoresponders and deliver course material to where most people spend most of their day: the inbox.
Another problem was that the course was about writing a book, and some of the lessons were slightly onerous — like “Write a first draft.” So, setting a fixed time delay wouldn’t work because some people complete things like that much more quickly than others.
Instead of automatically firing off each lesson after a set amount of time, I created a series of lessons via autoresponders that fired only when the previous lesson was marked as finished. That way, I got to deliver each new lesson only when the student had finished the previous. This method does not require you to configure any website, plugins or additional software (beyond setting up a mailing list and creating pages on your existing website, which you probably already know how to do).
I made my own course, Write and Sell Your Damn Book, free for a few reasons. First, I was able to bring some sponsors on board to give me enough money to make it worthwhile to create and set up. Secondly, I felt that the course material should be available to anyone, on any budget, who is writing a book.
Thus, the course made money before it launched, but the downside is that it made a fixed amount of money. I set up additional (albeit minor) revenue streams for it — affiliate links on Amazon to recommended books on the same subject, links to my own paid books, as well as the course in Kindle format, just in case people wanted to read the material all at once.
Using the method outlined below, I created a self-paced email course that had over 1,000 registrations in the first 24 hours, and almost 2,500 in the first week. There are other ways to do this using MailChimp, such as triggering the completion of a course with a URL, but this is how I set up mine.
1. Create A List
This list is only for people who will take your email course. Make sure the publicity settings are set to non-public and non-archivable (otherwise, people will be able to share the lessons with whomever they want).
Check “No, my campaigns are not public,” and uncheck “Activate the archive bar.”
When creating autoresponders, ensure that you remove the “View this campaign in a browser” link, to further discourage shareability. To take things one step further and make sure only subscribers see some or all of the course’s content, read up on conditional merge tags.
2. Match The Colors And Fonts In The Course Material To The Registration Process
You’ll find these by going to “Signup Forms” and then “General Forms.” Match the fonts, colors and logo of the course’s website for a consistent user experience.
3. Select “Send A Final Welcome Email”
You’ll find this option in the drop-down menu on the “Create Forms” page; it will be automatically selected, unless you’ve unchecked the box. Add text to this email (scroll down to edit the contents), informing users to “Click the completed lesson” button in each lesson to get the next lesson.
Later, we’ll get into how to set this up, but essentially each lesson’s email will have a link that users can click when they’re finished to notify MailChimp to deliver the next lesson.
Also, in this final welcome email, let users know when the first lesson will be delivered.
4. Set Up The First Lesson And Autoresponder
Go to “Autoresponders” and then “Create autoresponder.” Select the entire list to be the recipients. On the next page, the event that triggers this autoresponder is “Subscription to the list.” Make sure that “Also trigger on list import” is checked if you want to use Twitter cards or if you will be charging for the course (more on this later).
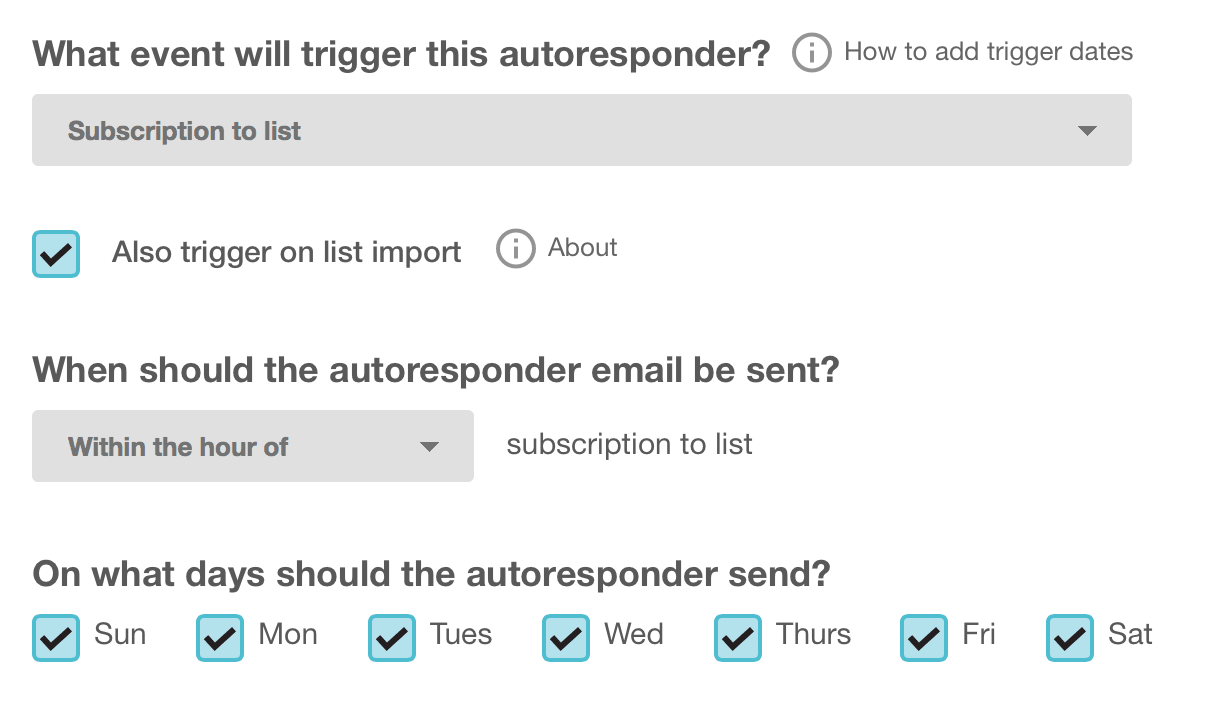
Choose whether to send it within the hour or at another time and date. On the set-up and campaign information page, give the campaign a subject line and make sure that, under “Tracking,” “Goal Tracking” is checked — this is important because it will trigger the next autoresponder lesson.
5. Set A Goal For Your Campaign
A goal is simply a URL that you add to the lesson. For my own email course, I created a few pages on my website that thanked the user for completing the lesson. For example, I added a button to the campaign for lesson 1, reading “I have completed this lesson” and linking to http://mydamnbook.com/lessons/lessonone.
The URL may be anything, but if you are setting a reminder email (more on this later), then the URL must contain the same folder — in this case, lessons. If you use WordPress, this is simply the parent page, and each individual lesson would be a child page of the parent, /lessons/.
These pages that live on your website are important for firing off autoresponders, as well as for letting the user know that a lesson has been completed and that a new one is on the way.
A good marketing strategy is to add some social engagement to the completion page for each lesson, such as “Tweet that you’ve finished lesson 1,” with a hash tag for your course or sharing buttons, so that users can let others in their network know about the course and where to sign up.
6. Set Up Subsequent Lessons By Creating A New Autoresponder
Set the entire list as the recipients. On the next page, set “Specific link in the campaign is clicked” as the event to trigger the autoresponder.
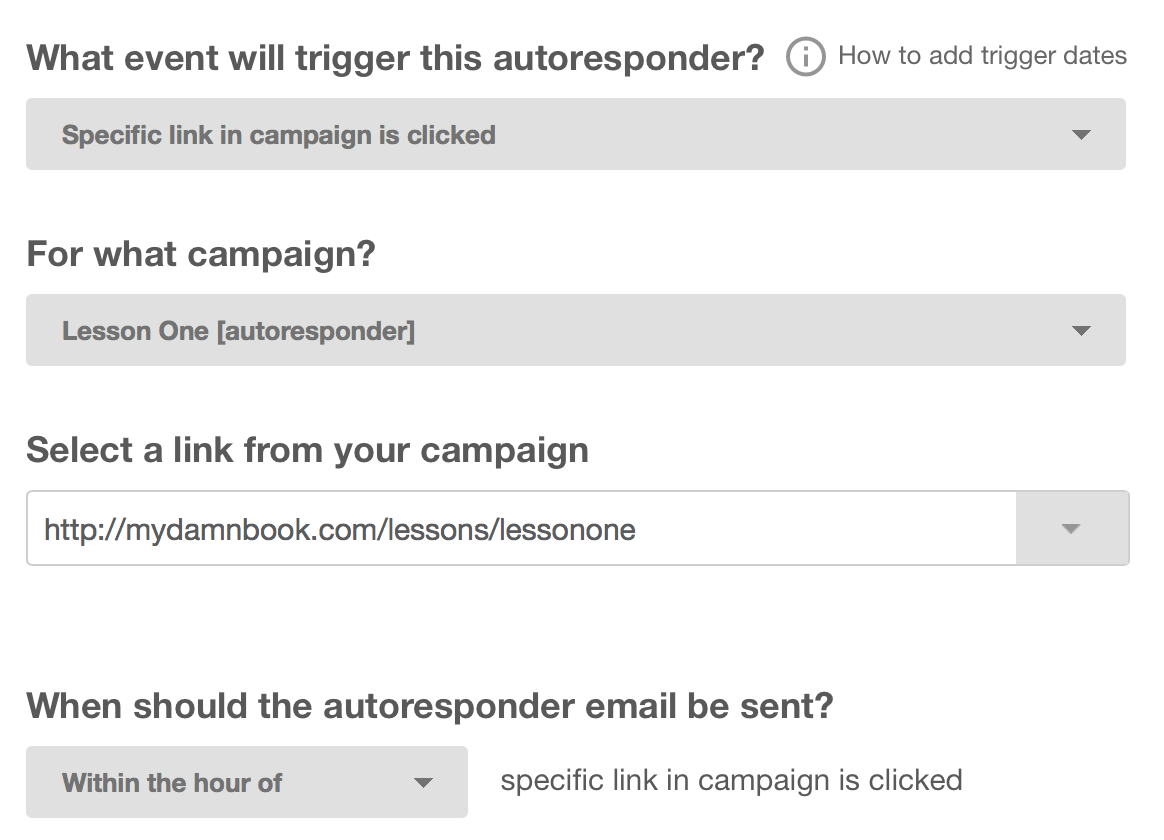
Then, select the previous lesson. If you’re creating lesson 2, then select lesson 1’s autoresponder from the drop-down menu. Then, choose “Select a link from your campaign” and select the URL that you used for the button that tells the user they have completed that lesson.
Set the autoresponder to send either within the hour or at a time and date of your choosing. I always pick “Within the hour,” so that the user gets the next lesson fairly quickly.
Make sure to track goals for every lesson you create (otherwise, the URL clicks won’t be tracked by the following lesson).
To create lesson 3, you’d follow the steps above but would select lesson 2 from “For what campaign” and the lesson 2 completion URL for “Select a link from your campaign.” And so on, until you’ve added all of the lessons.
7. Set Up Additional Emails (If Needed)
In addition to the lessons, you may want to send out a different type of email a day or two after the final lesson has opened. The email could include additional resources, an “About the author” section, or perhaps a review of the course (if you’ve got one).
Select “Send to the entire list” for the recipients.
For the autoresponder, select “Campaign is opened” as the event to trigger the follow-up email, and select “For what campaign” as the final lesson (via the drop-down menu). Then, select the amount of time for “When the autoresponder should be sent.” If the email is a review or list of resources, then sending it a day or two after makes sense, while the lessons are still fresh.
8. Set Up A Reminder Email
Because the course is self-paced, people won’t get the next lesson if they forget about the email for the current lesson, so setting up a course reminder autoresponder is another good idea.
From step 5, if the same folder is in the URL for each lesson (in this example, /lessons/), then it’s simply a matter of creating a new reminder autoresponder that sends to a new segment of the list.
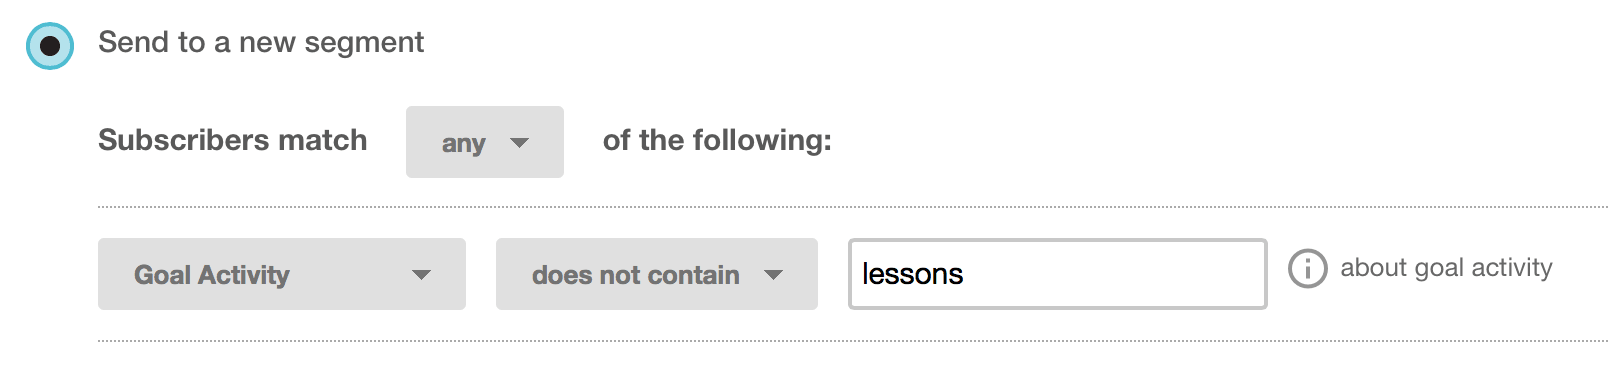
To do this, start an autoresponder, select “Send to a new segment,” then pick “Subscribers match,” and then “Any” from the drop-down menu.
In the next drop-down menu, choose “Goal Activity,” then “Doesn’t match,” and in the field type in the folder URL of all lessons (in this case, lessons) (don’t type the full URL or any slashes).
On the next page, select “Subscription to the list” as the event to trigger the autoresponder.
When setting the autoresponder, estimate a reasonable time which people would take to complete a lesson. For my own list, I’ve set the reminder to “45 days” after a user has stopped clicking anything.
Remind people that they’ve signed up for the course and, if they’ve forgotten about the lessons, to go back and read the current one (and click that they’ve finished it once they have). I also offer helpful suggestions on how to get over being stuck in the writing process.
Integrate With Payment Solution (Optional)
If you want to charge for the course, you will need to collect the user’s money before the course lessons start firing. I use Gumroad to sell items online; while it doesn’t directly integrate with MailChimp, one easy additional step makes it happen.
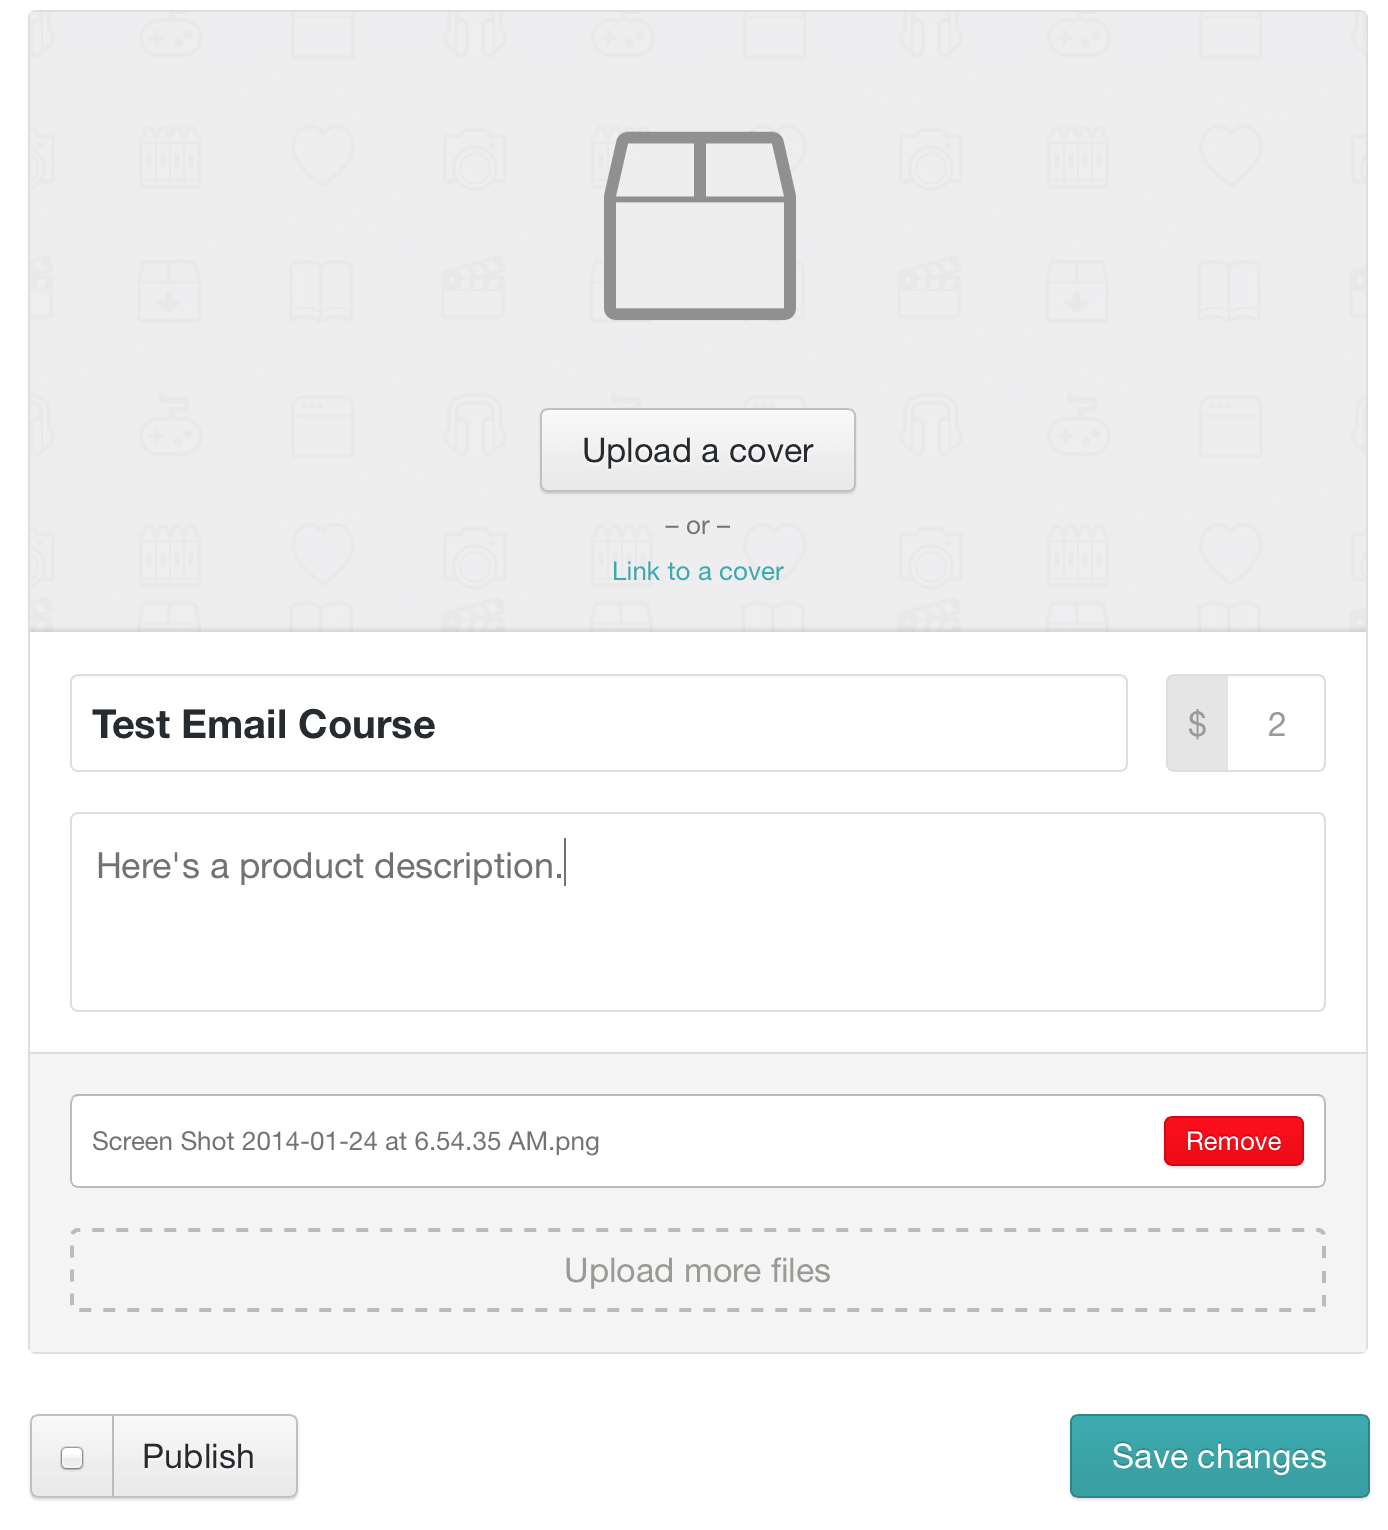
Giving your course a price can be done in one easy step. (View larger version.)
In your Gumroad account, click “Add a Product,” and then select the product. Where it asks for a file, create and upload a PDF of the text in your “Final welcome email” that tells people they’ve successfully signed up for the course and will get the first lesson within an hour.
Give it a price, and then “Add” the product. The next screen lets you upload a graphic (or video) and a description of the course. When it’s ready, click “Publish.”
To add an incentive (for example, to reward users with a discount for signing up early), click on the “Options” tab and create an offer. Otherwise, you’re done!
To integrate with Zapier, create a secret “free” offer, which you can use to finish the process, and delete it when you’re done.
Next, to connect Gumroad to MailChimp, sign up for an account with Zapier. Free and paid options are available. If you expect fewer than 100 users, go with a free account. Otherwise, it’s fairly cheap, and it scales. If 50,000 people are signing up a month, then the $99 per month price tag is well worth it.
By connecting Gumroad to MailChimp you can automatically add purchasers of your Gumroad product to your course’s mailing list. (View larger version.)
Once you’ve got an account, click “Create a Zap.” The trigger service is Gumroad, and the action service is MailChimp. For “Choose a trigger,” select “New sale.” For “Choose an action,” select “Add subscriber,” and then continue. From there, follow the steps to connect both your Gumroad and MailChimp accounts to Zapier.
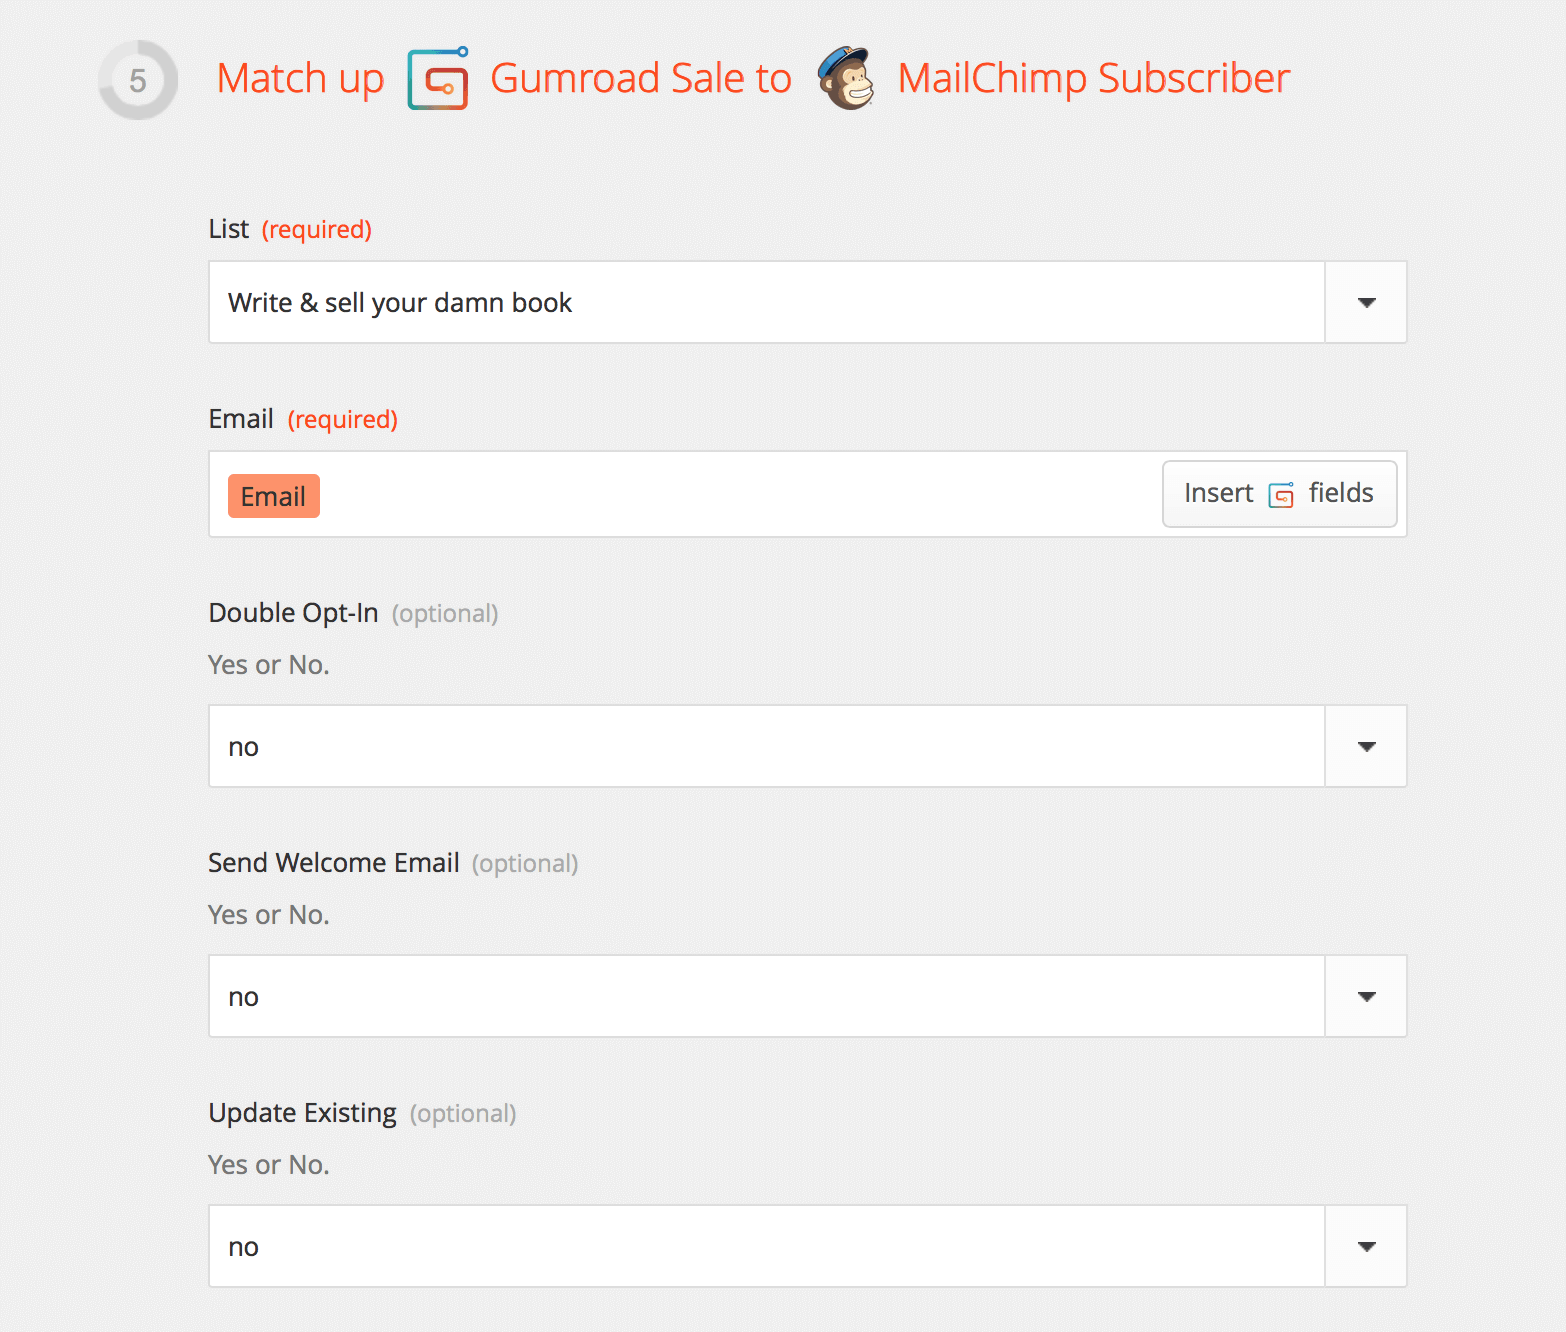
Next, choose your “Product” (which would be your course if you have more than one product in Gumroad), and then continue. Then, choose which MailChimp mailing list to put subscribers in. When you click on “Insert fields” in the email section, Zapier will ask you to create a new purchase of your product. Go back to Gumroad and do that (using the free discount code), and continue with the process. Make sure to select “Email” in the email drop-down menu.
Also, select “No” for “Send a welcome email” because subscribers will get the PDF as a download immediately upon paying. Click “Continue,” name the Zap whatever you’d like, and turn it on!
Now, whenever someone purchases the Gumroad product for your email course, they will be automatically added to the course’s mailing list and will start receiving lessons.
And that’s how you create a self-paced email course using MailChimp, Gumroad and Zapier.
Further Reading
- Useful Learning Resources For Web Designers
- How To Improve Your Email Workflow With Modular Design
- Design And Build Email Newsletters Without Losing Your Mind
- How To Optimize Email Newsletters With CSS
Credits of the image on the front page: Sneaky Pizza.


