Four Ways To Build A Mobile Application, Part 4: Appcelerator Titanium

Email Newsletter
Weekly tips on front-end & UX.
Trusted by 200,000+ folks.


 RSVP HERE

 Flexible CMS. Headless & API 1st
This article is the last in a series of articles covering four ways to develop a mobile application. In previous articles, we covered how to build a tip calculator in native iOS, native Android and PhoneGap. In this article, we’ll look at another cross-platform development tool, Appcelerator Titanium.
PhoneGap enabled us to build a tip calculator app quickly and have it run on both the Android and iOS platforms. In doing so, we were left with a user interface (UI) that, while quite usable, did not offer quite the same experience as that of a truly native application. Our PhoneGap solution leveraged a Web view and rendered the UI with HTML5 and CSS3.
By contrast, Appcelerator Titanium applications render the UI using the platform’s native controls. Titanium is intended to provide the experience of a native UI, along with portability between the iOS, Android and BlackBerry platforms. Appcelerator plans to release support for Windows Phone and Windows 8 later this year.
Here’s the Appcelerator Titanium version of our sample FasTip application running on both iOS and Android:

FasTip application on iOS. (Large preview)

FasTip application on Android. (Large preview)
With Titanium, an application is written in JavaScript. However, instead of manipulating an HTML DOM, as would be done in a PhoneGap application, the JavaScript is interacting with Appcelerator Titanium’s API. Titanium provides UI objects for things like buttons, text fields, lists and so on, and these are backed by the mobile platform’s truly faithful representation of the respective native controls. In many cases, the code you write for one platform can run unmodified on other platforms as well. However, as we’ve seen with native iOS and Android’s different approaches to navigating screens (for example, ViewControllers with the NavigationController on iOS and Activities in Android), not all of these differences can be abstracted well. As such, even with Appcelerator, at least some parts of your code will have to be written specifically for each platform.
Appcelerator consists of a suite of products, including the Titanium SDK for building mobile applications, and some cloud services that can be used for the back end of the application. The products may be used independently of one another or in combination. The Titanium SDK and an integrated development environment (IDE) are offered free of charge for any commercial application. Appcelerator makes available at additional cost an Enterprise version that includes additional support, cloud services and analytics capabilities. Training courses and a certification program are also available for an additional fee.
A Eclipse-based IDE named Titanium Studio is offered by Appcelerator. This IDE contains a JavaScript editing environment, along with a source-level debugger.

Titanium Studio IDE overview. (Large preview)
As of the time of writing, no graphic layout tools exist that are akin to the ADT layout manager for Android or the StoryBoards and Interface Builder for iOS. With Titanium, the layout of screens is written either in JavaScript or in an XML definition language, as part of Appcelerator Titanium’s Alloy framework. Alloy is an application framework that allows you to specify the UI of an application in XML and apply styles to the controls in the project via a CSS-like syntax. I’ve included the code for both an Alloy and a Classic version of our application in the same GitHub repository that holds the code samples for the other articles in this series.
Starting Your First Project
Appcelerator Titanium and Titanium Studio are available free of charge. Appcelerator offers a “Quick Start” document that fully covers the steps to get started. Just follow these steps to get Titanium’s tools:
- To use Titanium, you must create a free developer account on the Titanium website. Through this developer account, you will obtain the Titanium SDK and Titanium Studio IDE.
- Once you have a developer account, you’ll have access to Appcelerator’s developer resources. Here, you’ll find a series of “Getting Started” links, including ones to obtain the tools for Mac, Windows and Linux.
- Just as with PhoneGap, you’ll have to install the native SDKs for the platforms you wish to support. However, Titanium Studio makes that easy. A Platform Configuration tool built right into Titanium Studio makes it easy to install and update the native SDKs:

Install the native SDKs. (Large preview)
Now you’re ready to create a project. 4. From the “File” menu, choose “New” → “Mobile App Project.” This will open a dialog box that lets you choose an Alloy or Classic development project. As mentioned, Alloy is an application framework by Appcelerator that enables you to specify the UI of an application in XML and to use a CSS-like syntax to style the application. The Classic templates take an all-code approach. Appcelerator recommends Alloy for most new Titanium projects. Most of the examples in this article will use Alloy because I find its code structure to be more maintainable.

Choose a development project. (Large preview)
5. Selecting the “Default Alloy” project will give you a simple project with one “Hello World” screen, a useful starting point. Clicking “Next” opens the next dialog:

A simple project with as a useful starting point. (Large preview)
In the example above, we’ve filled in the fields for an app named “MySampleApp.” Once you click the “Finish” button, Titanium Studio will create the project’s directory structure and open it in the project explorer. 6. Running the app is as easy as selecting a simulator in the device drop-down menu and pressing the “Run” button:
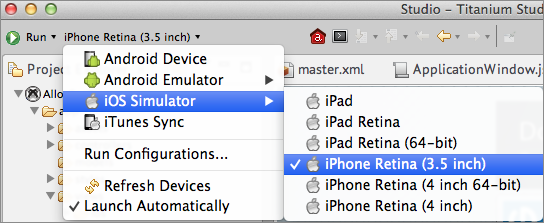
Running the app. (Large preview)
7. The “Run” button has a drop-down menu of its own that provides options for debugging and packaging your application for distribution.
Organizing An Appcelerator Project
For this article, we’ll focus on the Alloy version of the application. Its project structure looks like this:

Project Structure
A project is a collection of XML, TSS (we’ll get to these later) and JavaScript files, along with any graphic assets required for the application. When the project is compiled for a platform, the compiler translates the XML and TSS files into JavaScript code and packages the code, along with the graphic assets, into a deployment package for the relevant mobile platform. The XML and TSS files are not interpreted at runtime; they’re there simply to save you the tedium of writing a lot of code for the layout and styles of the controls. Titanium’s documentation shows how the XML and TSS are mapped to JavaScript. If you’re familiar with Adobe Flex development, the XML files are handled much like MXML files.
Every project starts off with an index.xml file, which serves as the starting point of the application. Upon opening the index.xml file in the views directory, we see the following:
<Alloy>
  <Require id="calculator" src="calculator" platform="android"/>
  <NavigationWindow id="index" platform="ios">
    <Require src="calculator" id="calculator"/>
  </NavigationWindow>
</Alloy>
This markup tells the compiler to load the contents of calculator.xml into the main window. Note the platform="android" attribute; every element in Alloy may be decorated with a platform and/or formFactor attribute to indicate that the element is meant for a particular platform (Android, iOS, etc.) or form factor (handheld or tablet).
After the Require element for Android, we see the same Require element but wrapped in a NavigationWindow element. As mentioned, Android and iOS have different mechanisms for moving the user between screens. In this case, NavigationWindow corresponds to the UINavigationController that we used to build our native iOS application. Android does not have a corresponding navigation element, and so navigation is handled differently. Titanium’s SDK exposes both forms of navigation to the developer, rather than attempting to abstract the differences via some lowest-common-denominator approach. This provides more direct access to the native controls but requires the developer to deal with these differences. As a result, in several places in our code, we’ll have to account for the requirements of each platform.
For each view, we have a corresponding controller file. Here are the contents of index.js:
if (OS_IOS) {
  Alloy.Globals.navgroup = $.index;
}

if (OS_ANDROID) {
  $.calculator.getView().open();
} else {
  $.index.open();
}
This file begins with some code that checks special variables provided by Alloy to indicate the platform on which the application is running. For iOS, we assign a reference to the NavigationWindow object onto the Alloy.Globals object. Alloy.Globals is simply a common namespace where you can store objects that can be accessed anywhere in the application. In this case, we’re storing a reference to NavigationWindow so that we can access it anywhere in the app. The last section of code opens the controller that will display the main calculator view. For Android, we’ll open the view on the controller directly. For iOS, the view is in NavigationWindow, so we need to open NavigationWindow instead.
Defining The UI
On the first screen of our application, the UI is defined by the views/calculator.xml file. It contains elements to describe each TextField, Button, Label and so on on the screen.
<Alloy>
  <Window title="Alloy FasTip" backgroundColor="#fff">
    <!-- Android menu -->
    <Menu platform="android">
      <MenuItem
          onClick = "clickedSettings"
          title = "Settings"
          icon = "Ti.Android.R.drawable.ic_menu_preferences"
          showAsAction = "Ti.Android.SHOW_AS_ACTION_IF_ROOM" />
    </Menu>

    <!-- rightNavButton for platforms that support it -->
    <RightNavButton platform="ios">
      <Button id="settingsButton"
          onClick="clickedSettings"
          title="Settings" />
    </RightNavButton>

    <TextField id="billAmtTextField"
          top="40"
          width="146"
          height="35"
          textAlign="right"
          hintText="Bill amount"
          keyboardType="Ti.UI.KEYBOARD_DECIMAL_PAD"
          returnKeyType="Ti.UI.RETURNKEY_DONE" />

    <Button id='calcTipButton'
        onClick="clickedCalculate"
        title="Calculate Tip"
        top="100" width="122"
        class="primaryButton" />

    <View top="170" width="Ti.UI.SIZE" height="Ti.UI.SIZE">
      <Label left="13" width="124"
          top="0"
          textAlign="Ti.UI.TEXT_ALIGNMENT_RIGHT">
        Tip Amount:
      </Label>
      <Label id="tipAmtLabel" left="130"
          top="0" width="80"
          textAlign="Ti.UI.TEXT_ALIGNMENT_RIGHT">
        $0.00
      </Label>
      <Label left="13" width="124" top="30"
          textAlign="Ti.UI.TEXT_ALIGNMENT_RIGHT"
          class="totalAmt">
        Total Amount:
      </Label>
      <Label id="totalAmtLabel" left="130"
          top="30" width="80"
          textAlign="Ti.UI.TEXT_ALIGNMENT_RIGHT"
          class="totalAmt">
        $0.00
      </Label>
    </View>
  </Window>
</Alloy>
At the top of the file, we run into another difference between platforms. Android supports menus that, as we saw in the article on native Android, appear in the action bar on Android 4.x devices. This menu element describes a single menu option on this screen, the settings wrench.

<!-- Android menu -->
<Menu>
  <MenuItem
      onClick = "clickedSettings"
      title = "Settings"
      icon = Ti.Android.R.drawable.ic_menu_preferences
      showAsAction = Ti.Android.SHOW_AS_ACTION_IF_ROOM />
</Menu>
The menu element applies only to Android, so decorating this with a platform-specific attribute, such as platform="android", is not necessary. In iOS, this element will be ignored by the Alloy compiler.
To make the settings button appear in iOS, we need to add it to the iOS navigation controller’s button bar. This is accomplished with the following element, with an attribute that restricts it to iOS (platform="ios"):

<RightNavButton platform="ios">
  <Button id="settingsButton" onClick="clickedSettings"
      systemButton="Titanium.UI.iPhone.SystemButton.COMPOSE" />
</RightNavButton>
The systemButton attribute in the Button element above identifies one of iOS’ standard button styles. You could, of course, remove it and supply a text title or other suitable image if you desire.
Notice that in both cases, the menu item and the navigation button invoke the same function via the onClick attribute. The code for this screen is controlled by a JavaScript file with the same name as the .xml file. The Alloy framework refers to this as a controller, and by convention it is found in the controllers/calculator.js file. Alloy follows a set of conventions that govern where all files are located in the directory structure and how they relate to each other.
The first function in our calculator.js file handles the click event when the user taps the “Calculate tip” button:
function clickedCalculate(e) {
  var tipPct = Ti.App.Properties.getDouble('tipPct', .15);
  var billAmt = parseFloat($.billAmtTextField.value) || 0;
  var tipAmt = billAmt * tipPct;
  var totalAmt = billAmt + tipAmt;
  $.tipAmtLabel.text = '$' + tipAmt.toFixed(2);
  $.totalAmtLabel.text = '$' + totalAmt.toFixed(2);
  $.billAmtTextField.blur();
}

Ti.App.addEventListener('recalc', clickedCalculate);
To calculate the tip, we first attempt to retrieve the default tip percentage from Ti.App.Properties. This object is much like the objects we’ve used in the other three implementations: NSUserDefaults in iOS, SharedPreferences in Android and LocalStorage in PhoneGap. The controls that we defined in the calculator.xml file become properties in this controller, and we can reference them by using the `$.
In the calculator.js controller, we’ve also added an event listener via the Ti.App.addEventListener method. This enables our code to respond to events that occur elsewhere in the application. In this case, we’ll fire the recalc event from the settings screen when the user exits the window. This way, the calculator will always be up to date with the latest tip percentage. As we’ll soon see, the settings screen does not contain a direct reference to the calculator, so it cannot invoke methods on it directly. Using event listeners in this manner is a good way to decouple the controllers in our application, allowing them to continue communicating but without direct references to each other. These events come with some performance overhead, so use a direct callback if they’re going to fire in rapid succession.
Navigating Between Screens: Dealing With Platform Differences
The following code is run when the user clicks the “Settings” button:
function clickedSettings(e) {
  var settingsController = Alloy.createController('settings');
  var win = settingsController.getView();

  if (Alloy.Globals.navgroup) {
    Alloy.Globals.navgroup.openWindow(win);
  } else if (OS_ANDROID) {
    win.open();
  }
}
As soon as the user clicks the “Settings” button in the calculator view, the clickedSettings method on the calculator’s controller is invoked. Here, we create an instance of settingsController and get a reference to its view. The Alloy.Globals object is then checked for whether it contains a navgroup reference. Recall that this was established for iOS applications in the index.js file when our app first launched. Now we can use that navgroup to open the settings window. Android has no navgroup object, so we would just open the window directly.
The Settings Screen
The settings screen is defined in settings.xml, and its content is very similar to what we saw in calculator.xml:
<Alloy>
  <Window title="Settings" backgroundColor="#fff">
    <!-- Android menu -->
    <Menu platform="android">
      <MenuItem
          onClick="clickedDone"
          title="Done"
          icon = "Ti.Android.R.drawable.ic_menu_save"
          showAsAction = "Ti.Android.SHOW_AS_ACTION_IF_ROOM" />
    </Menu>

    <Label top="35">Set tip percentage</Label>

    <TextField id="tipPctTextField"
          top="72"
          width="60"
          height="35"
          textAlign="right"
          hintText="Tip %"
          keyboardType="Ti.UI.KEYBOARD_DECIMAL_PAD"
          returnKeyType="Ti.UI.RETURNKEY_DONE"
        ></TextField>
    <Label top="72" left="195">%</Label>

    <Button id='saveButton'
        onClick="clickedSave"
        title="Save Settings"
        top="120" width="130"
        class="primaryButton" ></Button>
  </Window>
</Alloy>
Just as with the calculator view, there are two different approaches to including a button in the action bar (in Android) or the navigation bar (in iOS). The “Done” button and “Save” button are wired to the relevant controller methods, as we’ll see next.
Upon the “Save” button being clicked, the following code is run in settings.js:
var tipPct = parseFloat( $.tipPctTextField.value );
if (tipPct > 0) {
  // Persist the new percentage value
  Ti.App.Properties.setDouble('tipPct', tipPct / 100);
  Ti.API.log('info', 'Settings saved');
  closeSettings();
} else {
  var dialog = Ti.UI.createAlertDialog({
        message: 'Enter a tip percentage greater than zero',
      ok: 'Try again',
      title: 'Invalid percentage'
      }).show();
}
To preserve the value of the tip percentage for future use, we use Ti.App.Properties.setDouble, which will persist the value between runs of our application. For debugging purposes, we’ll also log a message via Ti.API.log, which will write a message to the device log. This is essentially the same as writing a message to console.log() in a browser.
The next important section of code deals with how the window is closed:
function closeSettings() {
  Ti.App.fireEvent("recalc");
  var settingsWindow = $.getView();
  if (Alloy.Globals.navgroup) {
    Alloy.Globals.navgroup.closeWindow(settingsWindow, {animated:true});
  } else {
    settingsWindow.close();
  }
}
In this case, first, we’ll fire the recalc event that we established a listener for in the calculator controller earlier on. This will trigger the calculator to apply the new percentage value when the user leaves this screen. Just as we saw with opening the settings window, some platform-specific code is needed when the window is closed. The Alloy.Globals namespace is checked once again to see whether there is a navgroup for iOS. If so, we use it to close the window. On Android, we can close the window directly. Upon closing this window, the user will return to the previous calculator window and, because we’ve fired the recalc event, will see the tip calculation updated to reflect the newly saved percentage.
Styling Our Application
In the past, Appcelerator required the developer to programmatically define each control and its attributes. This was tiresome if you wished to change the style of an application. You might have needed to go back and change a lot of code. With the Alloy framework, Appcelerator has added Titanium style sheets (TSS). These work much like CSS in Web development. Each view and controller in an application has a corresponding TSS file, which allows you to adjust the style for that view in the application. In addition, the app.tss file governs the overall style of the whole application, allowing us to style the controls in all views of the application. The app.tss file is ideal for establishing consistency across views in an application. Here is the app.tss code for our application:
"Window": {
  backgroundColor:"#fff"
}

"Window[platform=android]": {
  navBarHidden: true
}

"Label": {
  width: Ti.UI.SIZE,
  height: Ti.UI.SIZE,
  color: "#000"
}

"TextField": {
  color: "#000"
}

"TextField[platform=ios]": {
  paddingLeft:10,
  paddingRight:10,
  borderColor:"#000",
  borderRadius: "10",
  borderWidth: "1"
}

"Button": {
  width: Ti.UI.SIZE,
  height: Ti.UI.SIZE,
  borderRadius: 15
}

".primaryButton": {
  backgroundColor: '#3883B5',
  color: '#fff'
}
The TSS entries above may be applied to Alloy elements such as the Window and TextField objects. They may also be applied to specific controls, via a class attribute that works just like the class attribute in HTML. Recall that a “Calculate tip” button was in our calculator.xml file:

<Button id='calcTipButton' onClick="clickedCalculate"
    title="Calculate Tip"
    top="100" width="122"
    class="primaryButton" >
</Button>
This button has a class of primaryButton, which maps to the style defined in app.tss:
".primaryButton": {
  backgroundColor: '#3883B5',
  color: '#fff'
}
We’ve used the same class name for the “Save settings” button on the settings screen, and it will receive the same styles. In addition, the “Calculate tip” button has rounded corners because we’ve styled all of the buttons in our application to look so:
"Button": {
  width: Ti.UI.SIZE,
  height: Ti.UI.SIZE,
  borderRadius: 15
}
You may also specify styles based on platform. This TSS code applies only to TextFields in iOS:

"TextField[platform=ios]": {
  paddingLeft:10,
  paddingRight:10,
  borderColor:"#000",
  borderRadius: "10",
  borderWidth: "1"
}
Alloy also allows you to create platform-specific folder names under the styles directory and obtain styles that way as well. In addition, you can create themes to apply different assets and styles based on the configuration of a particular build. Using a theme, you could load an entirely different set of assets, which would be useful if you’re working with different branding requirements from multiple clients.
Other Alloy Features
Our simple application does not require several of Alloy’s other features, such as models and collections. These features were actually drawn from the popular Backbone.js library, which should make them familiar to many JavaScript developers. In addition, you can reuse visual components across applications with widgets. A widget is self-contained and provides its own set of models, views and controllers, allowing it to be dropped into multiple applications.
Classic Appcelerator Applications
In the GitHub repository, I’ve included sample code for our FasTip application written in the Classic development style. We won’t go through all of the code here — just a few highlights to show how this approach differs from Alloy. For most projects, I’d recommend using Alloy. However, note that Alloy essentially creates a Classic Appcelerator application from your Alloy code. Understanding traditional Appcelerator development is important if you want to dynamically add or remove controls at runtime.
When a Titanium application starts, it runs the contents of the app.js file. In FasTip, we’re largely relying on the same app.js file that is created when a new project is initialized in Titanium Studio. Note that the following code identifies which platform the app is running on:
(function() {
  // Determine platform and form factor and render appropriate components
  var osname = Ti.Platform.osname,
    version = Ti.Platform.version,
    height = Ti.Platform.displayCaps.platformHeight,
    width = Ti.Platform.displayCaps.platformWidth;

  var isTablet = osname === 'ipad' ||
    (osname === 'android' && (width > 899 || height > 899));
The Ti.Platform.osname property provides the main clue as to whether we are running on an iPad, iPhone or Android device. You can see from this code that by using data provided by Ti.Platform, we can assume some things about the type of device that the app is running on. We saw the Require element used in Alloy to load one controller into another. Here’s an example done in straight code:
if (osname === 'iphone') {
Window = require('ui/handheld/ios/ApplicationWindow');
} else {
  Window = require('ui/handheld/android/ApplicationWindow');
}
new Window().open();
Notice that the code snippet above loads a particular version of the ApplicationWindow.js script based on the value of platform.
The following is a block of code to add some controls to a window. It shows how controls may be created programmatically without the use of Alloy.
var isAndroid = (Ti.Platform.osname === 'android');

var billAmtTextField = Ti.UI.createTextField({
  id: 'billAmtTextField',
  borderStyle: Ti.UI.INPUT_BORDERSTYLE_ROUNDED,
  keyboardType: Ti.UI.KEYBOARD_DECIMAL_PAD,
  returnKeyType: Ti.UI.RETURNKEY_DONE,
  hintText:'Bill amount',
  textAlign: Ti.UI.TEXT_ALIGNMENT_RIGHT,
  top:40,
  width:'146dp', height: '35dp',
  color:'#000'
});
if (isAndroid) {
  billAmtTextField.font = {fontSize: '12dp'};
}
self.add(billAmtTextField);

var calcBillButton = Ti.UI.createButton( {
  title: 'Calculate Tip',
  top:100,
  width:'122dp', height: '30dp',
  color:'#000'
});
if (isAndroid) {
  calcBillButton.font = {fontSize: '10dp'};
}
self.add(calcBillButton);
The self object above refers to the window, and self.add() is used to add each of the controls to the window. Specifying all of these attributes for every control that you add of a given type is tedious. Moreover, keeping the styles consistent in an app is difficult without the help of TSS style sheets, as in our Alloy example. In practice, if you do not use Alloy, then building controls from a JavaScript “factory pattern” would be better than calling the Ti.UI.create methods directly. This way, you would only have to change the factory methods to generate controls with different attributes.
Extending Titanium With Modules
While Titanium does a great job of providing much of the common functionality found in the mobile platforms that it supports, what if you need to access device features that are not directly offered by Titanium? In PhoneGap, the plugin system provides this capability. Titanium offers a similar system, called modules, which enable your Titanium application to access native code. The Appcelerator Marketplace is a registry of both free and paid modules. In addition, a GitHub repository contains free open-source modules. You could, of course, write your own modules, too.
Deploying Your Application
Titanium Studio has a “Publish” option in the project explorer. Just right-click on the project and choose the appropriate publishing option:

As with any other development tool, you still need an account in the relevant app store to sell your application. Once you’ve chosen an option, the publishing dialogs will walk you through the process of signing the code and submitting it:

It’s convenient that this is built right into the Studio IDE, and the dialogs do a good job of walking you through the process. Titanium Studio’s documentation provides more details on the publishing process.
Appcelerator Cloud Services
While not the focus of this article, I should mention Appcelerator’s Cloud Services (ACS). These services are a separate offering from Titanium. They are server-based back-end services that can be used to store data for an application. At present, the services vary from photo storage to access control. Titanium exposes these services in the following ways:
- in Titanium via a Ti.Cloud module,
- via a native iOS library,
- via a native Android library,
- via a REST-based API for access from other platforms.
A recent addition is Node.ACS, which enables you to write custom NodeJS server-side applications. This is useful for encapsulating custom business logic on the server side. There are certainly alternatives to ACS, including Parse and StackMob, but they don’t have the same level of integration with Appcelerator.
Learning Resources
A series of tutorials are available to get you up to speed. Appcelerator offers a page of training resources, with many links on how to get started. It also offers a paid training and certification program for those who are interested in building skills in this way. The official blog is also a good way to stay up to date on the latest news about the platform.
In addition to Appcelerator-supplied resources, TiDev is an independent resource for Titanium-related articles. Another repository of Titanium modules resides at gitTio, and Alloy-related components can be found at Alloy Love
Appcelerator Titanium: Right For Your Project?
Like most tools, this one has its pros and cons. The promise of cross-platform development, with better user experience (UX) performance than an HTML-based solution like PhoneGap, is certainly attractive. However, as we’ve seen from the examples above, the framework cannot fully abstract all of the differences between platforms and still provide a native-like experience. As such, you’ll likely find yourself tailoring the view and controller code in your application to each platform.
Because they’re still writing the platform-specific code with Appcelerator’s API, a developer would find it much easier to leverage their skills across multiple platforms — they’d still be writing everything in JavaScript. For non-visual portions of an application, doing things like making AJAX calls from an Appcelerator app is quite simple, and unlike the fully native platforms, the JSON responses from typical REST-based services are directly understood by JavaScript. The native platforms require you to use a JSON parser to transform the REST responses into something that the native language can work with. Even if you wind up splitting the code for the Android and iOS views in your application, you would likely have to write the data model and business logic code only once. This single base of code could then be accessed from the platform-specific views in your application.
As with any tool from a third-party vendor, there may be some lag before a platform’s new features become available in Appcelerator’s platform. The development team at Appcelerator doesn’t get access to betas of the iOS and Android SDKs any earlier than other developers, so it will take time for a platform’s new features to get added to the product. If you need access to cutting-edge features as soon as they’re released in beta, then you’re better off with a purely native approach. Still, Appcelerator is generally proactive in making its tools compatible with the latest SDK releases, enabling developers to update their apps soon after a new version of a platform has been made available to the general public. Answers to most support-related questions can be found in Appcelerator’s own forums. By contrast, questions relating to fully native development and to PhoneGap are more widely covered on third-party websites such as StackOverflow.
Series Summary
We’ve seen how four different mobile technologies can be used to build the same application. A native application generally performs the best and provides the best access to a platform’s capabilities. Despite this, many enterprises are looking for solutions that run on multiple platforms.
PhoneGap is quite attractive to developers who have a strong background in HTML, CSS and JavaScript. It also offers a wide range of platform support, well beyond iOS and Android. As rendering performance and HTML5 compatibility improve on mobile devices, the gap in performance between native code and HTML narrows. Despite this, a UI implemented entirely in HTML and CSS might not be suitable for applications that are complex and have many animations. Still, in many cases, a properly written PhoneGap app provides a satisfying UX. The application’s UX designer and developer should work with the capabilities and limitations of the HTML5 platform, rather than try to force fit what could be accomplished in a purely native application.
Appcelerator requires the developer to learn its own API for UI controls — using, however, the native controls found on the platform. While the controls themselves will perform just as a native application’s would, all of the application logic will be running through a JavaScript engine. Thus, if the application performs a significant amount of calculations and data manipulation, then the performance would not match that of a truly native application. Moreover, Titanium abstracts the standard native controls into its own objects, meaning that not every property of the native controls would necessarily be exposed through Titanium. You could, of course, create modules to address this, but that would require additional effort. Depending on the number of modules necessary, the advantages of going with Titanium to begin with might be negated.
Your choice of development environment will depend largely on these factors:
- Functional and UX requirements
As stated above, some types of applications require native development. If you are competing with a number of native apps in the app store, then you might have to build a native app as well, just to match or exceed the UX of the competing applications. Perhaps you need access to a feature in the latest version of the operating system, one not yet supported by PhoneGap or Titanium. Working around this with the relevant plugin or module in PhoneGap or Titanium might be possible. But this assumes that a plugin exists or that you have enough experience in the native environment to write the plugin yourself. - Experience of the development team
Many people are interested in PhoneGap or Appcelerator because they want to avoid learning a new language and platform. However, one still has to understand plenty of nuances in developing for the mobile Web (in the case of PhoneGap) or for Titanium. While you might not have to learn a new language, you will certainly have to learn new APIs and have at least some knowledge of the underlying platform. For instance, with PhoneGap, one needs to be aware of the limitations of animation performance (particularly in old versions of Android), the responsiveness of touch events and so on. Poor performance in PhoneGap applications is often the result of developers not paying attention to these issues. Developers must learn to respect the conventions of the platform on which their app will run or risk frustrating end users. Remember that these are mobile apps, not Web apps or desktop apps. The techniques for developing Web or desktop applications do not necessarily hold true for mobile applications. - Long-term maintenance
Over time, an application will likely need changes. Do you have resources available in the given development technology to perform this maintenance? Are Appcelerator Titanium developers any more readily available than native developers or HTML5 developers conversant with PhoneGap?
We are fortunate to have several options for developing mobile applications. This overview has presented only four solutions. Other tools exist, such as Xamarin’s products, which enable developers to write iOS, Android and Windows applications with .NET tools and C#. Developers of gaming applications might want to look at Corona SDK. Or perhaps you don’t need an app at all. If the browser’s capabilities would suffice, then a mobile website might be appropriate.
Hopefully, this series has provided insight into some of the options available for building an application. Here’s wishing you well with whatever development platform you find best meets your needs.
Further Reading
- The Ultimate Guide To Push Notifications For Developers
- Fine-Grained Access Handling And Data Management With Row-Level Security
- Using Google’s Flutter For Truly Cross-Platform Mobile Development
- An Introduction To React With Ionic


