Putting Mobile Back End As A Service Into Practice (Part 2)

Email Newsletter
Weekly tips on front-end & UX.
Trusted by 200,000+ folks.
 Flexible CMS. Headless & API 1st


 Register!
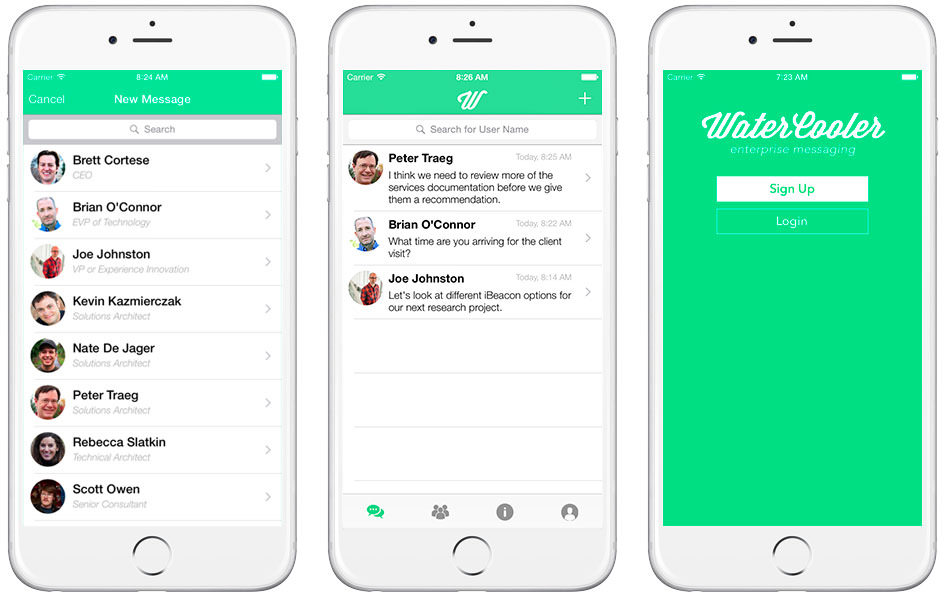
Mobile back end as a service (MBaaS) aims at giving app developers the ability to create seamlessly new feature-complete cross-platform native and web applications. In the first part of this series, I walked through a messaging application demo powered by the Kinvey application. We explored how to leverage user management, file storage and the data store.
To complete the demo, we need to leverage two key pieces of Kinvey functionality: the permissions provided by the data store, and push notifications, which are enabled through the business logic functionality.
Setting Up
Both the first article in this series and my initial article explaining the concept of MBaaS are prerequisites for this article. Also, this article does take a “real app” approach to understanding MBaaS. That being said, some knowledge of iOS and Swift would be helpful. However, I have provided the application’s source code, so you can learn and analyze at your own pace.
Permissions
In addition to the data store and file storage support provided by Kinvey, there is also a robust security model that can be applied to all of this data. All of the configuration for permissions on either files or data store objects happen with the KCSMetadata class. This instance can be configured with custom data model classes or attached as parameters to a file when uploading it to the file store.
File Permissions
As we discussed earlier, the file management functionality is a powerful piece of any MBaaS tool. However, clarifying who can access this content is equally important. In our example, profile pictures that are uploaded should be viewable by all users. If we wanted to add image sharing to the one-to-one messaging portion of the application, then we would want to limit who can access the image. Because we want to allow anyone to see the profile picture, we can leverage the setGloballyReadable method of KCSMetadata to ensure that while only the creator can edit this file, any user may read it.
// Extracted from SignupViewController.swift (https://tuck.cc/1vsaWcr)

// Initialize with the default initializer
let metadata = KCSMetadata();

// Ensure that all users can access this file
metadata.setGloballyReadable(true);

// This is added to a params object that is passed to the upload data method
var fileParams = [
  KCSFileMimeType : "image/jpeg",
  KCSFileACL : metadata
];

// By passing in this fileParams object, the file will be readable by all
KCSFileStore.uploadData(photoData, options: fileParams, completionBlock: { (file:KCSFile!, error:NSError!) -> Void in
    println("File Upload Completed")
}, progressBlock: nil);
Data Store Permissions
To make this as simple as possible to integrate in the application, I’ve defined a few Swift extensions to the classes provided in Kinvey’s SDK for iOS. One such extension is a convenience initializer for the KCSMetadata class to configure permissions for the Message and MessageThread classes:
/*
  This method is a convenience initializer that sets the permissions
  on a KCSMetadata instance for the user IDs passed in (and, optionally,
  for the current user as well). All persistable data in the Kinvey data
  store can be configured using a KCSMetadata instance.
 */
extension KCSMetadata {

  convenience init(userIds:[String], includeActiveUser:Bool) {
    self.init()
    var ids = userIds
    setGloballyReadable(false)
    setGloballyWritable(false)
    if(includeActiveUser) {
      ids.append(KCSUser.activeUser().userId)
    }
    for userId in ids {
      readers.addObject(userId)
      writers.addObject(userId)
    }
  }
}
With this in place, we can now initialize the meta-data instance with the correct security settings when we create an instance of the Message class. Now, when it is saved, it will be accessible only to the sender and recipient.
class Message : NSObject, KCSPersistable {

  var entityId:String = ""
  var messageText:String!
  var senderId:String!
  var threadId:String!
  var userEntryTime:NSDate!
  var metadata:KCSMetadata! = nil

  init(messageText:String, recipientId:String) {
    senderId = KCSUser.activeUser().userId
    messageText = messageText
    entityId = NSUUID().UUIDString
    // This uses our convenience initializer to allow for the limited
    // permissions of only the sender and recipient
    metadata = KCSMetadata(userIds: [recipientId], includeActiveUser:true)
  }

  // You have to let Kinvey know which property corresponds to the meta-data
  // instance. Do this by assigning the property the KCSEntityKeyMetadata
  // value in the hostToKinveyPropertyMapping method.
  override func hostToKinveyPropertyMapping() -> [NSObject : AnyObject]! {
    return [
      "entityId" : KCSEntityKeyId,
      "messageText" : "message",
      "senderId" : "senderId",
      "threadId" : "threadId",
      "metadata" : KCSEntityKeyMetadata
    ]
  }
}
Business Logic And Push Notifications
An MBaaS solutions that provides all of the functionality detailed so far would be adequate in a limited set of use cases. However, the ability to centralize business logic when tied to the lifecycle of a data object opens up many doors to creating effective cross-platform applications. In the WaterCooler demo application, this is relevant in two distinct ways:
- When a
Messageinstance is saved to the data store, we need to determine who it is being sent to. After we have ascertained the recipient of the message, we need to send them a push notification. - When a
Messageinstance is saved to the data store, we need to also fetch theMessageThreadinstance and save thelatestMessageproperty. This frees us from having to make an additional fetch call when populating the message thread’s view.
While both of these could be accomplished through the iOS application, that would be putting the logic in the incorrect place. Consider if we also had a web and Android application for the WaterCooler application. We would want the same functionality to occur upon a message being saved on both of those platforms as well. In this case, any business logic that spans multiple platforms should reside on the server using Kinvey’s business logic capability.
Configuring Push Notifications
For push notifications to work properly on iOS, we need to configure Kinvey to work with our push notification certificate(s) for the application. This step involves two distinct steps:
- Configure the application with push notification certificates for development and production in the iOS Developer Center.
- Export and uploaded the required certificate to Kinvey.
The full process of completing these steps is beyond the scope of this article, but Kinvey has a “Push” guide in the documentation to assist you in the overall integration process.
Kinvey Collection Hooks
To accomplish the two goals listed above, we leverage one particular piece of functionality in Kinvey: collection hooks. With collection hooks, we can define server-side business logic in JavaScript that is executed at particular points. The predefined points for a collection are listed below:
onPreSaveThis logic is executed prior to an instance being saved in the data store. Any errors that occur in this logic would prevent thesaveaction from being executed.onPreFetchThis logic is executed prior to any fetch call on theentitytype. Any errors would prevent thefetchaction from being executed.onPreDeleteThis logic is executed prior to anyentityinstance being deleted from the data store. Any errors would prevent the instance from being deleted from the data store.onPostSaveThis logic would be executed after an instance is saved to the data store. Any errors here would not prevent the object from being stored in the data store, but they would cause an error to return on the request.onPostFetchThis logic would be executed after afetchcommand has been executed by the data store. Any errors here would not prevent the object from being fetched from the data store, but they would cause an error to return on the request.onPostDeleteThe logic would be executed after an instance is deleted from the data store. Any errors here would not prevent the object from being deleted, but they would cause an error to return for the request.
Push notifications are an important part of any messaging application. Ideally, we would want one to be sent each time a sender saves a Message object to the data store. Kinvey provides this capability through its business logic’s hooks functionality. In short, you can add custom JavaScript logic that executes at certain points in the lifecycle of a data object.
Business Logic Modules
Kinvey provides a set of modules that enable you to access core Kinvey functionality within your business logic’s code. Several modules are available, but I’ve leveraged the following modules with the business logic hook:
loggerProvides a seamless way to log information from your business logic to the Kinvey consolecollectionAccessProvides a way to query the Kinvey data store from within your business logicpushProvides access to the push notification functionality for Kinvey with your business logicasyncProvides an approach for dealing with asynchronous JavaScript. This is the async module you may have used in Node.js applications.- For a complete reference on business logic modules, see the “Modules” guide in the “Business Logic” section of Kinvey’s documentation.
These hooks are configured via the Kinvey Console. To add an onPostSave hook for the Messages collection, follow these steps:
- Select the “Business Logic” option in the navigation on the left side of the Kinvey console.
- Select the “Create Your First Script” option.
- In the popup menu, select the “Add Hook” option for the Messages collection.
- Select the
onPostSaveoption. - You will see the new
onPostSaveJavaScript hook within the browser, which you can edit.
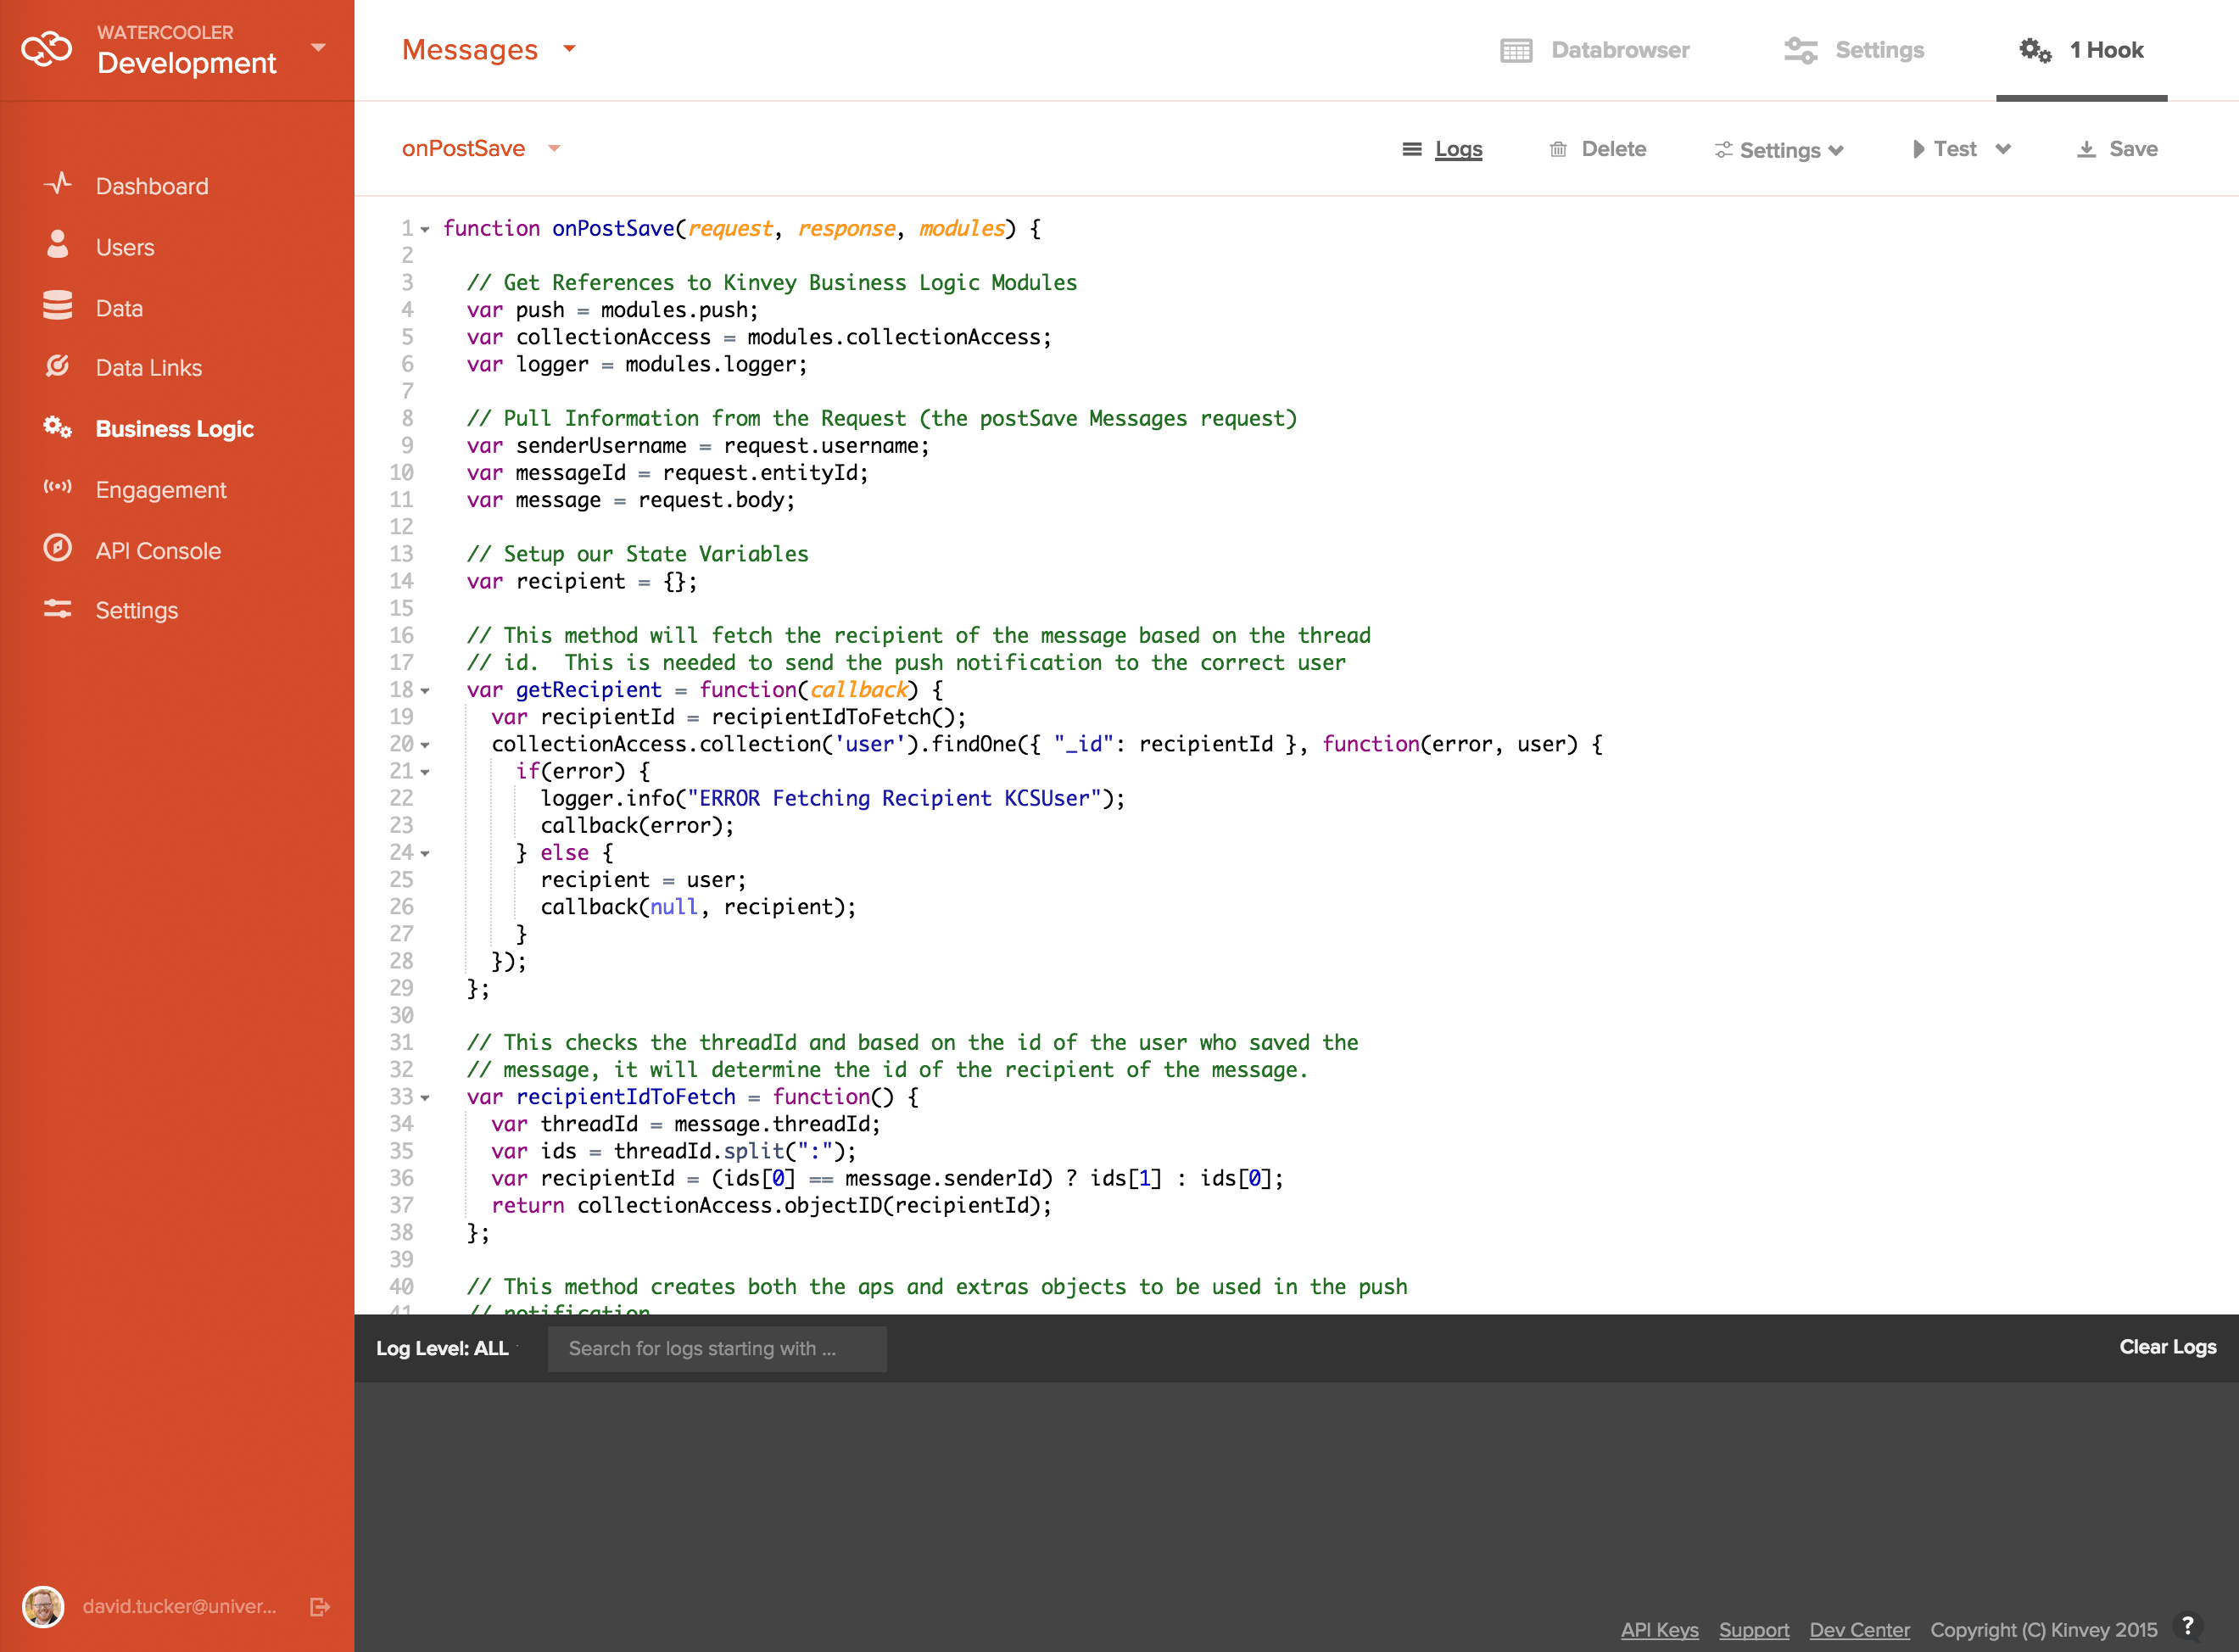
Complete Code For Business Logic
Putting these pieces together yields a single JavaScript method that is only 115 lines (with comments). This code gets the recipient, updates the thread with the latest message and then sends the push notification to the recipient.
To enable this hook, copy this JavaScript into the hook you’ve just created:
// Extracted from Messages-PostSave.js (https://tuck.cc/1MPrCAc)
function onPostSave(request, response, modules) {
// Get references to Kinvey's business logic modules
var push = modules.push;
var collectionAccess = modules.collectionAccess;
var logger = modules.logger;
var async = modules.async;
// Pull information from the request (the postSave messages request)
var senderUsername = request.username;
var messageId = request.entityId;
var message = request.body;
// Set up our state variables
var recipient = {};
// This method fetches the recipient of the message based on the thread
// ID. This is needed to send the push notification to the correct user.
var getRecipient = function(callback) {
var recipientId = recipientIdToFetch();
collectionAccess.collection('user').findOne({ "_id": recipientId }, function(error, user) {
if(error) {
logger.info("ERROR Fetching Recipient KCSUser");
callback(error);
} else {
recipient = user;
callback(null, recipient);
}
});
};
// This method sets the lastMessage on the MessageThread
var updateLatestMessage = function(callback) {
var threadId = message.threadId;
// This is how Kinvey stores relationships to other entities.
// We simply need to insert this object for the thread at the
// specified ID and we will have updated the reference.
var lastMessageRef = {
_type: "KinveyRef",
_id: threadId,
_collection: "Messages"
};
// This method finds and updates the thread with the updated
// reference to the message. It returns the updated thread from
// the data store.
collectionAccess.collection('MessageThreads').findAndModify({ "_id": threadId }, { "_id": 1 }, { $set: { "lastMessage" : lastMessageRef } }, { new: true }, function(error, thread) {
if(error) {
logger.error("Could Not Fetch Thread from ID: " + threadId);
} else {
callback(null, thread);
}
});
};
// This checks the threadId and, based on the ID of the user who saved the
// message, determines the ID of the recipient of the message.
var recipientIdToFetch = function() {
var threadId = message.threadId;
var ids = threadId.split(":");
var recipientId = (ids[0] == message.senderId) ? ids[1] : ids[0];
return collectionAccess.objectID(recipientId);
};
// This method creates both the APS and extras objects to be used in the push
// notification.
var pushDataFromMessageAndUser = function(user) {
return {
aps: {
alert: notificationAlertMessage(user),
badge: 0,
sound: "notification.wav"
},
extras: {
messageText: message.message,
creationDate: message._kmd.ect,
threadId: message.threadId,
senderId: message.senderId,
entityId: messageId
}
};
};
// This method calculates the text of the push notification based on the
// sender and the text of the message.
var notificationAlertMessage = function(user) {
var alertMessageComponents = [];
var alertMessage = user.first_name + " ";
alertMessage += user.last_name + ": ";
alertMessage += message.message;
return alertMessage;
};
// This method is executed after the recipient has been fetched from the
// user collection. It proceeds with making the push notification call to
// the recipient with the correct information.
var callback = function(error, results) {
if(error) {
response.body = {
error: error.message
};
response.complete(400);
} else {
var pushData = pushDataFromMessageAndUser(results[1]);
push.sendPayload(recipient, pushData.aps, pushData.extras);
response.complete(200);
}
};
// This kicks off the process to fetch the recipient and update the thread.
// Once that is complete, it calls the callback function to send the
// push notification.
async.parallel([updateLatestMessage, getRecipient], callback);
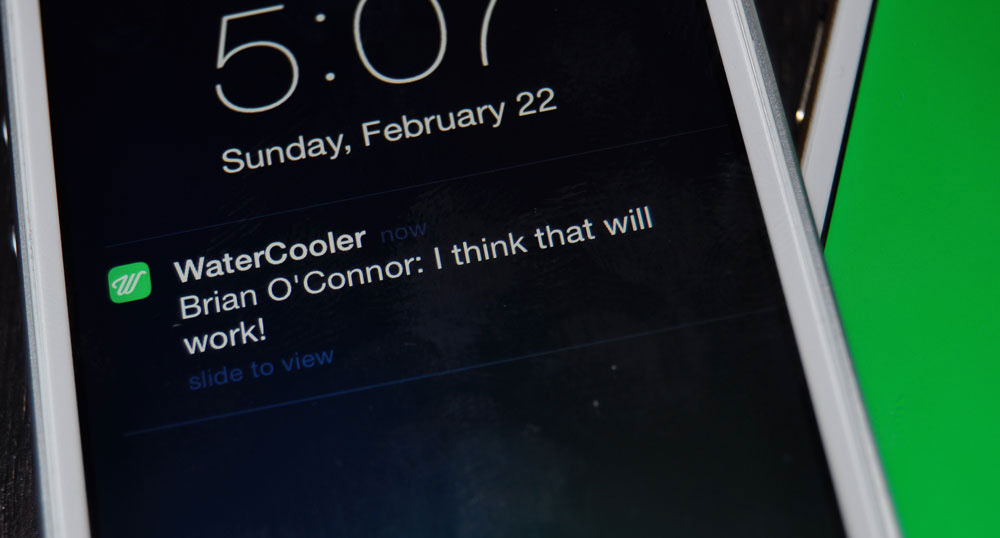
}With this code in place (and the push notifications properly configured), the application will now send a push notification to the recipient and also update the lastMessage property in the relevant message thread. In the image below, you can see a sample push notification that has been sent to the recipient of a message:
Putting The Pieces Together
While we didn’t walk through every step of how the application was created, you now have a complete example of a Kinvey application that you can use as a starting point for your own application. Hopefully, this article has given you a good working understanding of the code required, but also helped you think about how to solve problems using an MBaaS solution.

If you want to continue learning, you could add a lot of features to this application:
- support for images in messages,
- notifications for when a user is typing,
- group messaging.
All of these features would be possible with Kinvey’s back end.
Other Resources
Here are a few resources that were used in the creation of our app:
- SlackTextViewController, Slack, GitHub The team at Slack has released an amazing control for inputting text in a messaging app.
- MBProgressHUD, Jonathan George, GitHub This is a common control for showing overlays when the application is waiting on a task to finish. It is very customizable and configurable.
- Search for Creative Commons-licensed icons on Freepik, SimpleIcon, Google and Flaticon.
- Brandon McQuilkin, GitHub McQuilkin used to provide some great Swift image extensions for masking images. Since my initial work on the app, he has removed these from GitHub.
Conclusion
I hope that through the last few articles, you have seen ways that an MBaaS solution can help you to create compelling business- and consumer-focused mobile experiences. This certainly is a space with a lot of focus at the moment, and I expect rapid maturity and evolution of these services over the next year. Most any mobile developer would agree that this a valuable tool to have in your arsenal.
The following additional resources from Kinvey’s documentation will assist you to create iOS applications:
Further Reading
- Why You Should Consider React Native For Your Mobile App
- Server-Side Rendering With React, Node And Express
- Notes On Client-Rendered Accessibility
- Fitts’ Law In The Touch Era


