Fitting After Effects Into A UX Workflow

Email Newsletter
Weekly tips on front-end & UX.
Trusted by 182,000+ folks.

 Custom Web Forms for Angular, React, & Vue. Your backend.
 Celebrating 10 million developers

We all aim to be as agile as possible in today’s fast-paced web design world, while also remaining thoughtful of the end user and those we work with. After Effects is a great tool that enables us to quickly visualize and test robust animation patterns throughout web design, share those with the development team and clients, and even test variants with users to get quick validation on a design before it goes into production.
Web design transitions and animations, like parallax scrolling, hidden navigation, swiping, pull to refresh, transformations or really any UI transition, are great to prototype in After Effects. In this article, we will be scratching the surface of how to fit After Effects into your UX Workflow, and we’ll share details, advice, experience and links that you could use as influence and thought starters in your next project.
Motion In Experience Design
I like to think of motion in UI as a new type of aesthetic in design — a visceral aesthetic. Users might not be aware of it until they experience an interface that lacks it. This visceral aesthetic mimics how objects in real life actually move. This all stems from basic principles of physics. Physics is defined as “the natural science that involves the study of matter and its motion through space and time, along with related concepts such as energy and force. More broadly, it is the general analysis of nature, conducted to understand how the universe behaves.” In our case, our universe is the screen.
What Is After Effects?
Over the past year or so, you may have noticed a ton of really cool UI animations dancing around the interwebs. You may have said, “That looks cool! How did they achieve such accurate transitions like that without any code?” Well, the answer is probably After Effects. For those who do not know, After Effects is Adobe software that, from its inception, has been used to build complex title animations and special effects for film. Designers realized its power and started using it to show complex interactions and animation quickly and iteratively.
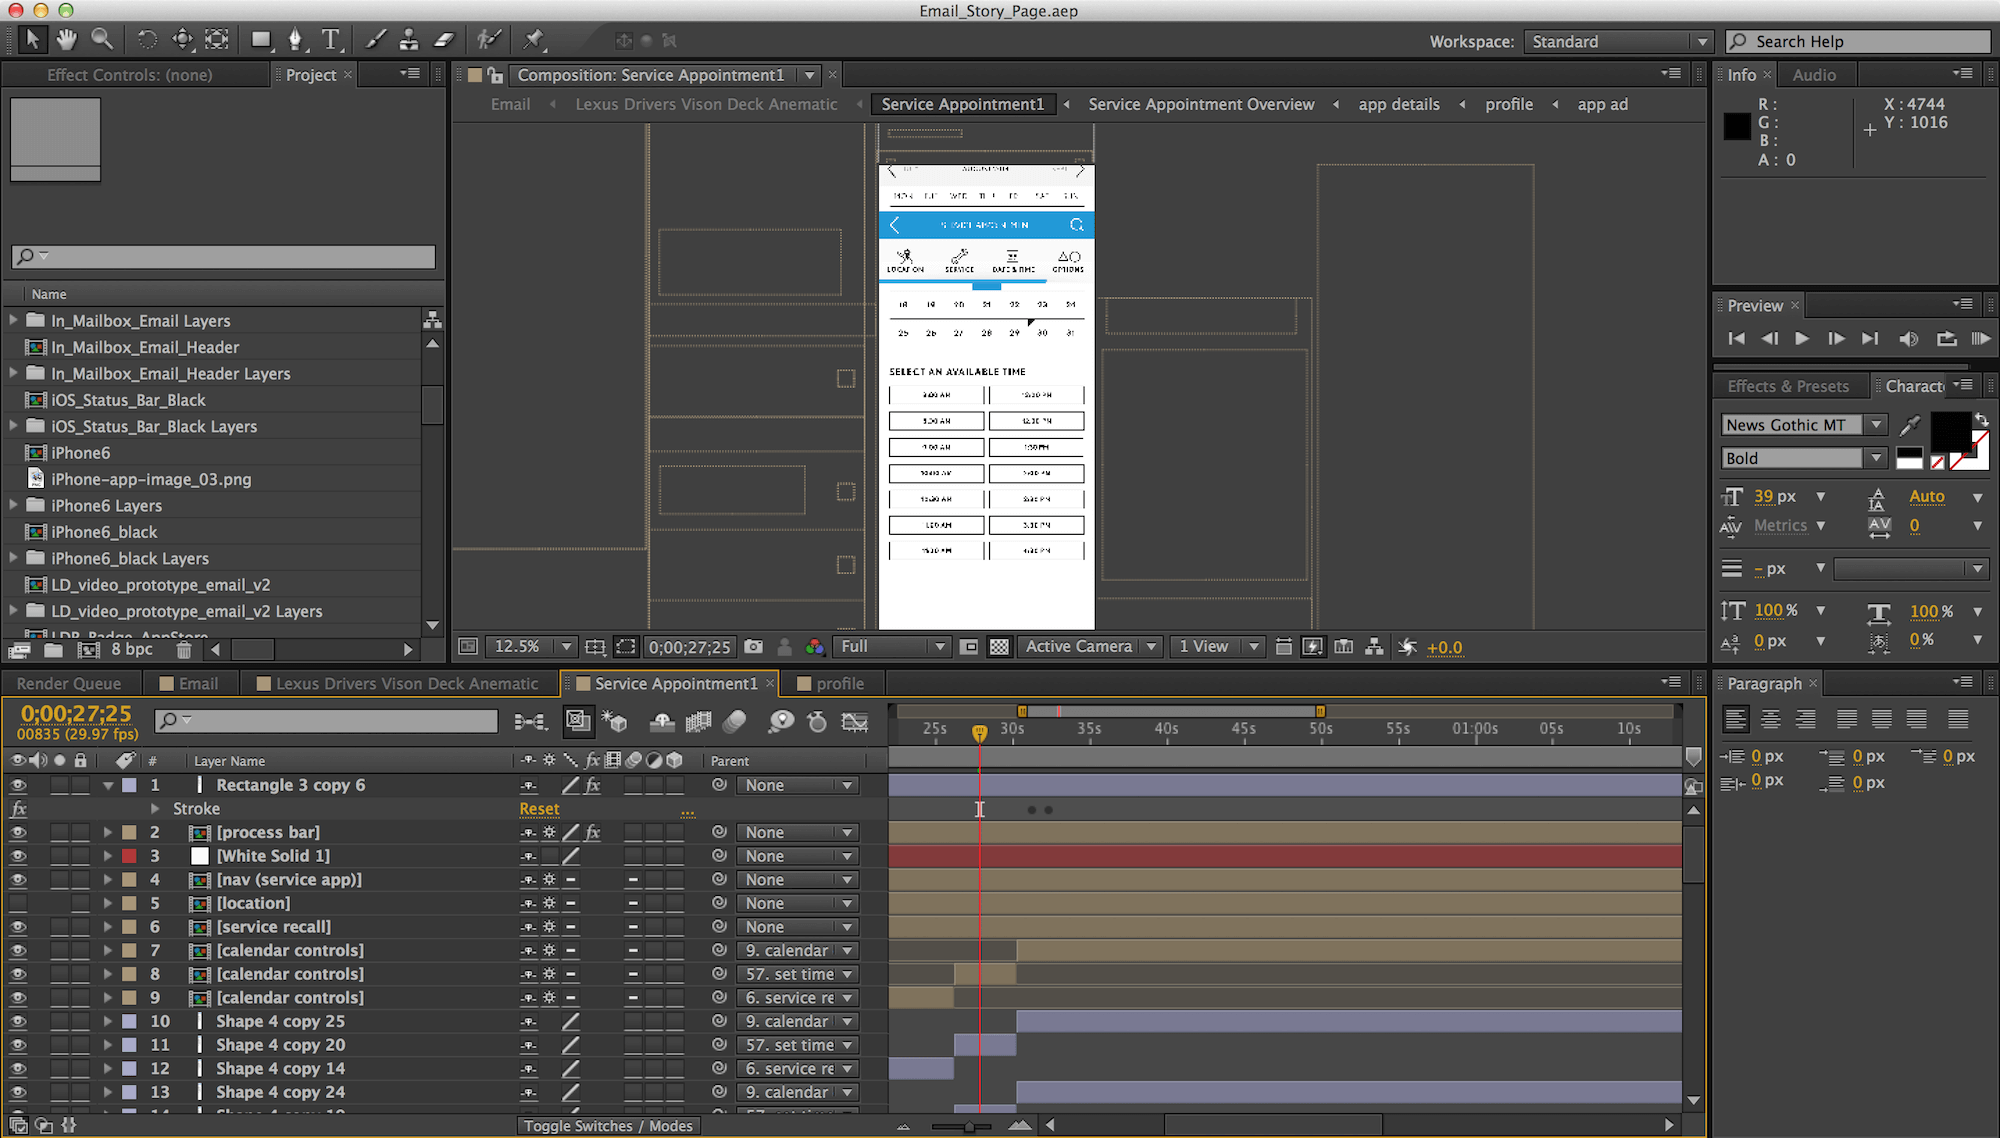
The photo below might look intimidating, with all of those layers and little diamonds (keyframes). A keyframe in animation is points that define the start and end of any transition. The points are called frames because their position in time used to be measured in frames on a strip of film.
If you remember Flash programming or “tweening” in Flash, then this concept should sound very familiar. Keyframes provide complex animations with very simple logic. And if you’re a developer, you could have some real fun creating robust keyframe animations through the software’s expression engine. Again, similar to Flash, which allows users to tween via keyframes or write custom code via ActionScript, After Effects has a built-in JavaScript-based engine that allows for more streamlined animation, without requiring you to create tens or hundreds of keyframes by hand.
An expression is a little piece of software — much like a script — that evaluates to a single value for a single layer property at a specific point in time. Whereas scripts tell an application to do something, an expression says that a property is something and tells that specific layer or property to animate or transition in a certain way. Expressions prove very useful when you’d like to test a particular animation across multiple elements very quickly.
Benefits Of After Effects
Speed Up Project Timeline
Explaining a complex UI animation to clients is really hard. Most of them cannot picture it. I even have a hard time picturing a UI animation when reading someone else’s documentation. When clients see a slick and finessed animation style in After Effects, they are thrilled. It gives them a clear picture of how the end product will look and function.
This kind of exploration of functionality through prototypes can be done in various phases of the design process. Showing a client some basic exploratory animations and transitions during the project’s discovery phase could get them really excited about the possibilities and make them want more for their website or application. We normally use After Effects as a way to validate functionality and visual design choices. No matter in which phase of the project cycle you choose to implement After Effects prototyping, be sure to have a clear end goal and know that this form of prototyping is supposed to be rapid. The goal might be to showcase the most complex pieces of functionality and finetune them for developers, or simply to show the client something shinny and sexy. Either way, the process should be rapid.
This rapid way of visualizing animation is also great for testing different designs with users. At this point in a project, most design decisions are based on the analytics of existing websites (if any), personas drawn from the user base and a lot of assumptions. So, this process enables us to easily create a few variations of the same design element, showing how it moves, and presenting that to users and asking for feedback in a survey or with one-on-one questions. By simply letting the user view the animation on a device, they can quickly judge which feels more natural and is most appealing. You can also bring this into a more traditional approach to testing by incorporating the animation as a GIF in a clickable prototype on whatever web platform you are using. Most rapid prototyping web tools support GIFs nowadays.
Paper-based (wireframe) transitions — of menus, button states, off-canvas containers or whatever else — might seem like an easy solution. But once you’ve annotated them for the developer and seen them in motion, you might quickly change your mind and say, “Actually, the menu looks weird sliding in from the left. Could we try sliding it in from the top? And could the link items in the menu list come in delayed right behind one another?” This turns into a back-and-forth between developer and designer and a matter of trial and error on both parts.
Avoid this by taking a few elements from your website in any form, whether they be boxes and arrows or visual comps, and making a few variants of how the elements could animate. Once this is complete and while the visual designers are making their last-minute tweaks and cleaning up their files for development, these different animations could be worked into quick prototypes in Invision or a comparable web-based prototyping tool, and they could be sent to stakeholders or actual users for testing. We could then take the results of these quick usability tests and tweak our functional document to reflect our findings, along with a GIF of the most effective menu variant.
To accompany the GIF file, we would add our functional documentation, as well as the easing curve that was applied and the duration of the animation. Because these attributes of the animation seemed to perform best among the variants, we can start to apply these to other functions and elements of the website to create a consistent visceral feel throughout the experience. Yes, other elements will have slight variations due to their different purposes, but again, the answer to that comes with testing.
By introducing this into your lean UX or agile workflow, the back-and-forth discussion about animation between the development and design teams can be chopped down tremendously, and the development team will feel more confident in its direction and will feel less of a cognitive load while programming and reading through the documentation. If you’re interested in how to go about translating custom After Effects easing easing curves to CSS3 keyframe animations for delivering more precise documentation to your developers, check out this article by Ryan Brownhill on the subject.
Easing
As mentioned earlier, this visceral aesthetic mimics how objects move in real life. Objects in the real word don’t move at a constant speed throughout the duration of their movement — they ease in. For instance, if you launch your computer mouse across the desk, it will not move at one constant speed and then come to an abrupt stop. In the digital word, we mimic the movement of real objects using easing curve functions.
An easing function usually describes the value of a property given a percentage of completeness. Different frameworks use slightly different methods, but the concept is easy to grasp once you get the idea. It’s probably best to look at a few examples.
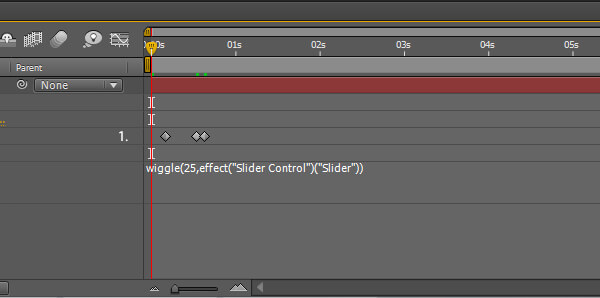
The Easing Functions Cheat Sheet enables you to go through and check out how each individual curve puts objects in motion, and then grab the function in either CSS, SASS or JavaScript to be leveraged in your After Effects project. If you’re looking for something a little more automated and less custom, you can download Ease and Wizz, a great script for After Effects that comes loaded with multiple curves; when keyframes are selected, you can apply a curve’s expression to those keyframes.
Integrating With Different Program Workflows
Photoshop Or Illustrator To After Effects
This is probably how most designers on your team will be turning your wireframes into visual beauties. Because After Effects is a Adobe product, Photoshop (PSD) and Illustrator (AI) files are extremely compatible. You don’t need any special exporting specifications for PSD files. Just save a file and import it. And for AI files, all you have to do is make sure that you “Release Layers to Sequence” before saving the file.
A great aspect of taking PSDs into After Effects is being able to edit text. This way, if you are going for more high-fidelity animation testing and some copy happens to change in the comps, making a change in the animated prototype becomes really easy.
If you haven’t enabled text, there is always the option of live updates. The beauty of working within Adobe programs is that most of them communicate very well with each other. So, when you make a change in a PSD or AI file, it should reflect in your After Effects composition. You may have to restart the After Effects project to see the changes reflected properly, though.
Try to limit animation GIFs to six seconds — that is, not the entire transition, but rather the entire video you will be exporting. While I sometimes use After Effects to show more complex flows that end up being two to three minutes long, that is not ideal because the file’s size will be too big and the file’s structure over-complicated. Doing quicker micro-interaction animations is most efficient and effective.
When presenting these animation videos to clients, I’ve found that just hitting the play button does not quite get the reaction I had hoped. I have recently been showcasing animations to clients in GIF form or leaving them in video form and allowing the client to use the video scrubber, which creates an interaction that mimics the functionality of grabbing a scroll bar with the mouse and sliding down the page. This, of course, does not work in all situations, but it is a really effective when dealing with page-scrolling animations or parallax effects or when you need to hide the navigation on scroll.
Sketch To After Effects
We’ve recently started using Sketch 3 at work, and it’s a great tool. It speaks with native CSS units of measurement, and hundreds of repositories on GitHub have plugins for it, and it fosters collaboration with the functional design team and visual design team if they are working in the same program. My only gripe is that it is not very compatible with After Effects. I figured out a few workarounds that ultimately didn’t prove to be very efficient. However, Issara Willenskomer has found a clever way to easily convert Sketch files into either PSD or AI files for easy animating in After Effects.
Exporting Canvas From Sketch
When exporting your Sketch file for AI, select the artboard(s) that you’d like to animate, select the format of SVG in the tools panel on the right, and then click “Export your file name” at the bottom of that panel. Now, you’re ready to open Illustrator and import the SVG file.
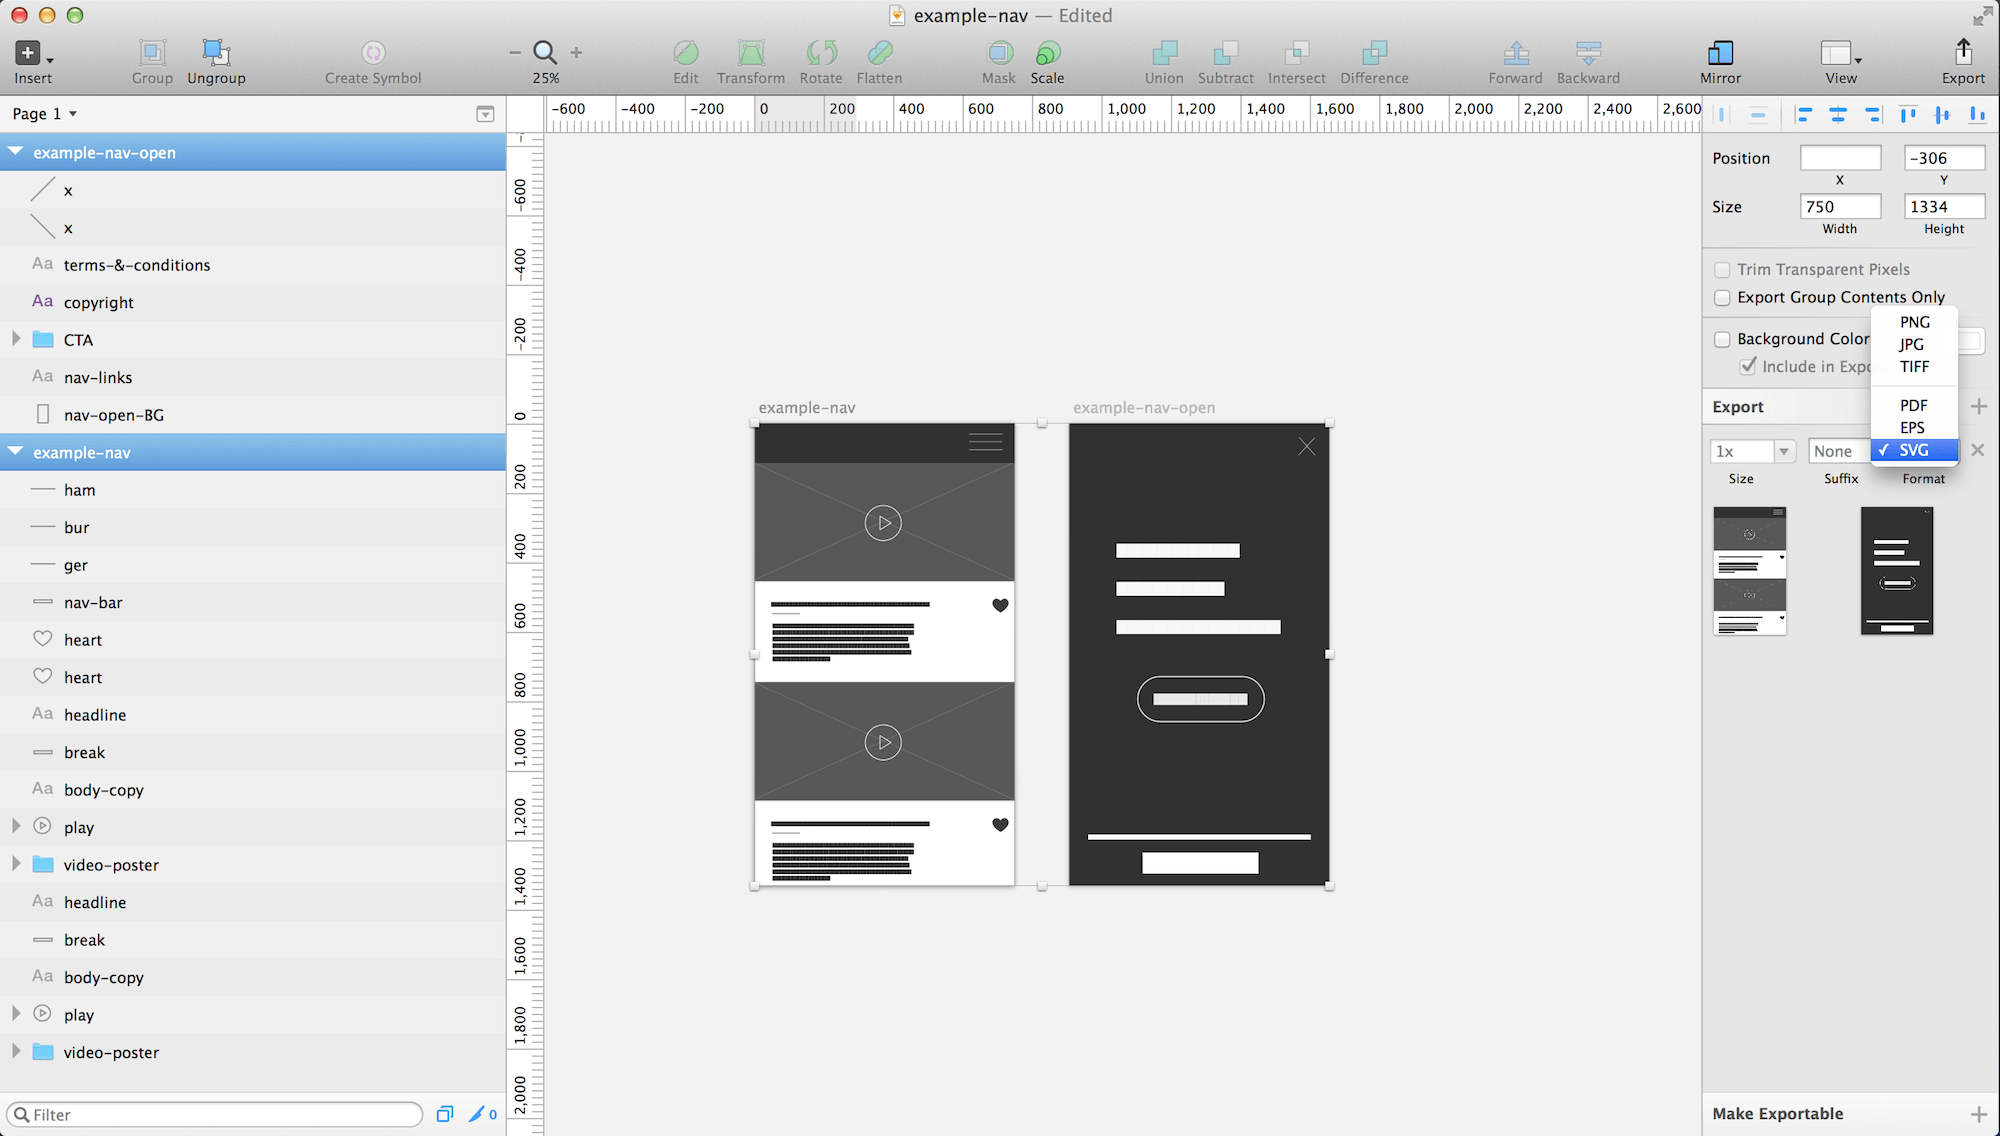
Import File To Illustrator
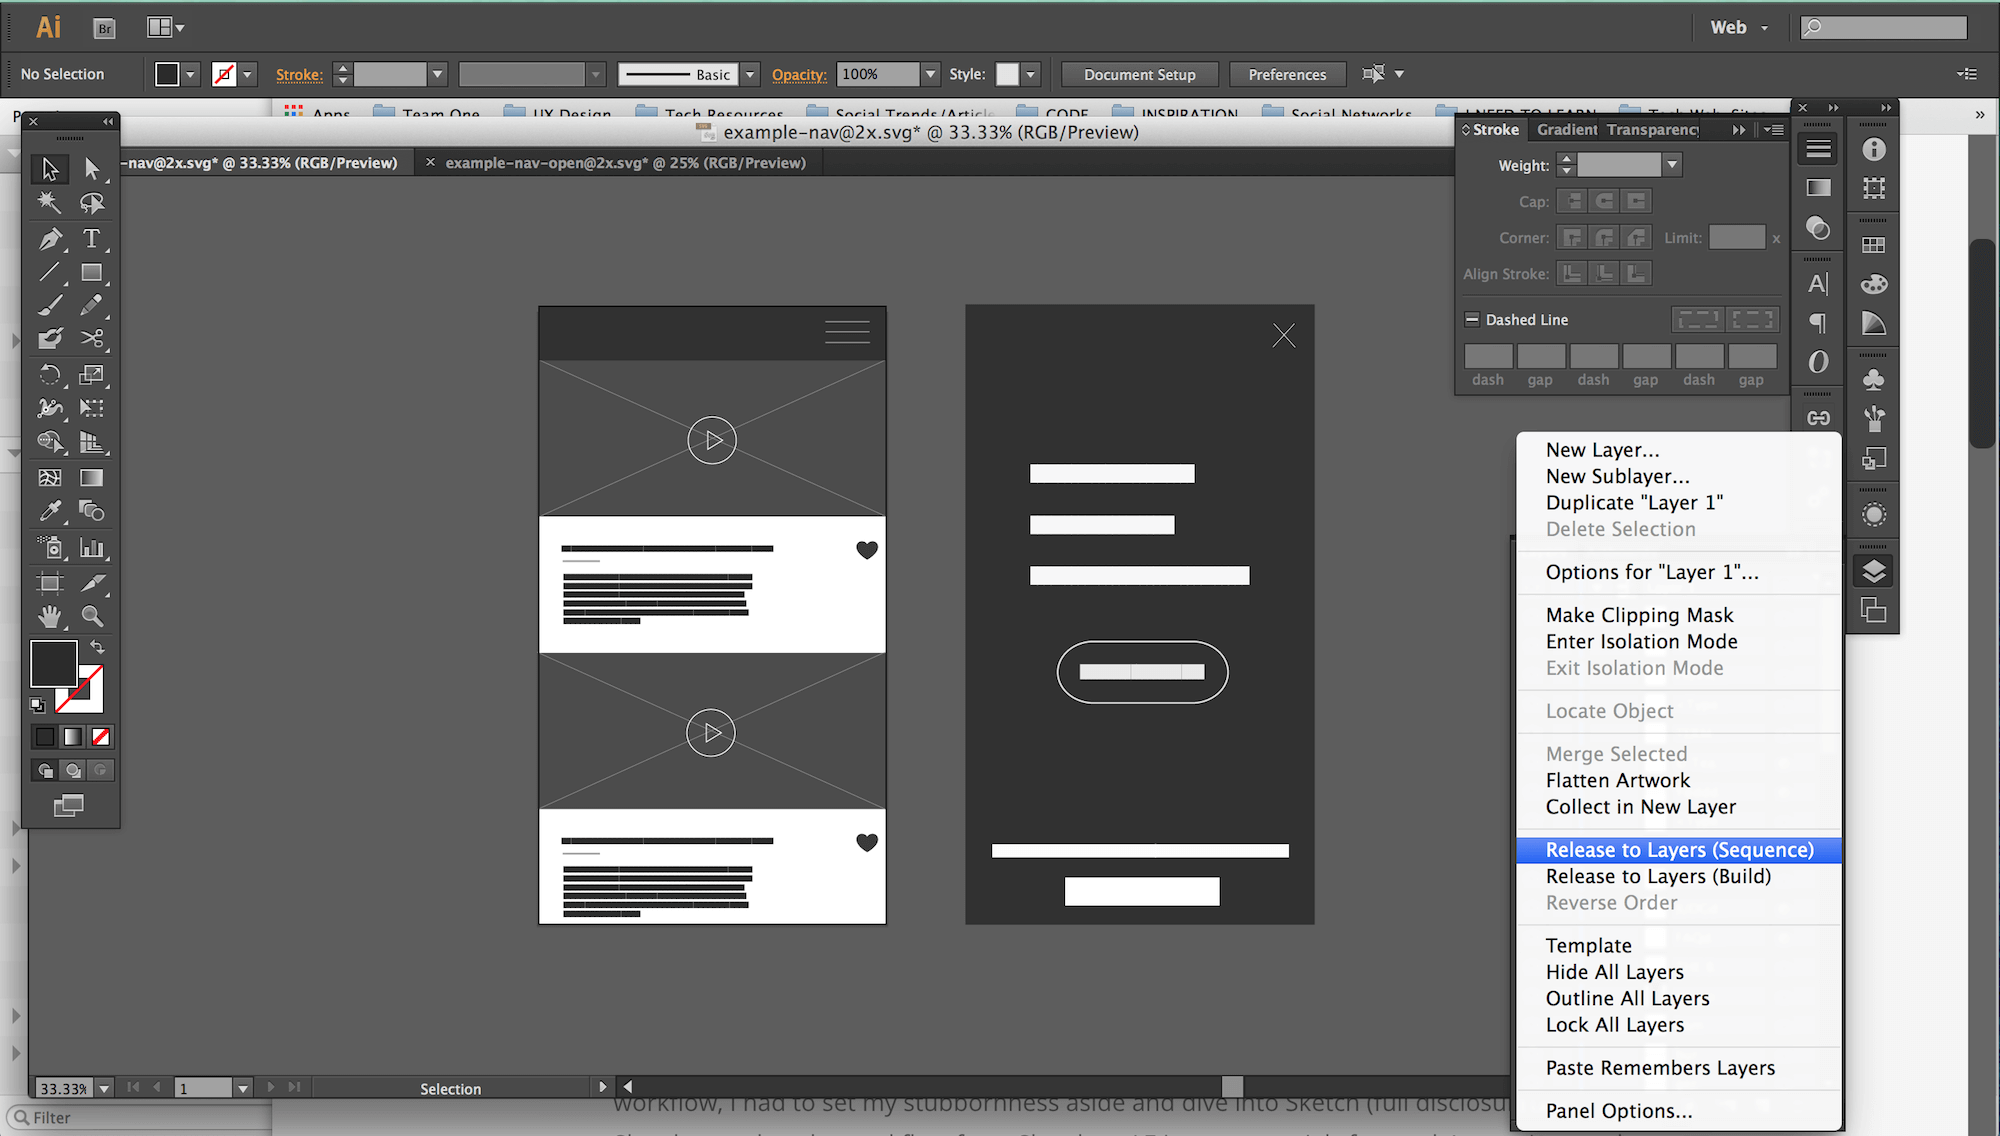
Once you’ve selected and opened the exported SVG in Illustrator, you’ll notice that all of the layers are lumped together. By default, when Sketch exports SVG files, it groups all of the layers, so you’ll need to ungroup them. Once the layers are ungrouped and in their individual layers, they are technically still living within the same layer. When prepping any AI files for animation in After Effects, you’ll need to use the special “Release Layers to Sequence” feature within the Layers panel. Make sure that the parent layer is selected when doing this. Once the layers have been released, you’ll notice that they have all been assigned their own color. At this point, you can select all of the files that have been released and move them above that parent layer.
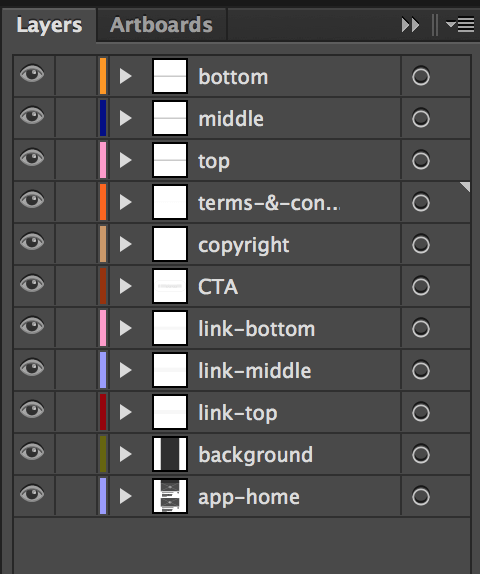
Order And Organize Layers
It’s time to organize this big mess to make it easier to edit. This is where logic comes into play. Think about how these layers will be animated, and simplify as much as possible. For example, if a ton of layers are in the background but you don’t need to animate those layers, you can group them in Illustrator so that they are imported as a single layer, or give them intuitive labels so that you can pre-compose those layers in After Effects. The pre-composition route will allow you to actually animate them later on, if you decide to do so.
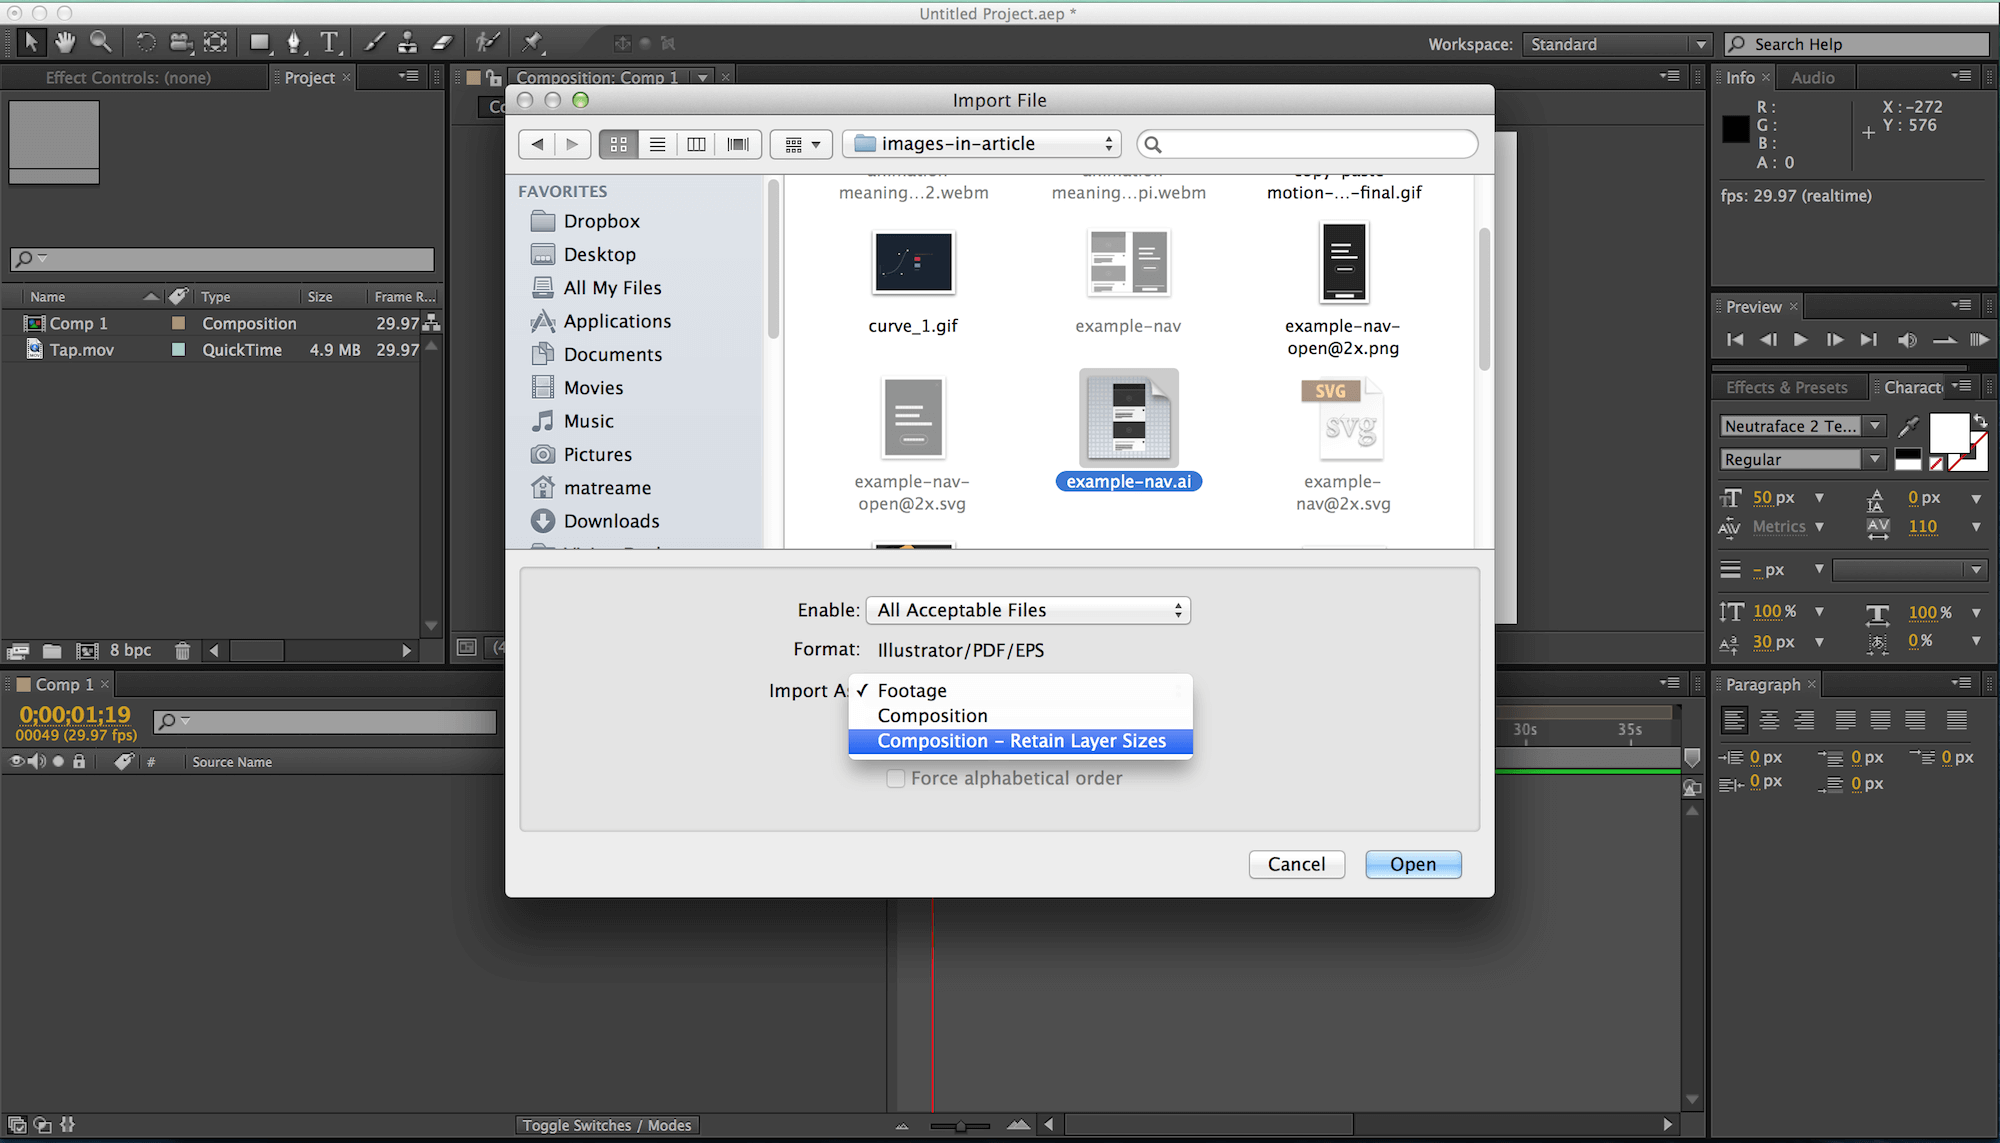
Import Illustrator File To After Effects
The most important part of the importing process, and where most people get frustrated, is the little drop-down menu where you must select “Composition – Retain Layer Size.” If this is not selected, the AI file will be imported as a flat file, without editable layers.
Other Key Features Of After Effects
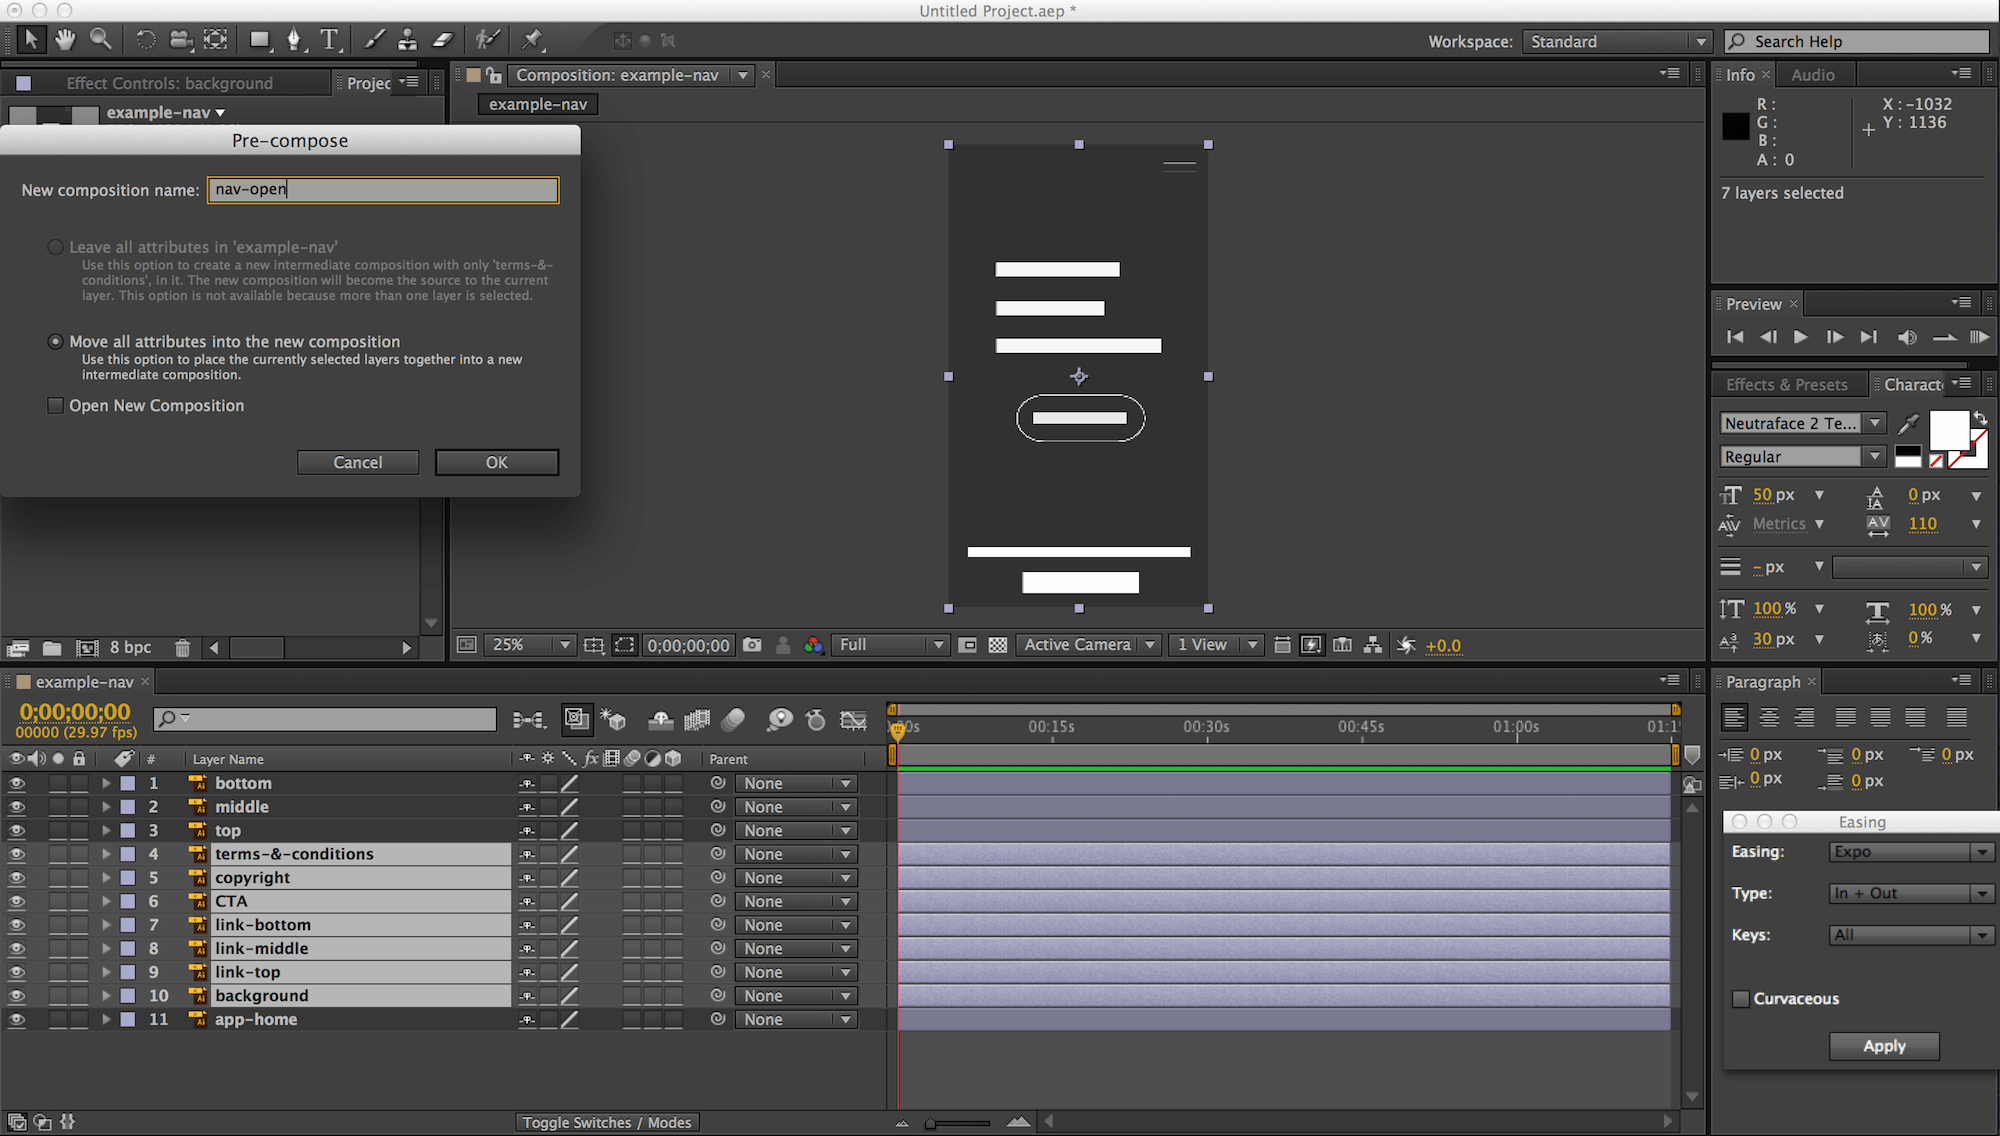
Pre-Compose To Stay Organized
Pre-comps will help you organize complicated After Effects projects. This is really important if a project is being touched by multiple people or if you expect to hand off a project to an interaction designer. The advantage of animating PSD documents over AI and Sketch documents is that if the layers are in a folder within Photoshop, that folder will be converted into a pre-comp. If you’re not animating a PSD, then once you’ve done your due diligence in the chosen UI platform, you can easily pre-compose layers by holding Shift, selecting the layers to pre-compose (i.e. group), right-click and hit “Pre-compose.” Now, you can animate the entire group or double-click into that pre-comp and animate individual layers.
Ease And Wizz
Ease and Wizz is a powerful expression engine that has popular preset easing curves. Open the Ease and Wizz UI panel in After Effects by going into the “File” menu item and then into the Scripts section. This script panel can be conveniently placed wherever best fits your workflow. Once the script panel is where you’d like it, you can set keyframes on a selected layer, select those keyframes, choose an easing curve from the Ease and Wizz script panel, and then apply that curve. The easing curves can be applied with a few clicks, and they add a feeling of real-world physics to your UI animation that the basic linear easing cannot.
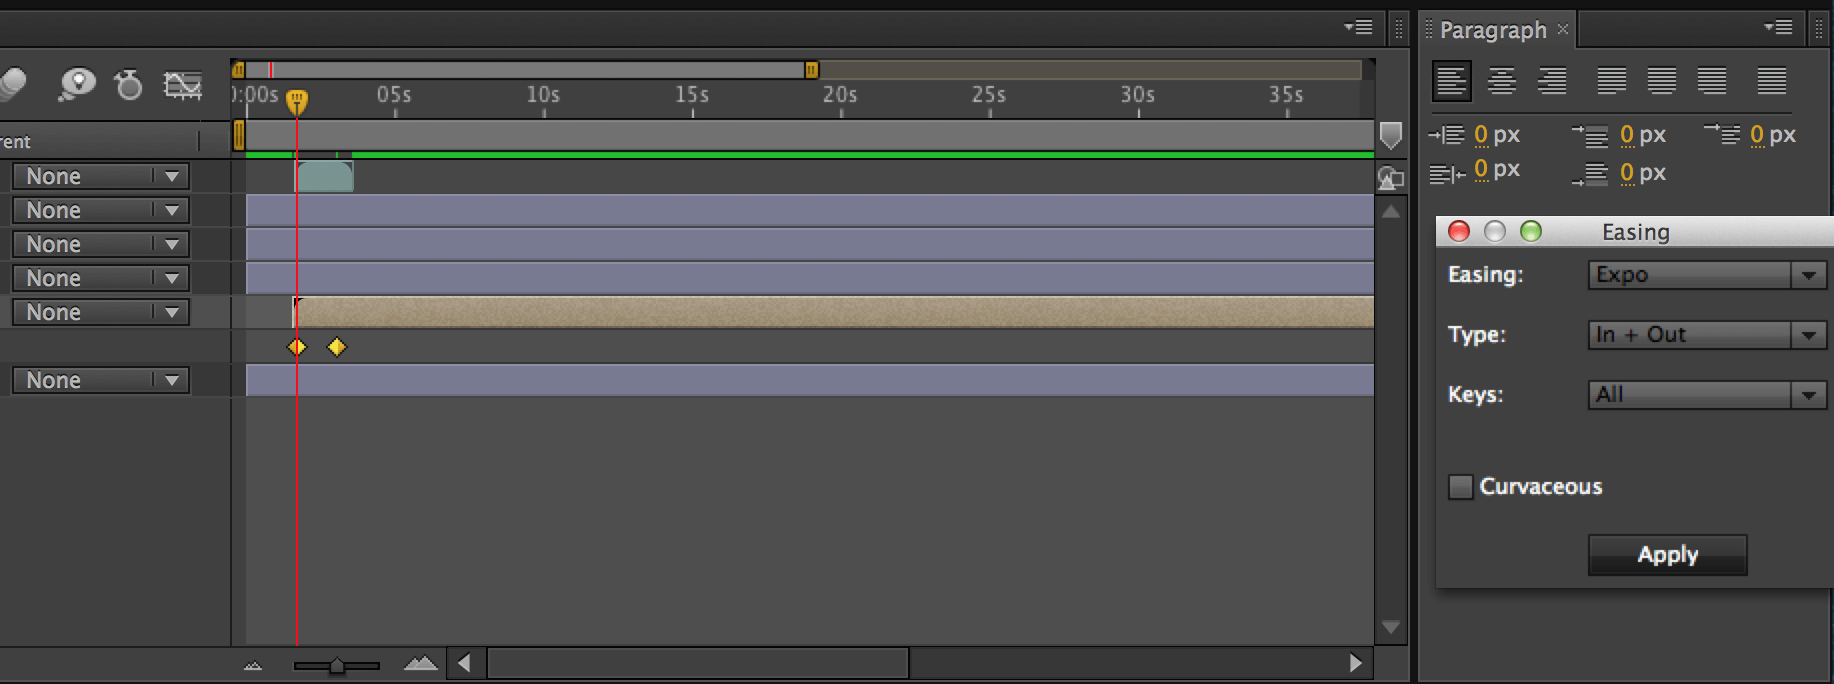
Visualizing The Easing Curve
Once you have applied the Ease and Wizz curve to your keyframes, you’ll notice they have turned from the normal diamond keyframe shape into an hourglass. This means the easing curve has been applied. Another indicator is that the coordinates of the animation have turned red. From here, you can go in and customize the easing curve of your UI animation if you wish.
Different Approaches To After Effects Prototyping
Google’s Material Design Approach
The way Google presents its material design micro-interactions is fantastic. They’ve taken simple shapes that resemble UI elements and quickly done motion testing on them. This way, both functional and visual design work in tandem, speeding up the redesign workflow. In Google’s words:
“”Perceiving an object’s tangible form helps us understand how to manipulate it. Observing an object’s motion tells us weather it is light or heavy, flexible or rigid, small or large. Motion in the world of material design is not only beautiful, it builds meaning about the spatial relationships, functionality, and intention of the system.”
Wireframes
This method could be very effective if you do not have a dedicated interaction designer on staff. Once the client has approved the wireframes and the designers are putting the finishing touches on the visual UI, you could quickly take a few key pieces of the experience and animate and test them. When you show the client the visual design, these reframe animations could play a supporting role.
High-Fidelity Approach
The high-fidelity approach takes a little longer because you have to wait for the visual designers to put their spin on the UI, but the results are great. Clients will be amazed at the level of finesse and attention to detail. This approach also gives you a great artifact to share with the various online GIF communities.
Conclusion
One last thing to keep in mind is how to stay on track when using this form of visualization of functionality in your workflow. As mentioned plenty above, this is meant to be rapid, not its own phase of the project. It supplements the discovery, functional or visual design phase. Clients will likely ask for changes to the animations, and sometimes they’re reasonable requests, but I wouldn’t take these animations into multiple rounds of revisions. If it gets that far, you’ll know that the train has gone off the tracks.
Unless your project is structured beautifully, certain animations are a pain to tweak. Just let the client know what your intentions are for the animations, and let the tweaking and finetuning happen in the code of the final product. Until then, you are simply painting a functional and visual picture for the client and developers, giving them a clear view of your vision.
I hope now you have some ammo to take back to your team and make a case for injecting this software into your web design workflow. Granted, it’s not necessary for every web project, but it’s an MVP (most valuable player) in certain projects. Below are some inspirational resources and reference material related to GIF animations to get you started creating magical UIs in After Effects.
Resources
- uiGIFs
- UI GIF (search query), Dribbble
- Easing Functions Cheat Sheet
- “Animation,” Material Design, Google
- “Expression Basics,” After Effects Help, Adobe
Further Reading
- The Ultimate Motion Graphics Tutorials Round-Up
- The Art Of Film Title Design Throughout Cinema History
- Creating Advanced Animations In Photoshop
- Better Context Menus With Safe Triangles


