Extending Advanced Custom Fields With Your Own Controls

Email Newsletter
Weekly tips on front-end & UX.
Trusted by 182,000+ folks.
 Custom Web Forms for Angular, React, & Vue. Your backend.
 Celebrating 10 million developers


Advanced Custom Fields (ACF) is a free WordPress plugin that replaces the regular custom fields interface in WordPress with something far more powerful, offering a user-friendly interface for complex fields like location maps, date pickers and more.
In this article I’ll show you how you can extend ACF by adding your own controls to tailor the experience to your needs.
How ACF Works
ACF is a collection of fields which can be added to a number of locations in WordPress, such as posts, taxonomies, users and so on. They share a common interface and a WordPress-compatible saving mechanism (using meta fields and options).
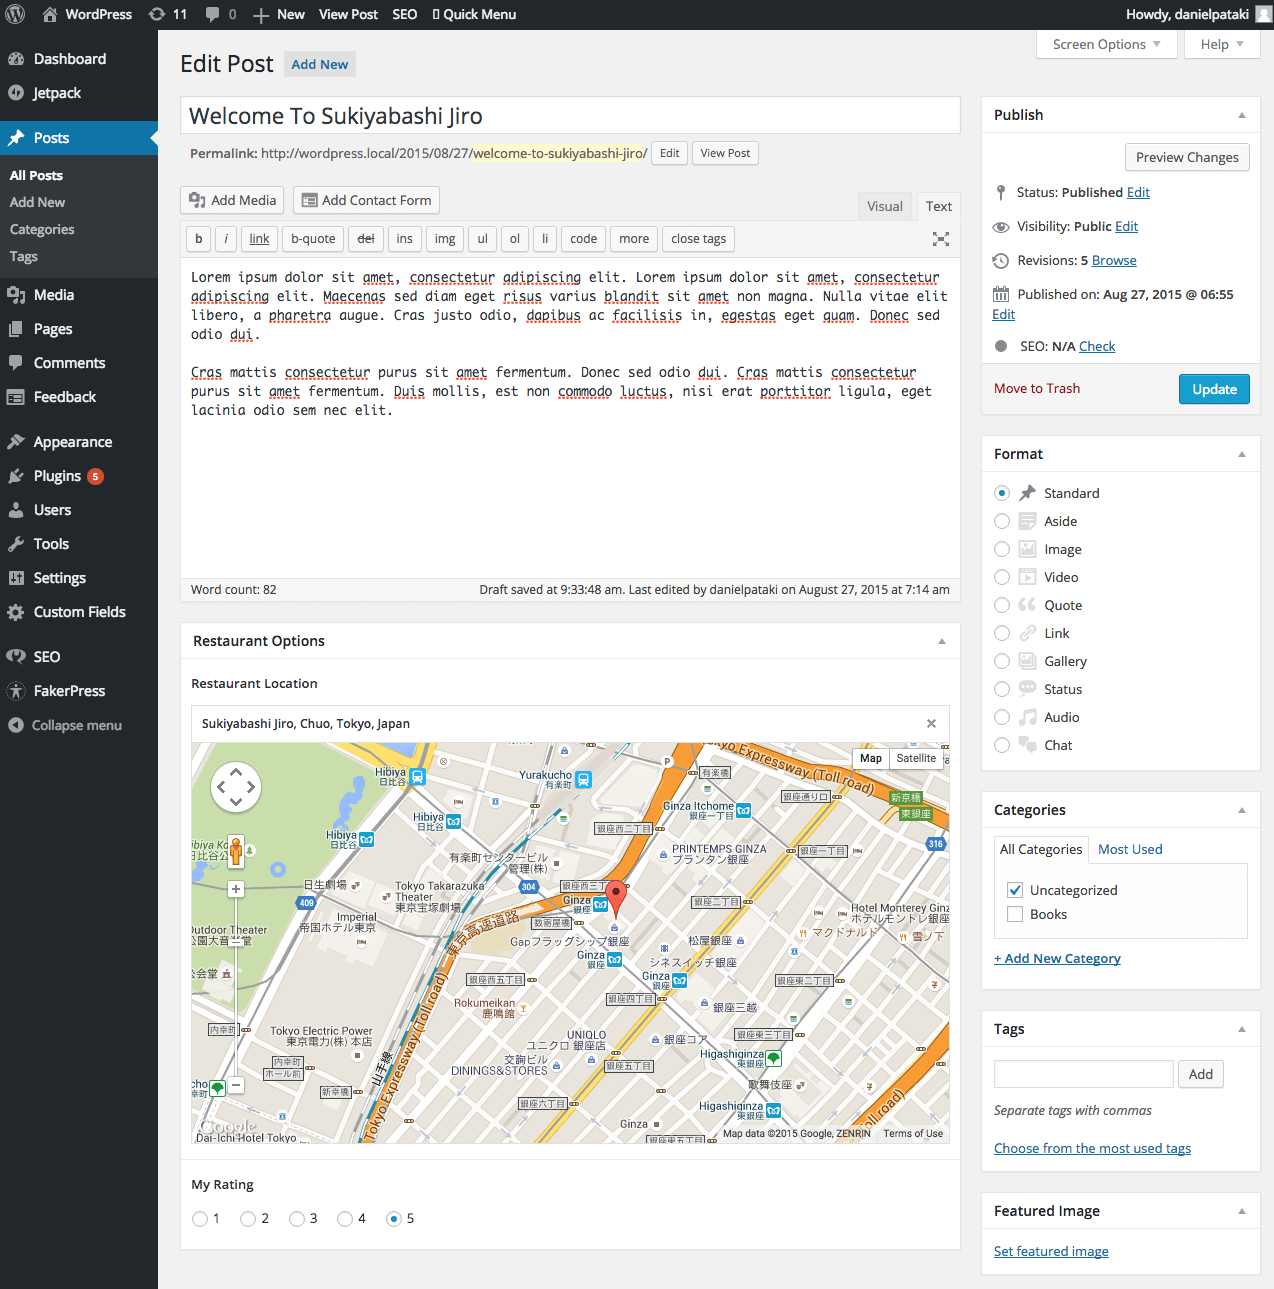
Each ACF field has field settings which you can think of as the back-end options for a field. Field settings allow you to control how the field behaves when displayed to the user. You may be able to control default values, how data is saved, and so on.
There is a default set shared by all fields, like field label, field name, field type, field instructions, required setting and conditional logic, but there are some field-specific settings as well.
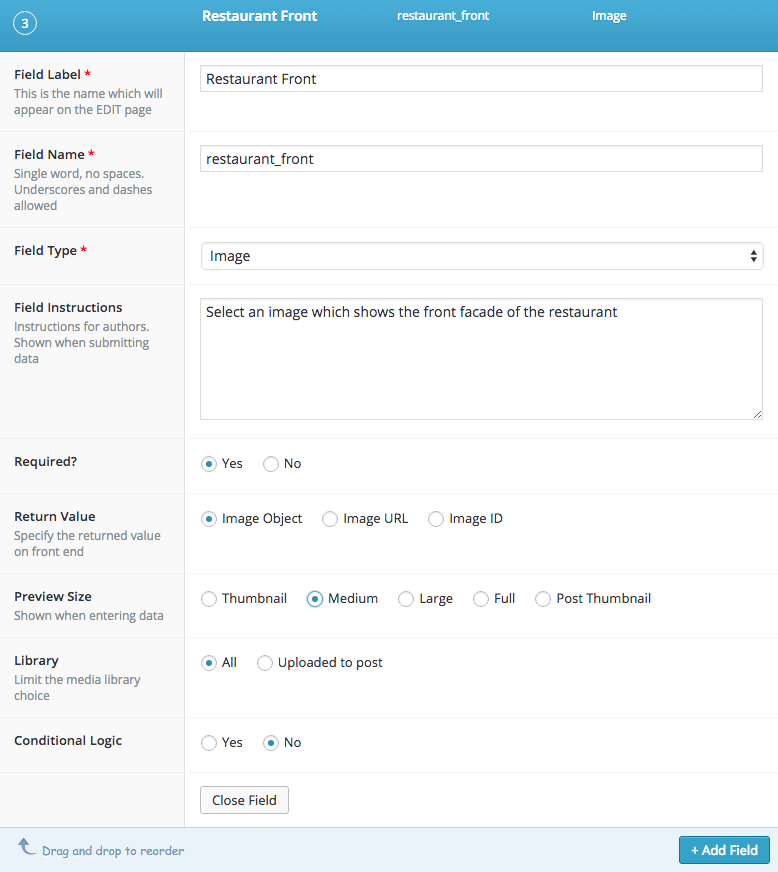
A good example is the image field which allows users to select an image and save it. The field settings allow you to define the following:
- Return value (image object, image URL or image ID)
- Preview size (any defined image size)
- Library (all or uploaded to post)
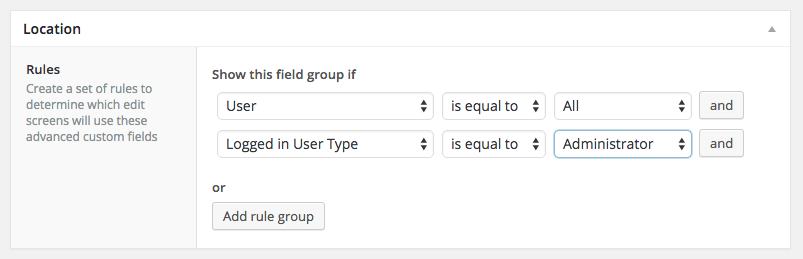
Fields are created within field groups which can be placed in a number of locations using powerful rule sets. Not only can you add your fields to edit profile pages, you can also restrict the visibility of a field group based on role, allowing access to admins only, for example.
What’s Available Out Of The Box
Right now ACF has 22 fields available, which includes basic fields like number, email, multi-select and radio, but more advanced ones as well, such as taxonomy selection and the user selector. You also get a few fields that use JavaScript to create a great interface, like the map field or the date and color-picker fields.
There are also quite a few fields available in the plugin repository. I’ve created six ACF plugins myself, like the Google Font Selector and Sidebar Selector, but a quick search in the repository will come up with star rating fields, recent posts, link pickers, widget area fields and so on.
If you are a developer I can also heartily recommend the pro version of ACF. It costs $100 – which is quite a bit – but you can use it in unlimited projects. It contains a repeater field, a gallery field, a flexible content field and the ability to add options to options pages very easily.
The great thing about ACF is that the pro version is nice, but you don’t need it in order to build something awesome. You can use the built-in fields or write your own if you need something different. Let’s look at how that can be done.
Extending Advanced Custom Fields
ACF can be extended by creating a separate plugin which integrates with the main ACF plugin. The heavy lifting is done by the ACF Field Type Template which you can grab from GitHub.
This includes all the files you need and has great inline commenting that walks you through the process. It also contains all the possible functions you can use. You won’t use all of them for each field, but you can leave the unwanted ones empty or delete them altogether.
In this tutorial I’ll show you the steps I follow when creating an ACF plugin. I’ll be creating a country selector which lets you select any country from a drop-down list. By the end you should be able to reproduce it and create your own, so let’s get cracking!
Step 1: A Local Environment
I like to do all my WordPress work locally. I won’t go into too much detail here – you can take a look at Rachel Andrew’s “A Simple Workflow From Development To Deployment” if you need some help. In a nutshell, I use a simple Vagrant box to create a local server and I use virtual hosts to create multiple projects.
The one additional aspect of my workflow is using symlinks to manage my plugins. I do this for three reasons:
- I can keep my plugins separate from my WordPress installs.
- A plugin can be symlinked to multiple WordPress installs which means I update the plugin in a central location and all installations use that code.
- I can use any folder structure I like which comes in handy when working with Git packages.
The process isn’t too difficult. Take a look at Tom McFarlin’s “Symbolic Links with WordPress” article for more information. Since the template is designed to be a plugin, this step is not strictly necessary but I think symlinks are worth looking into for development purposes.
Step 2: Adding The Plugin And Renaming
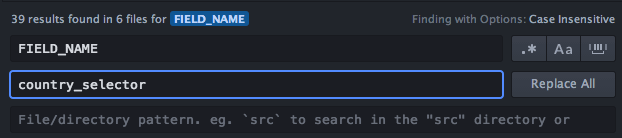
Once you’ve grabbed the template from GitHub, copy and paste the whole directory into your plugins folder and rename it to acf-country_selector. You’ll see that some of the files have FIELD_NAME in them; this is a placeholder for your actual field name which should be the same as the name of the folder (after “acf-”). In our case the field name is country_selector.
Some of you may be wondering why I’ve used an underscore instead of a dash: it’s common practice to use dashes in file names. The use of an underscore relates to consistency and a rule for translatable strings.
We’ll need to replace FIELD_NAME inside files as well. In some cases the placeholder is part of a function name where we can’t use dashes. I could decide to use dashes in file names and underscores within files, but there would then be a problem with the text domain.
The text domain is set to acf-FIELD_NAME, which actually needs to be the same as the folder name. This excludes the use of a dash outside and an underscore inside files. Because of this I’ve decided to use underscores. There are simply fewer downsides to it.
Back to creating our plugin! Replace FIELD_NAME in all file names with country_selector. Once done, I recommend dropping the whole folder in a good editor such as Sublime or Atom. Any editor that allows you to search and replace within multiple files at once will do.
Within our files there should be another set of placeholders: FIELD_NAME and FIELD_LABEL. There are a few more, but the others are used only once or twice and only in the readmes so you can replace those manually.
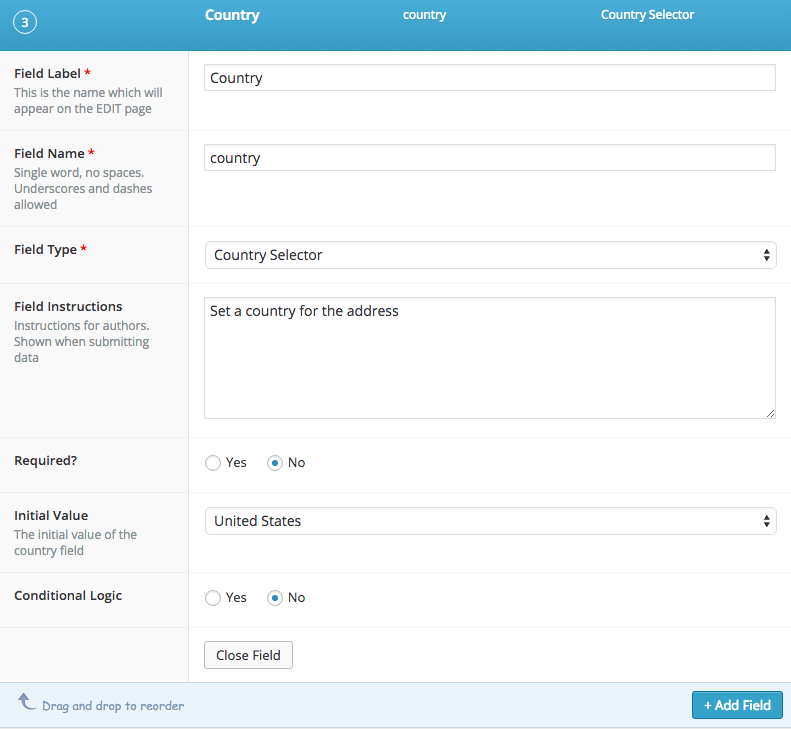
For this plugin I mass-replaced FIELD_LABEL with Country Selector and FIELD_NAME with country_selector.
Finally, open acf-country_selector.php and fill out the meta information in the header. This will ensure that the plugin shows up in the admin with the data you provide. In this plugin’s case I’ve filled it out like this:
/*
Plugin Name: Advanced Custom Fields: Country Selector
Plugin URI: https://danielpataki.com
description: >-
  A plugin for ACF that allows you to select any country from a list
Version: 1.0.0
Author: Daniel Pataki
Author URI: https://danielpataki.com
License: GPLv2 or later
License URI: https://www.gnu.org/licenses/gpl-2.0.html
*/
At this stage you can go to the plugins section and activate it. You won’t see any new fields just yet, but we can start chipping away at the code.

Step 3: Field Basics
You may have noticed that there are two similar files: acf-country_selector-v4.php and acf-country_selector-v5.php. One is for version 4 of ACF, the other for version 5. Right now, version 5 is actually the pro version, but soon the free version will also be updated to 5.
This doesn’t mean that the free version will have the premium fields, but it will run on a new and improved system. Since the free version is currently version 4, I will be looking at acf-country_selector-v4.php only. The methods for version 5 are very nearly the same, so it shouldn’t be too difficult to create both.
If you’re planning on releasing your plugin, I recommend using both files. Aside from some minor changes it’s really a matter of copying and pasting than anything else.
Our first stop, then, is acf-country_selector-v4.php, and the __construct() function within. Most of this is filled out for us. We’ll need to modify the value of $this->category. This determines which group our field type will be listed under. Since there’s a “Choice” group and we’ll be building a select field, let’s use Choice as the value here.
I also want to allow the person who creates the field to set an initial value for the country field. This will be really useful if the field is used on a website which predominantly uses a specific country for the field. Instead of having to go down and select “Hungary”, users could make that the initial value.
The $this->defaults array contains the defaults for our fields, like the initial_value field. I’ll make the default “United States”, which may be the most popular choice for the initial value. Here’s the full contents of the __contruct() function at the end of all that:
// vars
$this->name = 'country_selector';
$this->label = __( 'Country Selector' );
$this->category = __( 'Choice', 'acf' ); // Basic, Content, Choice, etc
$this->defaults = array(
    'initial_value' => 'United States'
);

// do not delete!
parent::__construct();

// settings
$this->settings = array(
    'path' => apply_filters('acf/helpers/get_path', __FILE__),
    'dir' => apply_filters('acf/helpers/get_dir', __FILE__),
    'version' => '1.0.0'
);
Step 4: Field Settings
The next step is to configure the field settings we’ll have. In our case this will be a single field for selecting the initial value of the front-end selector. This will be a selector with all countries selectable.
Before we create the selector, we need a list of countries. I created a little Gist which lists all of them in an array. I decided to create a method that returns all countries to make sure I can create country lists anywhere, without needing to add the large array more than once.
function get_countries() {
$countries = array( 'Afghanistan' => 'Afghanistan', 'Albania' => 'Albania', '...' );
return $countries;
}
I placed this function at the very end of the class, to separate it from the built-in ones. I can now use $this->get_countries within this class to return the array.
To add our initial value field we need to modify the contents of the create_options() method. Here’s the full code for that function:
function create_options( $field )
{
    $field = array_merge($this->defaults, $field);
    $key = $field['name'];

    // Create Field Options HTML
    ?>
<tr class="field_option field_option_<?php echo $this->name; ?>">
<td class="label">
    <label><?php _e("Initial Value",'acf'); ?></label>
    <p class="description"><?php _e("The initial value of the country field",'acf'); ?></p>
</td>
<td>
    <?php

    do_action('acf/create_field', array(
        'type'      =>   'select',
        'name'      =>   'fields['.$key.'][initial_value]',
        'value'     =>   $field['initial_value'],
        'choices'   =>   $this->get_countries()
    ));

    ?>
</td>
</tr>
    <?php

}
The main thing to keep in mind is that the name of the field must be fields[field_key][field_name]. My particular case translates to fields[field_55e584fa90223][initial_value], but the key is generated for you, so you’ll need a variable to reference it. Hence the use of fields[‘.$key.’][initial_value].
If you need to add more field settings simply create some more defaults and add more fields following the pattern above. In version 5 the process is somewhat simpler as you don’t have to wrap the whole thing in a bunch of HTML – that is done for you.
Step 5: Field Front-End
All that’s left is to create the control the user will actually see. This is done in the create_field() method. You’ll need to create the HTML yourself here but it shouldn’t be too difficult to create a standard <select> field, right?
function create_field( $field )
{
    $field = array_merge($this->defaults, $field);
    ?>
    <div>
        <select name='<?php echo $field['name'] ?>'>
            <?php
                foreach( $this->get_countries() as $country ) :
            ?>
                <option <?php selected( $field['value'], $country ) ?> value='<?php echo $country ?>'><?php echo $country ?></option>
            <?php endforeach; ?>
        </select>
    </div>
    <?php
}
At this stage, your field is ready to go. If you add your field to a field group and view the field in action, you should see the country selector with the initial value selected. If you save the object you’ve added the field to, it will retain its value.

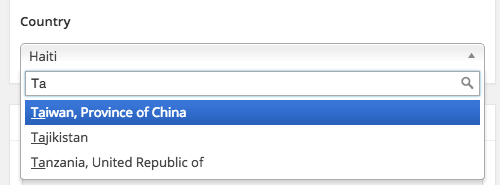
Step 6: Adding Scripts And Styles
This plugin doesn’t require any scripts and styles at the moment, but if we were to create a drop-down with the help of Chosen, for example, we would need to leverage the input_admin_enqueue_scripts() function.
In many cases you don’t actually need to modify the code of this function. The enqueued script and style points to the already created files in the js and css folders – simply use those to add your code. If you enqueue third-party scripts like Chosen you should drop that in the js folder and enqueue it the same way.
Once downloaded, I placed the files required by Chosen in the correct directories. I put chosen.min.css in the css folder, chosen.jquery.min.js in the js directory, and the two images in the images directory. To make sure images are referenced correctly I replaced url( in the CSS file with url(../img.
With all the files in place, I used the input_admin_enqueue_scripts() to enqueue them, resulting in the following code.
function input_admin_enqueue_scripts() {

    // register ACF scripts
    wp_register_script( 'acf-input-country_selector', $this->settings['dir'] . 'js/input.js', array('acf-input'), $this->settings['version'] );

    // Chosen
    wp_register_script( 'chosen', $this->settings['dir'] . 'js/chosen.jquery.min.js', array('acf-input', 'jquery'), $this->settings['version'] );
    wp_register_style( 'chosen', $this->settings['dir'] . 'css/chosen.min.css', array('acf-input'), $this->settings['version'] );

    // scripts
    wp_enqueue_script(array(
        'acf-input-country_selector',
        'chosen',
    ));

    // styles
    wp_enqueue_style(array(
        'chosen',
    ));

}
Note that I removed the original CSS file that was added (input.css), but I kept the input.js file enqueued. We will need a little bit of JavaScript to apply Chosen, but we won’t need any additional CSS, apart from Chosen’s own.
The last step is to apply Chosen to our field, which is where input.js comes in handy. Opening up the file, you can see that it has a dedicated section for version 4 and for version 5. We’ll be using the version 4 section, adding the Chosen initiation code. It’s only one additional line which you need to add below initialize_field( $(this) );
$(this).find('select').chosen()Once in place, you should be able to search within the select field’s values, making the UI that much better.
Step 7: Modifying Values
There are a number of methods which serve to modify values after or before they are sent/received. These can be helpful for manipulating data between the user interface and the back-end logic. Here are the four most important methods, along with how they can be used:
load_value()is used to modify the value of the field after it is loaded from the database. This could be useful if you’re saving complex things like geolocation. The saved value may be an array containing the latitude and longitude, but you actually want to display a string.update_value()modifies the value before it is saved in the database. If the user enters a comma-separated value of IDs, you may want to save that as an array. Using theupdate_value()function you can modify it easily.load_field()modifies the whole field after it is returned from the database.update_field()modifies the whole field before it is saved to the database.
Further Possibilities
I hope you can see that creating your own field is actually a pretty simple matter. If you want to add elaborate JavaScript to make things as user-friendly as possible, that’s all up to you – ACF supports it nicely. You can use a bunch of methods to play around with values and fields and much more. Browse through the template file for more information.
If that wasn’t enough, ACF also has powerful actions and filters. Check out the documentation for more info.
If you’d like to check out a more complex field which contains JavaScript, styles and interaction with a third-party API, I invite you to check out the GitHub repository for my Google Font Selector Field, which allows users to select fonts available from Google.
Further Reading
- Extend WordPress With Custom Fields
- Custom Fields Hacks For WordPress
- How To Create Custom Post Meta Boxes In WordPress
- The Complete Guide To Custom Post Types


