HTTPS Everywhere With Nginx, Varnish And Apache

Email Newsletter
Weekly tips on front-end & UX.
Trusted by 182,000+ folks.
 SurveyJS: White-Label Survey Solution for Your JS App
 Register Free Now
 Celebrating 10 million developers

The web is moving toward using HTTPS encryption by default. This move has been encouraged by Google, which announced that HTTPS would be a ranking signal. However, moving your website to HTTPS is good for other reasons, too. Rather than debate those reasons, this article assumes you have already decided to move to HTTPS. We’ll walk through how to move your website to HTTPS, taking advantage of Varnish Cache.
In previous articles on Smashing Magazine, I’ve explained how to use Varnish to speed up your website. For those of us who use Varnish and also want to move to HTTPS, there is a problem: Varnish doesn’t support HTTPS. If you make the move to SSL, configuring Apache to serve your website securely, then you lose the speed advantage of Varnish.
There is a relatively straightforward way to deal with this issue, and that is to stick something in between incoming SSL requests and Varnish, a layer that handles the secure connection and SSL certificates and then passes the request back to Varnish. For this task, we will use Nginx. You may know Nginx as a web server alternative to Apache, and it is. However, it can also be used as a proxy to handle and pass requests on to other services, which is what we are going to do here. In other words, we’re going to create a web server sandwich, with Varnish as the tasty cache-meat in the middle.
Where We Are And Where We Want To Be
I’m assuming you are in a similar situation as me and have a server — whether virtual or dedicated hardware — with a number of websites running on it. Some of those websites you want to make fully HTTPS, and perhaps some will remain HTTP for the time being.
Your current configuration would have every request on port 80 handled by Varnish. Varnish then decides, based on the rules added to your Varnish Configuration Language (VCL), whether to deliver a cached copy of the page or hand the request back to Apache for a new page to be created. Once the page hits Apache, the web server might need to pull information from the database or do other processing before delivering it.
By the end of this tutorial, we want to be in the following position:
- Nginx will run on port 443 and handle incoming HTTPS requests, handing them off to Varnish.
- Varnish will run on port 80 and handle incoming HTTP requests, including those from Nginx, delivering directly from cache or handing to Apache
- Apache will run on port 8080 and do what Apache does: deliver your website or application.
In this situation, Nginx becomes a proxy. It does no processing of your website, and it isn’t running PHP or connecting to your database. All it does is accept the HTTPS requests and pass them back to Varnish. Varnish then decides whether to hand back a cached copy or pass it back to Apache to get a fresh one, using the Varnish rules you already have.
My Example Environment
I’m going to work in Vagrant, using Ubuntu Trusty. My starting point is as described above, with Apache installed on port 8080, and Varnish 4 installed on port 80.
If you would like to follow along, you can download my environment from GitHub. Instructions on setting up are in the readme file.
I have two websites configured. If I visit those websites in a browser, Varnish will handle the request on port 80, either delivering the file from cache or passing it back to Apache.
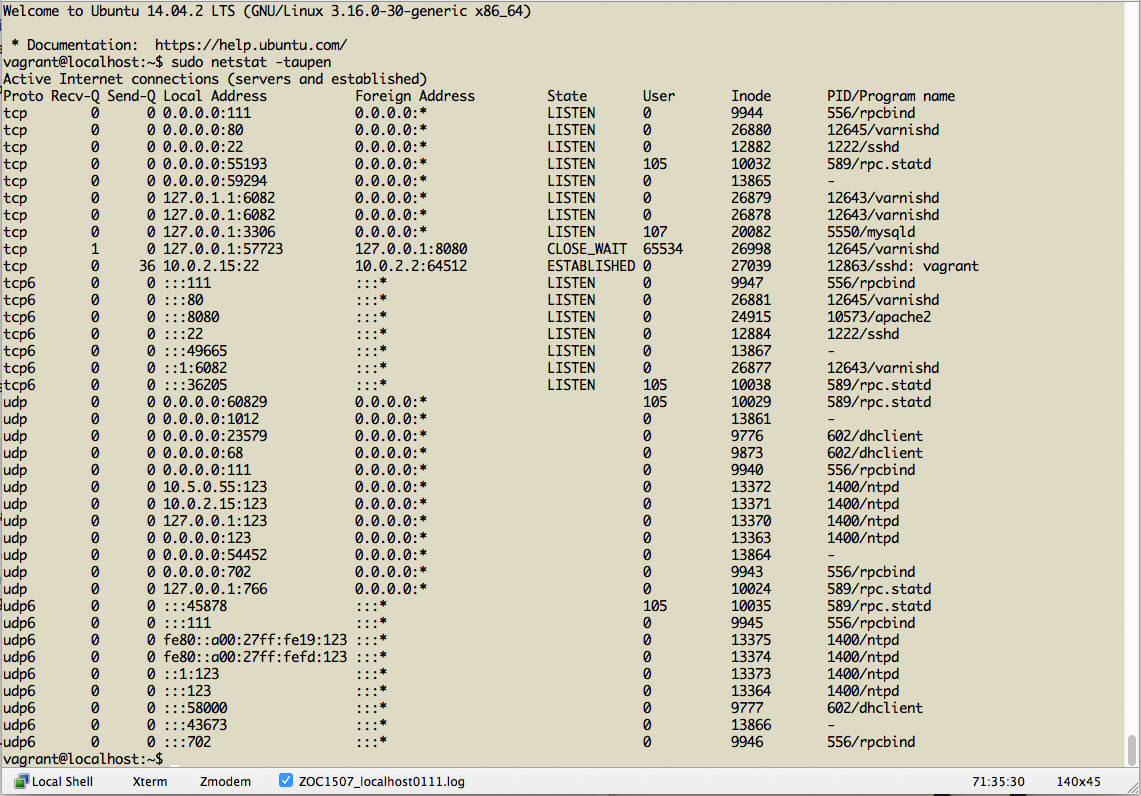
At this point, it is useful to check which ports things are running on. SSH into Vagrant on the command line:
> vagrant ssh
Then, run netstat:
> sudo netstat -taupen
This will give you an output of ports, as well as information on which process is using them. You should find that Varnish is running on port 80 and Apache on 8080.
You can also check that Varnish is running normally and serving pages from the cache by running the following:
> varnishstat
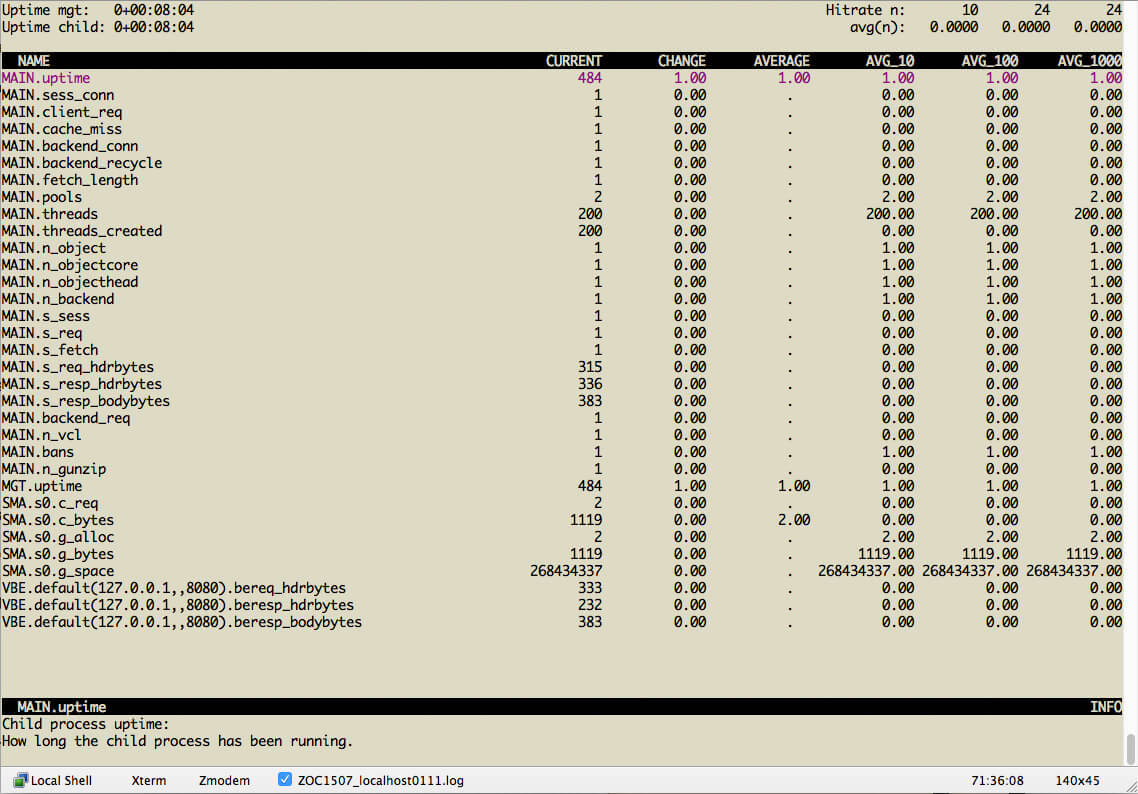
If you reload your page in the web browser, you should see cache hits and misses.
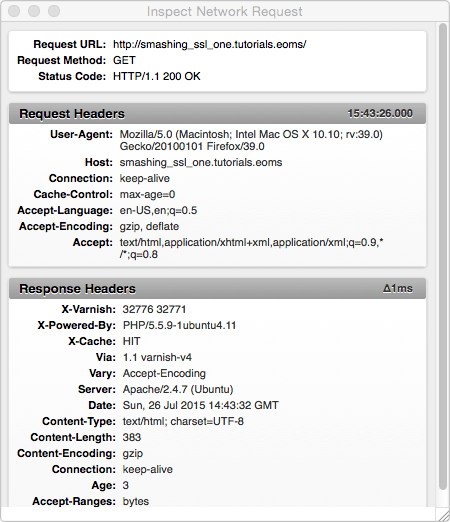
If you are using my VCL from GitHub, I’ve added to the Varnish configuration some code that will send a HIT or MISS header to the browser. This means you can look at the headers being sent. You should see X-Cache: HIT if the page came from Varnish and X-Cache: MISS if it was served by Apache.
Installing Nginx
We can now install Nginx. On an Ubuntu system, this is as straightforward as issuing the following command:
> sudo apt-get install nginx
Nginx’s documentation has information on installing Nginx on a variety of systems, as well as packages for systems that do not include it in their package management. Remember that we are just using Nginx as a proxy, so you don’t need to worry about configuring PHP or MySQL support. Nginx won’t start by default, and currently it is unable to start because Varnish is already using port 80. If you were doing this process on a live server, you would be safe to run this step without any impact on your running websites.
Create Or Install An SSL Certificate
The next step is to set up our SSL certificate. Because we are working locally, we can create a “self-signed” certificate in order to test SSL connections.
To create a self-signed certificate for testing, first choose or create a directory to put it in. I’ve created an nginx directory in /etc/ssl. Then, run the command below to generate the key and certificate pair.
> sudo openssl req -x509 -nodes -days 365 -newkey rsa:2048 -keyout /etc/ssl/nginx/smashing_ssl_one.tutorials.eoms.key -out /etc/ssl/nginx/smashing_ssl_one.tutorials.eoms.crt
When you run this command you will be prompted for a series of questions. You can mostly put junk in these; however, when prompted for the “Common Name,” use the domain that you type in the URL bar to access your website on Vagrant. For me, this is smashing_ssl_one.tutorials.eoms.
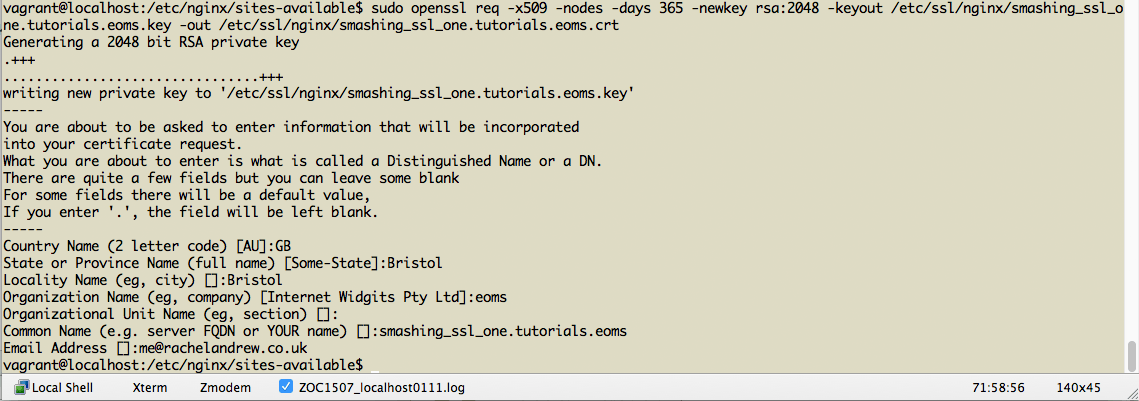
If you look now in the folder you created, you should see two files, one with a .key extension and one with a .crt extension.
On your live server, you would purchase a certificate from an issuing authority. You would then be given the key and certificate files and, rather than create them, you would place them on your server before following the next step.
Configure The SSL Websites In Nginx
With your self-signed or purchased SSL certificates in place, you can set up your websites in Nginx.
First, remove the default configuration file from /etc/nginx/sites-enabled. You can delete the default file or move it elsewhere.
We only need to configure websites that will be served over SSL; any other websites will continue to be served directly from Varnish on port 80. In my case, I’m going to configure smashing_ssl_one.tutorials.eoms. Wherever you see that domain in the steps below, you can replace it with your own live or local domain, if you are not using my example.
In /etc/nginx/sites-available/, create a configuration file as your_domain.com.conf.
In that file, add the following:
server {
  listen *:443 ssl;
  server_name smashing_ssl_one.tutorials.eoms;

  ssl on;
  ssl_certificate /etc/ssl/nginx/smashing_ssl_one.tutorials.eoms.crt;
  ssl_certificate_key /etc/ssl/nginx/smashing_ssl_one.tutorials.eoms.key;

  location / {

    proxy_pass            https://127.0.0.1:80;
    proxy_read_timeout    90;
    proxy_connect_timeout 90;
    proxy_redirect        off;

    proxy_set_header      X-Real-IP $remote_addr;
    proxy_set_header      X-Forwarded-For $proxy_add_x_forwarded_for;
    proxy_set_header      X-Forwarded-Proto https;
    proxy_set_header      X-Forwarded-Port 443;
    proxy_set_header      Host $host;
  }
}
The first line tells the server we are listening on port 443. This is the default port for HTTPS connections, just as port 80 is for HTTP. We then give the server name.
We set SSL to be on and then add the certificate and key that we created or installed, using a full file system path.
Under location, we use proxy_pass to pass the request back to port 80, where Varnish is waiting for it. We then set some headers, which will be passed through.
After adding this file, symlink the file in sites-available to sites-enabled. If you ever want to switch off the website, you can just delete the symlink. The following command will create a symlink on the command line:
> ln -s /etc/nginx/sites-available/smashing_ssl_one.tutorials.eoms.conf /etc/nginx/sites-enabled/smashing_ssl_one.tutorials.eoms.conf
Then, restart Nginx:
> sudo service nginx restart
If you see the output restarting nginx nginx, followed by [fail], the likely problem is some typo in your configuration. My usual problem are either separating the keys and values with a colon or forgetting the semicolon at the end of the line.
If Nginx fails to start, look at the log in /var/log/nginx/error.log because most problems are self-explanatory.
You will see [OK] if Nginx starts up successfully. Now, if you check to see what is running on which port, you should see that Nginx is now on port 443, Varnish still has port 80 and Apache 8080.
> sudo netstat -taupen
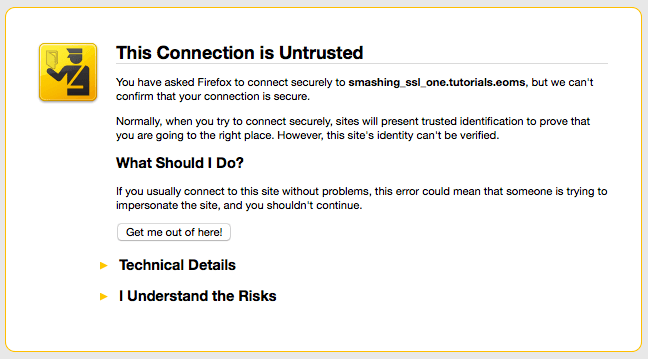
The big test is to now visit the website using https://. If you are using a self-signed certificate, then you will have to step through the warning messages — your browser is warning you that the certificate is issued by an unknown authority.
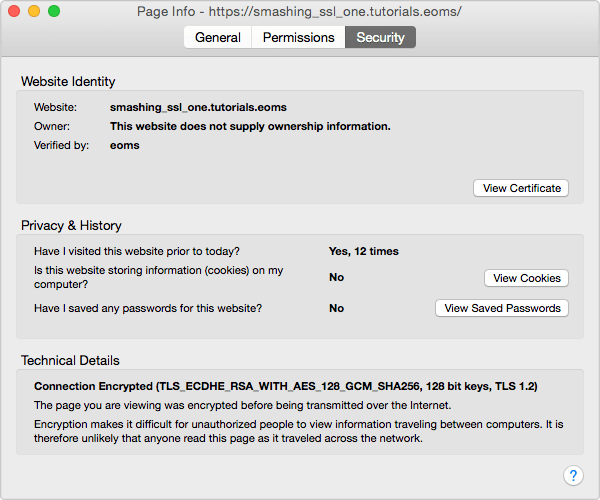
If you see your page served securely with the padlock in the URL bar, then you are now serving HTTPS via Nginx. If you check the HIT or MISS headers or run varnishstat on the command line, you’ll be able to check that pages are being served from Varnish and not hitting Apache each time.
Redirecting To SSL Using Varnish
Based on my own experience of doing this, you might want to tweak a few things.
If your website was running on HTTP and you want to run it on HTTPS, then you will need to redirect all HTTP requests. You can do this using Varnish. Varnish is at at port 80, handling any non-SSL requests. What we want to do is ask Varnish to spot any request for our website and redirect it to HTTPS.
In your VCL file at /etc/varnish/default.vcl, add a subroutine as follows:
# handles redirecting from http to https
sub vcl_synth {
  if (resp.status == 750) {
    set resp.status = 301;
    set resp.http.Location = req.http.x-redir;
    return(deliver);
  }
}
Then, in the sub vcl_recv block, add this:
if ( (req.http.host ~ "^(?i)smashing_ssl_one.tutorials.eoms") && req.http.X-Forwarded-Proto !~ "(?i)https") {
  set req.http.x-redir = "https://" + req.http.host + req.url;
  return (synth(750, ""));
}
You can view the full VCL, with this code included, on GitHub.
I am pattern-matching my domain and redirecting it to HTTPS with a 301 “moved permanently” code. So, now everything should be switched to SSL. Restart Varnish, and try to go to the HTTP version of the website and check that you are being redirected.
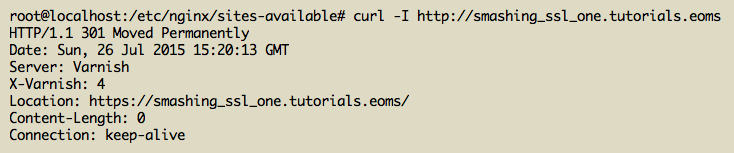
Another useful check is to use cURL on the command line. The following command will return only the headers of your request. You should see that you are getting a 301 when testing the HTTP URL.
> curl -I https://smashing_ssl_one.tutorials.eoms
If you seem to be getting a lot of cache misses on your website, then it would be worth checking which cookies are being stripped by Varnish. Varnish doesn’t cache content with cookies because it assumes that this is personalized content. However, things like Google Analytics cookies should not make your content uncacheable. In my example VCL, I’m dealing with some common cookies, but look at Mattias Geniar’s post for a way to see which cookies are being sent to the back end so that you can deal with your unique examples.
Grade An SSL
You’ve likely heard of the various compromises in OpenSSL. If you are going to all the trouble of running your websites on HTTPS, then make sure you aren’t vulnerable to any of these issues.
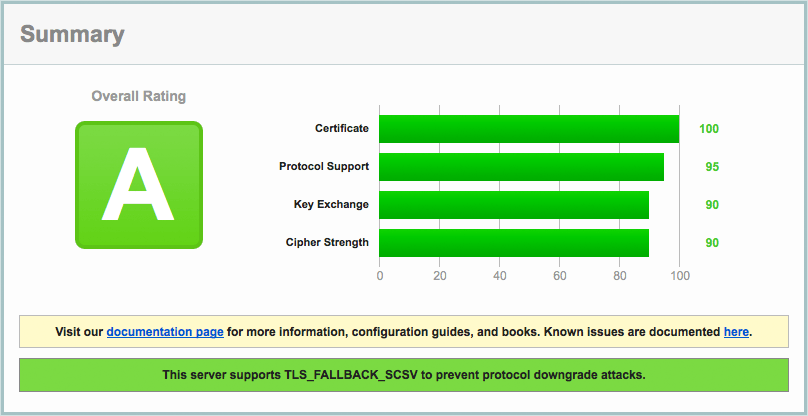
Once you have a live website using SSL, a great way to check is to use the SSL Server Test from Qualys SSL Labs. Add your domain name and wait for the test to run. The test checks for many common issues in SSL configurations — your aim is to pass with an A.
When I first ran this on a server with a similar setup to our example Vagrant installation — Ubuntu Trusty, Nginx, Varnish and Apache — I got a B rating, due to the server being vulnerable to the Logjam attack. The fix for this is detailed in “Weak Diffie-Hellman and the Logjam Attack.”
Back on your server, cd to the directory that you used to put or create SSL certificates, and run the following:
> openssl dhparam -out dhparams.pem 2048
This will create a file named dhparams.pem.
You can then add to your Nginx configuration the code detailed under “Nginx” on the “Weak Diffie-Hellman and the Logjam Attack” website.
server {
  listen *:443 ssl;
  server_name smashing_ssl_one.tutorials.eoms;

  ssl on;
  ssl_certificate /etc/ssl/nginx/smashing_ssl_one.tutorials.eoms.crt;
  ssl_certificate_key /etc/ssl/nginx/smashing_ssl_one.tutorials.eoms.key;
  ssl_dhparam /etc/ssl/nginx/dhparams.pem;
  ssl_protocols TLSv1 TLSv1.1 TLSv1.2;
  ssl_ciphers 'ECDHE-RSA-AES128-GCM-SHA256:ECDHE-ECDSA-AES128-GCM-SHA256:ECDHE-RSA-AES256-GCM-SHA384:ECDHE-ECDSA-AES256-GCM-SHA384:DHE-RSA-AES128-GCM-SHA256:DHE-DSS-AES128-GCM-SHA256:kEDH+AESGCM:ECDHE-RSA-AES128-SHA256:ECDHE-ECDSA-AES128-SHA256:ECDHE-RSA-AES128-SHA:ECDHE-ECDSA-AES128-SHA:ECDHE-RSA-AES256-SHA384:ECDHE-ECDSA-AES256-SHA384:ECDHE-RSA-AES256-SHA:ECDHE-ECDSA-AES256-SHA:DHE-RSA-AES128-SHA256:DHE-RSA-AES128-SHA:DHE-DSS-AES128-SHA256:DHE-RSA-AES256-SHA256:DHE-DSS-AES256-SHA:DHE-RSA-AES256-SHA:AES128-GCM-SHA256:AES256-GCM-SHA384:AES128-SHA256:AES256-SHA256:AES128-SHA:AES256-SHA:AES:CAMELLIA:DES-CBC3-SHA:!aNULL:!eNULL:!EXPORT:!DES:!RC4:!MD5:!PSK:!aECDH:!EDH-DSS-DES-CBC3-SHA:!EDH-RSA-DES-CBC3-SHA:!KRB5-DES-CBC3-SHA';

  ssl_prefer_server_ciphers on;

  location / {

   proxy_pass            https://127.0.0.1:80;
   proxy_read_timeout    90;
   proxy_connect_timeout 90;
   proxy_redirect        off;

   proxy_set_header      X-Real-IP $remote_addr;
   proxy_set_header      X-Forwarded-For $proxy_add_x_forwarded_for;
   proxy_set_header      X-Forwarded-Proto https;
   proxy_set_header      X-Forwarded-Port 443;
   proxy_set_header      Host $host;

  }
}
Reload Nginx and retest your website. Once you have achieved a A rating, you can periodically check your website to make sure you still have that A.
Check For Mixed Content Warnings
Your website may well have resources being loaded from other domains that are not HTTPS — this will cause a warning on your website. In many cases, the third party will have an HTTPS endpoint that you can link to. However, I had to remove the Lanyrd badges from my own website because the JavaScript was hosted only on HTTP.
Further Reading And Resources
I’ve added links to additional reading throughout this article. For your reference, here are those links, plus some extra resources I’ve found useful.
HTTPS And SSL
- “10 Reasons to Use HTTPS,” Guy Podjarny, Medium
- “The Big List of SEO Tips and Tricks for Using HTTPS on Your Website,” Cyrus Shepard, Moz Blog
- “Guide to Deploying Diffie-Hellman for TLS” A guide to protecting your server from the Logjam attack
- SSL Server Test, Qualys SSL Labs
- StartSSL Free SSL certificates
- Let’s Encrypt Offering free SSL certificates, this service will be available in September.
Varnish
- “Varnish Tip: See Which Cookies Are Being Stripped in Your VCL,” Mattias Geniar
- “Varnish and Website Performance,” Varnish Cache This section of the documentation will help you tune Varnish to your application.
If you know of any other helpful resources, or if you’ve followed these steps and found some extra piece of information, please add it to the comments. It will help out the next person doing it.
Further Reading
- HTTP/2: A Guide For Web Designers And Developers
- World Wide Web, Not Wealthy Western Web
- Understanding REST And RPC For HTTP APIs
- A Look At The Modern WordPress Server Stack


