From Zero To Appium: A How-To Guide For Configuring Appium With Android

Email Newsletter
Weekly tips on front-end & UX.
Trusted by 182,000+ folks.

 Custom Web Forms for Angular, React, & Vue. Your backend.
 Celebrating 10 million developers


If you are a web developer who cares about quality, most probably you have heard of Selenium and the advantages of using such a tool for test automation. (Check out my article on how to run your own continuous integration solution with Selenium).
Now, if you are a mobile developer, you might know how much harder it is to test your app due to the existence of different platforms, different OS versions and even variety of devices. Imagine how great it would be to write your tests only once and run them on different platforms. If so, then maybe today is your lucky day, because I want to tell you about Appium, a tool inspired by the Selenium WebDriver that allows you to write tests against multiple platforms using the same API.
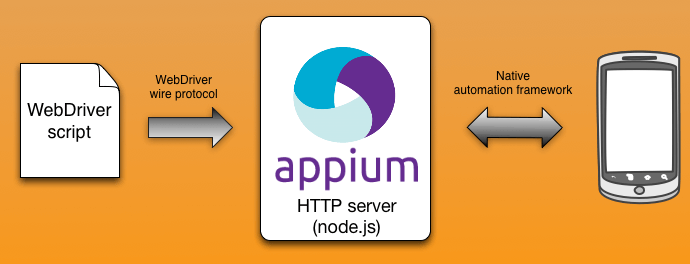
In short, Appium allows you to automatically interact with your app by exploiting the behavior of the components available in the user interface (buttons, lists, text labels, etc.). This mechanism can be reused to write tests that must be run repeatedly against the app. This kind of testing is known as functional testing, or black box testing in the literature, because it checks that the software does what the specification says without caring about the implementation details.
The biggest advantage of automating your tests is the speed at which they can be executed and the amount of time saved from avoiding manual repetition.
Tools for writing automation tests for Appium already exist; however, they are all platform-dependent. This means that if you have an app running on Android and on iOS, you would need to write the same test for each platform. The extra value provided by Appium is the possibility of running a test that shares the same code on every platform.
The philosophy behind Appium stems from the following principles:
- You shouldn’t have to recompile your app or modify it in any way in order to automate it.
- You shouldn’t be locked into a specific language or framework to write and run your tests.
- A mobile automation framework shouldn’t reinvent the wheel when it comes to automation APIs.
- A mobile automation framework should be open source, in spirit and practice as well as in name!
Appium is a great tool; however, installing it might be a little cumbersome. In this tutorial, we’ll show you all of the steps required to successfully install Appium on an Ubuntu server. We encountered several issues during installation and couldn’t find a proper step-by-step tutorial; so, we hope this article solves that problem and saves you some headaches.
Disclosure: I am not related to the Appium team in any way. All comments should be considered the personal opinion of a user who has been struggling with Android tests for a while and was expecting something like Selenium for the mobile world.
Appium requires a mobile platform to be installed in order for us to execute our tests. So, using Appium for testing an iOS app requires a machine running Mac OS X and Xcode. In this tutorial, we’ll focus uniquely on the Android platform, and we will show you in detail how to set up a headless installation of Android.
Finally, we will explain all of the configuration needed to run Appium tests with Python. Note that this section is included for the sake of testing the installation and not for exploring all of Appium’s features. The topic of testing with Appium will be covered in a future article.
Install Appium
For this tutorial, we will rely on an Ubuntu 14.04 server distribution. Note that our aim is to build a system that helps us run mobile tests in a headless fashion (i.e. without requiring a physical display). So, we will assume the following requirements as our starting point.
Requirements
- Ubuntu 14.04
- Python (version 2.7.6 in this tutorial)
- pip
Before we are able to run Appium, we need to make sure that the following tools are accessible in our system.
Summary Of Tools Required By Appium
- Java SDK 1.7 The openjdk-7-jdk package must be installed. Do not confuse it with openjdk-7-jre, which contains just the Java runtime environment.
- Apache Ant Java version of GNU make for building Java applications
- Apache Maven Java dependency management and build system
- RVM Ruby Version Manager
- gem Ruby package manager
- bundler Ruby dependency manager
- Node.js JavaScript runtime
- npm Node.js package manager
- grunt JavaScript task runner
These tools can be installed by following the next steps.
Step 0
Before you download the tools, we suggest creating a folder in your home directory that will be used to keep the files and later create the required environment variables in your path. For example, we are using a folder named workspace.
1. Install Java
$ sudo apt-get install openjdk-7-jdk
Appium requires the JAVA_HOME variable and Java in your path. In order to do so, edit the .bashrc file:
$ vim .bashrc
     export JAVA_HOME="/usr/lib/jvm/java-7-openjdk-amd64"
     export PATH="$PATH:$JAVA_HOME"
$ source .bashrc
Run the following command to check whether Java is accessible:
$ java -version
You should get the following output in your terminal:
java version "1.7.0_95"
OpenJDK Runtime Environment (IcedTea 2.6.4) (7u95-2.6.4-0ubuntu0.14.04.1)
OpenJDK 64-Bit Server VM (build 24.95-b01, mixed mode)
2. Install Apache Ant
Move to the workspace folder that we created in step 0 and download the latest version of Apache Ant (which is 1.9.6 at the time of writing):
$ wget https://www.eu.apache.org/dist//ant/binaries/apache-ant-1.9.6-bin.tar.gz
When that’s done, just uncompress the file and delete the original .tar.gz folder since we won’t need it anymore.
$ tar -xvzf apache-ant-1.9.6-bin.tar.gz
$ rm apache-ant-1.9.6-bin.tar.gz
Now you will have a folder named apache-ant-1.9.6 in your workspace folder. Use that folder to create the ANT_HOME in your .bashrc file:
$vim .bashrc
     export ANT_HOME="$HOME/workspace/apache-ant-1.9.6"
     export PATH="$PATH:$ANT_HOME/bin" # Add ant to PATH
$source .bashrc
From the ANT_HOME directory, run the following:
$ ant -f fetch.xml -Ddest=system
This will get the library dependencies of most of the Ant tasks that require them. If you don’t do this, many of the dependent Ant tasks will not be available.
3. Install Apache Maven
In your workspace folder, download the latest version of Apache Maven (which is 3.3.9 at the time of writing):
$ wget https://www.us.apache.org/dist/maven/maven-3/3.3.9/binaries/apache-maven-3.3.9-bin.tar.gz
$ tar -xvzf apache-maven-3.3.9-bin.tar.gz
Delete the .tar.gz file:
$ rm apache-maven-3.3.9-bin.tar.gz
Create the MAVEN_HOME variable and add it to the path:
$ vim .bashrc
     export MAVEN_HOME="$HOME/workspace/apache-maven-3.3.9"
     export PATH="$PATH:$MAVEN_HOME/bin"
$source .bashrc
Then, run the following command from the terminal to check that Maven has been properly configured:
$mvn -v
If everything is fine, you should get the following output:
Apache Maven 3.3.9 (bb52d8502b132ec0a5a3f4c09453c07478323dc5; 2015-11-10T17:41:47+01:00)
Maven home: /home/6020peaks/workspace/apache-maven-3.3.9
Java version: 1.7.0_91, vendor: Oracle Corporation
Java home: /usr/lib/jvm/java-7-openjdk-amd64/jre
Default locale: en_US, platform encoding: ANSI_X3.4-1968
OS name: "linux", version: "3.13.0-74-generic", arch: "amd64", family: "unix"
4. Install RVM
From a terminal, install the mpapis public key. You’ll need it to avoid errors while downloading RVM.
$ gpg --keyserver hkp://keys.gnupg.net --recv-keys 409B6B1796C275462A1703113804BB82D39DC0E3
Then, proceed to install RVM with Ruby:
$ \curl -sSL https://get.rvm.io | bash -s stable --ruby
Once this is done, proceed to update RubyGems and Bundler:
$ gem update --system
$ gem install --no-rdoc --no-ri bundler
$ gem update
$ gem cleanup
5. Install Node.js
The first rule for installing Node.js the right way is to avoid using apt-get, or else it will need sudo grants, and Appium will not work correctly. Instead, install Linuxbrew, and then install Node.js from it. In short, Linuxbrew is a package manager for Linux forked from the original Homebrew for Mac OS X.
You can install Linuxbrew on Ubuntu by running the following commands. First, install the Linuxbrew dependencies:
$ sudo apt-get install build-essential curl git m4 python-setuptools ruby texinfo libbz2-dev libcurl4-openssl-dev libexpat-dev libncurses-dev zlib1g-dev
Then, install Linuxbrew by running this:
$ ruby -e "$(curl -fsSL https://raw.githubusercontent.com/Linuxbrew/linuxbrew/go/install)"
Once installed, add brew to your path:
$ vim .bashrc
$ export PATH="$PATH:$HOME/.linuxbrew/bin"
$ source .bashrc
$ brew doctor
Now you are in shape to install Node.js from brew:
$ brew install node
Note that this step can take a bit of time, so please be patient and do not close the terminal. Once the process is done, check that Node.js and npm have been successfully installed by running the following:
$ node --version
$ npm --version
6. Install Grunt
Simply run the following command in the terminal, and npm will take care of everything:
$ npm install -g grunt grunt-cli
7. Install Appium
The latest Appium release is 1.5.0, freshly baked as we write this tutorial and which, according to the developers on GitHub, introduces big changes from previous versions. One of these changes affects the way Appium is configured during installation; specifically, the reset.sh script we refer to below has been removed in version 1.5.0. Until this latest version gets enough feedback from the community, we suggest starting with the stable release, 1.4.16.
Note: In this section, we’ll work with version 1.4.16 of Appium, but all of the information in this tutorial applies independent of the version.
To install version 1.4.16, change the directory to the workspace folder you created at the beginning, and then download the source code from GitHub:
$ wget https://github.com/appium/appium/archive/v1.4.16.tar.gz
$ tar -xvzf appium-1.4.16.tar.gz
$ rm appium-1.4.16.tar.gz
$ mv appium-1.4.16 appium
Now, this stage is where the official Appium documentation gets confusing. According to the documentation, the next steps are to run the following commands to execute a collection of scripts that will set up Appium so that you can start it and test your app with it.
$ cd appium;
$ ./reset.sh —android  --verbose
However, the documentation assumes that Android is already perfectly configured in your environment and ready for Appium. If that is the case, then you should not have any problem; otherwise, proceed with our instructions in the next section.
Set Up A Headless Installation Of Android
Because we are aiming to build a headless configuration for our test automation system, all of the instructions that follow are restricted to the terminal. Even though it is a bit more tedious than using the GUI, the advantage is that you can use commands to build your own script to automate the installation process.
The first step is to install the latest Android SDK for Linux. Switch to your workspace folder and run the following commands:
$ wget https://dl.google.com/android/android-sdk_r24.4.1-linux.tgz
$ tar -xvzf android-sdk_r24.4.1-linux.tgz
$ rm android-sdk_r24.4.1-linux.tgz
Then, create the ANDROID_HOME variable in .bashrc, and add tools and platforms_tools to the path:
export ANDROID_HOME="$HOME/workspace/android-sdk-linux"
export PATH="$PATH:$ANDROID_HOME/tools"
export PATH="$PATH:$ANDROID_HOME/platform-tools"
Refresh your environment so that the new variables are recognized by your terminal:
$ source .bashrc
Once the Android SDK is ready, the next step is to install the Android APIs that our apps will target in the tests. Note that Appium requires API level 17 or above in order to work properly.
Run the following command to see the list of available packages:
$ android list sdk --all
This will render a list like the following (edited for brevity):
Refresh Sources:
  Fetching https://dl.google.com/android/repository/addons_list-2.xml
  Validate XML
  Parse XML
  Fetched Add-ons List successfully
  Refresh Sources
  Fetching URL: https://dl.google.com/android/repository/repository-11.xml
  Validate XML: https://dl.google.com/android/repository/repository-11.xml
==== shorted ====
Packages available for installation or update: 160
   1- Android SDK Tools, revision 24.4.1
   2- Android SDK Tools, revision 25.0.5 rc6
   3- Android SDK Platform-tools, revision 23.1
   4- Android SDK Build-tools, revision 23.0.2
   5- Android SDK Build-tools, revision 23.0.1
   6- Android SDK Build-tools, revision 23 (Obsolete)
==== shorted ====
  26- SDK Platform Android 6.0, API 23, revision 2
  27- SDK Platform Android 5.1.1, API 22, revision 2
  28- SDK Platform Android 5.0.1, API 21, revision 2
  29- SDK Platform Android 4.4W.2, API 20, revision 2
  30- SDK Platform Android 4.4.2, API 19, revision 4
  31- SDK Platform Android 4.3.1, API 18, revision 3
  32- SDK Platform Android 4.2.2, API 17, revision 3
  33- SDK Platform Android 4.1.2, API 16, revision 5
  34- SDK Platform Android 4.0.3, API 15, revision 5
  35- SDK Platform Android 4.0, API 14, revision 4 (Obsolete)
  36- SDK Platform Android 3.2, API 13, revision 1 (Obsolete)
  37- SDK Platform Android 3.1, API 12, revision 3 (Obsolete)
  38- SDK Platform Android 3.0, API 11, revision 2 (Obsolete)
  39- SDK Platform Android 2.3.3, API 10, revision 2
  40- SDK Platform Android 2.3.1, API 9, revision 2 (Obsolete)
  41- SDK Platform Android 2.2, API 8, revision 3
  42- SDK Platform Android 2.1, API 7, revision 3 (Obsolete)
  43- SDK Platform Android 2.0.1, API 6, revision 1 (Obsolete)
  44- SDK Platform Android 2.0, API 5, revision 1 (Obsolete)
  45- SDK Platform Android 1.6, API 4, revision 3 (Obsolete)
  46- SDK Platform Android 1.5, API 3, revision 4 (Obsolete)
  47- SDK Platform Android 1.1, API 2, revision 1 (Obsolete)
==== shorted ====
The most important part of this list is the first number at the beginning of each line, because this is the identification number of the package that we want to install. You can install one or more packages at the same time with the following command:
$ android update sdk -u -a -t 1,2,3,4,..,n
Important: Make sure to install API 19. We’ve detected an open issue in Appium’s source code that requires API 19 in order to create a Bootstrap project for Android. For more details, check out lines 399 to 412 of the grunt-helpers.js file on GitHub:
module.exports.setupAndroidBootstrap = function (grunt, cb) {
  var projPath = path.resolve(__dirname, "lib", "devices", "android",
      "bootstrap");
  var args = ["create", "uitest-project", "-n", "AppiumBootstrap", "-t",
              "android-19", "-p", "."];
  // TODO: possibly check output of `android list target` to make sure api level 19 is available?
  setupAndroidProj(grunt, projPath, args, cb);
};

module.exports.setupAndroidApp = function (grunt, appName, cb) {
  var appPath = path.resolve(__dirname, "sample-code", "apps", appName);
  var args = ["update", "project", "--subprojects", "-t", "android-19", "-p", ".", "-n", appName];
  setupAndroidProj(grunt, appPath, args, cb);
};
For the next step, you need to install the application binary interface (ABI) for the Android API that you’ve installed. You can choose from among several ABIs. This is required because if your target API does not have at least one ABI installed, then you won’t be able to create an emulator for it.
In our configuration, we’ve installed armeabi-v7a for API 19. You can do this by running the same command as before but with the right package number that you see in your own listing. For example:
$ android update sdk -u -a -t 120
Note: Replace the -t argument (120) with the package number you want to install.
Now we are ready to create a new Android emulator. Check out the document “Handling AVDs From the Command Line” (AVDs being Android virtual devices) for more information.
Run the following command to see which Android images are already available in your system:
$ android list targets
You should get an output like this:
Available Android targets:
----------
id: 1 or "android-19"
     Name: Android 4.4.2
     Type: Platform
     API level: 19
     Revision: 4
     Skins: HVGA, QVGA, WQVGA400, WQVGA432, WSVGA, WVGA800 (default), WVGA854, WXGA720, WXGA800, WXGA800-7in
 Tag/ABIs : default/armeabi-v7a
To create a new AVD using this target, just run the following:
$ android create avd -n emulator-19 -t 1
The parameter -n helps us define a name for our AVD, which will be emulator-19 in our case. This name is important because we need to tell Appium about it later in order to run our tests. The parameter -t is used to select the target from the previous list. In our case, the ID is 1 or android-19.
Once the command is done, we should get something similar to this output:
Auto-selecting single ABI armeabi-v7a
Android 4.4.2 is a basic Android platform.
Do you wish to create a custom hardware profile [no]no
Created AVD 'emulator-19' based on Android 4.4.2, ARM (armeabi-v7a) processor,
with the following hardware config:
hw.lcd.density=240
hw.ramSize=512
vm.heapSize=48
By default, the Android tool creates the AVD directory in ~/.android/avd/ (on Linux and Mac).
Finally, you can start the emulator by running this:
$ emulator -avd []
Note that if you are using a real headless Ubuntu server, you will get the following error: “SDL init failure, reason is: No available video device.”
This means that it is not possible to detect a display connected to your machine. If you plan to run the Android test on a headless server, as we do, then you can start the emulator without a graphical display. You can solve this by running the following:
$ emulator -avd emulator-19 -no-window
Now that we have the Android SDK installed and the emulator running, it is a good time to run the Appium configuration that we referred to earlier.
Open a new terminal instance, and run the following commands from your workspace folder:
$ cd appium;
$ ./reset.sh —android  --verbose
If everything worked fine, you should see this message:
Done, without errors.
---- reset.sh completed successfully ----
We ran into the following problem for Ubuntu version 14.04 64-bit, as described on StackOverflow:
"android-sdk-linux/build-tools/23.0.2/aapt": error=2, No such file or directory
To fix this, you need to install two extra libraries by running the following:
$ sudo apt-get install lib32stdc++6 lib32z1
Then, proceed to clean Git and run the Appium configuration again:
$ git clean -dfx
$ git reset --hard
$ ./reset.sh —android  --verbose
In the end, you should see a success message:
Done, without errors.
---- reset.sh completed successfully ----
Now, you can start the Appium server just by running this:
$ node .
Running Appium Tests With Python
The first requirement at this stage is to get your Android emulator and Appium up and running.
Appium supports different languages that you can use to write tests. In our case, we want to use Python, so we need to install the Appium Python Client in our Python environment. Assuming you have pip installed, you can do this by running the following:
$ pip install Appium-Python-Client
For demonstration purposes, we will be using the sample code available in the appium folder available in our workspace. The sample-code folder contains examples of Appium tests written in different languages, plus a set of demo apps that we can use to get familiar with Appium’s API.
Go to the sample-code/examples/python/ folder, and open the android-simple.py file. This file contains two tests that we will run on one of the sample Android apps.
The first thing we need to do is edit the setUp method to indicate the right information about our environment. Replace platformVersion with the platform used in your emulator — in our case, 4.2.2 (API 19). Don’t forget to also replace deviceName with the one you used to create your emulator — in our case, emulator-19.
# Original android-simple.py

def setUp(self):
        desired_caps = {}
        desired_caps['platformName'] = 'Android'
        desired_caps['platformVersion'] = '4.2'
        desired_caps['deviceName'] = 'Android Emulator'
        desired_caps['app'] = PATH(
            '../../../sample-code/apps/ApiDemos/bin/ApiDemos-debug.apk'
        )

        self.driver = webdriver.Remote('https://localhost:4723/wd/hub', desired_caps)
# Modified android-simple.py

def setUp(self):
        desired_caps = {}
        desired_caps['platformName'] = 'Android'
        desired_caps['platformVersion'] = ‘4.2.2'
        desired_caps['deviceName'] = 'emulator-19'
        desired_caps['app'] = PATH(
            '../../../sample-code/apps/ApiDemos/bin/ApiDemos-debug.apk'
        )

        self.driver = webdriver.Remote('https://localhost:4723/wd/hub', desired_caps)
Once you do this, you can just run the test and observe the interaction in the terminal. To run the test, we recommend installing py.test in your Python environment. If you don’t have it yet, just run the following:
$ pip install py.test
Then, just run your Python test:
$ py.test android-simple.py
If everything has gone fine, you should see the following lines at the very bottom of the shell trace:
=================================================================== 2 passed in 221.54 seconds ===================================================================
info:
This indicates that two tests were executed and that they passed successfully.
Finally, once the test has completed, if want to stop the emulator and Appium manually, you can do so by running two commands. To stop the Android emulator, run this:
$ adb emu kill
And to stop Appium, type Control + C.
Summary
Writing tests to guarantee bug-free software is not straightforward. However, the underlying technology to build a testing infrastructure should not be an impediment. Appium is a solution that protects you from the heterogeneity of mobile platforms and helps you focus on writing functional tests that can be run independent of platform.
In this tutorial, we have shown how to build your own test automation environment for Android by relying on Appium. We have described all of the steps required to successfully install Appium on a fresh Ubuntu 14.04 server and shown how simple it is to run Appium tests written in Python.
Hopefully, this guide has lowered the barrier for you to build your own mobile test automation solution.
Further Reading
- What Every App Developer Should Know About Android
- Diverse Test-Automation Frameworks For React Native Apps
- The Basics Of Test Automation For Apps, Games And The Mobile Web
- The Art Of Layout Testing With Galen Framework


