Nash Vail has a passion for designing building user interfaces. He is currently a Computer Science undergrad and actively looking for internship opportunities. …
More about
Nash ↬
In this part of the tutorial Nash Vail will start by replacing the photographer’s name with the actual wallpaper image along with proper credits. During this process you’ll learn how to link a library in Xcode, as well as more on general styling and positioning of UI elements. You will learn how to save pictures to the Camera Roll and also how to run your app on a physical device. To apply all your newly learned React Native skills there is a challenge waiting for you at the end. Just like the first part, this article has five sections. Completing each section takes us a step closer to finishing our app.
In part 1 of this tutorial, we started building our iOS app from scratch. We started out by setting up a blank React Native project. Then we pulled data from the Unsplash.it API.
Because downloading data takes time, we built a loading screen. In the process we went over positioning UI elements with flexbox and styling them using CSS-like properties. Towards the end of part 1 we downloaded and included a third-party Swiper component from GitHub, which allowed us to display wallpaper data in a swipeable container.
It doesn’t do much yet but that’s all about to change. In this part of the tutorial we will start by replacing the photographer’s name with the actual wallpaper image along with proper credits. During this process you’ll learn how to link a library in Xcode, as well as more on general styling and positioning of UI elements. Then we will go over building a custom double-tap listener using the PanResponder API and a little bit of math. Toward the end you will learn how to save pictures to the Camera Roll and also how to run your app on a physical device. To apply all your newly learned React Native skills there is a challenge waiting for you at the end.
Just like the first part, this article has five sections. Completing each section takes us a step closer to finishing our app.
1. Displaying Wallpapers And Credits
Let’s take a look at the data each wallpaper object holds. Consider the following sample data.
Since we’re able to construct a URL for the image, we can add an Image component with proper source attribute.
But let’s not get ahead of ourselves. Wallpapers that we pull from Unsplash are high quality and may take time to load. If we simply use React Native’s Image component we will leave our users staring at a blank screen while the wallpaper loads. We need a progress bar-like component here – luckily, there is a component for just that.
Head over to the project directory from terminal and run the following two commands:
npm install --save react-native-image-progress
npm install --save react-native-progress
Let’s import these into our index.ios.js file. Add the following two lines right below the use strict; statement:
var NetworkImage = require('react-native-image-progress');
var Progress = require('react-native-progress');
Since our wallpaper images cover the whole viewport, we will need to know the width and height of the viewport. To do that add:
var {width, height} = React.Dimensions.get('window’);
outside the class declaration and right below the import statements. If you have been following carefully you’ll of course know that we can substitute React.Dimensions with Dimensions by adding a new line to the React import code block.
var {
  AppRegistry,
  StyleSheet,
  Text,
  View,
  Component,
  ActivityIndicatorIOS,
/***/
  Dimensions // Add this line
/***/
} = React;
Just saving a couple of keystrokes, y’know.
Now, we will use the NetworkImage component in renderResults.
Notice the value that uri holds inside NetworkImage’s source attribute. This is one of ES2015’s new features called template strings. Template strings allow you to include variables right inside the string using ${variableName} instead of concatenating them again and again using +.
I’ll tell you again. ES2015 is pretty cool!
Add the following style definition to the styles variable:
Refresh the simulator and you should end up with a bunch of errors. Don’t worry, we didn’t break anything. The compiler is just complaining about a library it needs and cannot find. Let’s help the compiler out.
Taking a closer look at the code we just added, notice one of the NetworkImage’s properties is indicator and it holds the value of Progress.Circle. As mentioned in the component’s docs on GitHub (don’t tell me you didn’t read the docs) Progress.Circle requires ReactART, which is a library to draw vector graphics using React. We don’t need to download anything new here, just include it in our project, this time through Xcode.
Clicking on any of the images below will point you to a larger version of that image, which will give you a better idea of what’s going on.
Concentrate and pay close attention here.
Head to the following path from the root of the project: node_modules/react-native/Libraries/ART/
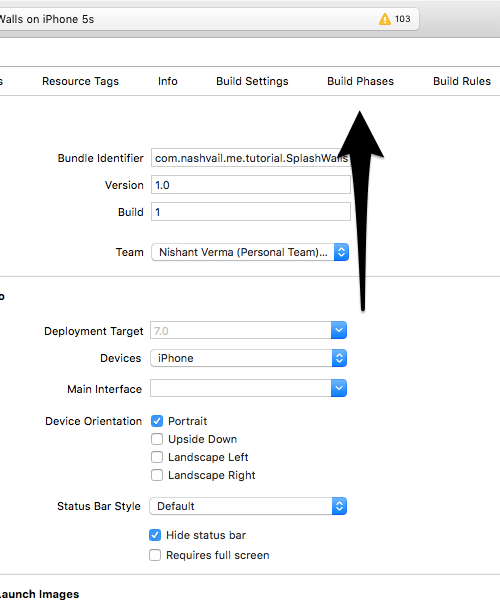
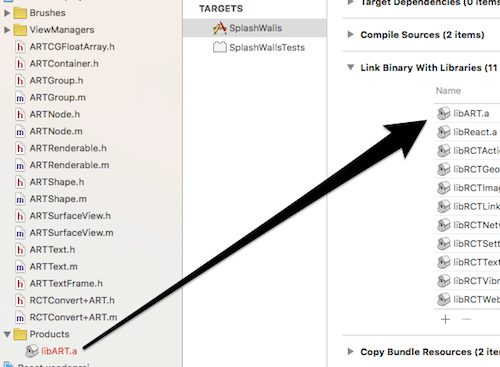
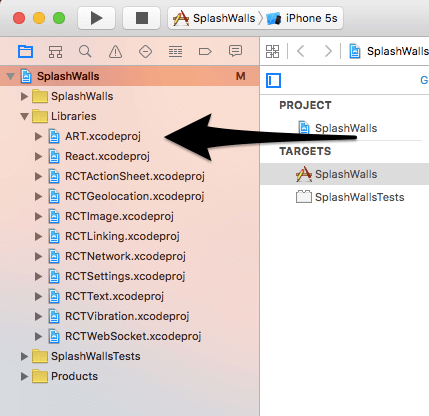
Path to ART library.See the ART.xcodeproj file? Drag that to Xcode under SplashWalls/Libraries.Libraries." />Drag ART.xcodeproj to SplashWalls/Libraries.Next, click on Build Phases located at the top along with General, Capabilities and others.Location of Build Phases.Then, drag libART.a from under ART.xcodeproj/Products into Link Binary With Libraries.Drag libART.a to Link Binary with Libraries.(Side note: generally inside the Products folder of React Native Libraries you will find a single .a file. For the libraries we will be linking in the future, make sure you drag the only .a file inside the Products folder into Link Binary With Libraries.)
That’s all. Linking libraries is such a drag (Pun Counter: 1).
Now, refresh the simulator. Cool! We already have the wallpapers showing up with loading indicators, and you can swipe through them. Feel like downloading one? Hold your horses, we're getting there.
The progress indicator currently follows the default color scheme and aesthetics. Let's change that. This is done by adding a new property indicatorProps to the NetworkImage component.
This will make the loading indicator look like this:Image loading indicator.Feel free to play around with the values. Whatever makes you happy, whatever you want. (10 internet points if you get the reference :-) )
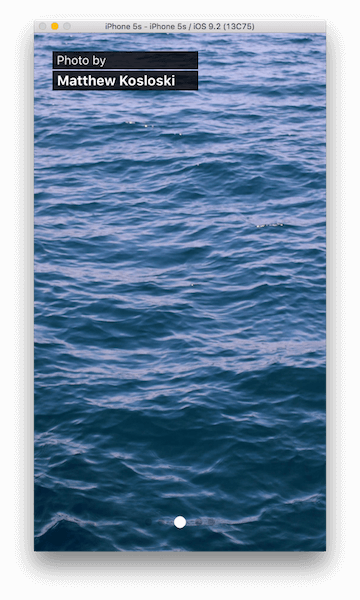
Let's now add the picture credits. Insert two text components between the the opening and closing tags of `` as shown below.
Refresh the simulator and Bam! We have the photo credits.Wallpaper image with credits.Everything we did to add the photo credits is very straightforward. I don’t think there is anything to explain here, right?
With that, we’re done with this section. Now it's time to go through what I believe is the toughest section of the whole tutorial.
## 2. Detecting Double-Taps
In this section we will venture into the lands of PanResponder API. This API will help us do some really cool things like detect a double-tap.
If we'd wanted, we could have just put a download button over the wallpaper: tap the download button and download the wallpaper. But that’s not what grown-ups do. We will design our custom double-tap listener, listen for double-taps, and then download the image.
Before getting started, you could read about the PanResponder API. I didn’t find it very helpful, though. It will all make sense once we start using the API. While we’re at it, you should know that React Native provides us with two APIs to handle touch and gestures: GestureResponder and PanResponder. PanResponder is the higher-level API and more convenient to use, so we will stick with it.
Enough talking, let’s get our hands dirty. Inside the SplashWall's constructor we’ll declare a blank object literal. Write the following line just after this.state's closing brace:
As of now, our imagePanResponder is just an empty object literal, there is nothing special about it. What we need to do is convert it to a PanResponder and then wire it to our `` component, since that is the component we would like to detect double-taps on.
First, let's make our empty object literal special. For that, we will write a new lifecycle method, componentWillMount. This method is automatically fired right before initial rendering occurs.
The three dots before this.imagePanResponder.panHandlers are what is called the spread operator. If you’re not familiar with it already, you can read more about it on the Mozilla Developer Network.
To understand what’s going on we will need to dive a little deeper into the PanResponder API.
Any touch event has three stages: start, move, and release; and a View/Component can claim to be the one that responds to a particular touch event. Notice the first key inside PanResponder.create({... that says onStartShouldSetPanResponder. As the name suggests, this is as though React Native asks if it should set PanResponder on this view when a touch is registered or started on it. In other words, should this view try to claim touch responder status.
We set this key’s value to this.handleOnStartShouldSetPanResponder, which is a method that will return true if we wanted the View to claim responder status, and false otherwise. In our case we will, of course, make it return true.
The next key is onPanResponderGrant, which will hold a function to be fired once our view is granted a responder status. Let us call this function handlePanResponderGrant. For now, let's simply make it log a message to the console.
handlePanResponderGrant(e, gestureState) {
  console.log('Finger touched the image');
}
The final two keys, which are pretty self-explanatory, hold the same value handlePanResponderEnd, which is what happens when a finger is lifted up from the responder component. For now, let's just make it log a message to the console.
handlePanResponderEnd(e, gestureState) {
  console.log('Finger pulled up from the image');
}
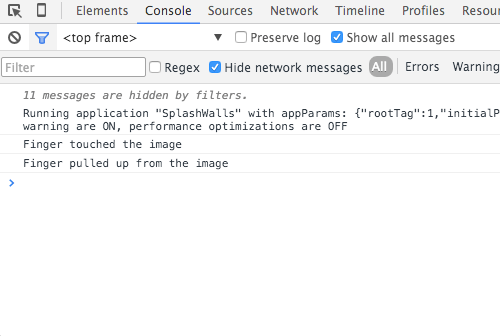
Refresh the simulator. Once a wallpaper is loaded, click on it and you should see the following in the console:Logging message to the console on touch and lift.Great! Now we know that our initial set-up is working correctly. Let's try to detect a double-tap.
Whenever a tap is registered, it's possible that tap concludes a double-tap. To check if a tap ends a double-tap we will need to have access to previous tap’s information: its location (x- and y-coordinates) and time stamp to be precise. Declare a new object literal prevTouchInfo just below the imagePanHandler object in the constructor.
handlePanResponderGrant is fired each time our NetworkImage component successfully claims the responder status or, in simpler words, whenever it is tapped on.
We are addressing this inside handlePanResponderGrant, but this inside this method is not our SplashWalls class; rather, it is PanResponder. To deal with this, before the closing brace of constructor add the following line:
Now is a good time to shed some light on a small difference between the two patterns of declaring React classes we discussed in part 1. In this tutorial we’ve chosen to go with the ES2015 class syntax; the other option was to use React.createClass({ ... }). If we had gone with the other option, we wouldn’t have to bind this to the method in the constructor. It would’ve been taken care for us by autobinding. Again, when you make a choice, you lose some, you gain some.
The first thing we do inside handlePandResponderGrant is grab the tap's time stamp in currentTouchTimeStamp using Date.now().
Then we check if this tap concludes a double-tap, using the isDoubleTap method:
distance simply calculates and returns the distance between two points using the following geometry formulaThe distance formula.Finally isDoubleTap in the return statement checks if the time difference between the previous and current tap is less than 300 milliseconds (DOUBLE_TAP_DELAY), and if the distance between the two consecutive taps is less than 20px (DOUBLE_TAP_RADIUS). If both conditions are met, the function returns true, otherwise false. Sound good? Great.
For one last step in handlePanResponderGrant, we update prevTouchInfo with the tap’s information that was just registered.
Let's try out our double-tap listener in the simulator. Once a wallpaper loads, try double-clicking anywhere on the wallpaper. You should be able to read “Double tap detected” in the console. Good job!## 3. Saving Wallpaper To Camera Roll
On detecting a double-tap right now, all we’re doing is logging “Double tap detected” to the console. Replace that line with the following method call:
We’ll get to declaring saveCurrentWallpperToCameralRoll later, but first declare the following variable inside the constructor:
this.currentWallIndex = 0;
currentWallIndex holds the index of the wallpaper that is currently visible on the screen. The first wallpaper has an index of 0, the next has an index of 1, and so on.
On each swipe, we need to update the value of currentWallIndex. This is a very simple task thanks to react-native-swiper's API. Remember the function onMomentumScrollEnd that we touched on towards the end of last section in part 1? Now’s the time to finally declare it.
To be able to access the Camera Roll in our app we will need to link the Camera Roll library to our app.
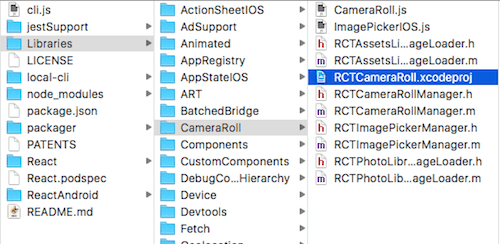
Remember linking ReactART in part 1? We’ll need to follow the exact same procedure with the RCTCameraRoll.xcodeproj file, which can be found in node_modules/react-native/Libraries/CameraRoll.Location of RCTCameraRoll.xcodeprojOnce you’ve linked to CameraRoll, add two new lines to the imports:
var {
  AppRegistry,
  StyleSheet,
  Text,
  View,
  Component,
  ActivityIndicatorIOS,
  Dimensions,
  PanResponder,
/***/
  CameraRoll, // Add this
  AlertIOS // and this
/***/
} = React;
Once the wallpaper has been saved to the Camera Roll, we’ll show the user an alert with a success message. We’ll need AlertIOS to do that. Now, we can define saveCurrentWallpaperToCameraRoll.
saveCurrentWallpaperToCameraRoll() {
  var {wallsJSON} = this.state;
  var currentWall = wallsJSON[this.currentWallIndex];
  var currentWallURL = `https://unsplash.it/${currentWall.width}/${currentWall.height}?image=${currentWall.id}`;

  CameraRoll.saveImageWithTag(currentWallURL, (data) => {
    AlertIOS.alert(
      'Saved',
      'Wallpaper successfully saved to Camera Roll',
      [
        {text: 'High 5!', onPress: () => console.log('OK Pressed!')}
      ]
    );
  },(err) =>{
    console.log('Error saving to camera roll', err);
  });

}
The whole of saveCurrentWallpaperToCameraRoll is very straightforward. If you’re curious or feeling stuck you can read more about CameraRoll and AlertIOS.
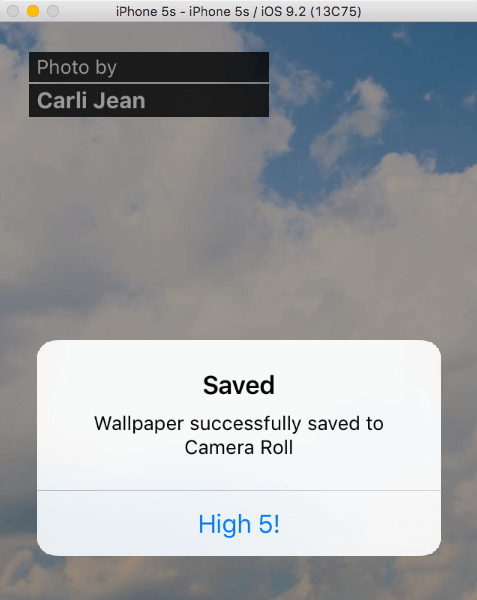
Refresh the simulator, and once a wallpaper loads double-click on it. After a little delay you should be prompted to provide SplashWalls permission to access the Camera Roll Once that is done you should see an alert like one shown below.Alert modal pops up when wallpaper is successfully saved to the Camera Roll.Notice that there is a delay between double-tapping and the appearance of the alert modal. We can’t do anything about the delay but we don't have to leave the user hanging, thinking the double-tap didn’t work. We’ll take care of this in the next section.
## 4. Creating A Progress HUD Component
In this section we will create our very first component, which will be a progress heads-up display (HUD). All it includes is a spinner on a translucent black background with “Please wait…” text below it. We will show this component during the delay that occurs between the double-tap and the appearance of the alert modal, so the user knows their action worked and the app is responsive.
Create a new file, ProgressHUD.js, in the root directory of the app. Fill the file with the following lines:
Notice the first line inside render. We’re creating three new variables and retrieving their values from this.props. Props in React are things passed to a component from inside another component, like width, height and isVisible will be passed to ProgressHUD:
Now add the `` component right after `` in the renderResults method. Doing so will lead to an error because we will be returning more than one component, which is not allowed in React Native. To get around this, simply wrap everything inside return() (the swiper and progress HUD component), in a simple ``.
We’re passing in three props to ProgressHUD: the first two are the dimensions of the screen; the third is a Boolean value determining whether ProgressHUD returns a spinner with “Please Wait…” on a translucent background or just nothing.
We will control the hiding and showing of the progress HUD from inside saveCurrentWallpaperToCameraRoll. Update the method to resemble the following:
saveCurrentWallpaperToCameraRoll() {

/***/
  // Make Progress HUD visible
  this.setState({isHudVisible: true});
/***/

  var {wallsJSON} = this.state;
  var currentWall = wallsJSON[this.currentWallIndex];
  var currentWallURL = `https://unsplash.it/${currentWall.width}/${currentWall.height}?image=${currentWall.id}`;

  CameraRoll.saveImageWithTag(currentWallURL, (data) => {

/***/
    // Hide Progress HUD
    this.setState({isHudVisible: false});
/***/

    AlertIOS.alert(
      'Saved',
      'Wallpaper successfully saved to Camera Roll',
      [
        {text: 'High 5!', onPress: () => console.log('OK Pressed!')}
      ]
    );
  },(err) =>{
    console.log('Error saving to camera roll', err);
  });
}
We make the HUD visible as soon as we enter the method, and hide it once saveImageWithTag is triggered.
Refresh the simulator and double-click on a wallpaper. You will notice the progress HUD becomes visible and goes away as soon as the alert dialog pops up.
But something odd is happening here: we are jumping back to the first image after the double-tap. This is because we’re modifying a state variable (isHudVisible) inside saveWallpaperToCameraRoll using this.setState(), which results in rerendering, and causes the swiper to reload data and start from the very first image.
To stop that from happening simply add a new attribute index to Swiper.
<Swiper ...
        index={this.currentWallIndex}>
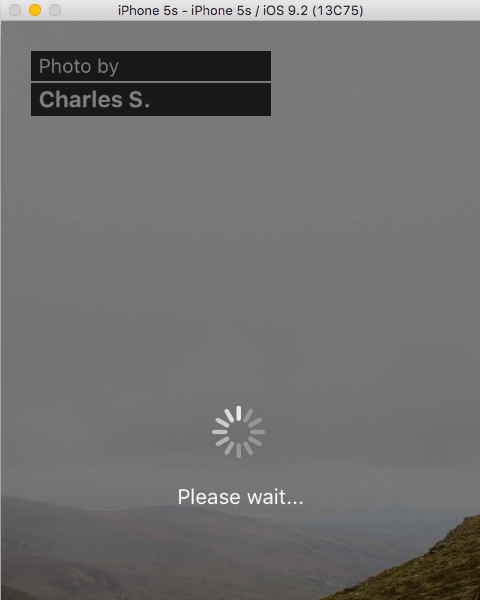
This makes sure that when rerendering occurs we’re shown the same wallpaper that was visible earlier. Refresh the simulator and everything should be working as intended.Progress HUD becomes visible on double-tap.With that, we’ve almost finished building our cute little app. Right now we’re simply fetching five wallpapers on launch. Wouldn’t it be cool if we could just shake our iPhone and it fetched five new random wallpapers automagically?
## 5. Running The App On An iPhone And Detecting Shake Gesture
Even if you don’t have a physical device you can still detect a shake gesture in the simulator by pressing Cmd + Ctrl + Z with the simulator window in focus.
Let's make our app fetch five new random wallpapers every time we shake the device. Like rolling a die!
To enable our app to detect shakes we will need to install an npm module called react-native-shake-event-ios.
Head to the root of the project and run the following command from the terminal:
npm install --save react-native-shake-event-ios
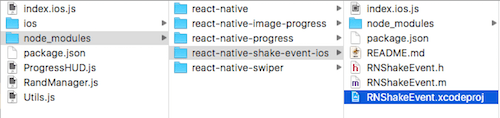
One more thing we need to do is to link a library. As this is the third (and last) time we'll link a library in this tutorial, you should be acquainted with the process already.
Find the RNShakeEvent.xcodeproj inside node_modules/react-native-shake-event-ios/ and link that through Xcode.Location of RNShakeEvent.xcodeprojLike any other library, we import it in our main file like so:
var ShakeEvent = require('react-native-shake-event-ios');
Then, head over to the componentWillMount method. This is where we will wire our shake event listener. After doing that, our componentWillMount method should look like this:
Once that is done, new random wallpapers are fetched from the API via a this.fetchWallsJSON() call.
Now, it’s time to install our app on our device and run it without any dev server running. The official React Native docs have a slightly different and cumbersome procedure to do this, which requires you to bundle and minify your code using a host of different flags. This is totally unnecessary, as described in this pull request. I suggest you don’t even try to go through the official docs. Simply do what the following steps say and you should be good.
Head over to Xcode/SplashWalls/SplashWalls/AppDeletegate.m, comment out the line starting with jsCodeLocation... below OPTION 1, and uncomment the line starting with jsCodeLocation... below OPTION 2.Contents of AppDeletegate.m after this step. Notice OPTION 2 has been uncommented and OPTION 1 has been commented out.
```
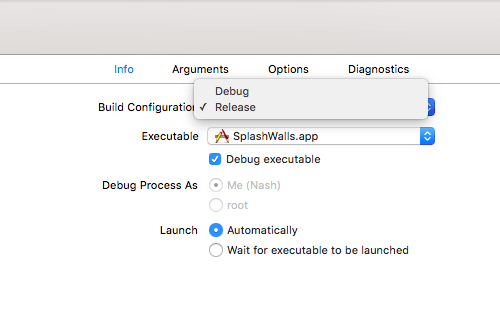
Go to Product → Scheme → Edit Scheme, or simply press Cmd + Shift + ,
```Change build configuration to Release.In the window that slides in, change Build Configuration under Run from Debug to Release. Click Close. Doing this will disable the Dev menu from popping up every time we shake the device.
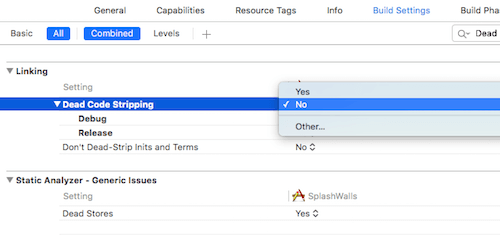
Head to Build Settings and disable Dead Code Stripping.Simply type "Dead" in search field to find Dead Code Stripping option.
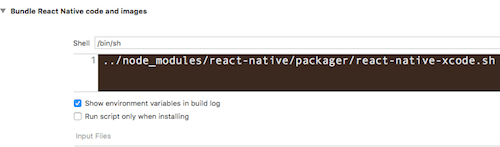
Make sure you have Bundle React Native code and images section under Build Phases with the following configuration:Build Phases should have Bundle React Native code and images present.If not, add it following the steps in the docs. Now connect your iOS device to your Mac, select it in the Devices section and hit Run from Xcode.
The whole process of bundling and installation will take a while initially. Once done you will be able to run the app on your device without any development server running. Whenever you want to go back to development simply reverse the steps 1 and 2.
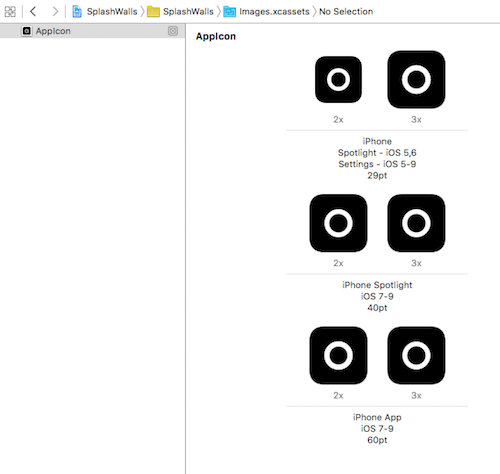
As a final step, add an app icon to the app.
Download the .zip file containing icons. Unzip it.
The app icon I designed is just a black rounded rectangle with a white circle in the center. If you want to design your own app icon, please go ahead. Make sure you follow the iOS guidelines regarding the dimensions of the icons.
In Xcode, head to SplashWalls/SplashWalls/Images.xcassets. In the left sidebar you should see a category called AppIcon; click on it.AppIcon section can be found under Images.xcassets.
From the folder containing the icons, drag each icon to its appropriate holder.Placing App Icons in appropriate holders.
Run the app again from Xcode and this time you should see the AppIcon we just added instead of the default one.
Whoa! Did we just officially finish the app? Yes, of course we did.
## Wrapping Up
From fetching data over the network, to dynamic rendering, installing third party components, and linking libraries, the first part of this tutorial illustrated how simple it is to get up and running with a React Native project.
In the second part:
We started out by installing a `` component that allowed us to show loading indicators while the image loads in background.
We then touched on the PanResponder API and built a double-tap listener using it.
In the third section we made our app gain access to the Camera Roll.
In the fourth section we created our very own component that is visible during the delay between a double-tap and appearance of the alert dialog.
In the last section we detected the shake gesture, ran the app on a physical device, and even added an app icon.
After all this, I hope this two-part series got you acquainted with how React Native works and you learned something new. Maybe you even have an opinion on whether you’d like to pursue React Native development further. I’d love to hear your thoughts on it. React Native is still very young and has a lot of potential. It will be quite interesting to see where it is headed.
Again, all the code for the app we just built can be found on GitHub.
## Up For A Challenge?
React Native provides a very convenient to use and powerful API for handling animations, appropriately named Animated. In this tutorial there wasn't enough time to go over it, but I used the Animated API to add more functionalities to the app.
First, I created a long press listener using PanResponder. When a long press is detected on the right side of the screen, a home screen preview fades in; when a long press is detected on the left, a lock screen preview fades in. The fading in and out is handled by the Animated API. Check out the video below.If you’re up for a challenge why not add these functionalities to your own app? Or go ahead and develop some of your own beautiful apps. Once you have put together something cool, show me on Twitter.

 Custom Web Forms for Angular, React, & Vue. Your backend.


 Celebrating 10 million developers
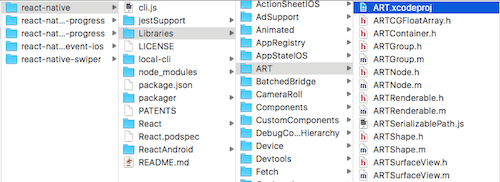
 Libraries." />