Why You Should Stop Installing Your WebDev Environment Locally

Email Newsletter
Weekly tips on front-end & UX.
Trusted by 182,000+ folks.

 Custom Web Forms for Angular, React, & Vue. Your backend.

 Celebrating 10 million developers
Have you heard of Docker but thought that it’s only for system administrators and other Linux geeks? Or have you looked into it and felt a bit intimidated by the jargon? Or are you silently suffering with a messy development environment that seems to break all of the time in various mysterious ways? Then read on. By the end of this article, you should have a basic understanding of Docker and have it working on your computer!
The first part of this article gives a bit of background to help you understand the concepts behind Docker through some metaphors. But if you just want to get started with the tutorial, skip to the “Time to Play!” section.
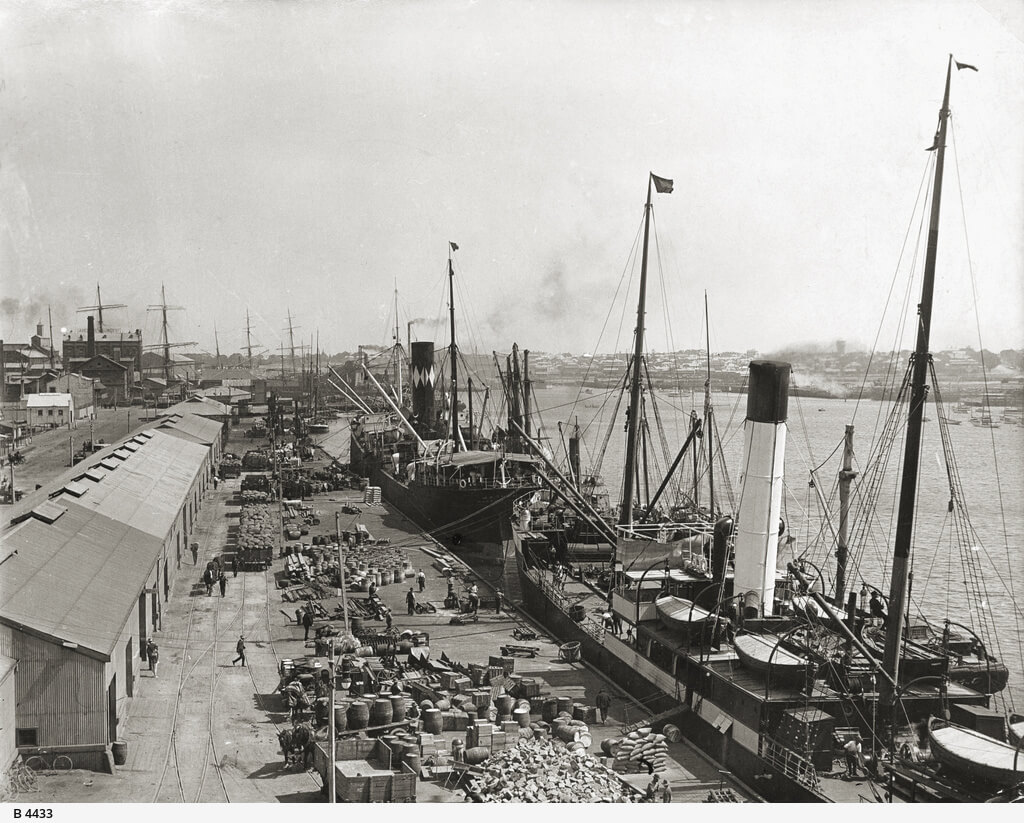
A Brief History Of The Shipping Industry
Break-Bulk Shipping
The loading and unloading of individual goods in barrels, sacks and wooden crates from land transporters to ship, and back again on arrival, used to be slow and cumbersome. Nevertheless, this process, referred to as break-bulk shipping, was the only known way to transport goods via ship up until the second half of the 20th century.
Needless to say, this process was very labor-intensive. A ship could easily spend more time at port than at sea, as dockworkers moved cargo into and out of tight spaces below decks. There was also high risk of accident, loss and theft.
The Introduction Of Shipping Containers
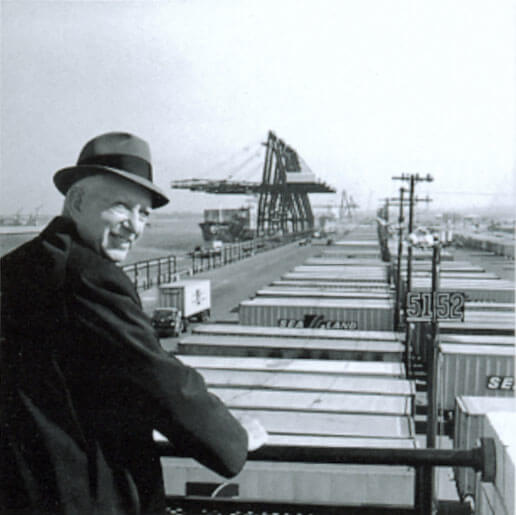
Fast-forward to 26 April 1956, when Malcolm McLean’s converted World War II tanker, the Ideal X, made its maiden voyage from Port Newark to Houston. She had a reinforced deck carrying 58 metal container boxes, as well as 15,000 tons of bulk petroleum.
By the time the container ship docked at the port of Houston six days later, the company was already taking orders to ship goods back to Port Newark in containers. McLean’s enterprise later became known as Sea-Land Services, a company that changed the face of shipping forever.
Many famous inland ports (including London’s Docklands) were completely shut down, as ever-larger container ships had to use open (and usually new) seaside ports.
But Why Would A Developer Care About Shipping Containers?
In the 1950s, Harvard University economist Benjamin Chinitz predicted that containerization would benefit New York by allowing it to ship its industrial goods to the southern United States more cheaply than from other areas, like the midwest. But what actually happened is that importing such goods from abroad became cheaper, wiping out the state’s dominant apparels industry, which was meant to be the beneficiary.
While I obviously can’t foresee the future, it looks like a new wave of containerization is about to transform software, particularly web development, with some potentially major consequences.
But what are the main characteristics of shipping containers?
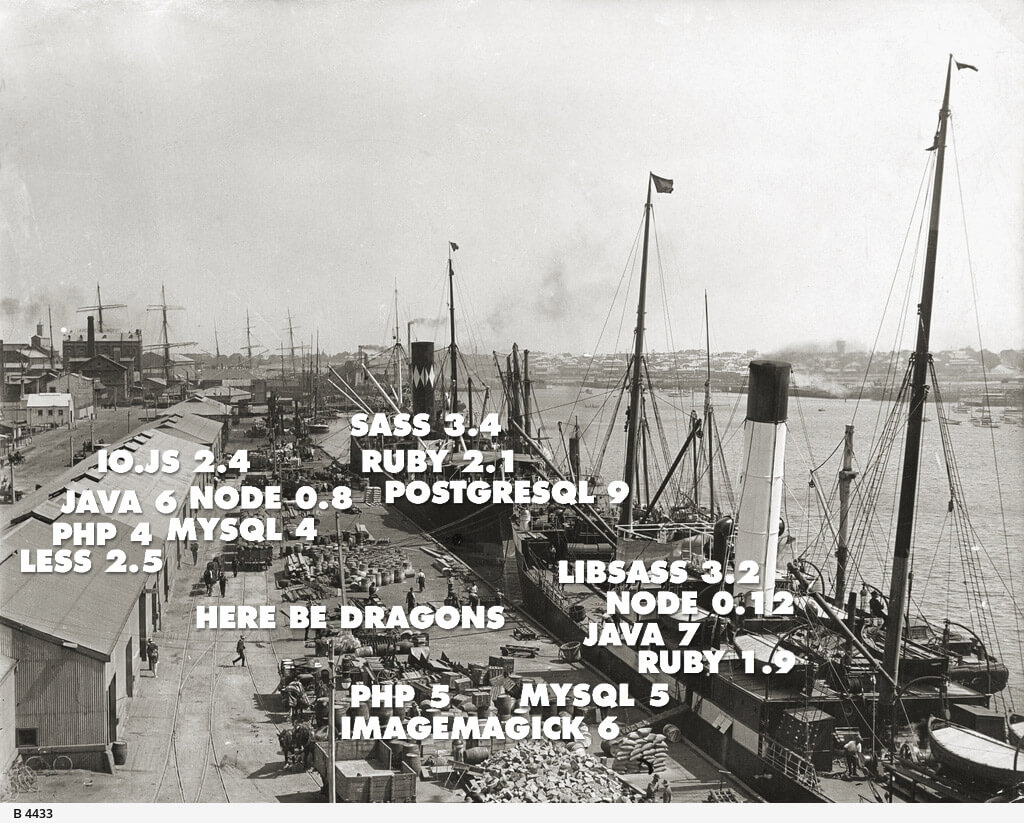
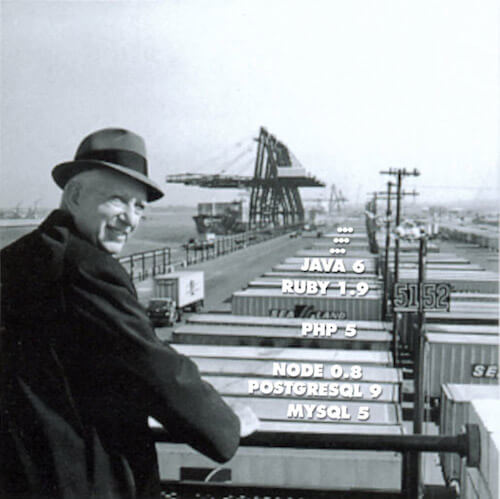
- They abstract what’s inside with a tough corrugated steel shell, the private and protected contents of which are known only to the creators.
- They provide a standardized interface for efficient handling and stacking throughout the delivery chain.
- They make it easy for anyone to scale their operations quickly using this existing standardized infrastructure.
Hmm, some familiar keywords in there, right?
What Is The Problem With Local Development Environments?
Even if you install dependencies only for projects that you have to actively work on, after a few new projects, things will start to become a mess — a mess that is difficult to clean up and even harder to restore if you need to work on some old project again.
And if you’re not paying the bills with just a few projects but also want to contribute to open-source libraries — which you totally should, but that means you might need to compile them — then that would get totally out of hand.
What if we could have a software Malcolm, locking each project’s mess into the digital equivalent of corrugated steel boxes?
Approaches For Multi-Project Development Environments
A few years ago, the best solution around was to use package managers (RubyGems and Bundler, npm, Maven, etc.) with local project-specific dependency bundles, instead of installing libraries on a global operating-system level. Together with runtime version switchers (Ruby Version Manager, rbenv, nvm, JSelect, etc.), these provided temporary relief, but there were still differences between environments on different developer machines, often resulting in broken builds and generally weird behavior. Of course, you were almost guaranteed to have to set up every single project again after every OS update and to remember quirky workarounds for legacy projects (if the dependencies were even still available).
Then, virtualization started becoming more mainstream (and open source) on the desktop, after years of success on servers. So, with help of the likes of Virtualbox and Vagrant, it became possible to run an entire operating system in a virtualized environment, independent of the host system. This way, the environments for all development computers and even production servers could be identical. While this is a powerful and versatile solution, the downside is a big hit on the resources of the host machine.
Taking the sealed-box approach from full-fat virtualization, yet sharing the kernel and some low-level components from the host operating system, containerization offers the best of both worlds. Because no actual virtualization is happening on a container level (just a few fences are drawn up and torn down for isolation), start-up is pretty much instant, and the direct access to the CPU and other hardware components eliminates performance overhead.
Enter Docker’s Containers
Docker started out by being built on an implementation called Linux Containers (or LXC) which has been around for quite a while; so, containers aren’t a totally new concept. That being said, Docker’s makers later decided to create a layer that depends less on Linux distribution-specific components, which was first Libcontainer and now RunC. Quite a lot of details are involved in how these container implementations actually work; however, from a user perspective, it’s enough to know that the high-level architecture is to run what’s inside the containers, with a limitation and prioritization of resources, its own networking, a mounted file system and so on, thereby creating practically complete but securely fenced child operating systems inside the host.
Docker itself is open-source and offers a large ecosystem of tools and contributors on top of the basic container technology, addressing several levels of the problem.
Docker Engine
The Docker Engine, or just Docker, is the core and deals with the containers themselves. It bundles together the barebones Unix-style utilities for handling various aspects of the containers, and it adds several convenience functions around them.
With Docker, a nice REST API is exposed on the containers, which makes it possible for both command-line and GUI tools (locally) and deployment scripts (remotely) to interact with them. It also makes it very simple to define images with a single Dockerfile, which enables one to build layered, incremental images quickly, including downloading and compiling all of the dependencies.
Because Docker is Linux-based, if you want to use it on Windows or Mac, it’ll need virtualization after all, which is typically done with the open-source Virtualbox and the tiny Boot2Docker image (although there are some promising up-and-comers, like xhyve). Of course, you can have as many containers in one box as you’d like, inside which containers would work the same way as on Linux, sharing the resources of one host machine.
Time To Play!
Installing Docker Toolbox
The simplest way to get started is to download the official Docker Toolbox. This is an installer that puts in place all Docker-related tools. It also makes sure Virtualbox is installed (in case you’re not using Linux and don’t already have it) and sets up the Boot2Docker image.
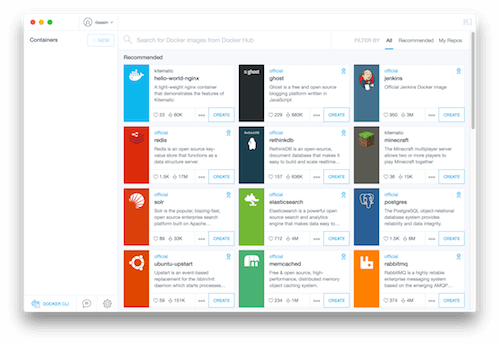
Once the installation process is completed, you should start Kitematic (Docker’s UI interface), an app that will automatically create a Docker host environment (named default) for you. If everything has gone well, you should see a list of downloadable Docker images on the right.
Cloning The Tutorial Repository
Now we are ready to Dockerize a small React, Sass and Node.js app, compiled with Gulp, which should be just enough to see something beyond “Hello World.”
To get started with this, clone the tutorial’s repository from GitHub.
Note: Make sure your working copy is under /Users/[username] (Mac OS X) or C:\Users[username] (Windows). Otherwise, mounting source-code folders won’t work later — these folders are automatically mapped by Docker.
If you haven’t done so yet, crack open a terminal shell, and go to the folder where you checked out the repository! All commands below (starting with, but without pasting, >) will have to be executed there.
Getting The Docker Host Ready
Because we’re going to use the default Docker host, you don’t have to create one. If you want to do it (later), you can use docker-machine create.
However, we need to tell Docker that we want to use this default host. So, go ahead and type this:
> eval "$(docker-machine env default)"
You’ll need to do this for every new shell session, or else put it in your .profile or .bashrc file. The reason for this is that Docker can work with multiple hosts locally, remote hosts like AWS, and swarms, so it can’t safely assume where you want to work.
To verify that everything has gone well, type the following:
> docker-machine ls
This should return all of the Docker hosts you have set up, and you should see default set as active. So, something like this:
NAME      ACTIVE   DRIVER       STATE     URL                         SWARM   DOCKER    ERRORS
default   *        virtualbox   Running   tcp://192.168.99.100:2376           v1.9.1
Writing The Dockerfile
This is where things get really interesting! The Dockerfile is essentially a step-by-step recipe for Docker to compile an image and create a container environment exactly the way you need it to be. For the sake of this tutorial, we’ll need to set up a simple Node.js environment so that we can install libraries using npm and compile everything using Gulp.
So, open Dockerfile in your favorite text editor, and let’s get started!
The first line takes the official Node version 5 image from Docker Hub, prebuilt on top of Debian Jessie as a starting point:
FROM node:5
Because Docker images can be pushed to Docker Hub and shared with other people, putting your name and email address in there is always a good practice. So, go ahead and edit the second line:
MAINTAINER You <me@example.com>
You’re on your own now — good luck!
Just kidding. I left the rest empty so that we can fill it in together step by step.
To tell Node.js that this is a development image, let’s set the NODE_ENV environment variable to development:
ENV NODE_ENV=development
Then, we need to set the base folder inside the image for Docker to put files in. So, let’s put this:
WORKDIR /usr/local/src
Now, we’re ready to start copying files from the local file system to the image:
COPY package.json /usr/local/src/package.json
Having put package.json in there, let’s install the dependencies:
RUN npm install
Now, we can copy our source files and start compiling with Gulp:
COPY gulpfile.js /usr/local/src/gulpfile.js
COPY .babelrc /usr/local/src/.babelrc
COPY src /usr/local/src/src
RUN npm run compile
In case you’re wondering why there are two COPY and RUN sections, Docker caches the results as intermediate images after each line. In this case, if we don’t change the contents of package.json, it will just take the image from the previous run, with all of the npm dependencies already installed, making the build incomparably faster than if it had to do it from scratch every time.
By default, Docker containers are completely locked down. So, we need to open a port for the Node.js server:
EXPOSE 8877
Finally, all Docker images need a default command to be executed automatically when running the container. In our case, let’s start a development Node.js server:
CMD ["babel-node", "src/server"]
Building The Image
Before you can use it in a container, you have to build your image. Type the following (making sure to include the . at the end):
> docker build -t node-tutorial .
Here, the -t parameter gives a name to the image; so, we can refer to it later without having to use the generated UUID hash.
This might take a while because Docker needs to download the Node.js image and all of the npm dependencies. If everything has gone well, something like this should be at the end of the output:
Step 12 : CMD babel-node src/server
 ---> Running in c5fc0a3a5940
 ---> ee02b5ac9bf4
Removing intermediate container c5fc0a3a5940
Successfully built ee02b5ac9bf4
Run The Container
At this point, you’re ready to run the container! So, let’s try this mouthful of a command — I’ll explain later what each parameter means:
> docker run -p 8877:8877 -p 3001:3001 --name node-tut -v $(pwd)/src:/usr/local/src/src --sig-proxy=false node-tutorial npm run browsersync
You should see the shell output inside Docker, with the Gulp compilation kicking off. And in a few seconds, the BrowserSync proxy should start up. So, if everything has gone well, things should be settling in, with something like these as the last few lines:
[14:08:59] Finished 'watch' after 70 ms
[14:08:59] [nodemon] child pid: 28
[14:08:59] [nodemon] watching 4 files
[BS] [info] Proxying: https://localhost:8878
[BS] Access URLs:
 -----------------------------------
       Local: https://localhost:8877
    External: https://172.17.0.2:8877
 -----------------------------------
          UI: https://localhost:3001
 UI External: https://172.17.0.2:3001
 -----------------------------------
[BS] Reloading Browsers…
docker-tutorial 1.0.0 up and running on 8878
If that’s the case, you’ve just passed another big milestone and are ready to see the results in a browser!
Let’s exit Docker’s shell session by pressing Ctrl + C. In your own shell, type this:
> docker-machine ip default
This should return the IP address of the Docker host’s virtual machine. Knowing that, let’s open our favorite development browser and paste in this address, followed by port 8877. So, something like 192.168.99.100:8877.
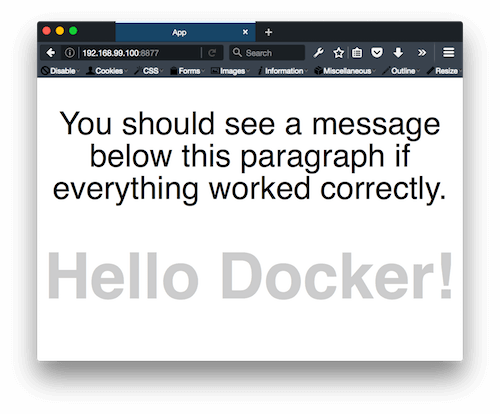
If you’re particularly adventurous, try editing any application-related file under src; in a moment, you should see the page reload. Congratulations! You have a relatively complex Node.js environment running in Docker!
With this moment of triumph, let’s look back and see what we did with this long docker run command. The basic anatomy looks like this:
docker run [OPTIONS] IMAGE [COMMAND] [ARG…]
These were our OPTIONS:
-p hostPort:containerPortThis maps the container ports to the host so that you can expose and access the web server ports.-v hostDir:containerDirThis mounts the local files and folders so that your local edits get pushed to the container without requiring a rebuild.--name containerNameThis assigns a name to your container so that you don’t have to use the UUID hash.--sig-proxy=falseThis lets us exit from Docker’s shell without killing the running process inside (by not proxying the SIGTERM — hence, the name).
Finally, the name of the IMAGE is node-tutorial, and the COMMAND + ARG… are npm + run browsersync.
I Want More!
While finishing the tutorial above should cover the basics of getting started with Docker for development, there’s much more to it. I’ve gathered some tips and pointers to get you started on the journey. There’s also a good (but rather long) guide to best practices in Docker’s documentation.
Images Vs. Containers
Perhaps one of the most important things to understand is the difference between images and containers. Images are read-only and come in layers. In the tutorial above, the layers are: the Debian Jessie base Linux image → the official Node.js 5 image → our customizations in the Dockerfile. These layers can be modified only by rebuilding the images; this way, you’ll always know what you’re getting, and it becomes a manageable process to share images in the Docker hub by building, pushing and pulling them. Containers, then, are the “machines” that run these images and add the layer of a writable file system on top. So, in the tutorial, the container is what enables volumes to be mounted and, with that, is what enables a way to keep on pushing and executing code inside without having to rebuild the entire image every time.
Because of this immutable nature of images, don’t expect files to stick around in a container when you restart it. This is why it’s important to use file system volumes for your code and, once you get to a more advanced level and want to deploy to production, volume containers for databases, logs, etc.
Docker Machine
Apart from helping with some basic management of the Docker container host (picking the virtual machine or starting and stopping it), once you have several containers between and maybe even within projects or you want to deploy and manage them on a cloud provider, Docker Machine will give you some simple commands to help with these.
Docker Hub And Registry
Docker Hub is the place to go for community-maintained containers. These containers range from simple base Linux distribution flavors with the bare minimum (Alpine is a great lean image, for example) all the way up to complete application stacks (for WordPress, Minecraft, etc.), ready to be started up and used.
As well as the automatic builds, you also get web hooks. So, integrating your continuous integration or deployment system shouldn’t be a problem.
Kitematic
While I’m reasonably comfortable with the terminal shell, I’m also the first to admit that, for example, unless I need to do something really complex with Git (like fixing a messed-up commit history), I won’t bother doing it manually and will happily do my commits, diffs and interactive rebases in the SourceTree app.
If you want to avoid the command line, that’s totally fine. Docker recently bought the similarly open-source Kitematic, which is a simple but decent UI to drive Docker. It’s still in its infancy but already lets you monitor logs; start, stop and restart containers; and view settings such as volumes, ports, etc.
Docker In Production Or Not?
It is worth making clear that you don’t need to commit to using Docker in production in order to use it to manage your development environment. You can stick to whatever way you’re doing it now. In fact, in this case, even on the same team, people can use Docker or a local environment. It doesn’t matter because the application code and repository will be the same except for the added Dockerfile.
That being said, if you do want to go to production, one important principle of containers is that they should run only one process and do one thing. Linking multiple containers to a network is not that difficult, but it is definitely a different approach and concept from working with virtual machines. If you want to see a working example of a few containers working in tandem, we have open-sourced our website code behind ustwo.com.
More Than Just Servers And Daemons
Just to give you an idea of how versatile a tools container can be, you can even use them instead of locally installed desktop tools. For example, you can convert an image with ImageMagick without having to worry about installing it with all of its dependencies. So, if you have open.png in the current folder and you want a .jpg version, you can just do this:
> docker run --rm -v $(pwd):$(pwd) jess/imagemagick convert $(pwd)/open.png $(pwd)/open.jpg
This will pull the tiny ImageMagick image, mount the current folder under the same path inside the container, do the conversion, sync the file back, exit, and remove itself when finished.
For more inspiration, check out the blog post “Docker Containers on the Desktop” on the brilliant Jessie Frazelle’s blog.
Beyond Docker
While the Linux-based Docker is the current star in the space, the Open Container Initiative is taking the containerization idea forward with a cross-platform standard. It’s backed by a big industry alliance, including Microsoft, which is promising to make it work natively on Windows. Apple is notably absent at this point, but let’s hope it is just taking its time.
The Future
Containerization will start a revolution in open source similar to what Git did, by making it much simpler to take any code and start compiling it right away.
You can quote me on that. I’m fairly confident that we’ll see more and more open-source projects — especially complex ones — embrace containerization for dependency management. All it takes is for someone to add a Dockerfile, after all. And in most cases, people may still choose not to use it and go with their existing local setup instead.
This will dramatically lower the barrier to entry for newcomers to a project, enabling potentially an order of magnitude more people to get involved, just like Git and GitHub did.
Takeaways
- Containerize any non-trivial development environment, especially legacy ones.
- Containerize your open-source projects to remove the barrier to entry for new contributors.
- Containerize other people’s open-source projects, instead of setting up the environment on your local machine, so that you solve it for all.
Further Reading
- A Simple Workflow From Development To Deployment
- The Issue With Global Node Packages
- How To Develop An Interactive Command Line Application
- Getting Started With Neon Branching


