3 Approaches To Adding Configurable Fields To Your WordPress Plugin

Email Newsletter
Weekly tips on front-end & UX.
Trusted by 182,000+ folks.
 Custom Web Forms for Angular, React, & Vue. Your backend.

 Celebrating 10 million developers

Anyone who has created a WordPress plugin understands the need to create configurable fields to modify how the plugin works. There are countless uses for configurable options in a plugin, and nearly as many ways to implement said options. You see, WordPress allows plugin authors to create their own markup within their settings pages. As a side effect, settings pages can vary greatly between plugins.
In this article we are going to go over three common ways you can make your plugin configurable. We will start by creating a settings page and create our fields using the default WordPress Settings API.
Further Reading on SmashingMag:
- Extend WordPress With Custom Fields
- Custom Fields Hacks For WordPress
- Extending Advanced Custom Fields With Your Own Controls
- The Complete Guide To Custom Post Types
I will then walk you through how to set up your fields with a custom handler. Finally, I will show you how to integrate a great configurable fields plugin Advanced Custom Fields (ACF) into your own plugin.
Since this is a long post, here is a table of contents with links to each of the major sections:
- Creating our Plugin and Settings Page
- Approach 1: Using the Built-In WordPress Functionality
- Approach 2: Setting Up a Custom Form and Handler
- Approach 3: Integrating ACF (Advanced Custom Fields) Into Your Plugin
For code examples please see the repository I have set up to accompany this post.
Creating Our Plugin And Settings Page
The first thing we need to do is set up our plugin and create a settings page. All three approaches outlined in this article start with the plugin structure below. This plugin structure is object-oriented so there may be a few differences in your own code if your plugin is written procedurally. Pay particular attention to the callback function format in the actions and filters.
/*
    Plugin Name: Smashing Fields Plugin
    description: >-
  Setting up configurable fields for our plugin.
    Author: Matthew Ray
    Version: 1.0.0
*/
class Smashing_Fields_Plugin {
    // Our code will go here
}
new Smashing_Fields_Plugin();
Inside our class we are going to add an action hook to add the settings page:
public function __construct() {
    // Hook into the admin menu
    add_action( 'admin_menu', array( $this, 'create_plugin_settings_page' ) );
}
You can see that our action’s callback is create_plugin_settings_page, so let’s create that method. Note: I have set up the arguments as separate named variables to give some context to our code, but you can simply place the values directly in the function to save memory.
public function create_plugin_settings_page() {
    // Add the menu item and page
    $page_title = 'My Awesome Settings Page';
    $menu_title = 'Awesome Plugin';
    $capability = 'manage_options';
    $slug = 'smashing_fields';
    $callback = array( $this, 'plugin_settings_page_content' );
    $icon = 'dashicons-admin-plugins';
    $position = 100;

    add_menu_page( $page_title, $menu_title, $capability, $slug, $callback, $icon, $position );
}
Take a look at the WP codex for add_menu_page for more information.
This function will create our page as well as the menu item. The important parts here are the slug, capability and callback arguments. The slug we will use later to register our fields, so write that down somewhere. You can change the capability to allow different user levels access to your settings page. As for the callback, we will create that method shortly. Notice you can also put a dashicon class directly into the function to change the icon for the menu. The last argument is the position of the menu item within the menu; play around with this number to find the spot in the menu you’d like your settings to fall. Note: you can use decimal values to avoid conflicts with other menu items.
Our next step is to create the callback method plugin_settings_page_content for our settings page.
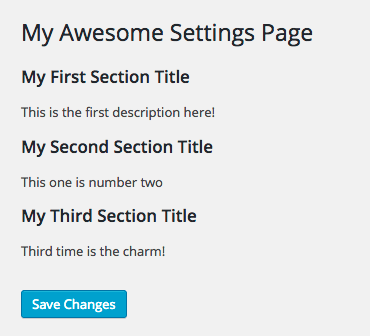
public function plugin_settings_page_content() {
    echo 'Hello World!';
}
If you save your plugin and refresh the WordPress admin panel you should see the following:
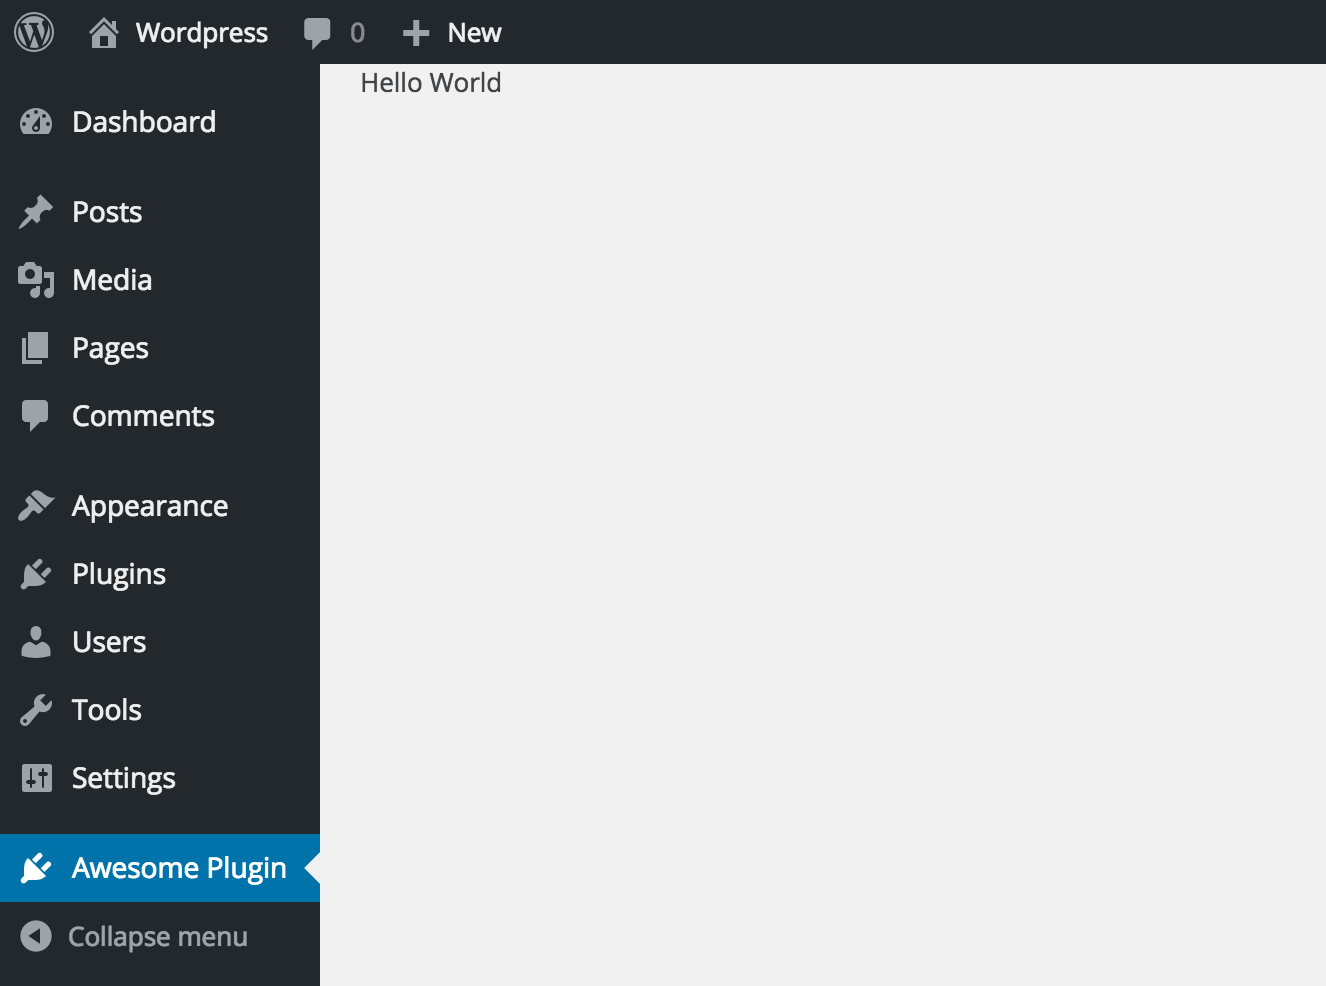
You can see that your settings page is a top-level menu item. You may prefer to leave it this way based on the needs of your settings page. However, you may also want to have your plugin settings under another menu item. In this case you will simply change the last line of the create_plugin_settings_page method to the following:
add_submenu_page( 'options-general.php', $page_title, $menu_title, $capability, $slug, $callback );Here we are changing the function add_menu_page to add_submenu_page and prepending a new argument. That argument is the parent menu item that the new settings page will be under. In the add_submenu_page documentation you can see a pretty good list for the parent menu items and their slugs. You might also see that we no longer have the last two arguments, $icon and $position. Since we are now in the submenu section, we no longer have control over the position of the element. Also, submenus don’t have icons available to them so there is no need for that argument.
If you save this new code you will see that our settings page will be displayed under the Settings menu item:
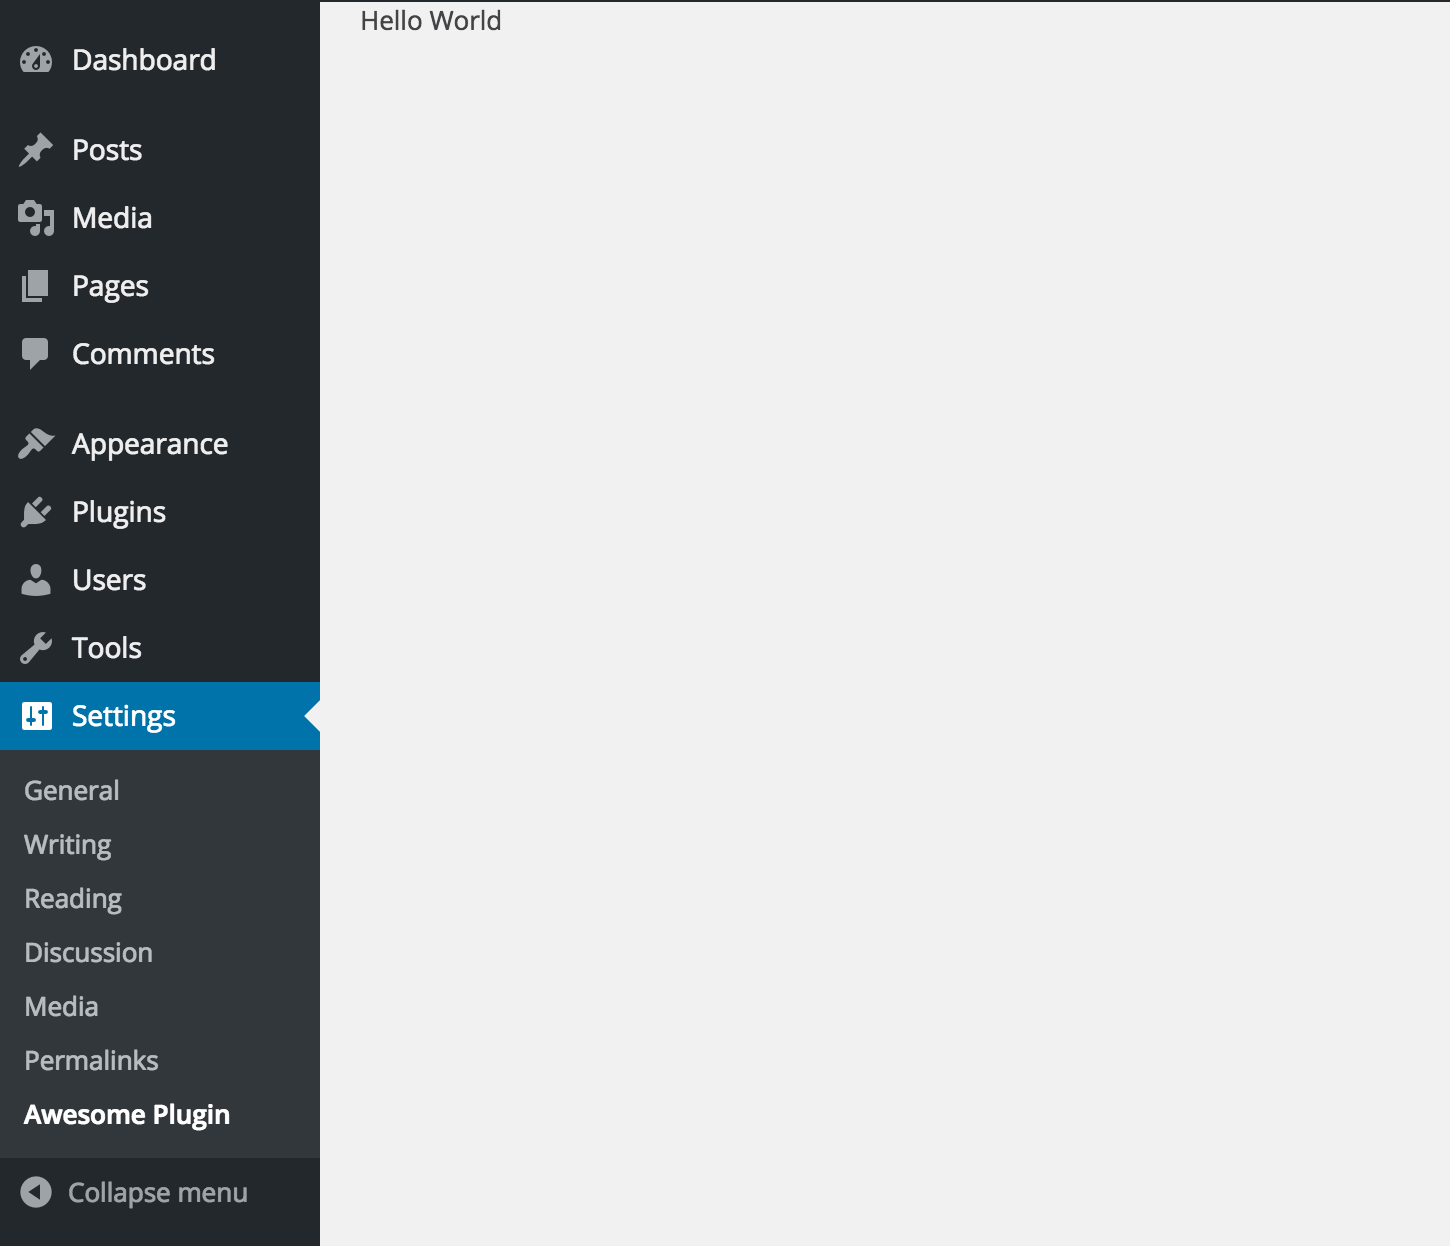
In many cases, the most appropriate place to add a plugin settings page is under the Settings item. In the WordPress codex it explains that the Settings section is used to “Display plugin options that only administrators should view.” However, this is just a guideline, not a rule.
Now that we have our settings page set up and we know how to move the items around, we can start working on the fields. The work we have done thus far will be reused for the various methods below.
Approach 1: Using The Built-In WordPress Functionality
Before we get too deep into the code, let’s go over some of the pros and cons of using this approach.
Pros
- Easy to integrate into existing settings pages
- Sanitization is done for you
- Unlikely to break since the code is managed by WordPress
- Can be used for both themes and plugins
- Flexible, secure and extensible
Cons
- Custom data validation is manual
- Advanced field types (repeaters, maps, uploads, etc.) are more difficult to implement
When should you use this approach?
This approach is flexible enough that it can be customized for very simple or very advanced settings pages. You can use this method in most situations if you don’t mind doing some things manually.
Getting Started
Using this approach we’ll need to follow the same markup that WordPress’s own options pages use. We should modify our plugin_settings_page_content method to the following:
public function plugin_settings_page_content() { ?>
    <div class="wrap">
        <h2>My Awesome Settings Page</h2>
        <form method="post" action="options.php">
            <?php
                settings_fields( 'smashing_fields' );
                do_settings_sections( 'smashing_fields' );
                submit_button();
            ?>
        </form>
    </div> <?php
}
The markup above is directly from the WordPress codex on creating options pages. The method name should match the callback name we put in the add_menu_page function above. The wrapper div is actually the same as a default WordPress form and will pull in the styles from those sections. The form tag is pointing to the default options form handler for WordPress.
The three lines of PHP do several things:
- The
settings_fieldsfunction is basically a reference for the rest of our fields. The string argument you put in that function should match the$slugvariable we set up earlier – it will be in all of the fields we register later in the plugin. This function also outputs a few hidden inputs for the nonce, form action and a few other fields for the options page. - The next function,
do_settings_sections, is a placeholder for the sections and fields we will register elsewhere in our plugin. - The last function,
submit_button, will output the submit input, but it will also add some classes based on the status of the page. There may be other arguments you will want to pass into thesubmit_buttonfunction; they are outlined in the codex.
If we refresh our settings page we should get something that looks like this:
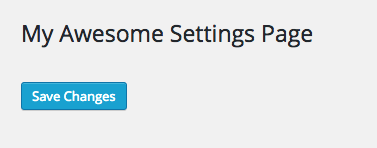
It’s looking a little sparse! Let’s start setting up the fields now.
Sections And Fields
WordPress separates its options pages into sections. Each section can have a list of fields associated to it. We need to register a section in our plugin before we can start adding our fields. Add the following code to your constructor function:
add_action( 'admin_init', array( $this, 'setup_sections' ) );This hook will set up the sections for our page. Here is the code for the callback:
public function setup_sections() {
    add_settings_section( 'our_first_section', 'My First Section Title', false, 'smashing_fields' );
}
The first argument is a unique identifier for the section and we will be using this for the fields we wish to assign to the section. These identifiers should be unique for all new sections on this page. The next argument is the title that is generated above the section – you can make it anything you want. The third argument is the callback. Right now I have it set to false, but we will revisit this shortly. The fourth argument is the options page to which the options will be added (the $slug variable from earlier).
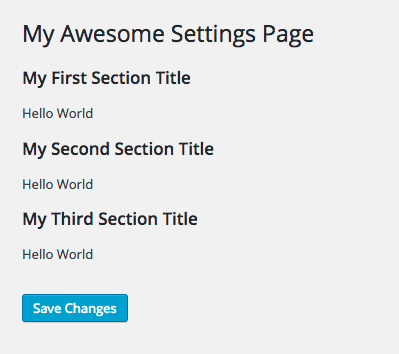
So why is there a false in our callback? Well, something that isn’t very clear when setting up WordPress options using their documentation is that multiple sections can share a callback. Often when you set up a callback there is a 1-for-1 relationship between the hook and the callback. So just for an example let’s try creating three sections with the same callback:
public function setup_sections() {
    add_settings_section( 'our_first_section', 'My First Section Title', array( $this, 'section_callback' ), 'smashing_fields' );
    add_settings_section( 'our_second_section', 'My Second Section Title', array( $this, 'section_callback' ), 'smashing_fields' );
    add_settings_section( 'our_third_section', 'My Third Section Title', array( $this, 'section_callback' ), 'smashing_fields' );
}
All three of these sections have the callback section_callback set in that third argument slot. If we then create a method that matches that callback and drop a “Hello World” in there:
public function section_callback( $arguments ) {
    echo '
Hello World
’; }
we get something that looks like this:
I know what you’re thinking, “Why the heck would I want to have the same text under all of my sections?” The answer is that you probably wouldn’t. This is where we can get a little tricky with the add_settings_section function. If you look at the documentation for that function you will see that in the Notes portion of the page the callback function will be assigned an array of arguments that directly correlate to the arguments in our hook. If you go in and var_dump( $arguments ) you will see all of the arguments getting passed into our function.
We can then write a simple switch in our callback to change out the text based on the ID that is passed into it:
public function section_callback( $arguments ) {
    switch( $arguments['id'] ){
        case 'our_first_section':
            echo 'This is the first description here!';
            break;
        case 'our_second_section':
            echo 'This one is number two';
            break;
        case 'our_third_section':
            echo 'Third time is the charm!';
            break;
    }
}
Now we have custom text for each section that we can change out in one function!
Of course, you can specify unique callbacks for these sections as well, but this approach allows you to consolidate your code into a single function. This idea works the same for setting up fields. We can have all of our fields share a callback and have it output the correct field type based on the arguments we pass in. Let’s add the fields to our constructor method. Put this code right after our sections hook in the constructor:
add_action( 'admin_init', array( $this, 'setup_fields' ) );Since you know the drill already, I’ll just give you the callback for our action:
public function setup_fields() {
    add_settings_field( 'our_first_field', 'Field Name', array( $this, 'field_callback' ), 'smashing_fields', 'our_first_section' );
}
The arguments in this function are similar to the ones in the sections function. The first argument is the unique identifier for the field. The second is the label that shows up next to the field. In the third argument you can see I am calling the method field_callback; we’ll create that callback in just a second. The fourth is the options page we want to use (our $slug from earlier). The fifth argument is the unique identifier for the section to which we want to assign this field.
Here is the code for the callback in our third argument:
public function field_callback( $arguments ) {
    echo '<input name="our_first_field" id="our_first_field" type="text" value="' . get_option( 'our_first_field' ) . '" />';
}
Here I am simply copying over the field’s unique identifier into the name, ID and our get_option function. Let’s see how our page looks with our new field attached:
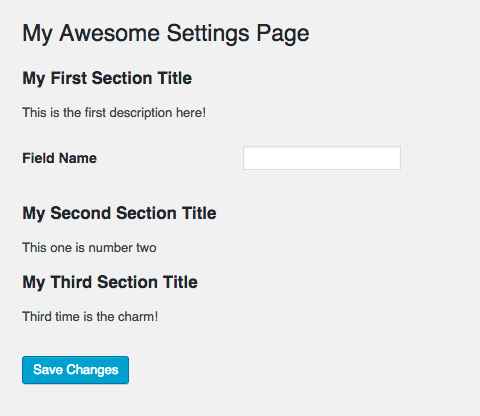
Awesome, we have our field on the page! Try adding some content to it and hitting save changes, I’ll wait here…
Did you do it? If you have done everything right up to this point you should have gotten an error saying something like ERROR: options page not found, or similar. The reason this happens is actually a security feature in WordPress.
You see, without this feature, a user could go into the HTML and change the name of a field to anything they wanted, hit save, and it would enter that option into the database with whatever name it was given (assuming it was a valid option name). This could allow any user to change options on other pages (even ones they couldn’t normally access) by simply entering the correct name into the field and hitting save – not cool.
This problem is solved by adding a function called register_setting. Unless you specifically tell WordPress, “Hey, this field is allowed to be saved on this page”, WordPress won’t update a field in the database. So underneath our field markup, we will add this new function. Here is what the callback looks like after we add the code:
public function field_callback( $arguments ) {
    echo '<input name="our_first_field" id="our_first_field" type="text" value="' . get_option( 'our_first_field' ) . '" />';
    register_setting( 'smashing_fields', 'our_first_field' );
}
The first argument in the new function is the options page we want to save the field on (the $slug from earlier) and the second argument is the field we want to save. Now try and update the field – it worked!
Congratulations! You just saved your first field using the WordPress Settings API. Now what if we want to have some different field types instead of just text? Let’s revisit our field callback and talk about that $arguments variable getting passed into our function.
Field Arguments
If we go into our field callback and var_dump( $arguments ) we will get an empty array. What gives? In our section callback we got a bunch of stuff about the section. Well, there is something different going on here. If you check out the documentation for add_settings_field there is a fifth argument that can be passed into the function. That variable directly correlates to the $arguments variable in our callback. So we are going to want to put our new stuff in there.
If we look at one of the default fields in a WordPress settings page we can see there are several areas that we can add to our field to get some default formatting. Here is a screenshot of the timezone field in the general settings page:

Using this field as a starting point let’s go over the data we want to pass into our field callback.
- The unique identifier
- The label for the field (Timezone in the example)
- What section it should go into
- The type of field (text, textarea, select, etc.)
- In the case that there are multiple options, we’ll want those
- Maybe a placeholder if the field type supports one
- Helper text (to the right of the field in the example)
- Supplemental text (underneath the field in the example)
- Maybe a default selection if there is one
From this list we can set up an associative array of fields and values that we can pass into our callback:
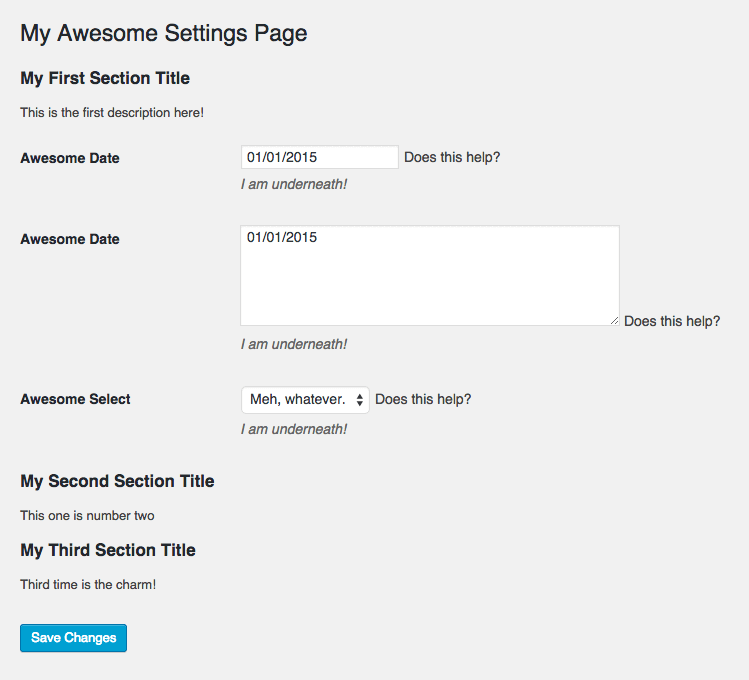
public function setup_fields() {
    $fields = array(
        array(
            'uid' => 'our_first_field',
            'label' => 'Awesome Date',
            'section' => 'our_first_section',
            'type' => 'text',
            'options' => false,
            'placeholder' => 'DD/MM/YYYY',
            'helper' => 'Does this help?',
            'supplemental' => 'I am underneath!',
            'default' => '01/01/2015'
        )
    );
    foreach( $fields as $field ){
        add_settings_field( $field['uid'], $field['label'], array( $this, 'field_callback' ), 'smashing_fields', $field['section'], $field );
        register_setting( 'smashing_fields', $field['uid'] );
    }
}
So the first thing we have here is a variable called $fields which will hold all of the fields we want to create. Inside that array we have another array that holds the specific data for each field. I have set up the data to exactly match our list above. Then, I loop through each field (we will add more shortly) in the array and add the field and register it. At the end of the add_settings_field function I am also adding the entire array of data for that specific field so we can do some stuff in the callback function. Let’s take a look at that callback function here:
public function field_callback( $arguments ) {
    $value = get_option( $arguments['uid'] ); // Get the current value, if there is one
    if( ! $value ) { // If no value exists
        $value = $arguments['default']; // Set to our default
    }

    // Check which type of field we want
    switch( $arguments['type'] ){
        case 'text': // If it is a text field
            printf( '<input name="%1$s" id="%1$s" type="%2$s" placeholder="%3$s" value="%4$s" />', $arguments['uid'], $arguments['type'], $arguments['placeholder'], $value );
            break;
    }

    // If there is help text
    if( $helper = $arguments['helper'] ){
        printf( '<span class="helper"> %s</span>', $helper ); // Show it
    }

    // If there is supplemental text
    if( $supplimental = $arguments['supplemental'] ){
        printf( '<p class="description">%s</p>', $supplimental ); // Show it
    }
}
In the example above, we are doing several things. We are setting the default values for fields if they are empty and adding the helper and supplemental text. The most important part in our code, though, is the switch statement. In this statement we are going to outline how our arguments will be handled based on the field type we want.
For example, if we have a text field, we have no need to have multiple options. However, a <select> dropdown must have options to work properly. Since we have text types already set up, let’s run this code and see what we get.

When you load your plugin settings page you should see the top field in this image. The bottom is what you will see if you remove the content from the field (i.e. the placeholder). If I were to remove the helper or supplimental arguments from our fields array, they should disappear on the settings page. We can also change the section argument and move around the placement of the field in the sections.
OK, so we have text fields; how about some more complex field types? Let’s take another look at our switch statement and add the option for text areas and single selects:
switch( $arguments['type'] ){
    case 'text': // If it is a text field
        printf( '<input name="%1$s" id="%1$s" type="%2$s" placeholder="%3$s" value="%4$s" />', $arguments['uid'], $arguments['type'], $arguments['placeholder'], $value );
        break;
    case 'textarea': // If it is a textarea
        printf( '<textarea name="%1$s" id="%1$s" placeholder="%2$s" rows="5" cols="50">%3$s</textarea>', $arguments['uid'], $arguments['placeholder'], $value );
        break;
    case 'select': // If it is a select dropdown
        if( ! empty ( $arguments['options'] ) && is_array( $arguments['options'] ) ){
            $options_markup = ’;
            foreach( $arguments['options'] as $key => $label ){
                $options_markup .= sprintf( '<option value="%s" %s>%s</option>', $key, selected( $value, $key, false ), $label );
            }
            printf( '<select name="%1$s" id="%1$s">%2$s</select>', $arguments['uid'], $options_markup );
        }
        break;
}
In the code above you will notice several differences between each of the field types. Although text areas are functionally similar to regular text fields, they require different markup. Select dropdowns are a whole other animal because of the options. We need to loop through the options and set values, selected states, and labels. So our markup is drastically different.
Now that we have updated our callback function, let’s see how the field data has changed:
$fields = array(
    array(
        'uid' => 'our_first_field',
        'label' => 'Awesome Date',
        'section' => 'our_first_section',
        'type' => 'text',
        'options' => false,
        'placeholder' => 'DD/MM/YYYY',
        'helper' => 'Does this help?',
        'supplemental' => 'I am underneath!',
        'default' => '01/01/2015'
    ),
    array(
        'uid' => 'our_second_field',
        'label' => 'Awesome Date',
        'section' => 'our_first_section',
        'type' => 'textarea',
        'options' => false,
        'placeholder' => 'DD/MM/YYYY',
        'helper' => 'Does this help?',
        'supplemental' => 'I am underneath!',
        'default' => '01/01/2015'
    ),
    array(
        'uid' => 'our_third_field',
        'label' => 'Awesome Select',
        'section' => 'our_first_section',
        'type' => 'select',
        'options' => array(
            'yes' => 'Yeppers',
            'no' => 'No way dude!',
            'maybe' => 'Meh, whatever.'
        ),
        'placeholder' => 'Text goes here',
        'helper' => 'Does this help?',
        'supplemental' => 'I am underneath!',
        'default' => 'maybe'
    )
);
Here are three fields, each one using a different field type in our plugin. The first one we’ve already gone over. The second is our new textarea field. We can pass the same parameters with the array (with the exception of the UID), but a simple change to our type and we will get a textarea instead. The last field in this array is the select dropdown. The main update here is the addition of the options array. We add a simple associative array with the array key as the HTML option value, and the label. Using this array, here is what our fields look like:
Almost done!
We now have a functioning plugin settings page. We’ve set up the sections for the page, the options, all of the callbacks and registered the fields. The only thing left is getting our setting values elsewhere. Believe it or not, we’ve already done this. At the top of our field callback you can see we are checking for the database value:
$value = get_option( $arguments['uid'] );We can use the same code in our plugin (or theme) and simply pass the uid into the function. So if I wanted to get the value of our_first_field I would simply write:
get_option('our_first_field')Hey presto! We have our awesome plugin and our awesome settings! Obviously we’ve only set up a few field types but I have gone through and added more in the code repository for this approach (specifically text fields, passwords, numbers, textareas, select dropdowns, multiselects, radio buttons and checkboxes).
Approach 2: Setting Up A Custom Form And Handler
In the past this approach was the only way to add settings pages. Before WordPress 2.7 plugin authors had to create their own custom forms and handlers. This obviously led to a lot of bugs and inconsistencies between plugins. While this approach is somewhat deprecated, it is still a viable option in some cases.
Pros
- You can submit the form to custom and remote handlers
- You can bypass some of the built-in Settings API restrictions
Cons
- Compatibility must be maintained by the developer
- Must sanitize and validate manually
When should you use this approach?
Use this approach when you absolutely must have a custom handler or a highly custom interface. You can probably get away with Approach 1 in most cases, but you have more flexibility with validation and handling using this method.
Getting Started
Before we get into the details we need to come up with a scenario where we would use a custom handler. For simplicity’s sake, let’s make a form that will verify a username and an email address. We could pull the data from a database or even a remote server. In this case I will set up an array with valid usernames and email addresses for us to check against. We will then store the field values the user entered and store them in the database.
Creating the Form
Like I mentioned before, we will follow the same steps that we did in “Creating Our Plugin And Settings Page”. For this approach we will set up our fields using static HTML markup. We will add this code to the callback from the plugin_settings_page_content function like this:
public function plugin_settings_page_content() {
    ?>
    <div class="wrap">
        <h2>My Awesome Settings Page</h2>
        <form method="POST">
            <table class="form-table">
                <tbody>
                    <tr>
                        <th><label for="username">Username</label></th>
                        <td><input name="username" id="username" type="text" value="" class="regular-text" /></td>
                    </tr>
                    <tr>
                        <th><label for="email">Email Address</label></th>
                        <td><input name="email" id="email" type="text" value="" class="regular-text" /></td>
                    </tr>
                </tbody>
            </table>
            <p class="submit">
                <input type="submit" name="submit" id="submit" class="button button-primary" value="Check My Info!">
            </p>
        </form>
    </div> <?php
}
You can see above that we are just adding some static HTML for our fields. We are duplicating the markup from the core WordPress settings pages. We are also omitting the form action so that it will submit the form to the current page as opposed to the default options.php handler.
Before we write our custom handler, let’s put in some quick security features. The first thing we should do is put a nonce in our form. Nonces will protect against cross-site request forgery attempts, which is similar to user spoofing or replay attacks. Let’s put the nonce in our HTML:
<form method="POST">
    <?php wp_nonce_field( 'awesome_update', 'awesome_form' ); ?>
    <table class="form-table">
The wp_nonce_field will add a couple of hidden fields to our form; the nonce and the referrer. We will come back to the nonce when we go through the handler code.
Next we need to add a field to detect when the form has been updated. We can do this by simply adding a hidden field at the top of our form:
<form method="POST">
    <input type="hidden" name="updated" value="true" />
    <?php wp_nonce_field( 'awesome_update', 'awesome_form' ); ?>
    <table class="form-table">
Now we can put a snippet of code at the top of our page to detect when our form is submitted and send us to our custom handler:
public function plugin_settings_page_content() {
    if( $_POST['updated'] === 'true' ){
        $this->handle_form();
    } ?>
    <div class="wrap">
        <h2>My Awesome Settings Page</h2>
Here we are simply checking if the hidden updated field has been submitted and, if it has, we call a method in our plugin called handle_form. This is where we can start writing our custom handler.
Creating the handler
There are a couple of things we need to check in the handler before we actually manage the form data. We first need to check if our nonce exists and is valid:
public function handle_form() {
    if(
        ! isset( $_POST['awesome_form'] ) ||
        ! wp_verify_nonce( $_POST['awesome_form'], 'awesome_update' )
    ){ ?>
        <div class="error">
           <p>Sorry, your nonce was not correct. Please try again.</p>
        </div> <?php
        exit;
    } else {
        // Handle our form data
    }
}
The code above verifies that the nonce is correct. If it is invalid we give the user a message about why the form wasn’t updated. If the nonce exists and is correct, we can handle our form. Let’s write the code for our form handler now (this code will replace the comment in the snippet above):
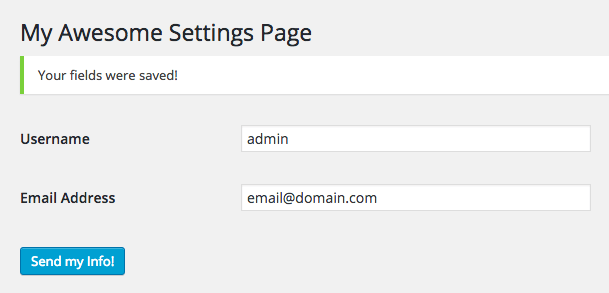
$valid_usernames = array( 'admin', 'matthew' );
$valid_emails = array( 'email@domain.com', 'anotheremail@domain.com' );

$username = sanitize_text_field( $_POST['username'] );
$email = sanitize_email( $_POST['email'] );

if( in_array( $username, $valid_usernames ) && in_array( $email, $valid_emails ) ){
    update_option( 'awesome_username', $username );
    update_option( 'awesome_email', $email );?>
    <div class="updated">
        <p>Your fields were saved!</p>
    </div> <?php
} else { ?>
    <div class="error">
        <p>Your username or email were invalid.</p>
    </div> <?php
}
Let’s go through the code in this section. The first couple of lines are the arrays of valid usernames/emails that we will be checking against. These array values could be populated from anywhere.
The next two lines are the values that our user has entered into the form. We are using the built-in sanitization functions that WordPress gives us. This step is important to avoid several vulnerabilities with web forms. Next, we are checking if the values supplied by the users are in our array of acceptable values. If they are, update the form options in the database. This step could also be replaced with a custom storage mechanism. We are also giving the user a message that their fields were saved. If the user’s input is invalid, we tell them so.
The last thing we need to do is show the stored fields in the form after they have been input. We will do that in the same way we would retrieve these fields elsewhere in the plugin: with the get_option function. Here are the fields after we add the correct code:
<tr>
    <th><label for="username">Username</label></th>
    <td><input name="username" id="username" type="text" value="<?php echo get_option('awesome_username'); ?>" class="regular-text" /></td>
</tr>
<tr>
    <th><label for="email">Email Address</label></th>
    <td><input name="email" id="email" type="text" value="<?php echo get_option('awesome_email'); ?>" class="regular-text" /></td>
</tr>
Now we are ready to test our form. Try putting in the username admin and the email address email@domain.com. You should get the following on your form:
If you try setting either field to an invalid value, you should get an error message and the fields shouldn’t update because of our custom handler.
That’s it for our second approach! You’ve now set up a custom form and handler to manage your plugin fields. The completed code for this approach can be found in this article’s repository. Now, let’s move on to our final approach.
Approach 3: Integrating ACF (Advanced Custom Fields) Into Your Plugin
If you haven’t yet used ACF by Elliot Condon, let me introduce you. ACF is a wonderful field manager for WordPress. One of the best things about it is the field configuration interface. It makes it quite easy to spin up fields for a number of different pages within WordPress (such as posts, pages, users, taxonomies, even their own integrated options pages). You may think “I can’t integrate someone else’s plugin into my own – that’s shady!” but Mr. Condon understands the plight of his fellow developers and has planned for this in his plugin. You can view his documentation on this topic, but I will be restating some of it here. Let’s go over the rules.
- First, if you are distributing a free plugin, you must use the free version of ACF. This is so that people can’t get hold of the PRO version from your free plugin – that would not be cool. You can use the PRO version in premium plugins and themes no problem, just make sure you buy the developer license.
- Second, do not modify ACF’s copyright info. Give the man some credit!
- Lastly, don’t distribute the license key with your plugin.
Now, the pros and cons of this approach:
Pros
- Very easy to integrate into themes and plugins
- You can take advantage of the advanced fields that are part of ACF
- Code and security updates are managed by the ACF team
- ACF has great addons and support if you get stuck
- Configuring your fields is super simple because of the field configuration UI
Cons
- Limited access to markup
- Creates a dependency for your plugin or theme
- To keep ACF current you must keep it updated in your plugin/theme files (more info below)
When should you use this approach?
When you want to build an advanced settings interface very quickly and you don’t need to customize the look and feel.
Getting Started
For this approach I will show you how to set up the options page for the free version of ACF. To view a guide on setting up the PRO version check out the ACF documentation. To get started we will be adding ACF to our plugin directory. First, download the latest version of ACF and unzip its contents. In your plugin directory create a vendor directory and add ACF to it. Your files should look like this:

Again, we will follow the steps we did in “Creating Our Plugin And Settings Page”. Before we get into that, though, we should include ACF in our plugin.
Include ACF In Your Plugin
It’s actually pretty easy to include ACF in your plugin – there are only three steps. First we have to include the main ACF file with PHP. Add the following code to the bottom of our constructor function:
include_once( plugin_dir_path( __FILE__ ) . 'vendor/advanced-custom-fields/acf.php' );If you refresh the admin you should see a new menu item titled Custom Fields. Before we go into that page and start setting up our fields we need to update a couple of paths in ACF. We need to tell ACF to look for its front-end assets and file includes in our plugin directory instead of its normal place. Add these two hooks to your constructor:
add_filter( 'acf/settings/path', array( $this, 'update_acf_settings_path' ) );
add_filter( 'acf/settings/dir', array( $this, 'update_acf_settings_dir' ) );
And the callbacks for those hooks:
public function update_acf_settings_path( $path ) {
    $path = plugin_dir_path( __FILE__ ) . 'vendor/advanced-custom-fields/';
    return $path;
}

public function update_acf_settings_dir( $dir ) {
    $dir = plugin_dir_url( __FILE__ ) . 'vendor/advanced-custom-fields/';
    return $dir;
}
The first callback updates the include paths for the PHP files within the ACF plugin. The second updates the URIs for the ACF assets. Now we can set up our fields.
Configuring Your Fields
Now comes the fun part: the ACF field configuration UI. Add a title and any fields you’d like in your form. There is a great walkthrough of what everything on this page does in the ACF documentation. Here’s how I have set up mine:
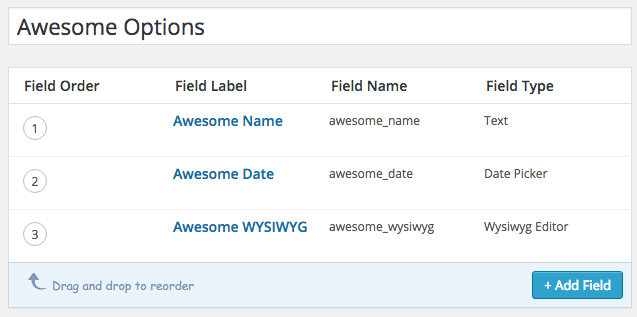
Once you are ready hit the Publish button on the right and your fields will be saved. Now we have to get the fields we set up into our plugin. Right now they only exist in the database. On the left-hand navigation, click the Tools item. On the new page, select the field group we just created and hit Generate Export Code. This will create a chunk of PHP code that we can now include in our plugin.
To add the options, we need to add a method call to our constructor. Add this line to the end of your constructor after our ACF include:
$this->setup_options();Then we can create the method that will wrap our options:
public function setup_options() {
    if( function_exists( 'register_field_group' ) ) {
        register_field_group(array (
            'id' => 'acf_awesome-options',
            'title' => 'Awesome Options',
            'fields' => array (
                array (
                    'key' => 'field_562dc35316a0f',
                    'label' => 'Awesome Name',
                    'name' => 'awesome_name',
                    'type' => 'text',
                    'default_value' => ’,
                    'placeholder' => ’,
                    'prepend' => ’,
                    'append' => ’,
                    'formatting' => 'html',
                    'maxlength' => ’,
                ),
                array (
                    'key' => 'field_562dc9affedd6',
                    'label' => 'Awesome Date',
                    'name' => 'awesome_date',
                    'type' => 'date_picker',
                    'date_format' => 'yymmdd',
                    'display_format' => 'dd/mm/yy',
                    'first_day' => 1,
                ),
                array (
                    'key' => 'field_562dc9bffedd7',
                    'label' => 'Awesome WYSIWYG',
                    'name' => 'awesome_wysiwyg',
                    'type' => 'wysiwyg',
                    'default_value' => ’,
                    'toolbar' => 'full',
                    'media_upload' => 'yes',
                ),
            ),
            'location' => array (
                array (
                    array (
                        'param' => 'options_page',
                        'operator' => '==',
                        'value' => 'smashing_fields',
                    ),
                ),
            ),
            'menu_order' => 0,
            'position' => 'normal',
            'style' => 'default',
            'label_placement' => 'top',
            'instruction_placement' => 'label',
            'hide_on_screen' => ’,
            'active' => 1,
            'description' => ’,
        ));
    }
}
Now that we have our fields ready to go, we can add them to the settings page.
Modifying The Settings Page Code
To add the fields we just created to the page we will need to update our plugin_settings_page_content method.
Previously, we set up the form tag for our page. In this case we will let ACF do that part for us. Here is what our updated function should look like:
public function plugin_settings_page_content() {
    do_action('acf/input/admin_head'); // Add ACF admin head hooks
    do_action('acf/input/admin_enqueue_scripts'); // Add ACF scripts

    $options = array(
        'id' => 'acf-form',
        'post_id' => 'options',
        'new_post' => false,
        'field_groups' => array( 'acf_awesome-options' ),
        'return' => admin_url('admin.php?page=smashing_fields'),
        'submit_value' => 'Update',
    );
    acf_form( $options );
}
The first two lines of our function are adding the scripts and styles that we will need for the settings fields. After that we are configuring the options for our form. You may notice that the value in the field_groups argument matches the ID from our register_field_group function. To see the other configuration parameters take a look at the acf_form documentation. The last line in our function is actually going to render the form.
If you try to load the settings page now, you may see that the page is actually broken. This is because ACF needs to localize a few variables for JavaScript. To do this, we need to add another hook to our constructor:
add_action( 'admin_init', array( $this, 'add_acf_variables' ) );Now we need to set up the callback:
public function add_acf_variables() {
acf_form_head();
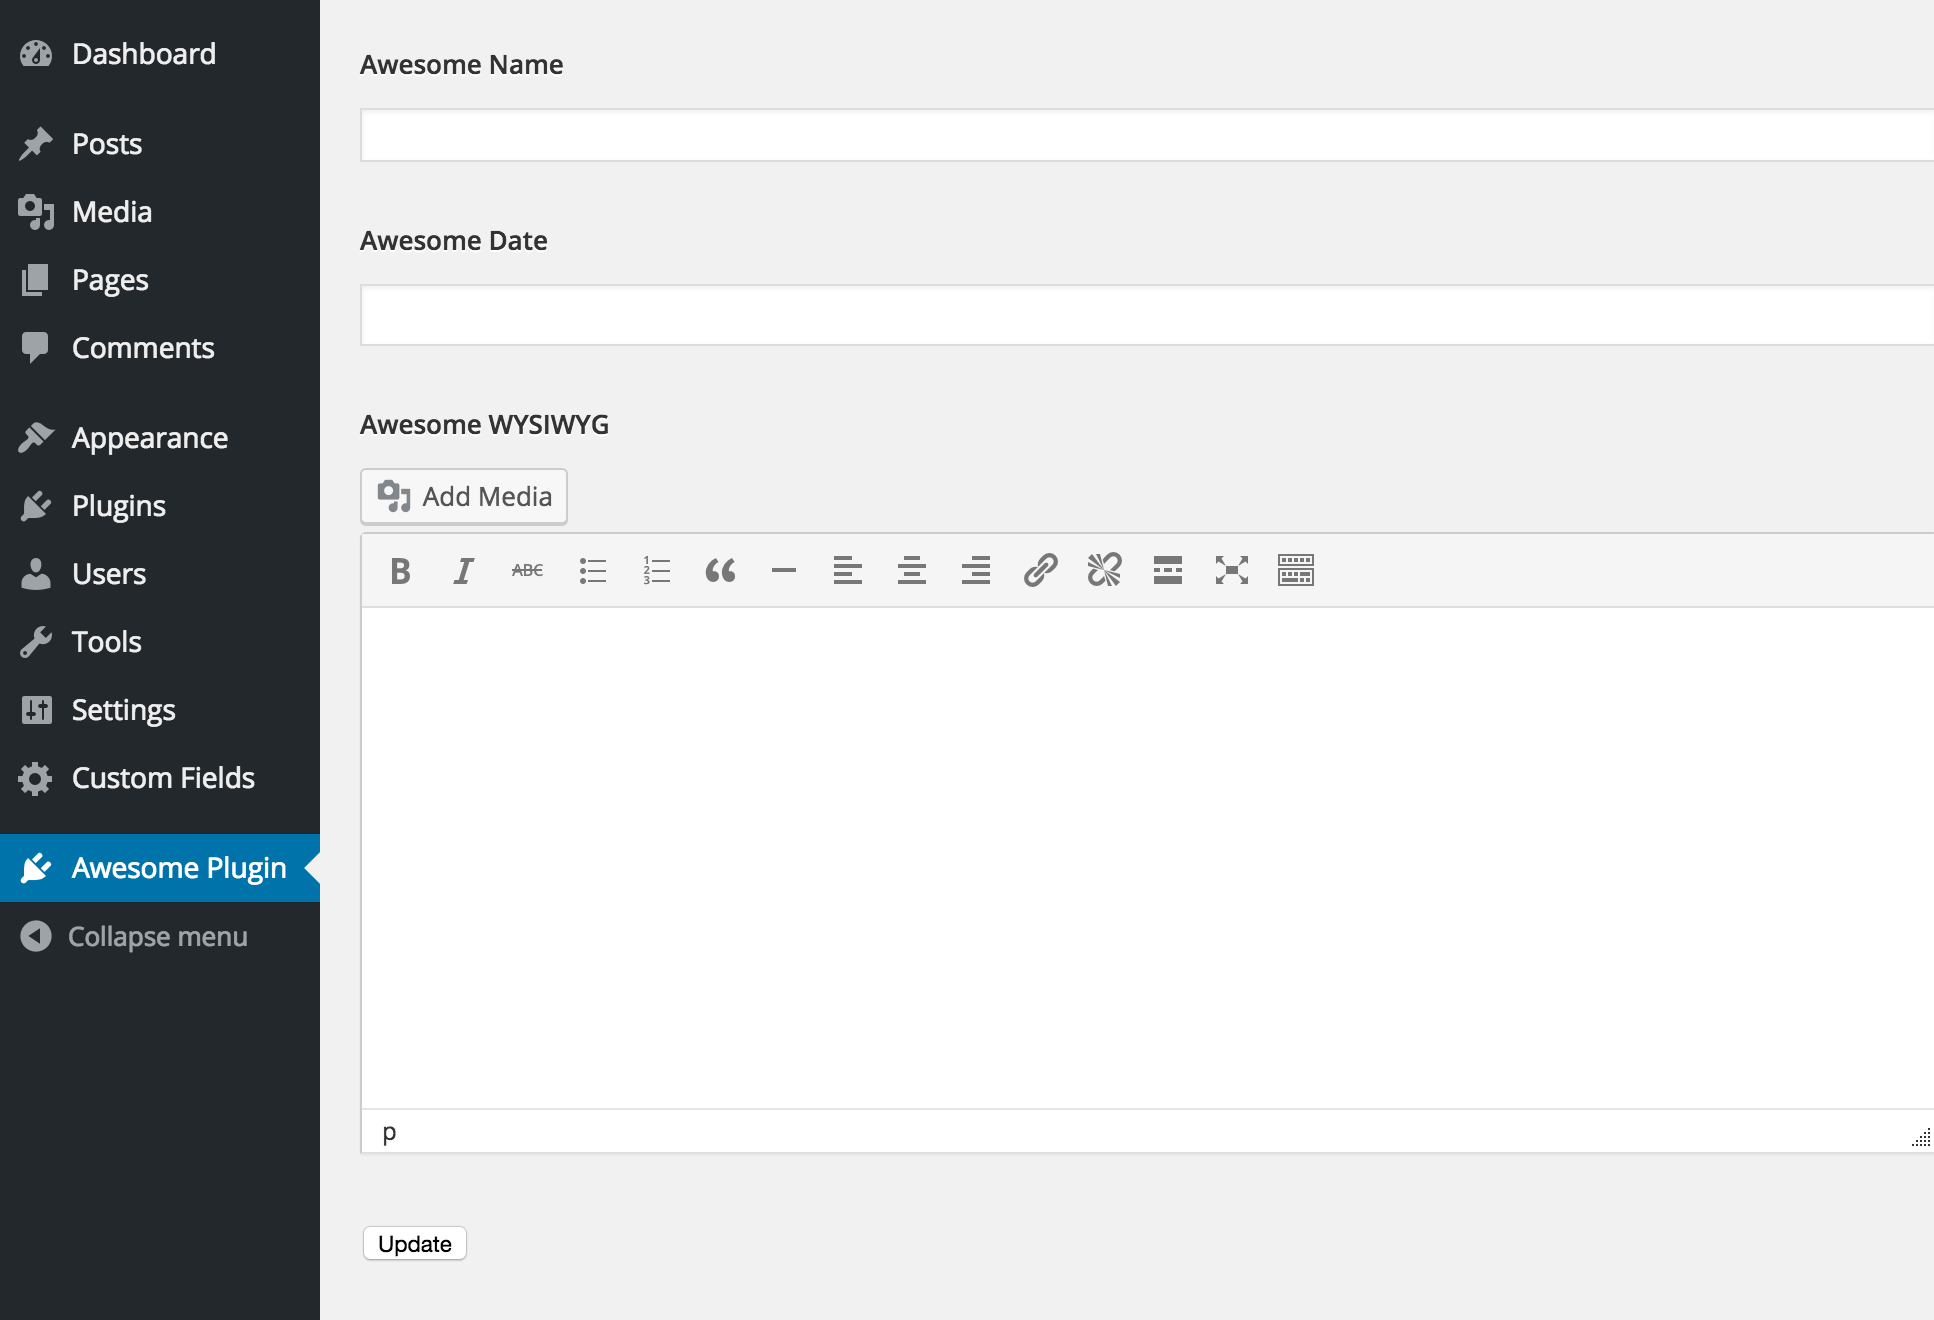
}You can try adding some content and saving and it should work just like our other two approaches. This is what our page should look like:
There are just a couple of clean-up items we need address:
You might want to hide the fact that you are using ACF for your plugin. If this is the case, you need to hide the Custom Fields menu item. You can do this by adding this snippet to your constructor function:
add_filter( 'acf/settings/show_admin', '__return_false' );We should remove the database version of our field group. Just go to the custom fields section and hit the trash button. This step is optional since it will only affect the environment where you built the plugin, but it could introduce issues if you are testing your plugin on the same environment.
Using ACF Fields Within Your Plugin
To get the ACF fields you created, you simply need use the default ACF get_field function. The first option should be the unique ID for the field and the second argument set to ‘option’. Here is how we would get the Awesome Date field:
get_field( 'awesome_date', 'option' )And that’s it. You have now set up a plugin with ACF settings! You can view the code for this approach in the repository.
Conclusion
So there you have it: three ways to make your plugins configurable. I would love to hear about the plugins you are able to create using these methods. Once again, I have set up a repository that houses the code for each of these approaches. Please feel free to fork them and customize them to fit your own needs.
As for my personal preferences for these approaches, I tend to lean towards Approach 1. I prefer to keep as few dependancies in my plugins as possible and you can customize the markup to theme the settings page for custom projects. For rapid prototypes, or projects where I need to set up very advanced fields I will use ACF – but it adds a level of complexity to managing plugin updates.
It is also worth mentioning the proposal for a Fields API by Scott Clark. While it is currently still a work in progress, the API would essentially allow plugin and theme developers the ability to use the same interface as the Customizer API to create settings fields on other areas of the admin panel.
ACF Alternatives
As pointed out in the comments below, and to give developers other options that are similar to the ACF approach you can check out some alternatives that may offer different features. If you have more please submit them in the comments below! Here they are in no particular order:


