A Better iOS Architecture: A Deep Look At The Model-View-Controller Pattern

Email Newsletter
Weekly tips on front-end & UX.
Trusted by 182,000+ folks.

 Custom Web Forms for Angular, React, & Vue. Your backend.

 Celebrating 10 million developers
If you’ve ever written an iOS app beyond a trivial “Hello world” app with just one screen and a few views, then you might have noticed that a lot of code seems to “naturally” go into view controllers. Because view controllers in iOS carry many responsibilities and are closely related to the app screens, a lot of code ends up being written in them because it’s just easier and faster that way. In the long term, though, all of this code piles up and becomes hard to read, modify, reuse and test. This happens so often that the joke is that MVC is short for “massive view controller.”
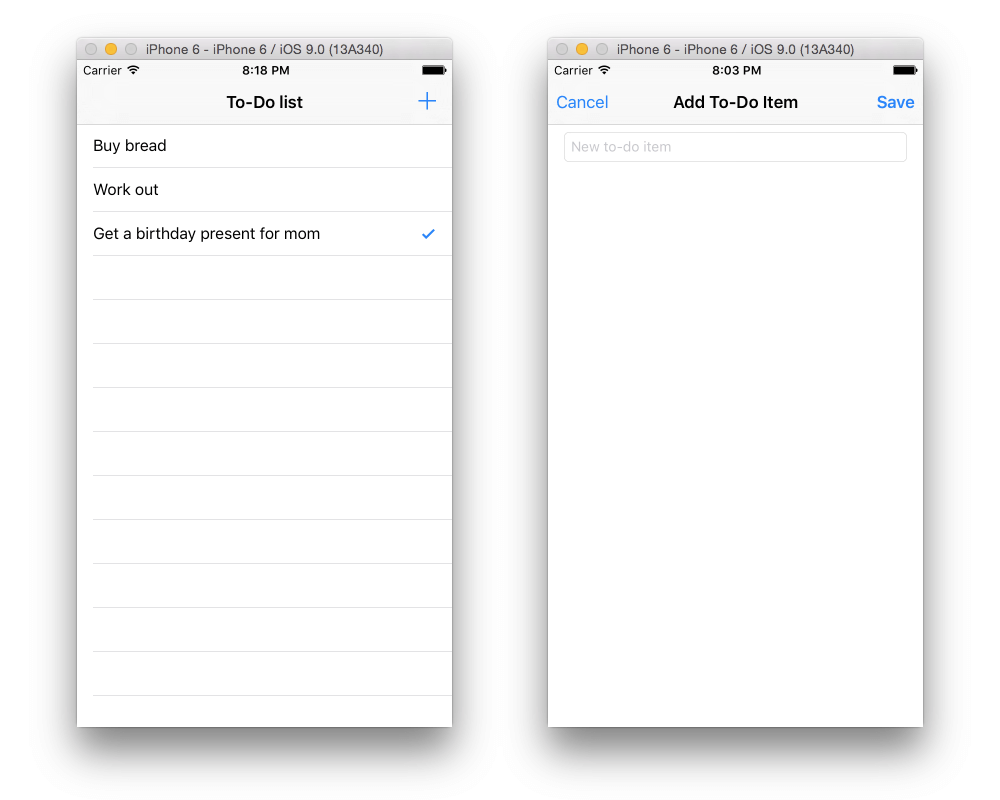
In this article, we’ll build a simple to-do list app that demonstrates how to correctly architect iOS apps. The app itself will contain only two screens, one with the list of to-do items and one to add new items to the list. Despite being a simple app, it lends itself very well to exposing the pitfalls of architecting iOS apps. I will show you the common mistakes I have seen many times and that I have done myself, as well as a better way to follow the model-view-controller (MVC) pattern and the reasoning behind it.
Further Reading on SmashingMag:
- Journey Through The JavaScript MVC Jungle
- Qualities Of Good Flux Implementations
- Client-Side Templating
Poor Implementations Of MVC pattern (By Apple Itself)
Let’s start by looking at an example of how a lot of code might appear to belong to a view controller. You will see this again and again in code written by developers who are starting to write iOS apps and don’t yet have a high-level view of what the architecture really is or know which approaches should immediately ring a bell for not being optimal.
Depending on where you’re coming from, you might not be familiar with this, but the UIView class in iOS has a tag property, to which you can assign an integer that can then be used for different purposes. UIView also has the viewWithTag(_:) method, which allows the caller to retrieve a subview with a specific tag.
This year’s WWDC had a session named “Cocoa Touch Best Practices.” The presenter had a few slides titled “Properties, not tags!,” advising against using UIView’s tag property and the viewWithTag(_:) method and explaining why this is a bad practice. (Apple forbids reproduction of WWDC material, so I won’t show those slides here, but you can find them in the deck for the presentation or watch the video of the session.)
When you are starting to learn iOS development, it might not be evident why this is so, but as you gain experience with the platform, the reasons become quite straightforward. The tag is just an integer, and as such it does not really say much about what we are trying to encode in it. For this reason, it has the following problems:
- It can cause collisions with other integers in the app that are used for different purposes, especially if the person on the team who uses the tag is not the person who created it in the first place.
- There are no compiler checks. We can assign any integer we want to a tag, but only a few of them have meaning in our app. If we assign an undefined integer to it, the compiler cannot catch our mistake.
- There are no runtime errors. Tags can cause crashes in an app, but the exception we will get probably won’t give us the real reason why the crash happened.
If you were using this approach before, you can now understand that this is indeed good advice and that you should not do this in your apps. It is ironic, though, that in the documentation for table views from the same Apple that gives us this advice, the sample code that sets the data in a cell actually uses the dreaded viewWithTag(_:) method (in listing 5-3). (I’ve excerpted it below in case it gets changed, after having been there for years.) That example has been there since the document was created and is the reason I myself used that method for a while. Granted, below that example is indeed another one that uses outlets. But that one, while better, is still, in my opinion, not the best way to implement this.
- (UITableViewCell *)tableView:(UITableView *)tableView
  cellForRowAtIndexPath:(NSIndexPath *)indexPath {
  UITableViewCell *cell = [tableView
    dequeueReusableCellWithIdentifier:@"MyIdentifier"];

  UILabel *label;

  label = (UILabel *)[cell viewWithTag:1];
  label.text = [NSString stringWithFormat:@"%d", indexPath.row];

  label = (UILabel *)[cell viewWithTag:2];
  label.text = [NSString stringWithFormat:@"%d", NUMBER_OF_ROWS -
    indexPath.row];

  return cell;
}
Unfortunately, developers who are coming to iOS for the first time will be exposed much more to Apple’s documentation than to that particular WWDC session video on best practices. The result is that these non-optimal implementations spread into many code bases, because the developers don’t know any better and think that this is the right way to solve the problem.
This example is not the only unfortunate case of misleading Apple documentation. For a while now, Apple has had a whole tutorial, titled “Start Developing iOS Apps,” that walks you through the various technologies and design patterns at the base of iOS development. The tutorial itself follows practices that are not really the best for MVC patterns. On the one hand, I understand that Apple does not want to overwhelm new developers with advanced concepts from the get go. On the other hand, I still don’t agree with it because this tutorial teaches new developers concepts that they will carry with them for a long time and across a lot of projects, doing a lot of avoidable damage.
This is not new. There was another tutorial with the same name, implemented in Objective-C, that is not available anymore. That tutorial also suffered from the same poor architectural decision that the newer one follows. Although that tutorial is not available anymore, in this article I will reimplement the app presented in it, with a more solid architecture, using Swift. It’s not important that the original is not available anymore; I will go over everything in this article so that you won’t need to refer to the old material.
I chose the app from the old tutorial for its simplicity, because the new one is more complex. Still, it will be enough to expose all of the important concepts I want to cover. After reading this article, as an exercise, you can go over the newer Apple tutorial yourself to check how you would implement it differently with what you’ve learned here. Re-architecting an existing app is a good exercise to consolidate your learning of the concepts.
Analyzing Problems With Common MVC Implementations
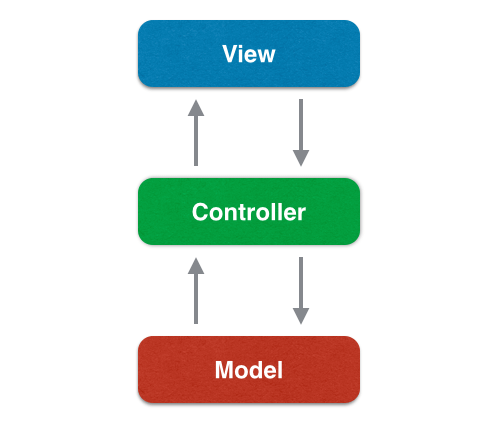
Let’s take a closer look at how the MVC pattern is usually implemented by many developers to understand where the problems are. First, let’s briefly review the MVC pattern as a refresher. The MVC pattern is made of three layers:
- The model encapsulates the data and the logic of the app. The classes in the model are concerned with the representation and storage of the data and the operations on it.
- The view layer is responsible for presenting and formatting the data for the user. It allows for interaction, enabling the user to manipulate and edit the data.
- The controller layer is responsible for mediating between the first two. Controllers connect views to the data and are also responsible for set-up, coordinating tasks and interpreting user input in an app-specific way.
The app we are going to implement is a simple to-do list app. It has two screens. The first displays a list of simple to-do items using a table view. The second screen is used for data input, allowing the user to add items to the list through a text field. The final product is very simple:
A common implementation of the MVC view controller would look like this. First, some model classes to represent the app data would be created. This app only has to-do items, so one class would be sufficient. The first mistake is usually to make this class a simple value class that contains just a few properties to contain the data (the name of the to-do item, its creation date and whether it’s been done or not) and no logic. This is usually how most or all of the model layer of an app is implemented.
The view side usually does not have that much code either. In a simple app like this one, it’s even possible to have no code at all on this side. We can simply use instances of the standard UITableViewCell class, with no customization.
At this point, our app is barely functional. We still need to implement a lot of logic to store the list of to-do items, add new ones, mark them as done, etc. Where does this code usually go? There is only one place left in the MVC pattern: controllers. Indeed, all of this is usually implemented in iOS custom view controllers. The implementation for the view controller for the first screen would probably do the following:
- Create and hold the data for the table view and, hence, the state of the app.
- Act as the table view data source, configuring and providing the table view cells. It probably would do so by directly accessing and changing the cell subviews (thus, it would know the internal logic of these cells), as we saw above in the case of Apple’s documentation for table views.
- Act as the table view delegate, handling selection of rows to complete the to-do items.
- Because it contains the state of the app, when the user adds a new to-do item, the view controller would handle insertion of a new element in the list.
- Finally, if we want to save the data to disk and load it when the user starts the app again, this would probably be handled by the view controller as well.
As you can see, the view controller does practically everything, covering the whole functionality of the app, while the model and view layers do almost nothing. You might think I’ve made up this example. Not so, unfortunately. Apple’s old tutorial did exactly this, and the new one still does. I have worked on many different projects, and I have seen this many times (and done it myself, too). Andy Matuschak recently gave a talk on this very topic. Chances are that the view controllers you write in your app do the same.
This app is not very big, so it might not seem like a big deal. As the app grows, though, the limits of this approach will become more evident. For starters, because the view controller acts as both delegate and data source, as we add normal features for a to-do list app, such as deleting items or sorting the list, that code will inevitably end in the view controller, because it has to be implemented in the other methods of the UITableViewDelegate and UITableViewDataSource protocols. Because the view controller contains the state of the app, too, when we want to persist such data on disk to have it back when we open the app in future, we will probably again add this code to the view controller. Now you are starting to see how fast this view controller is growing and how much it is doing.
Let’s also think about what normally happens when we add another view controller that also display lists of to-do items but perhaps arranged or filtered differently. For example, we could arrange to-do items into different lists, so we will need a screen that shows all of these lists in a table view. Because we are using view controllers as delegates and data sources for table views, this new view controller will need code similar to the code we’ve already implemented. But the code written in the first view controller will not be that easy to extract and reuse, because it is already entangled in a lot of the specific functionality of that class — functionality that makes the view controller class itself not really reusable for other screens. And let’s be honest, if you are already using a view controller as a delegate and data source for a table view, then you will probably know about all of these issues and just go on and do the same for the next view controller.
All of these issues relate to code duplication and coupling and don’t even touch on unit testing. View controllers in general are tricky to test because of their lifecycle in an iOS app. All of this code makes them even harder to test, because a lot of it relies on the internal state of the view controller and how it evolves over time. This state makes all of the code dependent on other code, making it hard to test in isolation. Moreover, getting a view controller to the internal state needed to run specific tests is not easy, and such a state is not easily inspectable either.
So, let’s revisit the tutorial and give this little app a better architecture. The complete source for this tutorial is available on GitHub, so that you can better follow it.
MVC Pattern Revisited
The key to understanding how to better architect an iOS app is to look at the boundaries between the three layers of the MVC pattern. The boundary between controllers and views we know already very well: That is where view controllers are placed. View controllers are controllers that skew more towards the view layer. As such, each represents one screen of the app (with the exception of containers); they have their own attached view that contains the whole user interface for that screen; they are a part of the responder chain; and they know how to interpret user input in an app-specific way. The fact that they already have so many duties should also tell us that we should not overload them more.
At the other boundary, between the model and controllers, we have model controllers. Apple’s definition of model controllers is slightly different from the one I am giving here, because it includes communication between model controllers and views. I personally consider model controllers to be separate from views. There is a variation of the MVC pattern, called model-view-viewmodel, in which view models fulfill this communication between the model and views. In my definition, model controllers are concerned with the model but are not a part of the model itself.
For example, a model object might be concerned with encoding and decoding itself when we want to save it on the disk or transmit it through the network, but it should not itself be concerned with these operations. A model controller should, for example, store and retrieve data from the disk, transmit data over the network, maintain the app’s state, interface with the device’s sensors and provide data to the view controllers when they need it. Another place where model controllers fit well is in taking out certain protocol implementations from view controllers, especially if these are quite common in our code bases. Good examples of this are the UITableViewDelegate and UITableViewDataSource protocols.
The more generic nature of these model controllers makes them good candidates to be generalized and later extracted to be reused in other projects and libraries — something you cannot usually do with view controllers.
To show the direction we will go in for the rest of the article, we should have a high-level overview of the architecture of the app. As I just explained in this revisitation of the MVC pattern, in this tutorial, we are going to spread responsibilities between different objects, each of which will specialize in a single task and only include code appropriate to its location in the MVC pattern. Here is a high-level view of the app’s architecture, with all of the classes we will implement, layered and colored to show their position in this new version of the MVC pattern I’ve just explained:

Creating The User Interface For The App
We’ll start by creating the user interface for the app. We don’t need to start here; we could just as well have started with the model of the app. Both ways are valid. Sometimes, depending on what you have available (designs or data and logic definitions), starting on one side or the other might make more sense.
We need two separate view controllers for the two screens of our app, one to display the to-do list and another for adding new items to the list. We’ll embed these two view controllers in the two navigation controllers, respectively, to provide each of them with a navigation bar at the top of the screen. This navigation bar, in turn, will contain the button to add a new to-do item in the first view controller and buttons to cancel or save the edits in the second. The view controllers will then be connected to each other by a modal presentation segue in the storyboard.

The process of laying out the interfaces for these view controllers is not a concern of this article, because we going deeper into the architecture instead; so, I won’t go into detail about it here. You can look at the screens of the app provided in the image above and recreate this interface easily in Xcode, and I’ll provide some general guidelines here.
All that this app requires are two view controllers, one of which is a table view controller with a plain cell prototype, and the second of which is a simple view controller with a text field in it.
These two view controller both need a custom class. The first one is named ToDoListTableViewController and is a subclass of UITableViewController, while the second is named AddToDoItemViewController and is a normal UIViewController subclass.
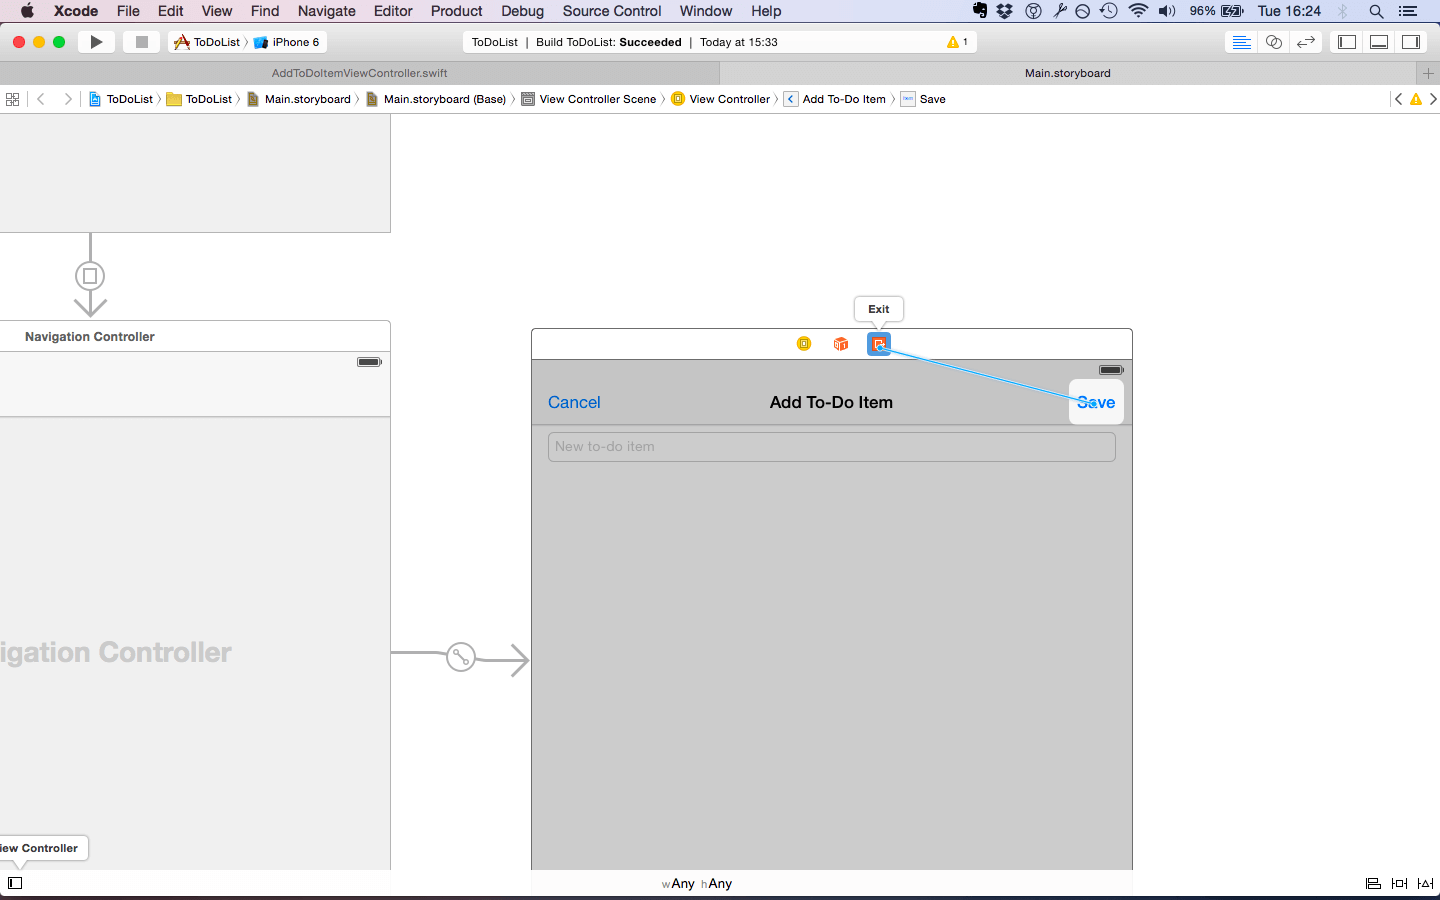
Taking the user back from the second screen (where they can add a new to-do item) to the first one (with the to-do list) can be implemented in different ways. Here, we are going to use segue unwinding, as in the original Apple tutorial. An alternative is to use a delegate protocol from the AddToDoItemViewController to the ToDoListTableViewController.
To enable segue unwinding, the ToDoListTableViewController needs to implement an action that takes a segue as a parameter.
class ToDoListTableViewController: UITableViewController {
  @IBAction func unwindToList(segue: UIStoryboardSegue) {

  }
}
Just adding this empty method to the view controller class makes it possible to connect both the cancel and save buttons of the AddToDoItemViewController to the “Exit” item at the top of its scene in the storyboard.
If you run the app at this point, the navigation will work, even though the action method we’ve created is still empty. All the system needs to know is that a view controller implements a certain action to make it possible to unwind a segue to that view controller. So, we don’t need to do any additional work.
The Model Of The App And Model Controllers
For the model of the app, we first need a model object for the to-do items. Each to-do item has a name, a creation date and a flag that tells us whether it’s been completed.
class ToDoItem {
  let name: String
  let creationDate: NSDate
  var completed: Bool

  init(name: String, completed: Bool, creationDate: NSDate) {
    self.name = name
    self.completed = completed
    self.creationDate = creationDate
  }
}
I could have just made this class a Swift struct, but we will need it to be a class (as we will see in a moment). This is the only model object we need in this app. This is where many people stop when creating model objects, including Apple. All that this object does at the moment is to represent the data, but we will expand this.
A to-do list is actually a collection of items and not just a single one. This list of items represents the internal state of our app at any given time. Model objects should not be concerned with this. They represent data, not the state of the app. View controllers, as I’ve said, should not be concerned with this either. A lot of logic is involved in keeping the state of an app updated. We don’t want this logic to end inside a single view controller or, worse, let it be scattered around different ones. The solution is to create a separate model controller that takes care of managing the app’s state.
Because the user can add new to-do items in our app, we need this functionality in such a model controller, too. I’ve named this controller StateController.
class StateController {
  private(set) var items: = [ToDoItem]()

  func addItem(item: ToDoItem) {
    items.append(item)
  }
}
Notice that the array of items is read-only from the outside of this class and that there is a specific method for adding a new item to the list instead. This is because the state controller presents the list to other objects as an array of items, but it might not necessarily store it internally as such (although, in this example, it does). For this reason, we don’t want the classes that will reference this controller, which will mostly be view controllers, to do the insertion in the array by themselves. This would mean that the logic for adding a new to-do item would end in all such classes, instead of being in the state controller alone, increasing coupling.
Now, to make this to-do app more real, we want our to-do list to be persistent and not to vanish when the app is closed. This means that we’ll need to save it on disk when the app closes. This already brings up some interesting questions on where to place code in order to encode, decode, save and load the list.
To save our data, we are going to use a straightforward technique in iOS called keyed archiving. Keyed archiving allows us to convert any object into a structured archive that can be saved on disk or transmitted over the network. This might not the best way to save data in a real app, but it’s quick and easy to implement for this example and allows us to see the responsibilities of each layer more clearly. You can then use these concepts in any other technology you use for storing data in your app; for example, with Core Data.
Now, let’s implement it in our app and see where all of this code goes. Because the model layer represents and interprets data, the code for converting the object to and from different types usually belongs to model objects. This means that the code to archive and unarchive an instance of our ToDoItem class will go in the class itself. A class that needs to be encoded must conform to the NSCoding protocol. NSCoding is a class protocol, which is why I made ToDoItem a class and not a struct. NSCoding has two requirements: an initializer that takes a coder, and the encodeWithCoder(_:) method that encodes the object. Implementing them is straightforward:
class ToDoItem: NSObject, NSCoding {
  let name: String
  let creationDate: NSDate
  var completed: Bool

  init(name: String, completed: Bool, creationDate: NSDate) {
    self.name = name
    self.completed = completed
    self.creationDate = creationDate
  }

  required init?(coder aDecoder: NSCoder) {
    // Taking the values to initialize properties from the
    // NSCoder instance
    name = aDecoder.decodeObjectForKey(Keys.Name.rawValue)
      as! String
    completed = aDecoder.decodeObjectForKey(Keys.Completed.
      rawValue) as! Bool
    creationDate = aDecoder.decodeObjectForKey(Keys.CreationDate.
      rawValue) as! NSDate
  }

  func encodeWithCoder(aCoder: NSCoder) {
    // Encoding of properties through NSCoder
    aCoder.encodeObject(name, forKey: Keys.Name.rawValue)
    aCoder.encodeObject(completed, forKey: Keys.Completed.
      rawValue)
    aCoder.encodeObject(creationDate, forKey: Keys.CreationDate.
      rawValue)
  }

  enum Keys: String {
    // These are the names of the properties for encoding and
    // decoding. We keep them in an enum to better organize
    // them and avoid typos.
    case Name = "name"
    case Completed = "completed"
    case CreationDate = "creationDate"
  }
}
While archiving belongs to the model, the code to save or read our to-do list does not. A model object represents data and should not be concerned with the way such data is then stored or transmitted. This code belongs instead to a model controller, so we will place it in our StateController. Saving to disk is accomplished through the archiveRootObject(:toFile:) method of NSKeyedArchiver, whereas reading it back is done through the unarchiveObjectWithFile(:) method of NSKeyedUnarchiver.
class StateController {
  // The path to the item's file in the documents directory
  static let itemsFilePath = NSSearchPathForDirectoriesInDomains(
    .DocumentDirectory, .UserDomainMask, true).first + "/items.txt"

  private(set) var items: [ToDoItem] = {
    // If a list has been saved, we read it from the file,
    // otherwise we return an empty array.
    if let items = NSKeyedUnarchiver.unarchiveObjectWithFile(
      itemsFilePath) as? [ToDoItem] {
      return items
    } else {
      return [ToDoItem]()
    }
  }()

  func addItem(item: ToDoItem) {
    items.append(item)
  }

  func save() {
    NSKeyedArchiver.archiveRootObject(self.items,
      toFile: StateController.itemsFilePath)
  }
}
I’ve put the loading of the list from disk in the initializer for the items property because I think that makes it more concise. You could put it in an initializer, too. The saving needs to be in a separate method, so that we can invoke it from the outside (we will see where in a moment). You could put it in a property observer, saving the data to disk every time the to-do list changes, but that might lead to too many save operations, which would slow down the app.
As a final touch, the ToDoListTableViewController needs a reference to an instance of StateController. Many developers make a view controller create its own data; we could just create such an instance of the state controller in the view controller, too. But, again, because this is the state of the whole app, a single view controller should not be responsible for it. It would be better to instantiate it in the app delegate and then pass it to the initial view controller of the app (which, in our case, is the ToDoListTableViewController). In this way, we can also save the list to disk when the app closes, removing another responsibility from the view controller.
class AppDelegate: UIResponder, UIApplicationDelegate {
  var window: UIWindow?
  let stateController = StateController()

  func application(application: UIApplication,
    didFinishLaunchingWithOptions launchOptions: [NSObject:
    AnyObject]?) -> Bool {
    // We retrieve the first view controller from the navigation
    // controller and pass to it the instance of StateController.
    if let navigationController = window?.rootViewController as?
      UINavigationController, let toDoListTableViewController =
      navigationController.viewControllers.first as?
      ToDoListTableViewController {
        toDoListTableViewController.stateController =
          stateController
    }
    return true
  }

  func applicationWillTerminate(application: UIApplication) {
    stateController.save()
  }

  func applicationWillResignActive(application: UIApplication) {
    stateController.save()
  }
}
Let me restate that how we’ve saved the data in this example is not important, but I wanted to show better places to put the code related to the model of the app. These rules apply in any case, regardless of the technology you use for storage. Putting all of this code in a view controller, as many do, would have been easy. But that would have quickly bloated the view controller with a lot of code very early on. In our example, we haven’t added any code to our view controllers yet.
Implementing Table View Protocols In Specific Classes
Now that we have a working model of the app and a way to store the items of our to-do list when the app closes, let’s work on bringing the to-do list on screen, populating the table view. Table views in iOS are configured through two protocols, UITableViewDataSource, which takes care of providing the data to the table view (telling the table view how many rows and sections there are, providing the configured cells to display, etc.), and UITableViewDelegate, which takes care of organizing the cells of the table view (editing and reordering rows, managing selections, etc.).
This is where another architectural problem of iOS apps arises. The table view controller is often set as both the data source and the delegate of the table view. This, again, comes from Apple’s examples in its documentation. This is even reflected in the UITableViewController class provided by Apple. UITableViewController simplifies the use of table views by doing all of the usual tasks you have to do when setting up a table view. One of these usual tasks is to set it as both the delegate and data source for its table view.
If you check the two table view protocols, each of them contains a lot of methods. Almost all of them are optional, but when implementing more complex interfaces, you’ll often need many of them. When the view controller acts as both the delegate and the data source of a table view, all of these methods will end in the view controller itself. You might not see this at the beginning, because the minimum requirement for a table view is to implement the two required methods of UITableViewDataSource. Two methods don’t seem like much after all, but then, as you implement more methods of the two protocols, all of those methods will have to be the view controller, bloating it further. A better architectural choice would be to create separate objects for each protocol, to keep this code separate and reusable, even across apps.
Let’s start from the data source, which is the only object of the two required to get the table view up and running. The data source takes care of providing the data to the table view. This means that all it needs to know about is the data itself. We can create a class for it that gets initialized with the data to provide to the table view.
class TableViewDataSource: NSObject {
  let stateController: StateController

  init(tableView: UITableView, stateController: StateController) {
    self.stateController = stateController
    super.init()
    tableView.dataSource = self
  }
}
Notice that I passed not only the pure data to the data source, but a reference to the whole state controller. This is because passing only an array of items would work when creating the class but not when the list changes; Swift arrays are value instances, which means that they get copied. Changing the to-do list would not change the array contained in the table view and would require us to update such an array every time the list changes. If we keep a reference to the state controller, the data source will always get an updated copy of the list by itself. If you want to make this data source more generic and use it in different classes with different state controllers, you can extract the requirements into a little protocol that the passed object would have to implement.
As I’ve said, two methods are required in the UITableViewDataSource protocol: tableView(:numberOfRowsInSection:), which provides the table view with the number of rows to display in each section (the default number of sections is 1), and tableView(:cellForRowAtIndexPath:), which provides the table view with an already configured cell for the requested row. The first of the two methods is straightforward to implement, because we just need to return the count of the items:
extension TableViewDataSource: UITableViewDataSource {
  func tableView(tableView: UITableView, numberOfRowsInSection
    section: Int) -> Int {
    return stateController.items.count
  }
}
The second method, though, is another area where the MVC pattern is not really respected in practice and needs some more discussion.
Very often, we will configure a cell by accessing the text property of its textLabel. This seems very convenient and straightforward, but it violates the principle of separation of concerns by coupling the data source to the internal implementation of the cell. What would happen if we changed the standard UITableViewCell with a custom one that does not have a textLabel anymore and display the to-do item’s name in some other way? The answer is simple: The code would break and would need to be rewritten.
We are using a standard UITableViewCell in this example, but the same problem happens with custom table view cells. What you’ll usually see is that the views inside a custom cell will get exposed through outlets, and the data source will configure the cell by accessing these outlets directly. This is the same approach as above, where the data source knows too much about the internal implementation of the cell. You can see an example of this again in Apple’s documentation on table views (see the listing 5.4). Admittedly, this is already better than the previous example, in which Apple uses viewWithTag(_:), but still not the best.
- (UITableViewCell *)tableView:(UITableView *)tableView
  cellForRowAtIndexPath:(NSIndexPath *)indexPath {
  MyTableViewCell *cell = [tableView
    dequeueReusableCellWithIdentifier:@"MyIdentifier"];

  cell.firstLabel.text = [NSString stringWithFormat:@"%d",
    indexPath.row];
  cell.secondLabel.text = [NSString stringWithFormat:@"%d",
    NUMBER_OF_ROWS - indexPath.row];

  return cell;
}
A better approach would be to have a separate class for the table view cells that keeps the code to display the data hidden from the outside and instead exposes properties that accept simple data types.
class ToDoItemCell: UITableViewCell {
  static let identifier = "ToDoItemCell"

  var name: String? {
    didSet {
      textLabel?.text = name
    }
  }

  var completed: Bool = false {
    didSet {
      if (completed) {
        accessoryType = UITableViewCellAccessoryType.
          Checkmark
      } else {
        accessoryType = UITableViewCellAccessoryType.None;
      }
    }
  }
}
I also added the implementation for the completed property, which sets the accessory type of the cell. This is another thing that usually ends up in the data source. In this way, if we ever change the way a cell displays a completed item, we won’t need to change any other code in our app. The data source will simply configure the cell using these custom properties, leaving the internal implementation to the cell itself. Now we can implement the other required method of the UITableViewDataSource protocol.
extension TableViewDataSource: UITableViewDataSource {

  func tableView(tableView: UITableView, numberOfRowsInSection
    section: Int) -> Int {
    return stateController.items.count
  }

  func tableView(tableView: UITableView, cellForRowAtIndexPath
    indexPath: NSIndexPath) -> UITableViewCell {
    // We retrieve the item from the array, deque a cell
    // for it and configure it, before returning it to
    // the table view.
    let toDoItem = stateController.items[indexPath.row]
    let cell = tableView.dequeueReusableCellWithIdentifier(
      ToDoItemCell.identifier, forIndexPath: indexPath) as!
      ToDoItemCell
    cell.name = toDoItem.name
    cell.completed = toDoItem.completed
    return cell
  }

}
We can now create a separate class for the table view delegate as well. We need this one to change the completion of a to-do item on screen when the user taps on it in the table view.
class TableViewDelegate: NSObject {
  let stateController: StateController

  init(tableView: UITableView, stateController: StateController) {
    self.stateController = stateController
    super.init()
    tableView.delegate = self
  }
}

extension TableViewDelegate: UITableViewDelegate {

  func tableView(tableView: UITableView, didSelectRowAtIndexPath
    indexPath: NSIndexPath) {
    // When a cell is selected, we remove its highlight,
    // retrieve the corresponding to-do item and change
    // its completion.
    tableView.deselectRowAtIndexPath(indexPath, animated: false)
    let tappedItem = stateController.items[indexPath.row]
    tappedItem.completed = !tappedItem.completed
    tableView.reloadRowsAtIndexPaths([indexPath],
      withRowAnimation: UITableViewRowAnimation.None)
  }

}
What is left to do is configure the table view with our custom data source and delegate in the view controller:
class ToDoListTableViewController: UITableViewController {

  var stateController: StateController?
  var tableViewDataSource: TableViewDataSource?
  var tableViewDelegate: TableViewDelegate?

  override func viewDidLoad() {
    super.viewDidLoad()
    // Create delegate and data source instances
    if let stateController = stateController {
      tableViewDataSource = TableViewDataSource(tableView:
        tableView, stateController: stateController)
      tableViewDelegate = TableViewDelegate(tableView:
        tableView, stateController: stateController)
    }
  }

  @IBAction func unwindToList(segue: UIStoryboardSegue) {

  }

}
As you can see, our view controller is much smaller than usual. A lot of code that would have ended up in it is now spread around more focused objects. These classes are more testable and maintainable than a view controller that has all such code within itself. They can also be generalized even more, to become more reusable.
Let’s take the data source as an example of how this might happen. At the moment, it is tied to our ToDoListCell class. If you create a data source for a table view with different cells, you will notice that the only code that will be different is the configuration of the table view cell itself. You can make the data source class more generic by not implementing the cell configuration directly inside of it, but rather by leaving it to a closure that you can pass to the initializer when you create a new data source instance. In this way, the data source can be used for different table views and even in other projects.
Setting Up The Final Connections
If you run the app at the moment, the to-do list will be empty, and adding a new to-do item still will not work. To finish the app, we just need to implement support for adding a new to-do item from the AddToDoItemViewController. We have already made all of the connections move from one view controller to the next and back when we created the view controllers in the storyboard. We just need to add some code for the communication of the view controller and the creation of to-do items.
If we made the AddToDoItemViewController contain the whole state of the app, as often happens, then the code to add a new ToDoItem to the list would end there as well. In our architecture, though, we have moved the state of the app to the StateController. This means that we can pass this controller to the AddToDoItemViewController and leave to it the responsibility of adding a new item to the list. Adding an item to the list is, in my opinion, exactly what the AddToDoItemViewController should be concerned with, as explained quite well by its name. The ToDoListTableViewController should only be concerned with displaying the list, because it does not contain any user interface for adding a new item.
class AddToDoItemViewController: UIViewController {
  @IBOutlet weak var cancelButton: UIBarButtonItem!
  @IBOutlet weak var saveButton: UIBarButtonItem!
  @IBOutlet weak var nameTextField: UITextField!

  var stateController: StateController?

  override func prepareForSegue(segue: UIStoryboardSegue, sender:
    AnyObject?) {
    // If the cancel button is tapped or no name for the item
    // has been typed in the text field, we do nothing.
    // Otherwise, we create a new to-do item and add
    // it to the state controller.
    guard let tappedButton = sender as? UIBarButtonItem
      where tappedButton != cancelButton else {
      return;
    }
    guard let text = nameTextField.text else {
      return
    }
    let todoItem = ToDoItem(name: text, completed: false,
      creationDate: NSDate())
    stateController?.addItem(todoItem)
  }

}
The last thing we need is for the ToDoListTableViewController to refresh the table view when it comes on screen again, so that the UI is updated with the new data.
override func viewWillAppear(animated: Bool) {
  super.viewWillAppear(animated)
  tableView.reloadData()
}

override func prepareForSegue(segue: UIStoryboardSegue, sender:
  AnyObject?) {
  // Pass the state controller forward to the next
  // view controller.
  if let navigationController = segue.destinationViewController as?
    UINavigationController,
    let addToDoItemViewController = navigationController.
      viewControllers.first as? AddToDoItemViewController {
    addToDoItemViewController.stateController = stateController
  }
}
Our to-do app is finally complete. Go back and have a look again at the scheme for the app’s architecture to see how it applies to what we have done here.
Recap
In this tutorial, we have taken a deep look at the MVC pattern and seen how to give an iOS app an architecture that is more understandable, testable and reusable.
We started from the common version of the MVC view controller that we have seen in countless apps and even in Apple’s documentation. In this version, the model and view layers are actually kept very thin, and most of the logic ends up in view controllers. This turns them into huge bloated objects that do too many things and are hard to change, reuse and test.
By following better software design principles, we put all of the code that usually ends up in view controllers in better places. These are the principles we followed:
- Model classes should contain all of the code concerned with the data of our app. This include their conversion to and from different representations.
- Code for maintaining state, storing data, transmitting data over the network, interfacing with the device’s sensors and so on should be contained in model controllers, not view controllers.
- Protocols for table views and other complex protocols can also be extracted and implemented in separate model controllers.
- Code relating to the UI should go in custom views that expose properties that accept only simple data types. Alternatively, if your views become very complicated, you can follow the table view example and create full protocols to configure them.
In this way, most of the code has been kept outside view controllers, which, due to their role and lifecycle in iOS, are the hardest objects to test and reuse.
Relevant Links
- To-Do List, Matteo Manferdini, GitHub The complete source for this tutorial
- “Understanding the Core Architectural Principles of iOS Development With a Practical Example,” Matteo Manferdini A simpler related example I wrote on the foundations of iOS development
- “Lighter View controllers,” objc.io
- Introduction to MVVM,” objc.io
- “Let’s Play: Refactor the Mega Controller!,” Andy Matuschak, Realm


