Stylelint: The Style Sheet Linter We’ve Always Wanted

Email Newsletter
Weekly tips on front-end & UX.
Trusted by 182,000+ folks.

 Custom Web Forms for Angular, React, & Vue. Your backend.

 Celebrating 10 million developers
Everyone wants a clean, consistent code base, no matter the language. Developers are accustomed to setting up linters in programming languages such as JavaScript and Python, but they rarely use a linter for style sheets. In this article, we’ll look at stylelint, a linter for style sheets.
We will learn why linting a style sheet matters, how stylelint brings order to a style sheet and how we can avoid errors. Finally, we will learn how to use stylelint and start linting as soon as possible.
Why Linting Is Important
A linter is a tool that analyzes code and reports errors when a piece of code doesn’t pass the rules defined in the linter’s configuration.
Many of us work on code bases that many people have access to. If no strict rules on coding style are adhered to, the code could become a mess very fast. Maybe your code is already a mess, and you want to clean it up and maintain this cleanliness over time. Even if you work on style sheets alone, you’ll still want the code to be consistent.
Of course, your team might have code styles rules written in plain text in some wiki somewhere. But there is always the human factor to account for: People make mistakes — never on purpose.
And even if you are obsessed with following the rules of a proper coding style, your colleagues or the contributors to your open-source project might not be. Without a linter, you’d need to check the code for styling and errors by yourself. No person should spend time on things that can be automated. A linter will significantly decrease the time spent on code review because you will not be spending time checking styles and writing a pile of comments about every error. You will be free to examine what the code does, rather how it looks.
Stylelint
Stylelint is a mighty, modern style sheet linter written in JavaScript by David Clark, Richard Hallows, Evilebot Tnawi and community. It is powerful in its speed, variety and quality of rules, and it’s totally unopinionated. Stylelint has over a hundred rules, and the number is growing. Fear not, though: All rules are disabled by default, and you enable only the ones you want. Stylelint can lint not only CSS but also Sass, SugarSS and any other syntaxes that PostCSS can parse (because stylelint is based on it).
Stylelint is to style sheets what ESLint is to JavaScript.
Rules
Stylelint has over a hundred rules, which can be divided into three groups: rules for styling, rules for the maintainability of code, and rules that check errors that would change what the code does in a browser. Style rules check for spacing (such as around colons), line breaks, indentation, etc. Rules for maintainability might report if an ID is used in a selector or if the !important keyword is used in a declaration. Rules for checking for errors might report an incorrect HEX color or a shorthand property that overrides another declaration.
I will not go over the style rules here (there are a ton of them). Rather, I want to describe some of the rules that help with maintainability and prevent errors.
The rule for preventing shorthand properties from overriding other declarations (or, in stylelint parlance, declaration-block-no-shorthand-property-overrides) would prevent a situation like this:
div {
    padding-left: 20px; /* This property is overridden. */
    padding: 10px;
}
Stylelint also prevents invalid HEX colors (color-no-invalid-hex):
p {
    color: #44;
}
And it prevents duplicate properties (declaration-block-no-duplicate-properties):
p {
    color: #000; /* This property is overridden. */
    margin: 0 0 1.25em;
    color: #777;
}
You may use the old syntax for gradients. Stylelint will check for it (function-linear-gradient-no-nonstandard-direction):
/* incorrect property */
.block {
    background: linear-gradient(bottom, #fff, #000);
}

/* correct property */
.block {
    background: linear-gradient(to bottom, #fff, #000);
}
Using the !important keyword on a property can cause problems down the line when you need to override the property with another rule. Just avoid !important altogether with the declaration-no-important rule.
Using an ID in a selector (#main) and using a type selector (i.e. a selector based on an HTML element — for example, .block p) might be forbidden in your development methodology (for example, BEM). In this case, selector-no-id and selector-no-type come in handy.
Sometimes you’ll misspell something or forget to add something to a style sheet. In the case of animation, no-unknown-animations will report if an animation’s name has no corresponding @keyframes rule.
And why would you want to bother with prefixes in values, properties names and selectors when we have Autoprefixer? Let Autoprefixer take care of that, and prevent prefixes from being added with the rules value-no-vendor-prefix, property-no-vendor-prefix and selector-no-vendor-prefix.
There are, of course, many more rules in stylelint.
Plugins
Beside the default rules, stylelint also supports plugins, so you can extend it with new rules. Not many plugins are available right now, but the ones we have are very handy.
Sometimes developers over-nest. While all preprocessors support nesting, nesting rules very deep results in increased selector specificity and leads to problems with maintaining those rules. Here is a typical example:
.header {
    .nav {
        .item {
            .link {
                color: blue;

                &:hover {
                    color: red;
                }
            }
        }
    }
}
This renders as follows:
.header .nav .item .link {
    color: blue;
}
.header .nav .item .link:hover {
    color: red;
}
Stylelint has no rule for this problem out of the box, but there is a plugin (stylelint-statement-max-nesting-depth) that adds a rule for nesting depth.
To use any plugin, install it first:
npm install stylelint-statement-max-nesting-depth --save-devThen, add the plugin to the configuration file in the plugins array. Add the new rule and configure it:
{
    "plugins": [
        "stylelint-statement-max-nesting-depth"
    ],
    "rules": {
        "statement-max-nesting-depth": 2
    }
}
In the configuration above, we’ve set the nesting depth to a maximum of two. So, we would be prompted to simplify our earlier example to a lower nesting depth (in this case, two levels):
.nav {
    .link {
        color: blue;

        &:hover {
            color: red;
        }
    }
}
Or we could simplify further to one level:
.nav-link {
    color: blue;

    &:hover {
        color: red;
    }
}
I will not go over all of the plugins here, but rather will recommend a few:
- Prevent qualified selectors, such as
ul.nav,div#mainandinput[type="submit"]. (Each option can be enabled separately.) - Enforce shorthand values whenever possible.
- If you are following the BEM or SUIT methodology, then you might want to check the validity of your selectors against it. Plugin
stylelint-selector-bem-patternhas predefined patterns for BEM and SUIT and can be configured for other methodologies.
If you want a new rule, you can write your own plugin.
Configuration Files
Configuring is the most difficult part about using a linter — and the most time-consuming. But there are shortcuts and different strategies that make stylelint easier to configure.
Your configuration can grow to be very big, so the most convenient way to store stylelint’s configuration is in a separate JSON file, named .stylelintrc. This way, the file can be used in the command line interface, in a build tool and in a code editor.
A very simple configuration might look like this:
{
    "rules": {
        "color-hex-case": "lower",
        "color-hex-length": "short",
        "color-no-invalid-hex": true
    }
}
There are three strategies for configuration. The first, a simple one, is to extend someone else’s configuration (which stylelint supports) and then add, disable or tweak the rules you want to change. Developers have made configuration that probably fit most needs. You can install one as an npm package:
npm install stylelint-config-standard --save-devThen, in your own configuration file, you would extend theirs and override any rules as needed:
{
    "extends": "stylelint-config-standard",
    "rules": {
        "indentation": "tab",
        "number-leading-zero": null
    }
}
In this example, we’ve extended stylelint-config-standard and changed the indentation rule to be “tabs” and disabled the number-leading-zero rule.
You can extend not only configurations shared via npm, but local ones, too. The documentation has more on extending and sharing configurations.
The second strategy is to start with an empty file and progress slowly by adding rules as you need them. For example, you might not care about coding style just yet and just want to focus on preventing errors:
{
    "rules": {
        "color-no-invalid-hex": true,
        "declaration-block-no-duplicate-properties": true,
        "declaration-block-no-shorthand-property-overrides": true,
        "function-linear-gradient-no-nonstandard-direction": true
    }
}
Later, you can add more rules.
The third strategy is to go over all of the rules and configure every one. I prefer this strategy because I want to check as much as possible and use stylelint at its full power. Sure, it’s the most time-consuming strategy, but it yields the best result. To make it easier, stylelint’s developers have created an example configuration file with all rules.
Every enabled rule has an error severity. This means that any rule that is not met will fail the test. The severity level for any rule can be lowered to a warning, which will prevent a test from failing. This is useful if you have just introduced a rule and don’t want a build to fail as the team is adjusting to the new rule.
{
    "rules": {
        "color-hex-case": ["lower", { "severity": "warning" }]
    }
}
In this example, stylelint will warn if a HEX color is miswritten, but it won’t throw an error.
Sometimes we need to put something in a style sheet that our stylelint configuration forbids. For example, we are forbidden to use the !important keyword, but we might need to use it in one place to override some third-party widget. We wouldn’t want to disable the rule because of this exceptional case. But we wouldn’t want to see the error every time either. Luckily, we can disable a particular rule in a line of CSS by adding a comment:
.widget {
  display: none !important; /* stylelint-disable-line declaration-no-important */
}
Or we can disable stylelint for a chunk of CSS:
/* stylelint-disable */
.third-party-code {}
/* stylelint-enable */
Usage
Stylelint can be used in many ways: in the command line, in a build tool (such as Gulp, Grunt or Webpack), in a code editor or as a Git pre-commit hook for staged changes in Git repository. I will focus here on two ways.
Command Line
Using the command line is useful when you want to lint a project that doesn’t have stylelint or you want to use stylelint in an npm script.
Install stylelint globally:
npm install stylelint -gThen, it will be available everywhere in your terminal:
stylelint "styles/**/*.css"This command will lint all CSS files in the styles directory and any of its subdirectories.
To lint SCSS or SugarSS files, add the syntax option:
stylelint "styles/*.scss" --syntax scssThe configuration file can be specified explicitly:
stylelint "styles/*.css" --config bar/myStylelintConfig.jsonIf it’s not specified explicitly, stylelint will look for a .stylelintrc file in the current working directory.
Gulp
To use stylelint with Gulp, use it as PostCSS plugin. You’ll need to install the following packages:
npm install gulp-postcss stylelint postcss-reporter --save-devgulp-postcss is a runner for all PostCSS plugins, and postcss-reporter outputs much nicer errors and warnings from stylelint.
var postcss = require('gulp-postcss');
var reporter = require('postcss-reporter');
var stylelint = require('stylelint');
gulp.task('lint:css', function() {
return gulp.src('src/**/*.css')
.pipe(postcss([
stylelint({ /* options */ }),
reporter({ clearMessages: true })
]));
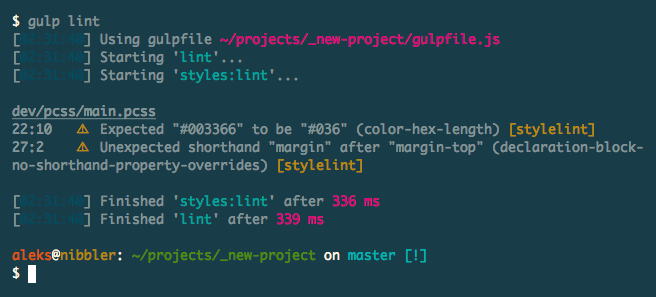
});The output would look like:
To lint a style sheet other than CSS, you’ll need to install the appropriate syntax. For example, to lint SCSS, we’d need to install postcss-scss:
npm install postcss-scss --savedevThen, configure gulp-postcss to use this syntax:
var postcss = require('gulp-postcss');
var reporter = require('postcss-reporter');
var stylelint = require('stylelint');
var scss = require("postcss-scss");

gulp.task('lint:css', function() {
    return gulp.src('src/**/*.scss')
        .pipe(postcss(
            [
                stylelint({ /* options */ }),
                reporter({ clearMessages: true })
            ],
            {
                syntax: scss
            }
        ));
});
You can specify the configuration file explicitly; otherwise, stylelint will look for .stylelintrc.
Conclusion
Stylelint is a powerful style sheet linter. It brings clarity to code and saves you from errors. It’s useful for everyone: individual developers, teams and open-source maintainers. Once you start using it, you will hear no more comments like, “You forgot to add a space here” or “You forgot to remove it there.” Happy developing, and may you have a peaceful code review.
Further Reading
- Why Coding Style Matters
- 7 Principles Of Clean And Optimized CSS Code
- ESLint: The Next-Generation JavaScript Linter
- An Introduction To PostCSS


