Free SSL For Any WordPress Website

Email Newsletter
Weekly tips on front-end & UX.
Trusted by 182,000+ folks.

 Custom Web Forms for Angular, React, & Vue. Your backend.
 Celebrating 10 million developers


If you have an e-commerce website, then SSL is mandatory for safely processing credit cards. But even if you aren’t processing payments, you should still seriously consider secure HTTP (or HTTPS), especially now that I’m going to show you how to set it up quickly, for free. Let’s get started.
What Is SSL And Why Should I Care?
In short, SSL is the “S” in HTTPS. It adds a layer of encryption to HTTP that ensures that the recipient is actually who they claim to be and that only authorized recipients can decrypt the message to see its contents.
Sensitive information such as credit-card numbers — basically, anything private — should always be served via HTTPS. However, there is an increasing trend towards serving all content via HTTPS, as we’re seeing on news website, blogs, search engines and the websites of most mainstream brands. So, even if your website isn’t processing payments, there are good reasons to consider HTTPS, a few of which are listed here:
- Credibility. Even non-technical audiences associate the little green padlock in the browser’s address bar with trust and reliability.
- Password protection. Perhaps your website only hosts kitten videos. But if users are logging into your website via Wi-Fi with a password that they also use for online banking, then you are potentially facilitating a serious security breach by broadcasting those credentials publicly.
- Future-proofing. Many websites are still served via HTTP, but there is an undeniable trend towards HTTPS, and this will only increase as users become increasingly educated about web security. Be on the right side of history.
- SEO. Google officially announced that HTTPS is used as a ranking signal. In other words, Google is rewarding HTTPS websites by boosting their rankings in search results.
A common argument against HTTPS is that it reduces performance. True, the process of encrypting and decrypting does cost additional milliseconds, but in most situations it is negligible, as evidenced by the fact that performance-conscious companies such as Google and Facebook serve all of their content via HTTPS. And, true, HTTPS can exacerbate existing performance problems, like many CSS files being served individually, but this is mitigated by following basic best practices for performance. And with the adoption of HTTP/2, the performance cost of HTTPS is even lower. The bottom line is that the reduction in performance is a meaningful deterrent only if your website is either hyperoptimized or so underperforming that every millisecond matters.
How To Set Up HTTPS For Free
The first step to setting up HTTPS for free is to sign up for a cloud DNS service. If you have no idea what DNS is, I recommend that you take a minute to learn before proceeding. The delightful How DNS Works does a great job of breaking it down into a quippy cartoon. Otherwise, simply know that DNS is the system whereby domain names like example.com (which humans understand) get linked to IP addresses like 104.28.2.167 (which computers understand). You have many options, but I’m a fan of CloudFlare because it’s really fast to set up, the dashboard is intuitive, and a free plan is available with many powerful features.
Setting Up CloudFlare
After registering for a CloudFlare account, you’ll be walked through an easy wizard to configure your first website, which will conclude with instructions on how to log into your domain registrar and point the nameservers to CloudFlare. The change will take some time to propagate, but when it’s complete, CloudFlare will be hosting your website’s DNS records. Next, turn on CloudFlare’s “flexible SSL” feature.
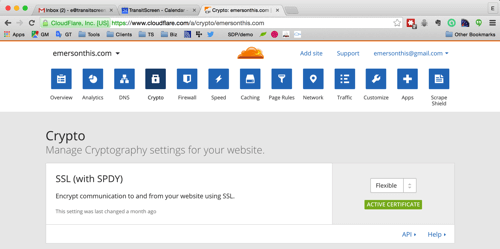
Choosing the “flexible SSL” setting is important because it doesn’t require you to buy and install your own SSL certificate on your website’s server. Here’s a diagram of what’s happening.

As you can see, CloudFlare is acting as the middleman to secure traffic between your website and the client. If this were a static HTML website, you would now be able to connect to it via HTTPS (https://yourdomain.com). WordPress, however, requires additional configuration in order to work with the modified protocol.
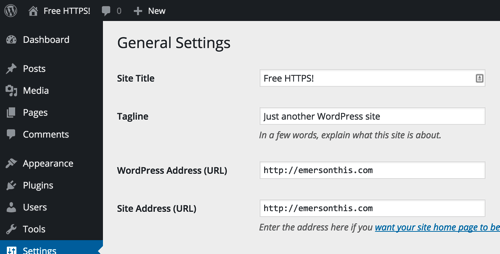
Reconfiguring WordPress From HTTP To HTTPS
You will first need to update the “WordPress Address” and “Site Address” settings in the dashboard, under “Settings” → “General.” When you do this, you will have to log into the dashboard again.
Proceed cautiously. If you update these settings prematurely, you risk locking yourself out. For example, if the website isn’t yet properly configured for HTTPS and the settings are updated, you could cause a redirect loop that breaks the website and prevents you from accessing the dashboard.
At this point, you should be able to visit the home page of the website via HTTPS. However, page links will still point to the HTTP URLs. WordPress stores links to pages and images as absoute URLs, meaning that the full URL, including the protocol, is saved in the database. To ensure that the entire website is consistently served via HTTPS (without spitting up warnings about mixed content), you will need to update your legacy content.
Updating Legacy Content
On a small website with only a few pages, the quickest option might be simply to manually update the URLs by editing existing pages in the admin interface. If the website is large or has a highly active blog, then manual editing likely isn’t practical. If your host provides phpMyAdmin or some other interface to run MySQL queries, you could do this pretty easily with a few MySQL queries in the SQL tab. Alternatively, you could follow The Customize Windows’ instructions to do it from the command line.
At the risk of stating the obvious, replace yourdomain.com in the following queries with your actual domain. Also, if you’ve customized WordPress’ table prefix, replace wp_ with the relevant prefix.
First, update the URLs of the posts and pages.
UPDATE wp_posts SET guid = replace(guid, 'https://yourdomain.com','https://yourdomain.com');
[UPDATE: As discussed in the comments, the guid field should not be edited.]
Update the wp_postmeta table, too.
UPDATE wp_postmeta SET meta_value = replace(meta_value,'https://yourdomain.com','https://yourdomain.com');Finally, update the actual contents of posts or pages. This will update any backlinks to HTTPS.
UPDATE wp_posts SET post_content = REPLACE(post_content, 'https://yourdomain.com', 'https://yourdomain.com');After running these queries, you will want to refresh your permalinks by going to “Settings” → “Permalinks.” Simply change the setting back to the default, and then set it back to whatever setting you were originally using.
Now, you should be able to click the menus and links throughout the website, and the protocol should remain HTTPS.
Troubleshooting Mixed-Content Warnings
Depending on the theme and plugins in use, you might get a warning in the address bar stating that certain resources are not being served securely. If the errors are associated with assets added by your own custom theme or plugin, make sure to properly enqueue JavaScript and CSS files and not to hardcode URLs that begin with HTTP. Most browsers will let you expand the warning to show the specific requests that are causing the error. You could also try a free plugin such as SSL Insecure Content Fixer, which will attempt to correct third-party plugins that have failed to do this.
By this point, you should see the green padlock in the URL bar when visiting your website. If you aren’t using an e-commerce plugin such as WooCommerce or WP eCommerce, you’re done! If you are, there is an important last step.
Getting Flexible SSL To Work With E-Commerce Plugins
WordPress has a core function named is_SSL() that plugins rely on to determine whether traffic is encrypted with SSL. With the method above alone, this function will return false because the encryption is only between CloudFlare and the client. The traffic that PHP interacts with is unencrypted, so the super global that that function checks (i.e. $_SERVER[‘HTTPS’]) would not be useful. For our purpose, the relevant variable is $_SERVER[‘HTTP_X_FORWARDED_PROTO’], which, at the time of writing, WordPress does not recognize. The request to change this is long-standing, but it is yet to be resolved.
Fortunately, a free plugin will fix this for you immediately, CloudFlare Flexible SSL. Simply install the plugin and activate it. Remember that this technique does not add any more security. Traffic between CloudFlare and your website’s server is still unencrypted and, therefore, still vulnerable to sniffing.
Flexible SSL Is Not Full SSL
CloudFlare’s “Universal SSL” initiative is an interesting attempt to make the Internet more secure, but it is not without controversy. The primary concern is that flexible SSL does not encrypt the second half of the traffic’s journey (to your server), yet the browser currently still shows the same green padlock that we have come to associate with complete SSL. CloudFlare offers the following justification on its blog:
"Having cutting-edge encryption may not seem important to a small blog, but it is critical to advancing the encrypted-by-default future of the Internet. Every byte, however seemingly mundane, that flows encrypted across the Internet makes it more difficult for those who wish to intercept, throttle, or censor the web. In other words, ensuring your personal blog is available over HTTPS makes it more likely that a human rights organization or social media service or independent journalist will be accessible around the world. Together we can do great things."
For better or worse, flexible SSL is here, and the Internet will have to adapt. In the meantime, the burden is on website owners to be educated and to make responsible decisions.
Redirecting HTTP Requests To HTTPS
Enabling a website to run on HTTPS does not ensure that requests will actually use the protocol. If your website has been around for a while, users might have already bookmarked it with HTTP. You can redirect all HTTP requests to the new protocol by adding the following snippet to the top of the .htaccess file in the root of your website. If the file does not exist, you can safely add it.
<IfModule mod_rewrite.c>
    RewriteEngine On
    RewriteCond %{HTTP:X-Forwarded-Proto} !https
    RewriteRule (.*) https://yourdomain.com/$1 [R=301,L]
</IfModule>
If an .htaccess file already exists, be careful not to change anything between the # BEGIN WordPress and # END WordPress lines in that file. Those lines are managed by WordPress, and whenever the permalinks get refreshed, the contents in that section get overwritten.
Congratulations
By upgrading your website to HTTPS, you have improved your website, protected users and participated in the advancement of the Internet. And it didn’t cost you anything!
Further Reading
- HTTPS Everywhere With Nginx, Varnish And Apache
- How To Issue A New SSL Certificate With An Old SSL Key
- Getting Ready For HTTP/2: A Guide For Web Designers
- WordPress Full-Site Editing: A Deep Dive Into The New Feature


