The Illusion Of Life: An SVG Animation Case Study

Email Newsletter
Weekly tips on front-end & UX.
Trusted by 182,000+ folks.
 Custom Web Forms for Angular, React, & Vue. Your backend.


 Celebrating 10 million developers
With flat design becoming the ever visible trend of 2016, it’s clear why there’s been a resurgence in SVG usage. The benefits are many: resolution-independence, cross-browser compatibility and accessible DOM nodes. In this article, we’ll take a look at how we can use SVGs to create seemingly complex animations from simple illustrations.
The Brief
This project began as a simple thought experiment: How far can we push SVG animation?
At the time, designer Chris Halaska and I were colleagues working on an illustration-heavy campaign website. While aesthetically pleasing, the designs lacked the required “oomph” that all creatives search for. We found the answer in “The Camera Collection,” a motion graphics animation that had just gone viral. We could use animations to bring illustrations to life, and SVGs were the perfect medium to do this.
The problem we were facing, which still exists very much today, is that SVG animation is either delegated to a front-end developer who is attempting art direction or to a designer who is attempting JavaScript. Of course, neither of these scenarios is inherently wrong, but with animation being visual in nature and with very few applications tackling the problem, we wanted to bridge the gap between code and design.
Our idea was to create a data-driven process that enables designers to quickly prototype animations from static illustrations.
The Rules Of Animation
In The Illusion of Life, Disney outlines 12 basic principles to add character to animation. Squash and stretch, anticipation, slow in and slow out, timing, and exaggeration all serve to bring any object, inanimate or otherwise, to life. We wanted to follow these principles in our project, moving away from the rigidness of the DOM to something more fluid and natural. By creating a system around transformations, timing and easing, we were able to create animations that were stylistically uniform, but each with a character of its own.
Transformations
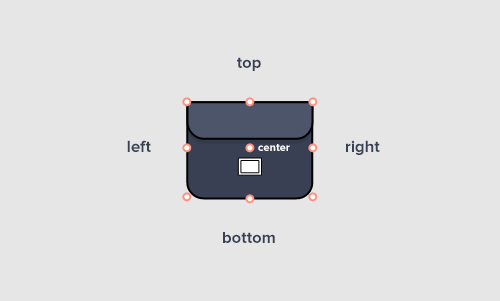
The flat design trend lends itself so well to SVG usage because of the simplicity of the illustrations. We mimicked this characteristic in animation, pairing geometric shapes with simple geometric movements. We had a single rule: use basic transformations (translate, rotate, scale) with basic origins (left, right, top, bottom and center).
Timing
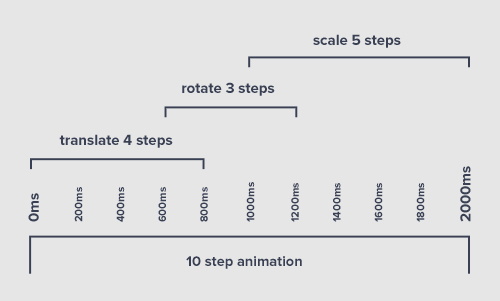
To maintain a similar cadence and rhythm, we constrained ourselves to very specific increments of time. Animations lasted 2 seconds and comprised 10 individual steps. A tween, an animation of just a single transformation (translate, rotate and scale) had to begin and end on one of these steps, which we defined as keyframes.
Easing
While transformations and timing are enough to create the visual perception of motion, easing brings everything to life. We found that three easing formulas provided more than enough variation to add character to the movements: easeOutBack, easeInOutBack and easeOutQuint.

easingBack will influence the transformations to some extent.Let’s Get Started
Preparing The Assets
Though the illustration app landscape has matured in recent years, with Sketch and Inkscape becoming increasingly popular, we opted to create our SVGs in Adobe Illustrator.
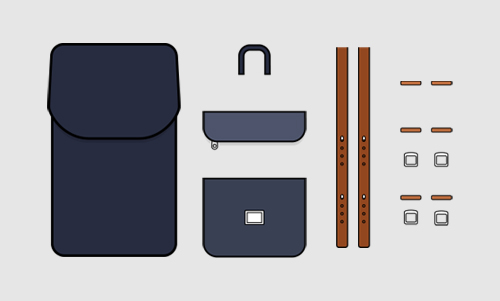

Before you export to SVG, group and label every layer. Illustrator will automatically creates IDs from the layer names during the exporting process. For every animated element, the output should look similar to the XML shown below. Note that even if an element doesn’t have any children, it still needs to be grouped under a g tag. This is in preparation for adding SVG transform groups, explained later on.
<g id="zipper">
<path fill="#272C40" d="…"/>
</g>
Handling Masks
You may have noticed the <Clip Group> layer in figure 6. These are essentially clipping masks created in Illustrator. When exported to SVG, they automatically become predefined clipPaths that can be used to mask elements in the exact same way.
<g>
<defs>
  <rect id="SVGID_1_" x="235" y="-106.3" width="500" height="309"/>
</defs>

<clipPath id="SVGID_2_">
  <use xlink:href="#SVGID_1_"  overflow="visible"/>
</clipPath>

<g id="strap-right" clip-path="url(#SVGID_2_)">
  <path fill="#93481F" stroke="#000000" stroke-width="1.5" stroke-miterlimit="10" d="…"
    />
</g>
</g>
clipPath to hide the belt straps before animation.Prototype, Prototype, Prototype
With the assets prepared, we were ready to build. We began an iterative process of creating prototypes and testing various technologies to find a solution. Here, we’ll briefly outline each of our attempts, the pros and cons, and why we pivoted from one solution to the next.
CSS And Velocity.js
Our initial attempts at using CSS to create animations were promising. We believed that with hardware-accelerated transformations, the animations would run smoothly and the implementation would be straightforward, without the need for external libraries. While we were able to create a functioning version in Chrome, the solution failed in all other browsers.
Firefox would not respect the transform-origin property of SVGs, while Internet Explorer’s support for SVG CSS animation is completely non-existent. Lastly, with CSS and JavaScript being so tightly coupled, we found ourselves jumping back and forth between too many files for the solution to be considered elegant.
In a similar vein, we ran into the same problems with Velocity.js. Because the animation engine also uses CSS transformations, the Firefox and Internet Explorer issues remained unresolved.
GSAP
GSAP has been an industry standard since its Flash days, and its popularity has risen even more so since being ported to JavaScript. With its chainable syntax, extensive SVG support and unparalleled performance, GSAP was an obvious contender — save for one issue: It was overkill. Importing TweenMax and TimelineMax immediately doubled the size of our project and proved to be excessive. Chris Gannon let us know that TimelineMax is included in TweenMax and combined is only 37kb, a misunderstanding on our end.
Snap.svg
In our final attempt, we used Snap.svg, the successor to Raphael. Snap offers extensive functionality in DOM manipulation but the bare minimum in animation support. Though we recognized this as a setback, the deficiencies led us to roll our own JavaScript to fill in the gaps. This resulted in a lightweight solution that was still capable of achieving the fidelity of animations we were striving for.
Mo.js, Anime And Web Animations API
Since writing this article, three very promising SVG animation libraries have been gaining traction in the community: Mo.js, Anime and the Web Animations API. If we get the chance to revisit the problem, these alternatives would definitely be taken into consideration. Nonetheless, the concepts behind this article should be transferable to any animation library you wish to use.
The Scaffold
We’ll begin by importing a basic style sheet and the Snap.svg library into our project. We’ll also include a port of Robert Penner’s easing functions for later use.
<!DOCTYPE html>
<html lang="en" class="no-js">
<head>
<meta charset="UTF-8" />
<meta http-equiv="X-UA-Compatible" content="IE=edge,chrome=1">
<meta name="viewport" content="width=device-width, initial-scale=1.0">
<title>The Illusion of Life: An SVG Animation Case Study</title>
<!-- Styles -->
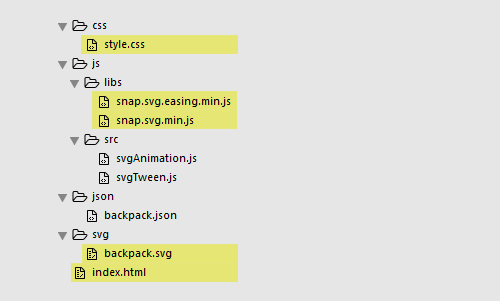
<link rel="stylesheet" type="text/css" href="css/style.css" />
<!-- Libraries -->
<script src="js/libs/snap.svg.min.js"></script>
<script src="js/libs/snap.svg.easing.min.js"></script></html>
</head>
</html>/* Full screen */
html, body {
position: relative;
width: 100%;
height: 100%;
margin: 0;
overflow: hidden;
background-color: #E6E6E6;
font-family: sans-serif;
}
/* Centered canvas */
#canvas {
position: absolute;
top: 50%;
left: 50%;
-webkit-transform: translateX(-50%) translateY(-50%);
-ms-transform: translateX(-50%) translateY(-50%);
transform: translateX(-50%) translateY(-50%);
overflow: hidden;
}Hello World
- “Hello World,” GitHub
“Hello world” — a small, simple win. For us, that just meant getting something on the screen. We first instantiated a new Snap object, with a DOM ID representing our canvas. We use the Snap.load function to indicate the external SVG source and an anonymous callback that will append the nodes to the DOM tree.
<body>
<div id="canvas"></div>

<script>
  (function() {
    var s = Snap('#canvas');

    Snap.load("svg/backpack.svg", function (data) {
      s.append(data);
    });
  })();
</script>
</body>
Making A Simple Plugin
- Plugin, GitHub
To create a reusable component for multiple animations, we create a “plugin” using the prototype pattern. Using an immediately invoked function expression (IIFE) ensures data encapsulation, while still adding SVGAnimation to the global namespace. If we place the code we have so far into a separate init function, we will have the basis for SVGAnimation.
; (function(window) {
'use strict';

var svgAnimation = function () {
  var self = this;
  self.init();
};

svgAnimation.prototype = {
  constructor: svgAnimation,

  init: function() {
    var s = Snap('#canvas');

    Snap.load("svg/backpack.svg", function (data) {
      s.append(data);
    });
  }
};

// Add to global namespace
window.svgAnimation = svgAnimation;
})(window);
See the Pen Simple Plugin by Michael Ngo (@hellomichael) on CodePen.
Adding Options
- Options, GitHub
Dissecting Snap.load, we can see two potential parameters that can be passed in as options, a canvas and an external SVG source. Let’s create a separate loadSVG function to handle just that.
/*
Loads the SVG into the DOM
@param {Object}   canvas
@param {String}   svg
*/
loadSVG: function(canvas, data) {
Snap.load(svg, function(data) {
  canvas.append(svg);
});
}
Objects As Parameters
Now we need a way to pass these options into SVGAnimation. There are several ways to do this, the standard way being to pass individual parameters.
var backpack = new svgAnimation(Snap('#canvas'), 'svg/backpack.svg');But there’s a better solution. By passing in objects instead, the code becomes not only more readable, but also more flexible. We no longer need to keep track of the order; we can make parameters optional; and we can also reuse the object later. So, let’s rewrite the previous snippet, passing in an options object instead.
var backpack = new svgAnimation({
canvas:       new Snap('#canvas'),
svg:          'svg/backpack.svg'
});
Merging Objects
Now that we have the options object, we need to make the values accessible to the rest of the plugin. But before we do this, let’s merge the passed-in object with our own defaults. Even though we’ve chosen to set both values to null, we’ll still include them as a reference for the type of values we expect to receive.
svgAnimation.prototype = {
constructor: svgAnimation,

options: {
  canvas:     null,
  svg:        null
}
};
With the defaults now set, we’ll use an extend function to merge both objects. Essentially, the function will loop through all of the properties of one object and copy them over to another.
/*
Merges two objects
@param  {Object}  a
@param  {Object}  b
@return {Object}  sum
https://stackoverflow.com/questions/11197247/javascript-equivalent-of-jquerys-extend-method
*/
function extend(a, b) {
for (var key in b) {
  if (b.hasOwnProperty(key)) {
    a[key] = b[key];
  }
}

return a;
}
With the extend function defined, let’s amend the SVGAnimation constructor. One thing you’ll notice is that self is set to this. We’ll cache the original this to ensure that inner scopes have access to the current object’s data and methods.
var svgAnimation = function (options) {
var self = this;
self.options = extend({}, self.options);
extend(self.options, options);
self.init();
}
Lastly, we’ll update init to call loadSVG, passing in the canvas and svg reference we set during instantiation.
init: function() {
var self = this;

self.loadSVG(self.options.canvas, self.options.svg);
}
See the Pen Adding Options by Michael Ngo (@hellomichael) on CodePen.
Hardcoded Prototype
- Hardcoded prototype, GitHub
Adding SVG Transformation Groups
As mentioned earlier, Snap.svg’s animation engine is quite primitive and, just like CSS, only supports transform strings as a single request. This means that if you’re looking to animate more than one type of transformation, it must happen either sequentially or all at once (sharing duration and easing). Though not the most elegant solution, adding extra nodes to the DOM tree solves this problem. With a separate grouped element for each translate, rotate and scale transformation, we can now independently control each tween. The example that best illustrates this use case is the zipper, which also serves as our initial prototype.
We begin by passing the zipper element to the createTransformGroup function, which we then go on to define.
var $zipper = canvas.select("#zipper");
self.createTransformGroup($zipper);
After we’ve selected all child nodes, we can use the Snap.g function to nest the contents within each respective transform group.
/*
Create scale, rotate and transform groups around an SVG DOM node
@param {object} Snap element
*/

createTransformGroup: function(element) {
if (element.node) {
  var childNodes = element.selectAll('*');

  element.g().attr('class', 'translate')
    .g().attr('class', 'rotate')
    .g().attr('class', 'scale')
    .append(childNodes);
}
}
This results in the creation of independent transformation groups, which we can target in our animations.
<!-- Old node -->
<g id="zipper">
<path fill="#272C40" d="…"/>
</g>

<!-- New node -->
<g id="zipper">
<g class="translate">
  <g class="rotate">
    <g class="scale">
      <path fill="#272C40" d="…"></path>
    </g>
  </g>
</g>
</g>
A Snap.svg Animation
We’re finally ready to animate our first element. Snap.svg provides two functions to do this: transform and animate. We’ll use transform to place the animation at the first keyframe, and then use animate to get us to the last.
Snap.svg supports standard SVG transform notation, but we’ve opted to use transform strings as a means to set parameters instead. Explanations are sparse on the official website, but legacy documentation can be found on Raphael’s. The initial uppercase letter is an abbreviation of the transformation. The parameters x, y and angle represent the values we are animating to, with cx and cy being the center of origin.
// Scale
Snap.animate({transform: 'S x y cx cy'}, duration, easing, callback);

// Rotation
Snap.animate({transform: 'R angle cx cy'}, duration, callback);

// Translate
Snap.animate({transform: 'T x y'}, duration, callback);
Calculating Origins
We ran into an interesting problem with defining origins, however. In Snap.svg, the animate and transform functions only accept parameters as pixel values, making it extremely difficult to measure. Ideally, as our brief outlined, we wanted to define the origin as a combination of top, right, bottom, left and center.
Fortunately, Snap.svg provides getBBox, which measures the bounding box of any given element, returning a multitude of descriptors, including the values we’re searching for. We’ll write two functions, getOriginX and getOriginY, that accept a bBox object and a direction string as parameters, returning pixel values as needed.
/*
Translates the horizontal origin from a string to pixel value
@param {Object}     Snap bBox
@param {String}     "left", "right", "center"
@return {Object}    pixel value
*/

getOriginX: function (bBox, direction) {
if (direction === 'left') {
  return bBox.x;
}

else if (direction === 'center') {
  return bBox.cx;
}

else if (direction === 'right') {
  return bBox.x2;
}
},

/*
Translates the vertical origin from a string to pixel value
@param {Object}     Snap bBox
@param {String}     "top", "bottom", "center"
@return {Object}    pixel value
*/

getOriginY: function (bBox, direction) {
if (direction === 'top') {
  return bBox.y;
}

else if (direction === 'center') {
  return bBox.cy;
}

else if (direction === 'bottom') {
  return bBox.y2;
}
}
Animation In Practice
Let’s see this all in practice with a scaling animation. We first select the corresponding transform group using its class name, scale it down until it’s hidden, and then animate it back to its original size. You’ll notice that we are scaling from the top of the zipper, with a duration of 400 milliseconds, and setting the custom easing to easeOutBack.
// Scale Tween
var $scaleElement = $zipper.select('.scale');
var scaleBBox = $scaleElement.getBBox();
$scaleElement.transform('S' + 0 + ' ' + 0 + ' ' + self.getOriginX(scaleBBox, 'center') + ' ' + self.getOriginY(scaleBBox, 'top'));
$scaleElement.animate({transform: 'S' + 1 + ' ' + 1 + ' ' + self.getOriginX(scaleBBox, 'center') + ' ' + self.getOriginY(scaleBBox, 'top')}, 400, mina['easeOutBack']);
Rotation follows the same pattern, with a few complexities. In this case, we have three tweens that play consecutively. When each animation is finished, we use its callback function to play the next animation in queue.
// Rotate Tween
var $rotateElement = $zipper.select('.rotate');
var rotateBBox = $rotateElement.getBBox();
$rotateElement.transform('R' + 45 + ' ' + rotateBBox.cx + ' ' + rotateBBox.cy);

$rotateElement.animate({ transform: 'R' + -60 + ' ' + self.getOriginX(rotateBBox, 'center') + ' ' + self.getOriginY(rotateBBox, 'top')}, 400, mina['easeOutBack'], function() {
$rotateElement.animate({ transform: 'R' + 30 + ' ' + self.getOriginX(rotateBBox, 'center') + ' ' + self.getOriginY(rotateBBox, 'top')}, 400, mina['easeOutBack'], function() {
  $rotateElement.animate({ transform: 'R' + 0 + ' ' + self.getOriginX(rotateBBox, 'center') + ' ' + self.getOriginY(rotateBBox, 'top')}, 400, mina['easeInOutBack']);
});
});
The translate tween mimics both scale and rotation, with one key difference. Because the translate animation doesn’t begin immediately, we use setTimeout to delay the starting time by 400 milliseconds.
// Translate Tween
var $translateElement = $zipper.select('.translate');
$translateElement.transform('T' + 110 + ' ' + 0);

setTimeout(function() {
$translateElement.animate({ transform: 'T' + 0 + ' ' + 0 }, 600, mina['easeOutQuint']);
}, 400);
See the Pen Hard-coded Prototype by Michael Ngo (@hellomichael) on CodePen.
Keyframes Are Key
At this point, you might be wondering, “Well, that was fairly complex for such a simple animation.” We wouldn’t disagree.
Our goal was to create a data-driven process to rapidly prototype animations. By creating a separate tween class and introducing the concept of keyframes, we can go from code like this…
// Translate Tween
var $translateElement = $zipper.select('.translate');
$translateElement.transform('T' + 110 + ' ' + 0);

setTimeout(function() {
$translateElement.animate({ transform: 'T' + 0 + ' ' + 0 }, 600, mina['easeOutQuint']);
}, 400);
… to code like this:
// Translate Tween
new svgTween({
element: $zipper.select('.translate'),
keyframes: [
  {
    "step": 2,
    "x": 110,
    "y": 0
  },

  {
    "step": 5,
    "x": 0,
    "y": 0,
    "easing": "easeOutQuint"
  }
],
duration: 2000/10
});
As we subdivide each animation into individual steps, we begin to see how this format might make prototyping easier. Let’s break down the parameters of this translate tween and explain where these numbers come from.
In our original code, you might have noticed that the durations and delays were all divisible by a factor of 200 milliseconds. That wasn’t a coincidence. If the entirety of an animation lasts 2000 milliseconds and consists of 10 steps, we simply need to divide the former by the latter to calculate the duration of a single step. We can now use the same logic to determine why the keyframes start at step 2 and end at step 5. The setTimeout, which lasts 400 milliseconds, corresponds to two steps, the initial delay. Furthermore, the duration of the animation is 600 milliseconds, which is calculated to be three steps, the difference between steps 2 and 5.
svgTween: Translate
- Tween translate, GitHub
With the output of our black box defined, let’s write the functionality for the SVGTween class. Using the same pattern as SVGAnimation, we’re able to quickly flesh out a basic scaffold.
/*
svgTween.js v1.0.0
Licensed under the MIT license.
https://www.opensource.org/licenses/mit-license.php

Copyright 2015, Smashing Magazine
https://www.smashingmagazine.com/
https://www.hellomichael.com/
*/

; (function(window) {
'use strict';

var svgTween = function (options) {
  var self = this;
  self.options = extend({}, self.options);
  extend(self.options, options);
  self.init();
};

svgTween.prototype = {
  constructor: svgTween,

  options: {
    element:    null,
    keyframes:  null,
    duration:   null
  },

  init: function () {
    var self = this;
  }
};

/*
  Merges two objects
  @param {Object} a
  @param {Object} b
  @return {Object} sum
  https://stackoverflow.com/questions/11197247/javascript-equivalent-of-jquerys-extend-method
*/
function extend(a, b) {
  for (var key in b) {
    if (b.hasOwnProperty(key)) {
      a[key] = b[key];
    }
  }

  return a;
}

// Add to namespace
window.svgTween = svgTween;
})(window);
Using the same algorithm as before, we’ll set the animation to the first initial hidden state, then animate from there. Instead of using Snap.svg’s transform and animate functions, we’ll rewrite them as resetTween and playTween to handle keyframes instead.
resetTween will accept an element and the keyframes array. The only difference is that, instead of directly setting the values in the transform string, we’ll use the values in the first keyframe.
/*
Resets the animation to the first keyframe

@param {Object} element
@param {Array}  keyframes
*/
resetTween: function (element, keyframes) {
var self = this;

var translateX = keyframes[0].x;
var translateY = keyframes[0].y;

element.transform('T' + translateX + ',' + translateY);
}
Because Snap.svg doesn’t provide chainable animation methods, we’ll have to use callbacks for consecutive animations.
Snap.animation(attr, duration, [easing], [callback]);
However, this instantly becomes unruly if we have more than two keyframes, essentially sending us into a form of callback hell. To handle this problem, we’ll implement playTween as a recursive function, allowing us to loop through animations without necessarily having to nest them.
Let’s start by defining the parameters of our animation. Just as with resetTween, we’ll set the values in our transform string to the keyframe values. Easing is done very much in the same way. Duration is either set to the pause leading up to the first animation or calculated as the span of time between steps.
/*
Recursively loop through keyframes to create pauses or tweens

@param {Object} element
@param {Array}  keyframes
@param {Int}    duration
@param {Int}    index
*/
playTween: function(element, keyframes, duration, index) {
var self = this;

// Set keyframes we’re transitioning to
var translateX = keyframes[index].x;
var translateY = keyframes[index].y;

// Set easing parameter
var easing = mina[keyframes[index].easing];

// Set duration as an initial pause or the difference of steps between keyframes
var newDuration = index ? ((keyframes[index].step - keyframes[(index-1)].step) * duration) : (keyframes[index].step * duration);
}
With the parameters prepared, let’s write conditional statements that pause, play or kill an animation. Our first conditional statement checks whether the animation begins immediately at step 0. If it does, we’ll move on, because the transform function already handles this first keyframe. If we tried to animate to the same values as resetTween, we would sometimes see a brief flicker, a bug that took us ages to find. The next two conditional statements check whether we should delay the animation or begin playing tweens. The one thing to note is the use of nested conditional statements that check whether the recursive function should fire again. Without them, playTween could run indefinitely.
// Play first tween immediately if starts on step 0
if (index === 0 && keyframes[index].step === 0) {
self.playTween(element, keyframes, duration, (index + 1));
}

// Or pause tween if initial keyframe
else if (index === 0 && keyframes[index].step !== 0) {
setTimeout(function() {
  if (index !== (keyframes.length - 1)) {
    self.playTween(element, keyframes, duration, (index + 1));
  }
}, newDuration);
}

// Or animate tweens if keyframes exist
else {
element.animate({
  transform: 'T' + translateX + ' ' + translateY
}, newDuration, easing, function() {
  if (index !== (keyframes.length - 1)) {
    self.playTween(element, keyframes, duration, (index + 1));
  }
});
}
The last step is to update our init function to call resetTween and playTween.
init: function () {
var self = this;

self.resetTween(self.options.element, self.options.keyframes);
self.playTween(self.options.element, self.options.keyframes, self.options.duration, 0);
}
See the Pen svgTween - Translate by Michael Ngo (@hellomichael) on CodePen.
svgTween: Rotation And Scale
- Tween: rotate and scale, GitHub
With our zipper now moving from right to left, it’s time to add rotation and scale to the mix. Let’s amend our options to include type, originX and originY. Because svgTween will now handle all transformations, we’ll include a type variable to specify which one. We’ll also track originX and originY to set the correct transform-origins for scale and rotation. Translation is never affected by transform-origin, so it is always set to center center by default.
options: {
element:    null,
type:       null,
keyframes:  null,
duration:   null,
originX:    null,
originY:    null
}
Let’s update resetTween and playTween to handle these new values. We’ll first check the type and then construct the respective transform strings. We’ll create separate translateX, translateY, rotationAngle, scaleX and scaleY variables, so that it is visually identifiable how our transform strings are generated.
/*
Resets the animation to the first keyframe

@param {Object} element
@param {String} type - "scale", "rotate", "translate"
@param {Array}  keyframes
@param {String} originX - "left", "right", "center"
@param {String} originY - "top", "bottom", "center"
*/
resetTween: function (element, type, keyframes, originX, originY) {
var transform, translateX, translateY, rotationAngle, scaleX, scaleY;

if (type === 'translate') {
  translateX = keyframes[0].x;
  translateY = keyframes[0].y;
  transform = 'T' + translateX + ' ' + translateY;
}

else if (type === 'rotate') {
  rotationAngle = keyframes[0].angle;
  transform = 'R' + rotationAngle + ' ' + originX + ' ' + originY;
}

else if (type === 'scale') {
  scaleX = keyframes[0].x;
  scaleY = keyframes[0].y;
  transform = 'S' + scaleX + ' ' + scaleY + ' ' + originX + ' ' + originY;
}

element.transform(transform);
We’ll mimic the same pattern in playTween, replacing the relevant index from the recursive function. We’ll also update the function calls with the new type, originX and originY parameters.
/*
Recursively loop through keyframes to create pauses or tweens

@param {Object} element
@param {String} type - "scale", "rotate", "translate"
@param {Array}  keyframes
@param {String} originX - "left", "right", "center"
@param {String} originY - "top", "bottom", "center"
@param {Int}    duration
@param {Int}    index
*/
playTween: function(element, type, keyframes, originX, originY, duration, index) {
var self = this;

// Set keyframes we're transitioning to
var transform, translateX, translateY, rotationAngle, scaleX, scaleY;

if (type === 'translate') {
  translateX = keyframes[index].x;
  translateY = keyframes[index].y;
  transform = 'T' + translateX + ' ' + translateY;
}

else if (type === 'rotate') {
  rotationAngle = keyframes[index].angle;
  transform = 'R' + rotationAngle + ' ' + originX + ' ' + originY;
}

else if (type === 'scale') {
  scaleX = keyframes[index].x;
  scaleY = keyframes[index].y;
  transform = 'S' + scaleX + ' ' + scaleY + ' ' + originX + ' ' + originY;
}

// Set easing parameter
var easing = mina[keyframes[index].easing];

// Set duration as an initial pause or the difference of steps between keyframes
var newDuration = index ? ((keyframes[index].step - keyframes[(index-1)].step) * duration) : (keyframes[index].step * duration);

// Skip first tween if animation immediately starts on step 0
if (index === 0 && keyframes[index].step === 0) {
  self.playTween(element, type, keyframes, originX, originY, duration, (index + 1));
}

// Or pause tween if initial keyframe
else if (index === 0 && keyframes[index].step !== 0) {
  setTimeout(function() {
    if (index !== (keyframes.length - 1)) {
      self.playTween(element, type, keyframes, originX, originY, duration, (index + 1));
    }
  }, newDuration);
}

// Or animate tweens if keyframes exist
else {
  element.animate({
    transform: transform
  }, newDuration, easing, function() {
    if (index !== (keyframes.length - 1)) {
      self.playTween(element, type, keyframes, originX, originY, duration, (index + 1));
    }
  });
}
}
Lastly, we’ll update our init function to set type, originX and originY, before calling resetTween and playTween. We can set type simply by adopting the class of the passed-in element. At this point, we can transfer over getOriginX and getOriginY from SVGAnimation. We then use a ternary operator to set our origin, defaulting to center if the values are undefined.
init: function () {
var self = this;

// Set type
self.options.type = self.options.element.node.getAttributeNode('class').value;

// Set bbox to specific transform element (.translate, .scale, .rotate)
var bBox = self.options.element.getBBox();

// Set origin as specified or default to center
self.options.originX = self.options.keyframes[0].cx ? self.getOriginX(bBox, self.options.keyframes[0].cx) : self.getOriginX(bBox, 'center');
self.options.originY = self.options.keyframes[0].cy ? self.getOriginY(bBox, self.options.keyframes[0].cy) : self.getOriginY(bBox, 'center');

// Reset and play tween
self.resetTween(self.options.element, self.options.type, self.options.keyframes, self.options.originX, self.options.originY);
self.playTween(self.options.element, self.options.type, self.options.keyframes, self.options.originX, self.options.originY, self.options.duration, 0);
}
Let’s finalize our zipper animation by instantiating new tweens for both rotation and scale. As with translate, we can calculate the keyframes and duration by the number of steps and overall length of the animation. In reality, we defined all of these parameters much more organically: by viewing the animations as they progressed and constantly fine-tuning the numbers.
// Rotate tween
new svgTween({
element: $zipper.select('.rotate'),
keyframes: [
  {
    "step": 0,
    "angle": 45,
    "cy": "top"
  },

  {
    "step": 2,
    "angle": -60,
    "easing": "easeOutBack"
  },

  {
    "step": 4,
    "angle": 30,
    "easing": "easeOutQuint"
  },

  {
    "step": 6,
    "angle": 0,
    "easing": "easeOutBack"
  }
],
duration: duration
});
// Scale tween
new svgTween({
element: $zipper.select('.scale'),
keyframes: [
{
"step": 0,
"x": 0,
"y": 0,
"cy": "top"
},
{
"step": 2,
"x": 1,
"y": 1,
"easing": "easeOutBack"
}
],
duration: duration
});See the Pen svgTween: Rotation and Scale by Michael Ngo (@hellomichael) on CodePen.
JSON Config
- JSON, GitHub
The very last step of our build is to extract the hardcoded values from SVGAnimation and add them to our constructor instead. Let’s add the keyframes, duration and number of steps in the instantiation.
(function() {
var backpack = new svgAnimation({
  canvas:       new Snap('#canvas'),
  svg:          'svg/backpack.svg',
  data:         'json/backpack.json',
  duration:     2000,
  steps:        10
});
})();
By passing in a JSON file to define keyframes, a designer can immediately create a prototype without having to dive into documentation. In fact, this concept could be completely library-agnostic if you replace Snap.svg with GSAP, Mo.js or the Web Animations API.
The JSON file is formatted into separate tweens, consisting of element IDs and keyframes. We include the zipper animation as an example, but the backpack.json file includes arrays for all of the elements (zipper, pockets, logo, etc.).
{
"animations": [
  {
    "id": "#zipper",
    "keyframes": {
      "translateKeyframes": [
        {
          "step": 6,
          "x": 110,
          "y": 0
        },

        {
          "step": 9,
          "x": 0,
          "y": 0,
          "easing": "easeOutQuint"
        }
      ],

      "rotateKeyframes": [
        {
          "step": 4,
          "angle": 45,
          "cy": "top"
        },

        {
          "step": 6,
          "angle": -60,
          "easing": "easeOutBack"
        },

        {
          "step": 8,
          "angle": 30,
          "easing": "easeOutQuint"
        },

        {
          "step": 10,
          "angle": 0,
          "easing": "easeOutBack"
        }
      ],

      "scaleKeyframes": [
        {
          "step": 4,
          "x": 0,
          "y": 0,
          "cy": "top"
        },

        {
          "step": 6,
          "x": 1,
          "y": 1,
          "easing": "easeOutBack"
        }
      ]
    }
  }
]
}
options: {
data: null,
canvas: null,
svg: null,
duration: null,
steps: null
}The details of how to load a JSON file are beyond the scope of this article, but what’s significant is the use of a callback function to return the JSON data for future use — in our case, passing the animations array to loadSVG.
/*
Get JSON data and populate options
@param {Object} data
@param {Function} callback
*/
loadJSON: function(data, callback) {
var self = this;
// XML request
var xobj = new XMLHttpRequest();
xobj.open(‘GET’, data, true);
xobj.onreadystatechange = function() {
// Success
if (xobj.readyState === 4 && xobj.status === 200) {
var json = JSON.parse(xobj.responseText);
if (callback && typeof(callback) === "function") {
callback(json);
}
}
};
xobj.send(null);
}
We’re now able to update loadSVG to loop through our animations array, creating svgTweens dynamically. If any of translateKeyframes, rotateKeyframes or scaleKeyframes are defined, we instantiate a new svgTween, passing in the keyframes and duration from our options file.
loadSVG: function(canvas, svg, animations, duration) {
var self = this;

Snap.load(svg, function(data) {
  // Placed SVG into the DOM
  canvas.append(data);

  // Create tweens for each animation
  animations.forEach(function(animation) {
    var element = canvas.select(animation.id);

    // Create scale, rotate and transform groups around an SVG node
    self.createTransformGroup(element);

    // Create tween based on keyframes
    if (animation.keyframes.translateKeyframes) {
      self.options.tweens.push(new svgTween({
        element: element.select('.translate'),
        keyframes: animation.keyframes.translateKeyframes,
        duration: duration
      }));
    }

    if (animation.keyframes.rotateKeyframes) {
      self.options.tweens.push(new svgTween({
        element: element.select('.rotate'),
        keyframes: animation.keyframes.rotateKeyframes,
        duration: duration
      }));
    }

    if (animation.keyframes.scaleKeyframes) {
      self.options.tweens.push(new svgTween({
        element: element.select('.scale'),
        keyframes: animation.keyframes.scaleKeyframes,
        duration: duration
      }));
    }
  });
});
}
Finally, we update our init function to call loadJSON, which in turn calls loadSVG, finishing our tutorial for good.
init: function() {
var self = this;

self.loadJSON(self.options.data, function (data) {
  self.loadSVG(self.options.canvas, self.options.svg, data.animations, (self.options.duration/self.options.steps));
});
}
See the Pen JSON Config by Michael Ngo (@hellomichael) on CodePen.
A Note On Performance
Our goal was to see how far we could push SVG animation; so, we favored animation fidelity over performance. We stand by this because it enabled us to push our animations much further than anticipated. However, we didn’t ignore performance completely.
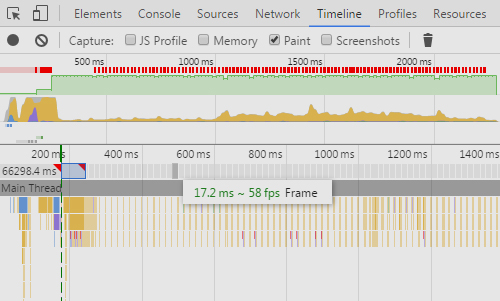
Looking at the Chrome DevTools timeline, we see that the animation plays at a steady 60 frames per second, with a few hiccups in between. If we break down the backpack animation, there are 19 elements with 3 possible transforms. That means, at worst, there are 57 possible tweens happening at once. Fortunately, this isn’t the case because the tweens are staggered over the lifetime of the animation. We can visually see this in the CPU graph, as its usage steadily ramps up, peaks where the animations overlap the most, and then diminishes as each tween ends. Visually, Firefox and Internet Explorer were able to play the animations with no discernible differences in performance.
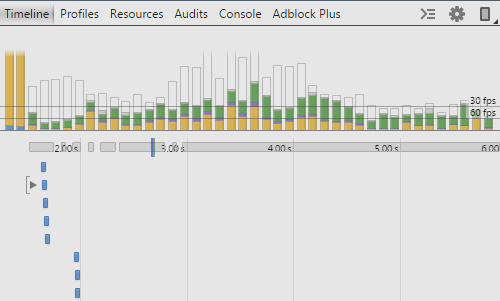
As expected, mobile devices took a performance hit. Using remote debugging on an old Android device, our frame rate dropped from 60 per second, hovering between 30 and 60. Though not perfect, we felt this was more than satisfactory for our needs. There is a silver lining, though, because our latest tests on an iPhone 5 and iPhone 6 performed flawlessly.
What’s Next?
Unfortunately, the campaign was dropped before completion, so we never had a chance to dive deeper into the project. As is, the source code provided isn’t quite production-ready; we would have liked to have addressed a few key issues.
Event-Driven
Our Codepen embed provides a “rerun” button, but our implementation isn’t event-driven. Ideally, the animations wouldn’t immediately play back until initiated via some type of interaction (mouse click, waypoint, etc.).
Mobile Devices
While these animations do run on mobile devices, as mentioned, they are processor-heavy. So, consider their importance in the overall design of your project. Performance and file size could be saved significantly by excluding them. If they’re an absolute necessity, consider further how they could be made responsive for mobile viewports.
Fallbacks
The solution for our animations works in all modern browsers and has been tested in Internet Explorer 9+, Firefox and Chrome. This is primarily due to Snap.svg support. If your project requires the use of older browsers, you could try using Snap.svg’s predecessor, Raphael. The more accessible approach is progressive enhancement, serving a static SVG initially and then adding animation for those with capable browsers.
Signing Off
Well, there you have it, from simple illustration to complex animation. You can download the entire code base on GitHub.

Last but not least, a big thank you to Rey Bango of the Smashing Magazine team, Chris Halaska for the amazing illustrations, Matt Harwood for the code review, and Rhiana Chan for the much-needed editing.
Further Reading
- Rethinking Responsive SVG
- A Few Different Ways To Use SVG Sprites In Animation
- Creating Cel Animations With SVG
- The Guide To CSS Animation: Principles and Examples


