Diverse Test-Automation Frameworks For React Native Apps

Email Newsletter
Weekly tips on front-end & UX.
Trusted by 182,000+ folks.
 Celebrating 10 million developers
 Custom Web Forms for Angular, React, & Vue. Your backend.


The bar is set high for today’s mobile apps. First, apps must meet the standard of quality that app markets expect. Secondly, mobile app users are very demanding. Plenty of alternatives are available to download, so users will not tolerate a buggy app. Because mobile apps have become such a crucial part of people’s lives, users won’t be shy about sharing their love or hate for an app — and that feedback gets in front of millions of users in seconds.
Mobile is more important than ever. But getting an app just right, getting it to work across all possible devices, with different OS versions, display resolutions, chipsets and other hardware characteristics, and making the user experience smooth across all possible configurations, is a challenging task.
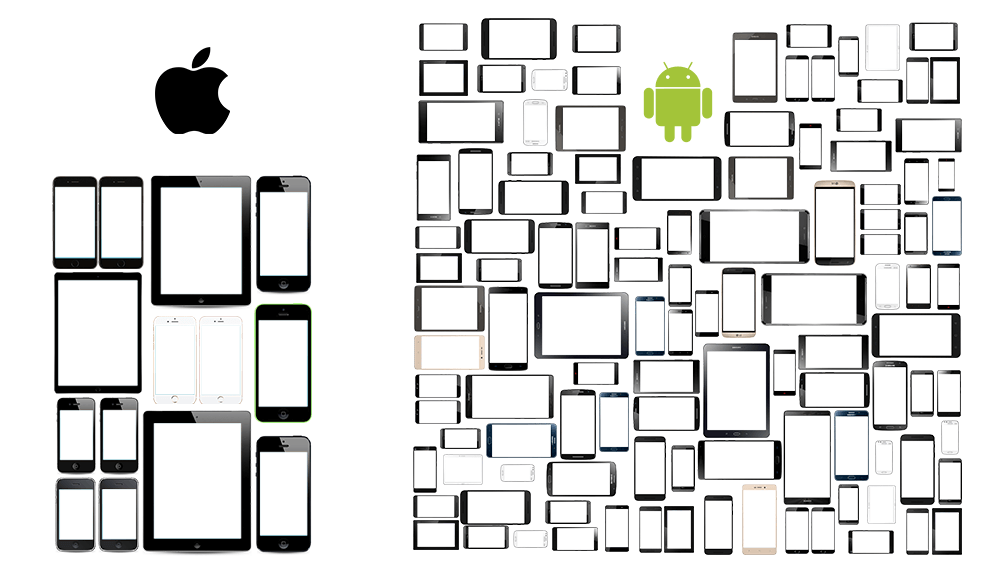
A ton of great technologies, tools, frameworks and open-source components are available for building native mobile apps. What value does React Native bring to the scene, and how can we make sure that apps built with it are well received by their target audiences?
In this article, we’ll look at what’s available for testing React Native apps. First, I’ll explain some key features of React Native, before looking at how to implement these tests. Secondly, I’ll categorize testing methods and frameworks on three levels (unit, integration, functional), providing examples for each. Finally, I’ll provide simple examples of how to implement tests using the most popular open-source test-automation frameworks for functional app testing.
The Basic Architecture Of React Native Apps
It all got started with React more than three years ago, when Facebook introduced its framework to web developers. It was bound to be popular, not just because it was authored and developed by Facebook, but because of the capabilities it provided to web developers — and especially how it changed the way we build apps.
The concept of this type of “learn once, write anywhere” framework wasn’t new, though; we had already seen JavaScript libraries do similar things (Sencha, PhoneGap and Appcelerator, among others), but something was better about React that had an impact on developers’ habits and how they break down an application’s UI into discrete components.
React Native does not use the DOM for rendering. Instead, it renders with native UI views, which means you are using the native components provided by the operating system. This sort of product-creation flow, where you replace the DOM API with a more declarative API, gives developers a more cohesive and simplified level of abstraction.
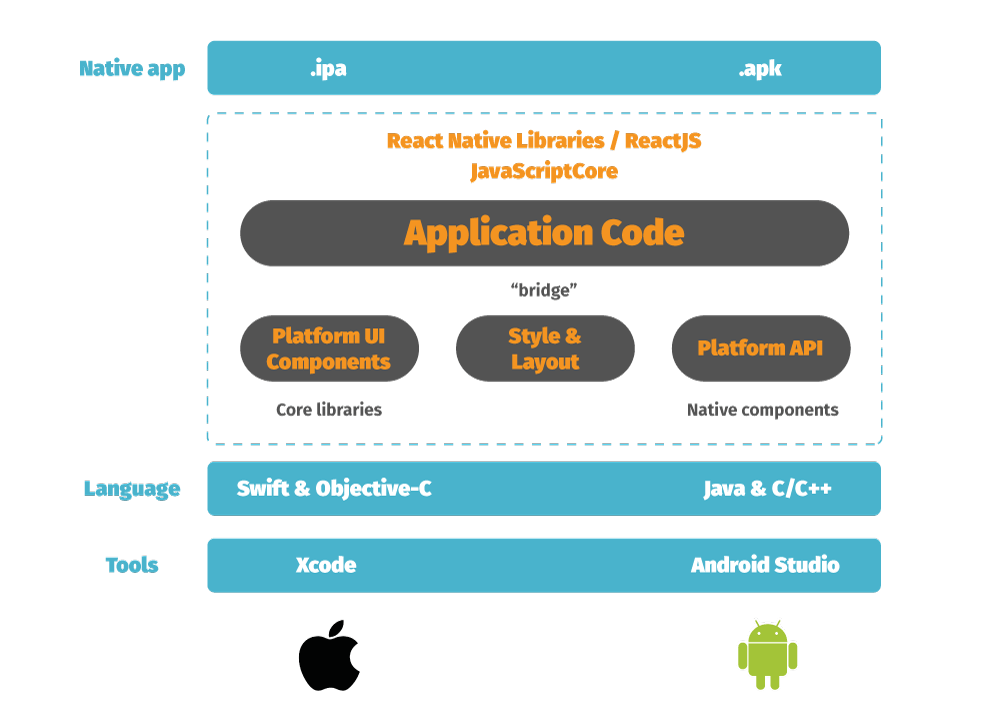
The key thing about React Native is that it brings the React programming model to mobile apps, development and testing. It doesn’t actually work directly as a cross-platform tool or framework, but it accelerates the trend of building mobile apps on this new platform. And that’s one of the cornerstones of what makes React Native so powerful, easy to learn and easy to write on this new platform.
The major difference, as well as advantage, of native mobile versus the web is that, instead of running a JavaScript-based implementation in a browser and exposing HTML elements, we are now relying on the embedded JavaScriptCore in apps, which get platform-specific UI elements.
Test Automation On Different Levels: Unit, Integration, Component And Functional
All mobile software is built using composition. On Android and iOS, this means that small software components are arranged together to form larger, higher-level components with greater functionality, until the goals and requirements of the application have been met. A good testing practice is to run tests that cover functionality at all levels of the composition.
In this article, I’ll cover test methods and automation frameworks at three levels. The primary focus is on the highest level, functional testing, but React Native apps can be tested — and testing can be automated — on at least the following levels:
- Unit testing
This could be even as basic as testing JavaScript objects and methods on the component level. - Component testing
Each component can be tested either visually or functionally. ReactTestUtils provides a simple framework for testing React components. - Integration testing
Integration testing comes next and is a phase when a group of different units are typically tested as an entity. - Functional testing
Functional testing is a type of black-box testing that focuses on user requirements and interactions, and it covers all underlying software, all user interaction and the application as an entity.
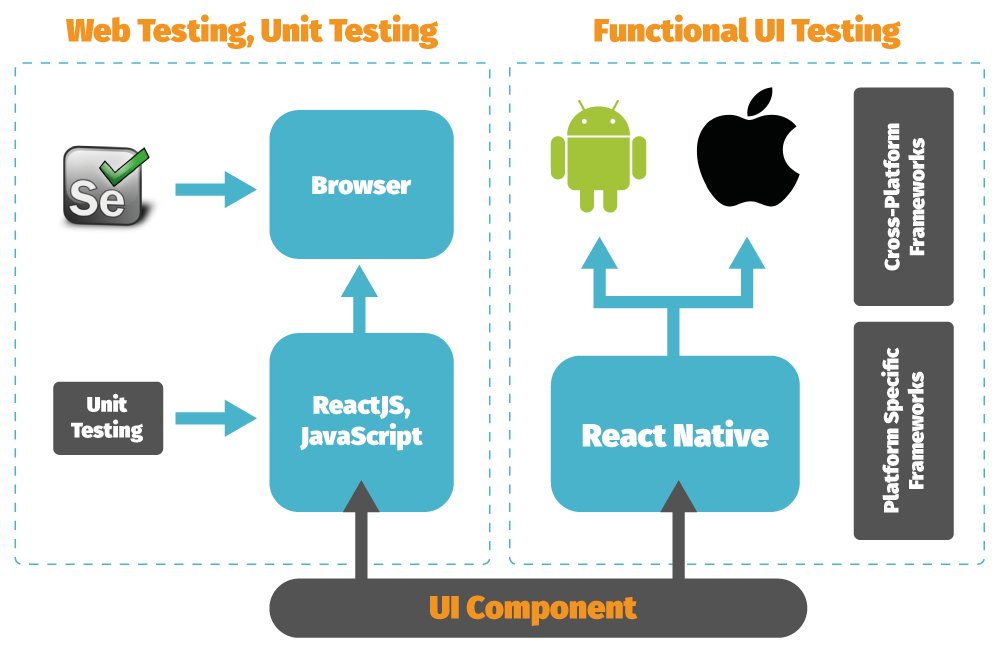
In addition to ReactTestUtils, React Native provides useful unit-testing methods, but none of them thoroughly cover the application’s actual logic. Therefore, mobile apps built on React Native benefit more from functional UI testing. A variety of functional test-automation frameworks are available, and we’ll look at few of the most popular ones in this article.
While unit testing can be done at the component level, functional test automation provides better capabilities for testing the larger entities in a React Native app. With React Native, component logic unit testing can be done in isolation, using traditional JavaScript libraries and forcing React Native to return regular components instead of native ones. With functional test-automation frameworks, UI components are part of the app and are easy to test as a whole.
I’ll separate these frameworks into cross-platform frameworks and platform-specific frameworks, as illustrated in the picture below.
The best part of React Native apps is that they are fully native for both major mobile platforms (Android and iOS). This means we get more frameworks, tools and native methods for testing purposes. We’ll look at functional test-automation frameworks in the section below titled “Using Functional Test-Automation Frameworks With React Native Apps.”
Let’s start with unit-testing capabilities, using a JavaScript test to illustrate.
Unit Testing With Jest And Jasmine
By default, React Native provides Jest tests for unit testing, and this works for both Android and iOS. Currently, test coverage isn’t perfect, but according to Facebook, more unit-testing capabilities will be introduced in React Native, and users can already build their own.
Jest uses the Jasmine behavior-driven framework as the basis for testing JavaScript code. Every test case starts from a describe() function call, similar to how JUnit uses the TestCase class. The describe() function takes two parameters: the description and title of the test case, and the function to be executed. The it() function includes all of the test steps and (similar to JUnit) provides a series of expect() functions.
Here is an example of a Jasmine test script for a player application.
describe("Player", function() {
  var player;
  var song;

  beforeEach(function() {
    player = new Player();
    song = new Song();
  });

  it("should be able to play a song", function() {
    player.play(song);
    expect(player.currentlyPlayingSong).toEqual(song);

    //demonstrates use of custom matcher
    expect(player).toBePlaying(song);
  });

  describe("when song has been paused", function() {
    beforeEach(function() {
      player.play(song);
      player.pause();
    });

    it("should indicate the song is paused", function() {
      expect(player.isPlaying).toBeFalsy();

      // demonstrates use of 'not' with a custom matcher
      expect(player).not.toBePlaying(song);
    });

    it("should be possible to resume", function() {
      player.resume();
      expect(player.isPlaying).toBeTruthy();
      expect(player.currentlyPlayingSong).toEqual(song);
    });
  });

  // demonstrates use of spies to intercept and test method calls
  it("tells the current song whether the user has made it a favorite", function() {
    spyOn(song, 'persistFavoriteStatus');

    player.play(song);
    player.makeFavorite();

    expect(song.persistFavoriteStatus).toHaveBeenCalledWith(true);
  });

  //demonstrates use of expected exceptions
  describe("#resume", function() {
    it("should throw an exception if song is already playing", function() {
      player.play(song);

      expect(function() {
        player.resume();
      }).toThrow("song is already playing");
    });
  });
});
This basic example shows how Jasmine can be used to test the functionality of an app, but it keeps the focus on method-level testing. In addition, React Native provides some basic capabilities for testing integrated components. This works for both native and JavaScript components and enables communication between them via a bridge.
Integration Testing
At the moment, integration tests highlighted in the React Native community are available only for iOS and are very limited in their ability to test components. The communication goes through the bridge and requires both native and JavaScript components. For this functionality, two components are available to implement customized integration tests, RCTestRunner and RCTestModule.
A basic Objective-C example for building a test skeleton of an iOS app would start like this:
@implementation ExampleTests
{
  RCTTestRunner *_runner;
}

- (void)setUp
{
  [super setUp];
  _runner = RCTInitRunnerForApp(@"IntegrationTestHarnessTest", nil);
}

- void()testExampleTests
{
    [_runner runTest:_cmd module:@"ExampleTests"]
}
@end
However, there are other ways to run integration testing and to extend it to Android and iOS. A good alternative for running both unit and integration tests is Mocha, which provides a feature-rich JavaScript test framework that runs on Node.js. Mocha also provides behavior-driven development (BDD), test-driven development (TDD) and QUnit interfaces for testing.
For functional UI testing, I’ll be covering the most prominent and most used test-automation frameworks, including Appium, Calabash, XCTest and a few others.
Using Functional Test-Automation Frameworks With React Native Apps
To streamline the app development process and to maximize testing coverage, we have numerous open-source test-automation frameworks to choose from.
The best choice — if your app will run on several OS platforms — is a framework that supports multiple platforms and provides a robust foundation for test automation. In mobile, the term “cross-platform” refers to a framework that provides the same API, tools and capabilities for both Android and iOS.
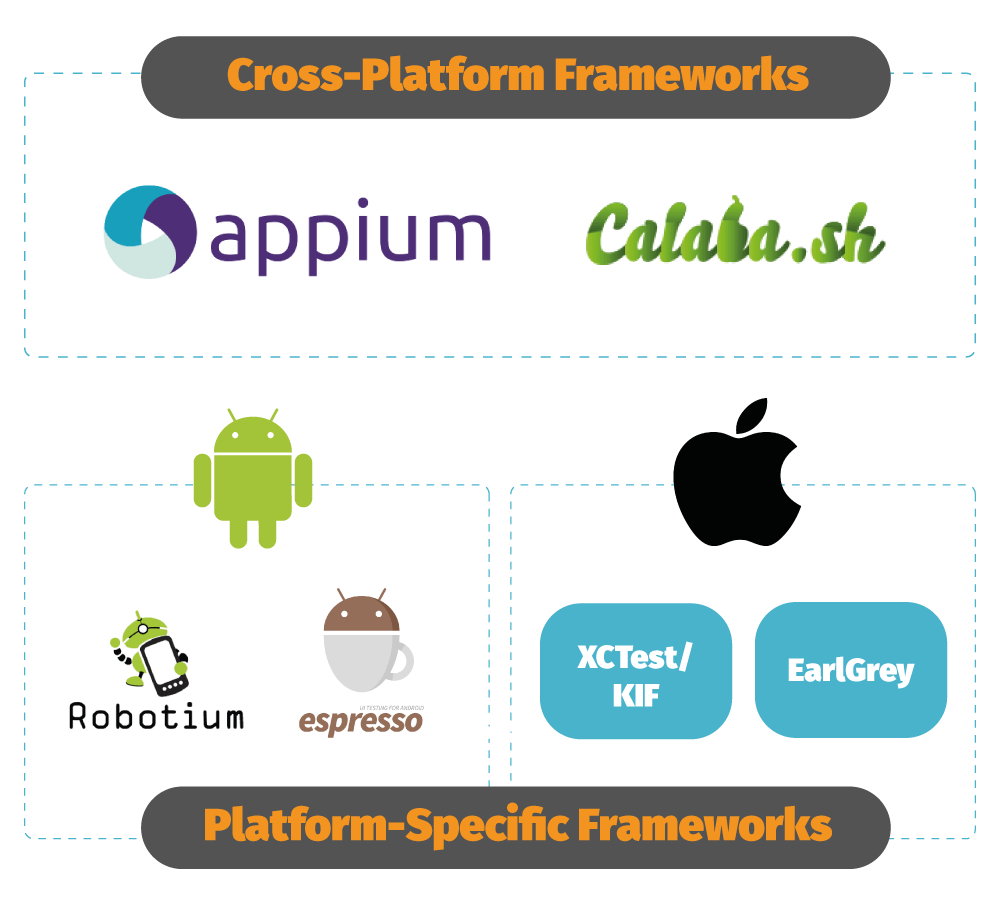
In addition, a range of great platform-specific frameworks are available. Naturally, each framework has been built for a particular platform and, in most cases, is easier to adopt for that platform. In addition to Appium and Calabash, I’ll cover four platform-specific frameworks in this article: Robotium and Espresso for Android, and XCTest and EarlGrey for iOS.
When it comes to test automation, bear in mind that apps built with React Native are fully native on both iOS and Android; hence, functional test-automation frameworks will work fine with them.
The example I’ll use with each framework is an implementation of a very basic radio button UI.
<Radio onSelect={this.onSelect.bind(this)} defaultSelect={this.state.optionSelected - 1}>
  <Option color="black" selectedColor="#000000">
    <Item title="First option" description="First radio button"/>
  </Option>
  <Option color="black" selectedColor="#000000">
    <Item title="Second option" description="Second radio button"/>
  </Option>
  <Option color="black" selectedColor="#000000">
    <Item title="Third option" description="Third radio button"/>
   </Option>
</Radio>
The test snippet included in each framework section below shows how the test script deals with each UI element and how clicks and other user inputs are handled. The purpose of the examples is not to provide step-by-step instructions, but rather to compare examples and show what is available for test automation today and what programming languages can be used for testing.
Cross-Platform Frameworks
As stated, React Native is not actually a cross-platform framework, but adoption of it across other platforms is easy. In the next two sections, we’ll go through two popular cross-platform test-automation frameworks for mobile testing and mobile test automation.
Appium
Appium is an open-source test-automation framework, with an inspection tool that works well for native, hybrid and mobile web apps. It uses JSONWireProtocol internally to interact with iOS and Android apps, using Selenium WebDriver. Because of this, Appium works extremely well for the mobile web as well, and the use cases are very similar if Selenium is used for web testing.
In fact, Appium has been a rising star in mobile test automation in the last year. Originally, it was built to provide cross-platform support for both major platforms, Android and iOS.
Being cross-platform means that the framework and its scripts work exactly the same on both platforms. In addition, Appium provides fantastic programming language support — developers can write tests using their favorite language (for example, Java, Ruby, Python, C#), tools and environment. It’s also easy to get started, to create and maintain reusable tests, and to execute those tests on real physical devices.
When it comes React Native-powered apps, JavaScript isn’t necessarily required; tests can be written in any language. For example, Appium scripts can look like this:
driver.findElement(By.id("com.example.app:id/radio0")).click();
driver.findElement(By.id("com.example.app:id/radio1")).click();
driver.findElement(By.id("com.example.app:id/radio2")).click();
driver.findElement(By.id("com.example.app:id/editText1")).click();
driver.findElement(By.id("com.example.app:id/editText1")).sendKeys("Simple Test");
driver.findElement(By.name("Answer")).click();

// or alternatively like this:

driver.findElement(By.id("com.example.app:id/button1")).click();
So, how do these WebDriver functions access apps running on devices? Basically, Appium starts a test script on the device or emulator, which then creates a server and listens for commands from the main Appium server. It is the same as the Selenium server, which gets HTTP requests from Selenium client libraries. The difference between Android and iOS is illustrated in the picture below:
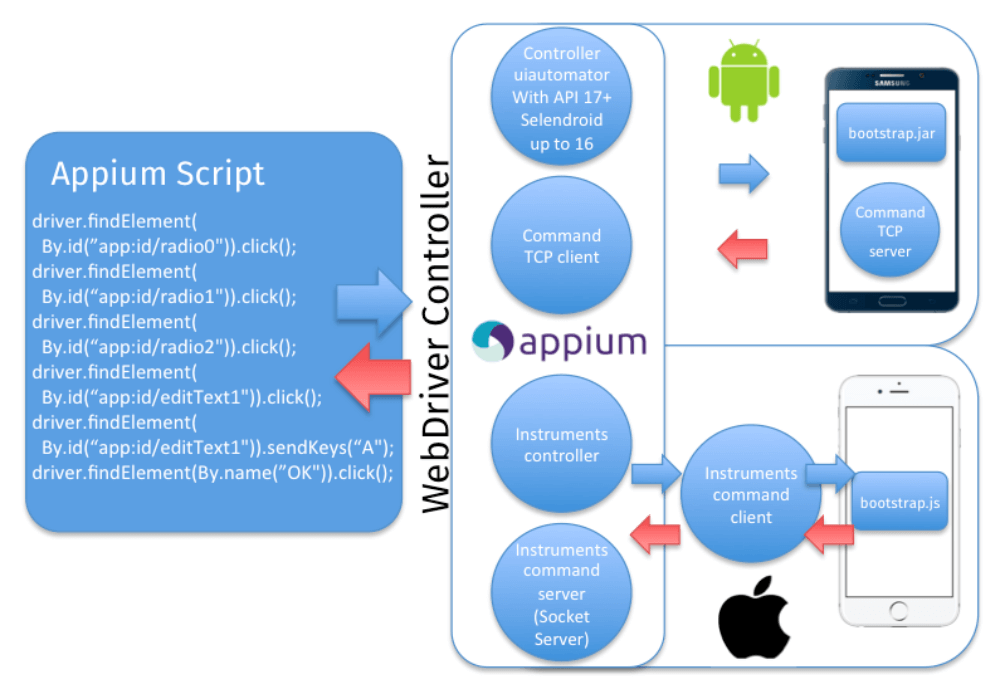
With iOS, Selenium WebDriver gets a command from the Appium script (for example, click()) and sends it in the form of JSON via an HTTP request to the Appium server. Appium knows the automation context and sends this command to the Instruments command server, which waits for the Instruments command client to pick it up and execute it with bootstrap.js in the iOS Instruments environment. Once the command is executed, the Instruments command client sends the message back to the Appium server, which logs everything related to the command in its console. This cycle keeps going until the test script has finished.
On Android, things work almost the same way, except that the frameworks used are Selendroid and UiAutomator. In short, Appium translates WebDriver commands to UiAutomator (API level 17 or higher) or Selendroid (API level 16 or lower) commands. On a physical device, bootstrap.jar launches a TCP server that gets commands from a TCP client. The process is similar on iOS.
If you are interested in getting started with Appium, plenty of material is available, including step-by-step instructions and Appium tutorials.
Calabash
Another great cross-platform testing framework is Calabash, which enables anyone to write tests for mobile applications. The main difference is that Calabash tests are written in Cucumber. The idea behind using this sort of language for tests is awesome: The test itself is like a specification, and all tests are simple and easy to read yet executable by the automation system.
Compared to Appium, Calabash provides an easier way to create cross-platform tests for Android and iOS. This is due to the straightforward vocabulary and specification-oriented language, which makes Calabash tests identical on both platforms. The actual tests are written in Gherkin and run in Cucumber.
Because of these capabilities, the differences between Calabash working on Android and on iOS applications are minor. Again, there is no implication for React Native apps because all components and user interfaces are fully native to these platforms.

The basic testing and test-creation flow, however, remains the same. Calabash (and Gherkin) tests comprise features, scenarios and steps. The recommended approach is to complete the highest-level descriptions first: features, followed by scenarios and then the actual steps. A good rule of thumb is to create Calabash features first.
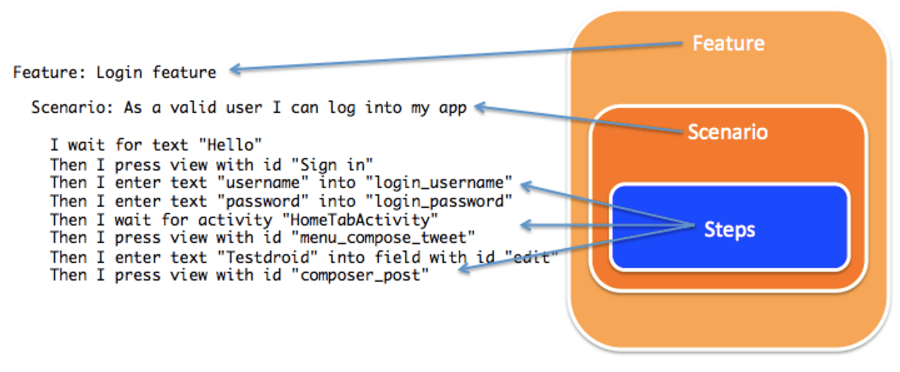
The example below shows how our application and its UI components (radio buttons, text field and button) would be implemented in Calabash:
Feature: Answer the question feature
Scenario: As a valid user, I want to answer app question,
   I wait for text "What is the best way to test application on a hundred devices?"
   Then I press radio button 0
   Then I press radio button 1
   Then I press radio button 2
   Then I enter text "Simple Test" into field with id "editText1"
   Then I press view with id "Button1"
Steps usually begin with one of the keywords given, then, when, and or but. However, they don’t have to; they can use * instead.
Calabash is also widely used by non-developers, and it can be used for product specifications and documentation due to its easy-to-understand language and logic. Eventually, the features and scenarios are wrapped in Ruby code.
Setting up Calabash and starting to work with it are easy. If you have Bundler and Ruby (or rbenv) installed, just hit these few lines in your console, and a Calabash environment will soon be set up:
$ gem install calabash-android
$ gem install calabash-cucumber
This will take care of installing Calabash-Android and Calabash-iOS, and your journey with test automation can begin.
Platform-Specific Frameworks
When it comes to automating tests on Android and iOS apps, there are certain advantages to using platform-specific frameworks over cross-platform ones. For instance, some frameworks are built closely to SDKs and IDEs, which are readily available while an application is under development. Let’s look at a few examples of these types of frameworks for Android and iOS.
Robotium And ExtSolo (Android)
Robotium was one of the first testing frameworks to work for native and hybrid Android apps. The UI tests created with Robotium enable functional, system and user-acceptance tests for Android apps, spanning and handling multiple Android activities. In fact, Robotium provides support for very early versions of Android, starting from API level 8.
Recently, Robotium was extended with the ExtSolo library, which provides various useful features for app testing:
- automatic scaling of x and y clicks for any display resolution;
- multi-path drags;
- automatic screenshot capture at moment of test failure;
- mock locations (GPS coordinates);
- change of Android device language;
- control of Wi-Fi connection;
With Java code, tests are easy to build using any Java SDK and IDE. The primary function used in this example is findViewById, which finds a view that is identified by the id attribute. The UI element could be also identified by a name, class or some other attribute. Our code example with an id attribute would look like this:
solo.clickOnView(solo.findViewById("com.example.app:id/radio0"));
solo.clickOnView(solo.findViewById("com.example.app:id/radio1"));
solo.clickOnView(solo.findViewById("com.example.app:id/radio2"));
solo.enterText((EditText) solo.findViewById("com.example.app:id/editText1"), "Simple Test");
solo.clickOnView(solo.findViewById("com.example.app:id/button1"));
Robotium here is trying to locate UI elements based on the id, description and other characteristics. Unfortunately, this isn’t always the best approach and does not necessarily work well with webview components. However, with the help of the ExtSolo library, users can define clicks and other interactions on UI elements that scale with the resolution. Also, hardcoding coordinates is possible, and these scale when the display resolution changes.
If you are using Robotium, then getting started with Robotium ExtSolo is easy and effortless. Just clone the repository for yourself and build the library:
$ git clone https://github.com/bitbar/robotium-extensions
$ ant clean instrument
After this, place the recently built .jar file in the libs folder in your Android Studio project, and make sure your project is linked to it. All of these great additional features and services are now in your workspace.
Espresso (Android)
The Espresso testing framework provides APIs for writing UI tests to simulate user interactions for an Android app. The Espresso API is lightweight and provides three main components: viewMatchers, viewActions and viewAssertions.
The beauty of Espresso is that it provides automatic synchronization of test methods and UI elements that are being tested. For example, if the test script wants to press a button but the button isn’t visible on the screen yet, it will wait until this button can be pressed (i.e. it is visible and a click can happen). This makes test execution very fast because no test scripts need to include any sleep or wait commands. Also, developers do not need additional logic to handle timing-related issues.
// R class ID identifier for radio buttons
onView(withId(R.id.radio0)).perform(click());
onView(withId(R.id.radio1)).perform(click());
onView(withId(R.id.radio2)).perform(click());
onView(withId(R.id.EditText1)).perform(click());

// Instead of R, we use getIdentifier
onView(withId(getInstrumentation().getTargetContext().getResources()
    .getIdentifier("com.example.app:id/EditText1", null, null))).perform((typeText("Simple Test")));
onView(withId(getInstrumentation().getTargetContext().getResources()
    .getIdentifier("com.example.app:id/Button1", null, null))).perform(click());
Espresso has its own pros and cons, and due to the lightweight API, not many additional services or function calls are available to developers. For instance, you must use alternative methods to take screenshots, manage tests, output test results and more.
At Google IO 2016 Google introduced Espresso Test Recorder as an integral part of Android Studio. While the feature is not yet available, it will definitely be worth the wait.
XCTest And KIF (iOS)
XCTest is tightly coupled with Xcode but is still usable with both real iOS devices and simulators. XCTest allows developers to write tests for components at any level and also provides a framework for UI testing capabilities. XCTest tests are grouped into subclasses of XCTestCase. Writing any tests with XCTest should be trivial to iOS developers because XCTest is fully compatible with both Objective-C and Swift.
KIF (short for “keep it functional”) is an iOS integration test framework that is closely related to and that uses XCTest test targets. KIF tests can be executed directly in XCTestCase or any subclass. KIF allows for easy automation of iOS applications by leveraging the accessibility attributes that the OS makes available to those with visual disabilities.
Let’s see how our UI components would look with Objective-C:
- (void)testClicksOnRadioButtons {
   [tester tapViewWithAccessibilityLabel:@”Radio1”];
   [tester tapViewWithAccessibilityLabel:@”Radio2”];
   [tester tapViewWithAccessibilityLabel:@”Radio3”];

   [tester enterText:@”Simple Test”
                    intoViewWithAccessibilityLabel:@”editText1”];

   [tester tapViewWithAccessibilityLabel:@”Answer”];
}
Alternatively, with Swift, the test would look as simple as this:
testClicksOnRadioButtons() {
   let app = XCUIApplication()

   app.radiobutton[0].tap()
   app.radiobutton[1].tap()
   app.radiobutton[2].tap()

   app.staticTexts[“Simple Test”]

   app.button[0].tap()
}
Note that this high-level pseudo-code requires additional code in order to fully function. If you are looking for more information on XCTest and generally on using Xcode testing capabilities, Apple has you covered.
EarlGrey (iOS)
It was just earlier this year when Google open-sourced its functional iOS app-testing framework, named EarlGrey. Being used internally by Google, it has worked relatively well with native iOS apps — YouTube, Google Calendar, Google Photos, Google Play Music, to name a few — and has sparked some serious interest. To get started with EarlGrey, you’ll need the Xcode environment installed and basic knowledge of iOS development.
There are a lot of similarities between EarlGrey and Espresso (yes, both are developed by Google), and their characteristics make both frameworks work and execute tests quickly. Similar to Espresso, EarlGrey tests automatically wait for events (animations, network requests, etc.) before trying to interact with the UI. This makes writing tests easier because developers do not need to worry about sleep or wait commands. In addition, the code itself is easier to maintain because it provides procedural descriptions of the test steps.
EarlGrey also contains matchers that are available from the GREYMatchers class. The documentation recommends using UI elements with the accessibility parameters. To identify UI elements, developers can use grey_accessibilityID() or grey_accessibilityLabel().
- (void)testBasicSelectionAndAction {
[[EarlGrey selectElementWithMatcher::grey_accessibilityID(@"ClickHere")]
    performAction:grey_tap()];

// Example of long press with EarlGrey matchers
- (void)testLongPress {
  [[EarlGrey selectElementWithMatcher::grey_accessibilityLabel(@"Box")]
      performAction:grey_longPressWithDuration(0.5f)];
  [[EarlGrey selectElementWithMatcher::grey_accessibilityLabel(@"One Long Press")]
      assertWithMatcher:grey_sufficientlyVisible()];

// Example of multi-select, visible click on items
- (void)testCollectionMatchers {
  id visibleSendButtonMatcher =
      grey_allOf(grey_accessibilityID(@"Box"), grey_sufficientlyVisible(), nil);
  [[EarlGrey selectElementWithMatcher:visibleSendButtonMatcher]
      performAction:grey_tap()];
}
Similar to XCTest, our radio button implementation isn’t that straightforward, and buttons for XCTest should be defined as iOS-supported UIElements to enable clicks and user interactions.
Conclusion
We’ve covered the basics of React Native applications and how they can be tested using various methods and frameworks. This comes up quite often, but the industry standards for mobile test automation at the functional UI level will work on React Native apps just as they do with any other native apps. The test-automation frameworks we’ve covered here are widely used for native mobile apps, hybrid apps, the mobile web as well as React Native apps.
In summary, determining the programming language that a mobile application is built on is not critical because it won’t have any influence on the test-automation frameworks that it can be tested with. As discussed, plenty of powerful test-automation frameworks are available today, which React Native apps will work with when wrapped as an APK or IPA.
What are you using for React Native app testing? Weigh in with a comment below!
Further Reading
- Building Your First iOS App With JavaScript
- Why You Should Consider React Native For Your Mobile App
- Test Automation For Apps, Games And The Mobile Web
- Server-Side Rendering With React, Node And Express
- Notes On Client-Rendered Accessibility


