What You Should Know About The App Design Process

Email Newsletter
Weekly tips on front-end & UX.
Trusted by 182,000+ folks.
 Register for Free
 Custom Web Forms for Angular, React, & Vue. Your backend.


 Celebrating 10 million developers
I realized something the other day: I’ve been designing apps for nine years now! So much has changed since the early days and, it feels like developers and designers have been through a rollercoaster of evolutions and trends. However, while the actual look and functionality of our apps have changed, along with the tools we use to make them, there are some things that have very much stayed the same, such as the process of designing an app and how we go through the many phases that constitute the creation of an app.
Sure, collectively you could argue that we’ve become a lot better at the process. We’ve invented new terminology and even completely new job titles to better facilitate the process of designing mobile applications. But, at its core, the process remains largely unchanged.
And while this approach has become a truism in most of our industry, it’s far from obvious for anyone entering the field. A lot of articles have been written about all the different aspects of this process, but that doesn’t seem to change the fact that I encounter very basic questions from clients and new designers alike. How do you go about designing an app? So, here’s an article about just that. A top level, somewhat simplified, and very honest overview of the steps involved in designing an app. This is an account of how most of the apps I work on are born, complete with shameless links to the tools I use (several of them my own).
It might be different from how you do it. The steps might be named differently or the tools might vary. In fact, if you’re a seasoned designer, you’ll know most of this. You might even think the content is trivial or, “something everyone knows.” In that case, you’re most likely part of the bubble we live in. But, if you’re a new designer or someone trying to understand what you’re paying other people to do, this will hopefully give you a down-to-earth overview.
Now when people think of ‘designing’ something, their thoughts often circle around the visual aspects of a product. Pixel pushing in Photoshop or laying grids in Sketch, but that’s a common misconception. Design, in the context of this article, covers the entire process. It is every deliberate action meant to produce something. The truth is that from the moment you get an idea, you are designing.
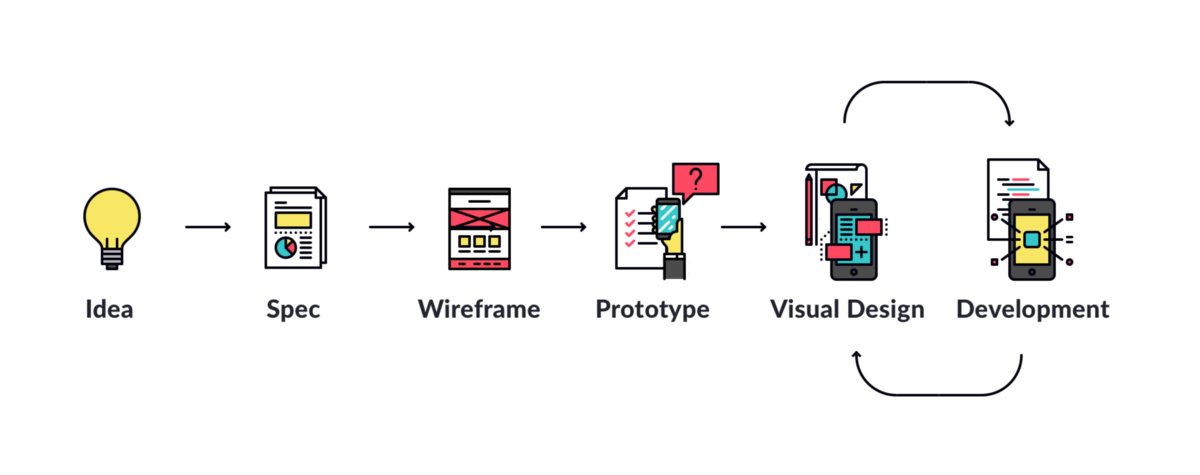
Idea
Everything starts with an idea. This might be your idea or an idea that a client has approached you with. Ideas are great, but they’re also a dime a dozen. The sooner you realize that ideas are nothing but passing phantoms of something that might one day turn into a product, the better you’ll be able to handle this phase.
We tend to put way too much stock in ideas, as getting the idea ‘right’ is far less important than people think. Ideas are sealed up and protected by NDA’s, paraded around in pitch decks, and tend to take on a very defined state much too early.
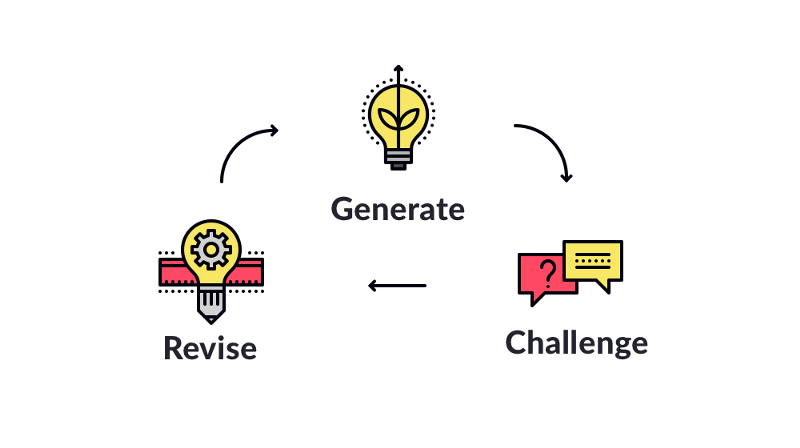
Keeping your idea malleable and changing for as long as possible is, in my experience, much healthier and leads to far better end-results. Ideas should be subjected to a healthy dose of Darwinism before being pursued – survival of the fittest. You want your idea to evolve the best version of itself, and to that end, it can make sense to talk about a circular process within this phase.
Depending on the type of idea, there are different questions to ask. In the case of apps, these are some of the most often asked questions:
- Is this idea financially viable? Making anything takes time, effort and money. Can you recoup your investment? Does the idea have a solid plan for revenue? A realistic one?
- Is this idea technically feasible? Can this be made? Who should make it? How would we go about making it? What sort of tools do we use? What sort of data/API/touch points do we need? What are the obstacles facing the implementation of the idea?
- Is someone else already doing this? Most things today are a remix. While that’s cool, what we can do better? What components of this idea differentiate it from existing ideas? How are we adding something new to the market?
- Could this be made simpler/differently? Are there other ways to accomplish the same goals? Or, are there other methods that could be more effective and take less time to execute?
Those are just a handful of the tough questions you need to ask while you or your clients’ idea is taking shape. To be honest, 90% of app ideas I’ve ever been pitched or have come up with myself, fall flat on the first question. People always underestimate how long it takes to make something and always overestimate how much they stand to gain.
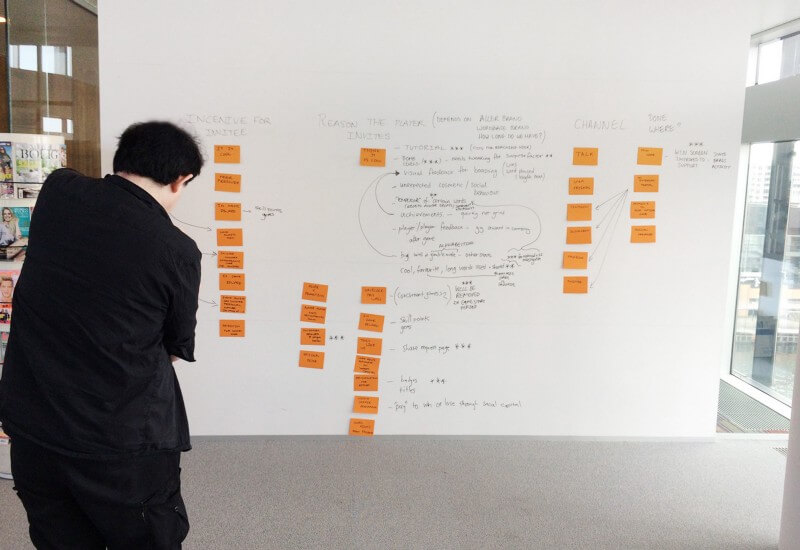
Idea workshops are great ways to force the evolution of your ideas. You can use things like Trello to track aspects of your idea in an environment where you can move around and prioritize concepts. Collaboration helps promote the strong aspects of the concept, the ones that resonate with participants. At the same time, collaboration helps identify and eliminate what is detracting from the idea.
Once you’re satisfied with an idea, it’s time to put things in writing.
Spec
A ‘Specification’ or a ‘Spec’ is the piece of paper(s) that declares what your app does and how it is accomplished. It’s the blueprint if you will. There are quite a few ways to do a spec, ranging from the lighter (also sometimes called a ‘brief’) to the enveloping complete enveloping breakdown. No matter which way you choose to go about it, always do a spec. I repeat: Always do a spec.
In client projects, specs are often contracts on which estimates can be based on – the mother document that dictates to all parties involved what needs to be made and (roughly) how. In personal or in-house projects they’re not as commonly seen as a priority, but they should be.
You’d be surprised how much of an idea is further developed, changed or refined when you’re asked to put everything in writing. Areas of uncertainty are naturally brought forward and further questions are raised. In a sense, the act of creating a spec is the first conscious and calculated ‘design’ of the solution. A lot of initial ideas and assumptions are explored and illuminated in this document, which keeps everyone involved in tune with what is being built. It can also be beneficial to periodically revisit a spec and update it retroactively while the project moves into its next phases.
A program like Pages, Word, or any other simple markup editor will be fine for this phase. The real trick is deciding what to include and what to leave out of a spec. It is best to keep things short and concise under the assumption that the more you write, the more can be misinterpreted. List both functional and non-functional requirements. Explain what your app is, and not how it needs to be done. Use plain language. In the end, the best spec is the one that is agreed upon by all parties.
Many articles could be written about the art of a good spec, however, this is not one of those articles.
Wireframe
Wireframes, or low fidelity mockups, can be either part of the spec or built from the spec. Information Architects (iA’s) and User Experience Designers (UX designers) usually take ownership of this phase but, the truth is it’s important that everyone on the team discuss and understand how the product is put together and how the app is structured.
If you’re a single designer working on the product, you’re likely the one holding the marker here. Draw on your experience of the platform conventions, knowledge of controls and interface paradigms, and apply that knowledge to the challenges you’re trying to solve alongside those who may have domain-specific knowledge. The fusion of knowledge on how to best achieve things on the platform, with knowledge about the target audience or the goal of the product, creates a strong foundation for the architecture of the app.
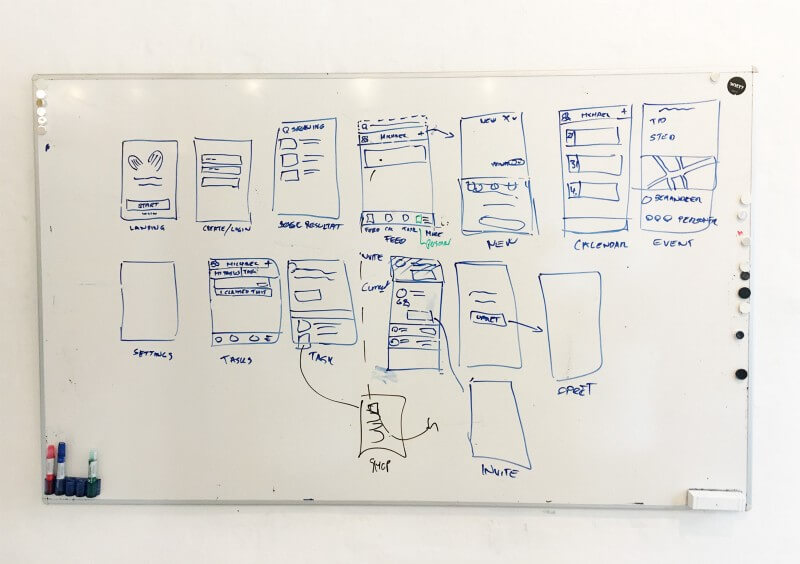
We tend to do workshops either internally or, ideally, with the client, and go through the spec, screen by screen, and whiteboard the wireframes. The wireframes are then brought into a tool to be digitized, shared and revised. Many people prefer applications like Omnigraffle or Sketch, while some of us still use Photoshop.
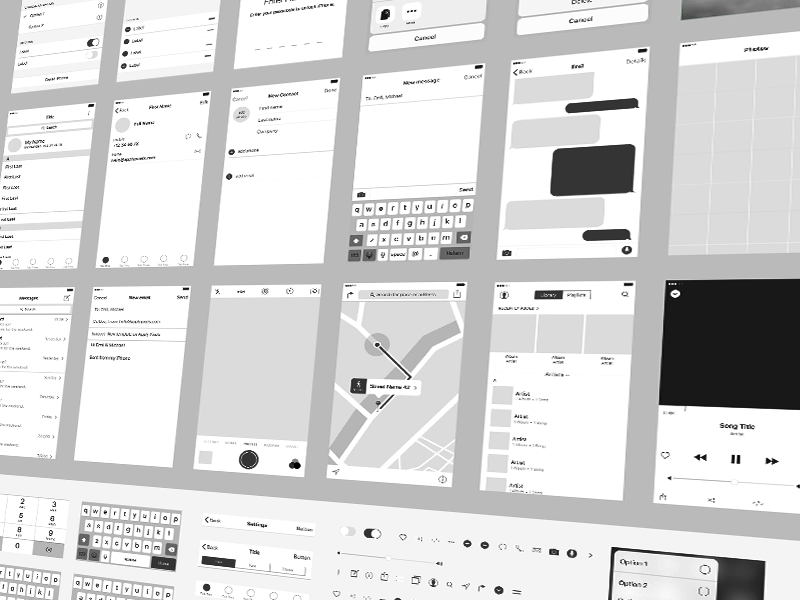
There are many tools out there that will help you wireframe. On applypixels.com I’ve got a wireframe UI kit that I use. Below is an example of how that can be done:
Wireframes are the first deliberate design made in a project. Everything not caught in the production of the spec usually becomes painfully obvious during this phase. Inconsistencies in navigation, entire missing sections of the app or counterintuitive flows are brought forth, discussed and fixed. I like to think of it as the great ironing out of all the wrinkles the original idea has left behind.
Armed with a spec and a wireframe, you’re now ready to get serious. These are also the materials that I advise you have ready when you contract other people to work on your project. Specs and wireframes can vary greatly in quality, but showing that you’ve made those initial preparations makes all of the difference. You had an idea, you’ve committed it to a document, and you’ve thought through a proposed solution.
You’d be surprised how many people do not do this. Why? Because it’s difficult and laborious work. You need to be specific about what you want and how you propose it could be done. The single reason why most apps I’m pitched don’t get off the ground is because it is entirely more compelling to talk about the overall idea of an app instead of asking the tough questions and getting into the gritty details of how to execute it.
Prototype
The next step varies greatly. In fact, the next three steps are all entwined and often run alongside each other. With the spec and the wireframe in hand, we are now ready to attempt a prototype. The word prototype in this context covers many different things, but ultimately it’s about creating a bare-bones version of the app with the goal of testing your hypotheses and get early feedback. Some people use tools like Invision or Marvel where you can convert your low-fidelity mockups into interactive “apps” that allow you to tap through the design. Often, designers go straight for a native prototype written in Swift.
There are pros and cons to each approach. More complex and “bigger” apps with larger teams influencing the product (or with more loose specs) may benefit more from this intermediate step, where iterations are quickly and more easily shared. For smaller teams with a more solid spec, going directly to code allows for a quicker turnaround, while laying the foundation for the actual app. This also often confronts implementation issues directly as you’re actually building the real product right from the start.
There are many tools popping up that span the divide between visual design and functional prototype, while aiming to take collaborative design to new interactive heights. Both Framer and Figma are two options worth looking at.
How you choose to prototype depends on many different factors. The most important thing in this step when deciding is getting early validation of your idea. A bad experience with a prototype might cause you to uncover issues with your wireframes, your spec, or even the very core of your idea. You can then, before you’ve invested time in the next two phases, make changes or abandon it entirely.
Visual Design
Now, you’ve been ‘designing’ all along, but in this phase, you get to what is more traditionally consider ‘design’. Visual design deals with the appearance of the app. It is not just making things look nice, but also making sure that there’s a consistent and identifiable visual language throughout. Here design helps, not only to tell a story and communicate your brand, to guide users through challenging parts of the app, but also to make particular aspects of the experience more enjoyable.
Proper visual design should build on top of all of the experiences you’ve made in the previous stages. It should support the overall ethos of the idea, the goals defined in the specs, the flows laid out in the wireframes, and the lessons learned from the prototype.
Visual design is not just a ‘skin’. It’s not a coat of paint applied to make things look pretty. It is the visual framework you use to create a coherent and consistent experience, tell an engaging story, and differentiate your product from others’. Great visual design elevates the mundane, clarifies the unclear and leaves a lasting impression with the user.
Rules defined in the great unwritten design manual of your product, inform every choice on every visual solution you may encounter. The work in this stage consists of the designer defining a series of rules and conventions and then applying those to every challenge he or she may encounter when putting the interface together. Luckily you don’t need to reinvent the wheel every time (even though sometimes we do just that). iOS & Android have a ton of existing rules, conventions, and expressions on which we can lean. “UI Kit with a Twist” is an expression being thrown around that covers the idea of a visual design that leans on the standard iOS UI components, but with a sassy colored navbar or other minor customizations.
There is no right way of creating a visual design for an app and this stage is probably the phase that has the most tools and approaches. If you’ve been diligent and digitized (and updated) your wireframes you could start to add embellishment to those and build it from there in Sketch or Photoshop. Another place to start is to base your design off existing iOS UI elements and then tweak from there.
I usually start my visual design based on a UI kit, like the one available from applypixels.com (available for both Sketch & Photoshop). This lets me lean on iOS conventions while attempting to break the mold and experiment in subtle but meaningful ways. There are many other UI kits out there, and places like ui8.net can be particularly great sites to find a pre-made style.
Visual design doesn’t end when you hand something off to the developer. It is a continued and constantly evolving process, evaluating your visual rulebook and the choices that dictate. You may find yourself delivering and redelivering assets or tweaking interactions, right up until you ship.
Development
Next up, or as is sometimes the case, alongside, is the development of the app. In an ideal world, the person responsible for developing the app has been part of all previous phases, chiming in with his or her experience, deliberating on the difficulty level of implementation of various proposed designs, and discussing best practices in terms of structure, tools, libraries, and so on.
I am familiar with the desire to clearly separate development from design, both from an organizational and a cultural perspective. It is my clear conviction that the best products are built by teams made of multiple professionals from various disciplines who have a mutual understand of each other. Development shouldn’t be devoid of a design presence and design shouldn’t be without development know-how.
There’s an obvious balance to this. Designers probably shouldn’t have much to say in the choice of an API implementation, like developers probably shouldn’t get to veto a color scheme. However, during a wireframing session a developer could save a designer from making a disastrous proposal that would cause time for implementation to increase tenfold. Likewise, a designer overlooking implementation of navigation could steer the interaction towards a much more enjoyable experience that better fit the consistency and feel of the app. Use your best judgment but, don’t rob your team of their combined expertise by putting up imagined barriers.
A lot could be written about the iterative nature of development as well, but once again, I will let someone else to write that article.
Iterate
The real truth that seems to catch many people off guard is that you’re never actually done designing. In most good projects, designers have product ownership from spec to ship. You don’t want design becoming a relay race where you hand off something to another department or group of people where you don’t have a say. Even just listing the individual steps like I’ve done, I run the risk of misleading you, as it can very easily be understood as a progression that runs from A to B. Designing apps, or anything for that matter, is rarely a straight line or a clear succession of stages.
While our tools, as well as our products, have changed a lot over these past years, the underlying process of making apps remains largely the same.
- Get an idea
- Write it down
- Build a prototype
- Enter into the dance between design and development until something comes out of it
As you progress down this narrowing funnel of bringing an app through development, you make assumptions. Then, you challenge and revise until some nugget of truth makes it into the next stage (or the next build).
People tend to think about building apps the way they think about building a house. First, you lay the foundation, then the walls come up and the appliances are installed. It seems straightforward. There is a blueprint, a design, and a team building it. This fallacy is the source of much grief in the world of making software. It’s why clients expect you to be able to tell them how much their idea costs to develop. It’s why estimates are almost always wrong, and frankly, why we have so many terrible products. It implies that we know the outcome of the process – that right from the start we’re working in a mostly controlled environment with a clearly defined goal.
But, if the process and the stages outlined above teach us anything, it is that we don’t and we shouldn’t have one. The process is there to help us explore the potential by challenging our assumptions and iteratively execute each step – to bring the best nuggets from the idea into the hands of people.
Rather than building a house, designing apps is probably more like composing a symphony. Each profession a separate instrument. In the beginning, it sounds odd, hollow and out of tune. Slowly, however, as we move through the acts and apply our experience and skill, iteratively it finds its direction and becomes some version of the music described in the original idea.
Final Notes
- In this article I use several tools available to subscribing members at applypixels.com, including the Wireframe kit and the iOS 10 UI kit. These are my own tools that I care greatly for, but there are many other design templates out there. Worth mentioning is the free tools on Bjango’s site and the ones you can purchase on ui8.
- For both wireframing and visual design, I recommend you take a look at Photoshop or Sketch.
- For prototyping and collaborative design work you should check out Framer, Figma, Marvel, or InVision.
- For idea generation workshops and general project management I use Trello.
Further Reading
- How We Designed And Built Our First Apple Watch App
- Getting Started With VR Interface Design
- Building A First-Class App That Leverages Your Website
- Creating A Complete Web App In Foundation For Apps


